Click Account, then Account settings. Scroll to GitHub and click Link.
GitHub in the account settings
2
Authorize on GitHub
GitHub opens. Sign in if you are asked to, then authorize the application.
3
Check the link
You are back in the account settings, and the button now says Unlink.
Your GitHub account is linked
If your account is not linked yet, Import from GitHub and the GitHub card in the editor ask you to link it first. Click Link to your GitHub account. You also end up in the account settings, in a new tab if you started in the editor. Then go back and start again.
This creates a new project from a GitHub repository, already linked to it.
1
Open the import dialog
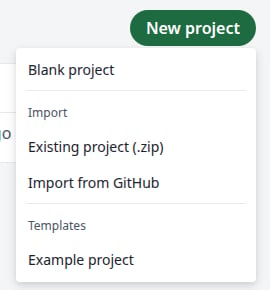
On the projects page, click New project, then Import from GitHub.
The New project menu
New project appears once you have a project. The Create a new project menu on the welcome page has no import, so create a blank project first.
2
Choose the repository
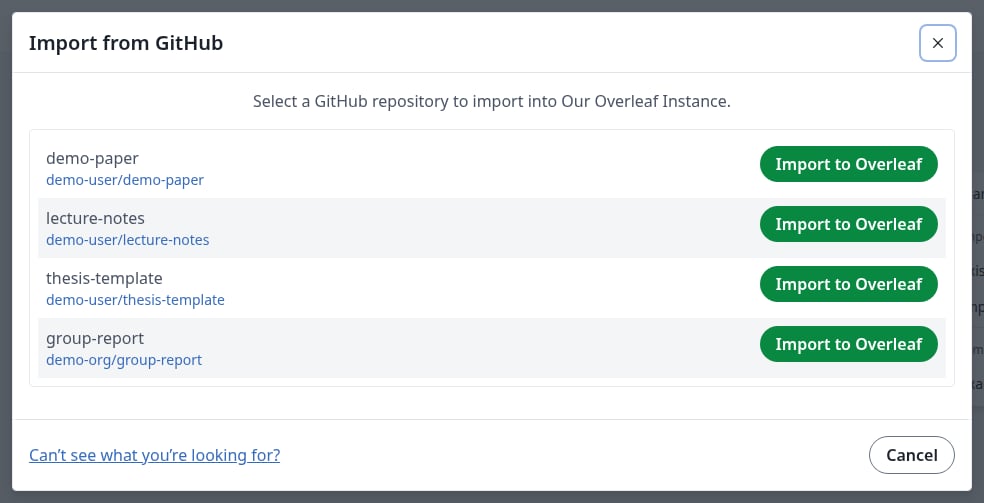
Click Import to Overleaf next to the repository. The list includes your repositories and those of your organizations.
Your GitHub repositories
If an organization’s repository is missing, click Can’t see what you’re looking for? for GitHub’s help on approving the application for that organization.
3
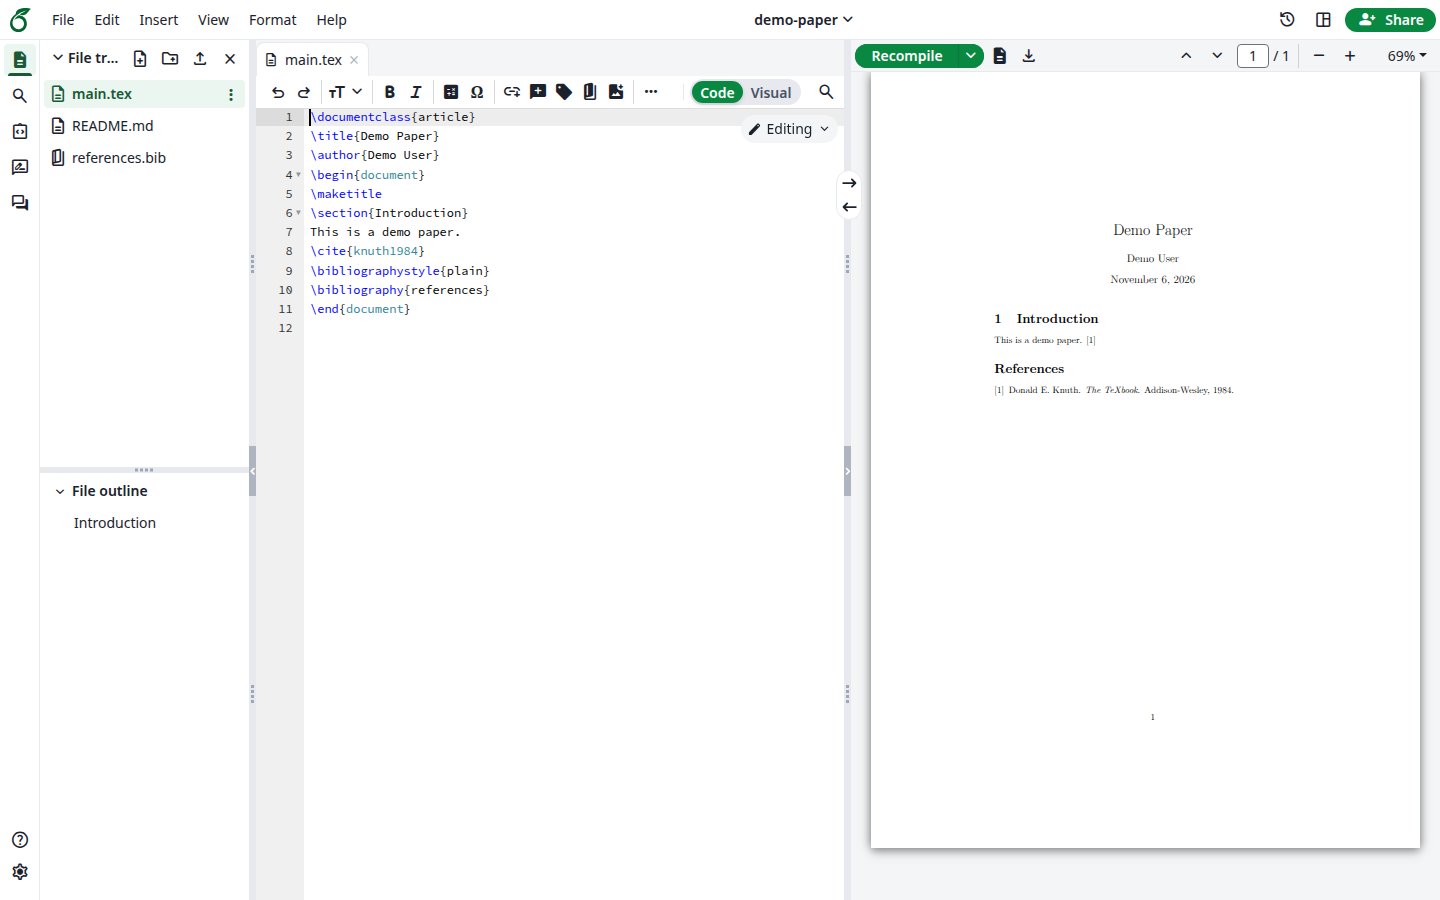
Check the project
The new project opens with the files of the repository.
This creates a repository from a project you own and links them. A project can only be linked this way or by importing: you cannot link it to a repository that already exists.
1
Open GitHub in the editor
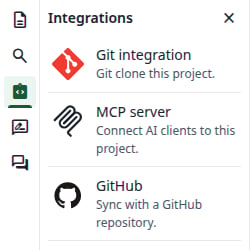
Open the project. In the left bar, click Integrations, then GitHub.
The Integrations panel
2
Fill in the repository
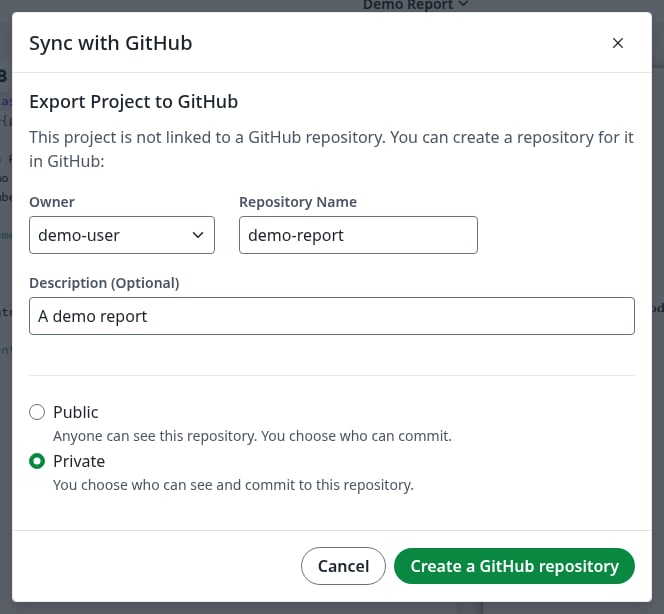
Choose the Owner, which can be you or one of your organizations. Repository Name starts as the project’s name. The description is optional, and Private is selected by default. Click Create a GitHub repository.
Export Project to GitHub
3
Check the link
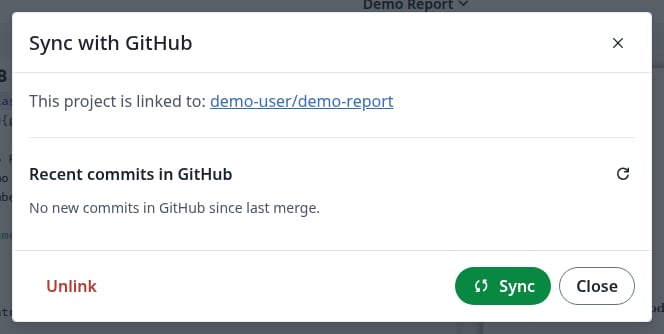
The dialog now says This project is linked to and names the repository.
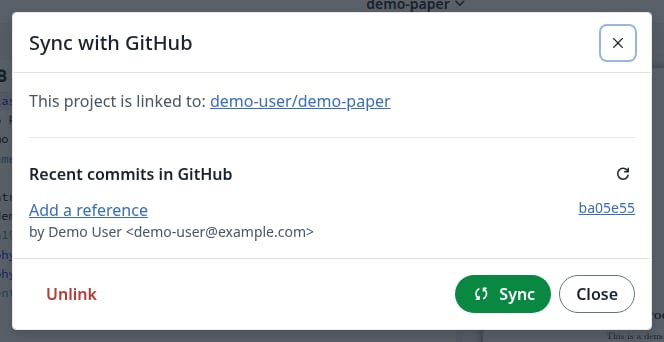
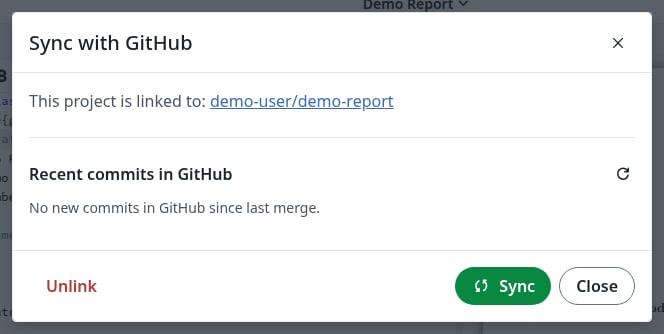
Open a linked project. In the left bar, click Integrations, then GitHub.Recent commits in GitHub lists what will come into the project.
A new commit waiting in GitHub
2
Describe your changes
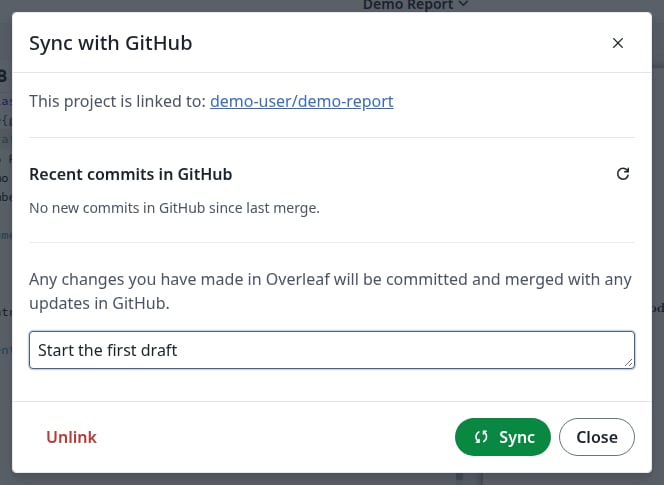
If you changed something in the project, a commit message box appears. It is optional: when you leave it empty, the commit is called Updates from Overleaf.
The commit message for your changes
3
Click Sync
Click Sync. New commits from GitHub come into the project, and your changes go to the default branch of the repository. If both sides changed different things, they are merged for you.
4
Check the result
The dialog shows No new commits in GitHub since last merge. and the commit message box is gone. The files in the editor and the commits on GitHub are up to date.
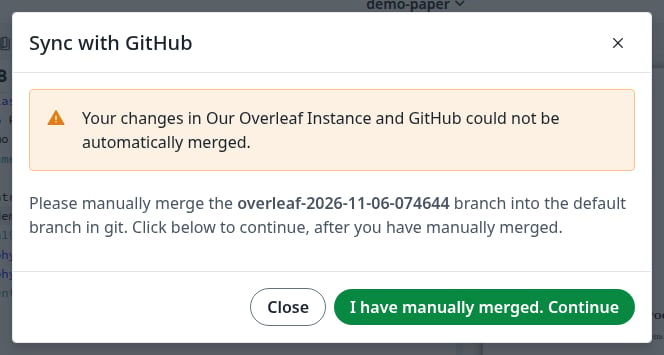
The dialog says the changes could not be merged and names a new branch, overleaf-YYYY-MM-DD-HHMMSS, which holds your changes.
A conflict
Merge that branch into the default branch on GitHub or with Git. You can close the dialog in the meantime: it shows the same message when you open it again.
Click I have manually merged. Continue. The merged result comes into the project.
The branch stays on GitHub. Delete it when you no longer need it.
Do this when you no longer want the project to sync. Only the project owner can.
1
Click Unlink
In the sync dialog, click Unlink.
2
Confirm
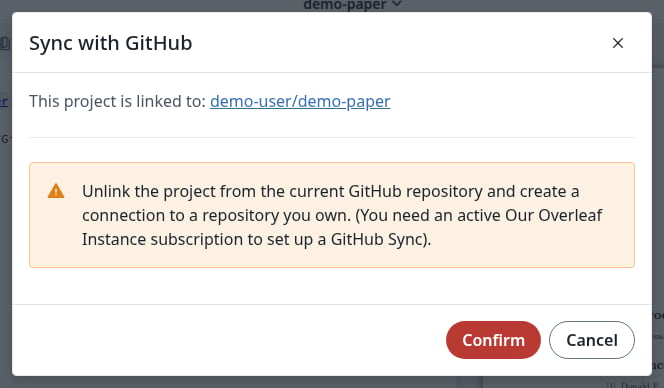
Click Confirm. The note about a subscription does not stop you from linking the project again.
Confirm the unlink
3
Check the result
The dialog now shows Export Project to GitHub. The project and the repository both keep their content. To sync again, export the project to a new repository, or import the repository into a new project.
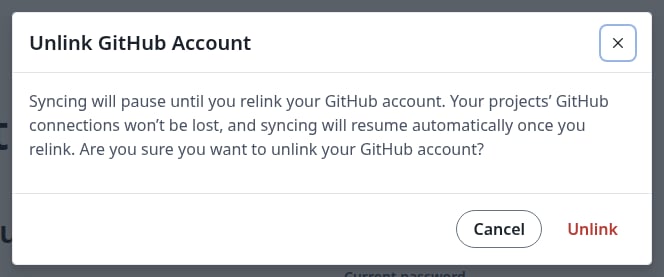
In Account settings, under GitHub, click Unlink, then Unlink again in the dialog.
Unlink your account
Your projects stay linked to their repositories. You cannot sync them until you link your account again.
For who can do what in a shared project, see Who can link and sync. Every collaborator who syncs links their own GitHub account.
Last modified on November 7, 2026
Was this page helpful?
{"docsConfig":{"theme":"mint","$schema":"https://mintlify.com/docs.json","name":"Ayakaleaf Pro","description":"Overleaf Community Edition enhanced with all Pro features: open source, free to use, self-hostable.","colors":{"primary":"#0E0E0E","light":"#D4A27F","dark":"#0E0E0E"},"logo":{"light":"https://mintcdn.com/ayakaleaf-pro/JetHeEeglWIIXNds/logo/light.png?fit=max\u0026auto=format\u0026n=JetHeEeglWIIXNds\u0026q=85\u0026s=7f1abd8dcc74dd3b7cdafac9e6e82092","dark":"https://mintcdn.com/ayakaleaf-pro/JetHeEeglWIIXNds/logo/dark.png?fit=max\u0026auto=format\u0026n=JetHeEeglWIIXNds\u0026q=85\u0026s=4e369d29a8c5a6cd8b4b7697ddb1f7e2","href":"/"},"favicon":"https://mintcdn.com/ayakaleaf-pro/x9kfDjtWlyyhG_mR/favicon.png?fit=max\u0026auto=format\u0026n=x9kfDjtWlyyhG_mR\u0026q=85\u0026s=832c6bfafce5eb69ebc83783083a4a85","background":{"color":{"light":"#FDFDF7","dark":"#09090B"}},"navbar":{"links":[{"href":"https://github.com/ayaka-notes/ayakaleaf-pro-playground","label":"Playground"},{"href":"https://github.com/orgs/ayaka-notes/packages/container/package/overleaf-pro","label":"Docker Image"},{"href":"https://github.com/ayaka-notes/texlive-full","label":"TeXLive Full"}],"primary":{"type":"button","label":"Open GitHub","href":"https://github.com/ayaka-notes/ayakaleaf-pro"}},"footer":{"socials":{"github":"https://github.com/ayaka-notes"}},"styling":{"latex":true},"contextual":{"options":["copy","view","chatgpt","claude","perplexity","mcp","cursor","vscode","assistant","download-pdf","download-spec"],"display":"header"},"metadata":{"timestamp":true},"navigation":{"languages":[{"language":"en","default":true,"href":""},{"language":"zh-CN","href":"zh-CN"},{"language":"zh-TW","href":"zh-TW"},{"language":"ja","href":"ja"},{"language":"de","href":"de"},{"language":"fr","href":"fr"},{"language":"es","href":"es"},{"language":"it","href":"it"},{"language":"ko","href":"ko"},{"language":"ru","href":"ru"},{"language":"nl","href":"nl"},{"language":"pt","href":"pt"},{"language":"tr","href":"tr"},{"language":"uk","href":"uk"},{"language":"pl","href":"pl"},{"language":"cs","href":"cs"},{"language":"sv","href":"sv"},{"language":"fi","href":"fi"},{"language":"ar","href":"ar"},{"language":"vi","href":"vi"},{"language":"no","href":"no"},{"language":"da","href":"da"},{"language":"id","href":"id"},{"language":"zh-Hans","href":"zh-Hans"},{"language":"zh-Hant","href":"zh-Hant"}]}},"deployment":{"deploymentMetadataValue":{"subdomain":"ayakaleaf-pro","hasAudioNarration":false,"actualSubdomain":"ayakaleaf-pro","customDomains":[],"gitSource":{"type":"github","owner":"ayaka-notes","repo":"docs","deployBranch":"main","contentDirectory":"","isPrivate":false,"mountPath":"","label":""},"feedback":{"thumbs":true},"entitlements":{"AI_CHAT":{"status":"ENABLED"},"WEB_MCP":{"status":"ENABLED"},"NARRATION":{"status":"ENABLED"}},"buildId":"6aee957818cb0ff786610e20","clientVersion":"0.0.4076","searchFilterCounts":[{"language":"en","tag":"On-Premises","count":138},{"language":"ar","tag":"الاستضافة المحلية","count":101},{"language":"cs","tag":"On-Premises","count":101},{"language":"da","tag":"On-premises","count":101},{"language":"de","tag":"On-Premises","count":101},{"language":"es","tag":"Local","count":101},{"language":"fi","tag":"Paikallinen asennus","count":101},{"language":"fr","tag":"Sur site","count":101},{"language":"id","tag":"On-Premises","count":101},{"language":"it","tag":"On-premise","count":101},{"language":"ja","tag":"オンプレミス","count":101},{"language":"ko","tag":"온프레미스","count":101},{"language":"nl","tag":"On-premises","count":101},{"language":"no","tag":"Lokal drift","count":101},{"language":"pl","tag":"On-Premises","count":101},{"language":"pt","tag":"On-Premises","count":101},{"language":"ru","tag":"Локальное развертывание","count":101},{"language":"sv","tag":"On-Premises","count":101},{"language":"tr","tag":"Şirket İçi Kurulum","count":101},{"language":"uk","tag":"Локальне розгортання","count":101},{"language":"vi","tag":"Tự triển khai (On-Premises)","count":101},{"language":"zh-CN","tag":"本地部署","count":101},{"language":"zh-Hans","tag":"本地部署","count":101},{"language":"zh-Hant","tag":"本地部署","count":101},{"language":"zh-TW","tag":"本地部署","count":101},{"language":"ar","tag":"الإعداد","count":60},{"language":"en","tag":"Configuration","count":60},{"language":"cs","tag":"Konfigurace","count":60},{"language":"da","tag":"Konfiguration","count":60},{"language":"de","tag":"Konfiguration","count":60},{"language":"es","tag":"Configuración","count":60},{"language":"fi","tag":"Määritys","count":60},{"language":"fr","tag":"Configuration","count":60},{"language":"id","tag":"Konfigurasi","count":60},{"language":"it","tag":"Configurazione","count":60},{"language":"ja","tag":"設定","count":60},{"language":"ko","tag":"구성","count":60},{"language":"nl","tag":"Configuratie","count":60},{"language":"no","tag":"Konfigurasjon","count":60},{"language":"pl","tag":"Konfiguracja","count":60},{"language":"pt","tag":"Configuração","count":60},{"language":"ru","tag":"Настройка","count":60},{"language":"sv","tag":"Konfiguration","count":60},{"language":"tr","tag":"Yapılandırma","count":60},{"language":"uk","tag":"Конфігурація","count":60},{"language":"vi","tag":"Cấu hình","count":60},{"language":"zh-CN","tag":"配置","count":60},{"language":"zh-Hans","tag":"配置","count":60},{"language":"zh-Hant","tag":"設定","count":60},{"language":"zh-TW","tag":"設定","count":60},{"language":"en","tag":"Installation","count":35},{"language":"ar","tag":"Ayakaleaf Toolkit","count":31},{"language":"en","tag":"Docker Compose","count":31},{"language":"cs","tag":"Ayakaleaf Toolkit","count":31},{"language":"da","tag":"Ayakaleaf Toolkit","count":31},{"language":"de","tag":"Ayakaleaf Toolkit","count":31},{"language":"es","tag":"Ayakaleaf Toolkit","count":31},{"language":"fi","tag":"Ayakaleaf Toolkit","count":31},{"language":"fr","tag":"Ayakaleaf Toolkit","count":31},{"language":"id","tag":"Ayakaleaf Toolkit","count":31},{"language":"it","tag":"Ayakaleaf Toolkit","count":31},{"language":"ja","tag":"Ayakaleaf Toolkit","count":31},{"language":"ko","tag":"Ayakaleaf Toolkit","count":31},{"language":"nl","tag":"Ayakaleaf Toolkit","count":31},{"language":"no","tag":"Ayakaleaf Toolkit","count":31},{"language":"pl","tag":"Ayakaleaf Toolkit","count":31},{"language":"pt","tag":"Ayakaleaf Toolkit","count":31},{"language":"ru","tag":"Ayakaleaf Toolkit","count":31},{"language":"sv","tag":"Ayakaleaf Toolkit","count":31},{"language":"tr","tag":"Ayakaleaf Toolkit","count":31},{"language":"uk","tag":"Ayakaleaf Toolkit","count":31},{"language":"vi","tag":"Ayakaleaf Toolkit","count":31},{"language":"zh-CN","tag":"Ayakaleaf Toolkit","count":31},{"language":"zh-Hans","tag":"Ayakaleaf Toolkit","count":31},{"language":"zh-Hant","tag":"Ayakaleaf Toolkit","count":31},{"language":"zh-TW","tag":"Ayakaleaf Toolkit","count":31},{"language":"ar","tag":"Kubernetes","count":29},{"language":"en","tag":"Kubernetes","count":29},{"language":"cs","tag":"Kubernetes","count":29},{"language":"da","tag":"Kubernetes","count":29},{"language":"de","tag":"Kubernetes","count":29},{"language":"es","tag":"Kubernetes","count":29},{"language":"fi","tag":"Kubernetes","count":29},{"language":"fr","tag":"Kubernetes","count":29},{"language":"id","tag":"Kubernetes","count":29},{"language":"it","tag":"Kubernetes","count":29},{"language":"ja","tag":"Kubernetes","count":29},{"language":"ko","tag":"Kubernetes","count":29},{"language":"nl","tag":"Kubernetes","count":29},{"language":"no","tag":"Kubernetes","count":29},{"language":"pl","tag":"Kubernetes","count":29},{"language":"pt","tag":"Kubernetes","count":29},{"language":"ru","tag":"Kubernetes","count":29},{"language":"sv","tag":"Kubernetes","count":29},{"language":"tr","tag":"Kubernetes","count":29},{"language":"uk","tag":"Kubernetes","count":29},{"language":"vi","tag":"Kubernetes","count":29},{"language":"zh-CN","tag":"Kubernetes","count":29},{"language":"zh-Hans","tag":"Kubernetes","count":29},{"language":"zh-Hant","tag":"Kubernetes","count":29},{"language":"zh-TW","tag":"Kubernetes","count":29},{"language":"en","tag":"Using Docker Compose","count":23},{"language":"en","tag":"User guide","count":21},{"language":"ar","tag":"التكاملات","count":20},{"language":"en","tag":"Integrations","count":20},{"language":"cs","tag":"Integrace","count":20},{"language":"da","tag":"Integrationer","count":20},{"language":"de","tag":"Integrationen","count":20},{"language":"es","tag":"Integraciones","count":20},{"language":"fi","tag":"Integraatiot","count":20},{"language":"fr","tag":"Intégrations","count":20},{"language":"id","tag":"Integrasi","count":20},{"language":"it","tag":"Integrazioni","count":20},{"language":"ja","tag":"連携","count":20},{"language":"ko","tag":"통합","count":20},{"language":"nl","tag":"Integraties","count":20},{"language":"no","tag":"Integrasjoner","count":20},{"language":"pl","tag":"Integracje","count":20},{"language":"pt","tag":"Integrações","count":20},{"language":"ru","tag":"Интеграции","count":20},{"language":"sv","tag":"Integrationer","count":20},{"language":"tr","tag":"Entegrasyonlar","count":20},{"language":"uk","tag":"Інтеграції","count":20},{"language":"vi","tag":"Tích hợp","count":20},{"language":"zh-CN","tag":"集成","count":20},{"language":"zh-Hans","tag":"集成","count":20},{"language":"zh-Hant","tag":"整合","count":20},{"language":"zh-TW","tag":"整合","count":20},{"language":"ar","tag":"التثبيت","count":19},{"language":"cs","tag":"Instalace","count":19},{"language":"da","tag":"Installation","count":19},{"language":"de","tag":"Installation","count":19},{"language":"es","tag":"Instalación","count":19},{"language":"fi","tag":"Asennus","count":19},{"language":"fr","tag":"Installation","count":19},{"language":"id","tag":"Instalasi","count":19},{"language":"it","tag":"Installazione","count":19},{"language":"ja","tag":"インストール","count":19},{"language":"ko","tag":"설치","count":19},{"language":"nl","tag":"Installatie","count":19},{"language":"no","tag":"Installasjon","count":19},{"language":"pl","tag":"Instalacja","count":19},{"language":"pt","tag":"Instalação","count":19},{"language":"ru","tag":"Установка","count":19},{"language":"sv","tag":"Installation","count":19},{"language":"tr","tag":"Kurulum","count":19},{"language":"uk","tag":"Встановлення","count":19},{"language":"vi","tag":"Cài đặt","count":19},{"language":"zh-CN","tag":"安装","count":19},{"language":"zh-Hans","tag":"安装","count":19},{"language":"zh-Hant","tag":"安裝","count":19},{"language":"zh-TW","tag":"安裝","count":19},{"language":"en","tag":"For users","count":16},{"language":"ar","tag":"المصادقة","count":12},{"language":"en","tag":"Authentication","count":12},{"language":"cs","tag":"Ověřování","count":12},{"language":"da","tag":"Godkendelse","count":12},{"language":"de","tag":"Authentifizierung","count":12},{"language":"es","tag":"Autenticación","count":12},{"language":"fi","tag":"Todennus","count":12},{"language":"fr","tag":"Authentification","count":12},{"language":"id","tag":"Autentikasi","count":12},{"language":"it","tag":"Autenticazione","count":12},{"language":"ja","tag":"認証","count":12},{"language":"ko","tag":"인증","count":12},{"language":"nl","tag":"Authenticatie","count":12},{"language":"no","tag":"Autentisering","count":12},{"language":"pl","tag":"Uwierzytelnianie","count":12},{"language":"pt","tag":"Autenticação","count":12},{"language":"ru","tag":"Аутентификация","count":12},{"language":"sv","tag":"Autentisering","count":12},{"language":"tr","tag":"Kimlik Doğrulama","count":12},{"language":"uk","tag":"Автентифікація","count":12},{"language":"vi","tag":"Xác thực","count":12},{"language":"zh-CN","tag":"身份验证","count":12},{"language":"zh-Hans","tag":"身份验证","count":12},{"language":"zh-Hant","tag":"身分驗證","count":12},{"language":"zh-TW","tag":"身分驗證","count":12},{"language":"ar","tag":"المطوّرون","count":11},{"language":"cs","tag":"Vývojáři","count":11},{"language":"da","tag":"Udvikler","count":11},{"language":"de","tag":"Entwickler","count":11},{"language":"es","tag":"Desarrollador","count":11},{"language":"fi","tag":"Kehittäjä","count":11},{"language":"fr","tag":"Développeur","count":11},{"language":"id","tag":"Pengembang","count":11},{"language":"it","tag":"Sviluppatore","count":11},{"language":"ja","tag":"開発者","count":11},{"language":"ko","tag":"개발자","count":11},{"language":"nl","tag":"Ontwikkelaar","count":11},{"language":"no","tag":"Utvikler","count":11},{"language":"pl","tag":"Dla deweloperów","count":11},{"language":"pt","tag":"Desenvolvedor","count":11},{"language":"ru","tag":"Разработчикам","count":11},{"language":"sv","tag":"Utvecklare","count":11},{"language":"tr","tag":"Geliştirici","count":11},{"language":"uk","tag":"Розробникам","count":11},{"language":"vi","tag":"Nhà phát triển","count":11},{"language":"zh-CN","tag":"开发者","count":11},{"language":"zh-Hans","tag":"开发者","count":11},{"language":"zh-Hant","tag":"開發者","count":11},{"language":"zh-TW","tag":"開發者","count":11},{"language":"ar","tag":"نظرة عامة","count":9},{"language":"ar","tag":"الصيانة","count":9},{"language":"cs","tag":"Přehled","count":9},{"language":"cs","tag":"Údržba","count":9},{"language":"da","tag":"Oversigt","count":9},{"language":"da","tag":"Vedligeholdelse","count":9},{"language":"de","tag":"Überblick","count":9},{"language":"de","tag":"Wartung","count":9},{"language":"es","tag":"Descripción general","count":9},{"language":"es","tag":"Mantenimiento","count":9},{"language":"fi","tag":"Yleiskatsaus","count":9},{"language":"fi","tag":"Ylläpito","count":9},{"language":"fr","tag":"Aperçu","count":9},{"language":"fr","tag":"Maintenance","count":9},{"language":"id","tag":"Ikhtisar","count":9},{"language":"id","tag":"Pemeliharaan","count":9},{"language":"it","tag":"Panoramica","count":9},{"language":"it","tag":"Manutenzione","count":9},{"language":"ja","tag":"概要","count":9},{"language":"ja","tag":"メンテナンス","count":9},{"language":"ko","tag":"개요","count":9},{"language":"ko","tag":"유지 관리","count":9},{"language":"nl","tag":"Overzicht","count":9},{"language":"nl","tag":"Onderhoud","count":9},{"language":"no","tag":"Oversikt","count":9},{"language":"no","tag":"Vedlikehold","count":9},{"language":"pl","tag":"Przegląd","count":9},{"language":"pl","tag":"Utrzymanie","count":9},{"language":"pt","tag":"Visão geral","count":9},{"language":"pt","tag":"Manutenção","count":9},{"language":"ru","tag":"Обзор","count":9},{"language":"ru","tag":"Обслуживание","count":9},{"language":"sv","tag":"Översikt","count":9},{"language":"sv","tag":"Underhåll","count":9},{"language":"tr","tag":"Genel Bakış","count":9},{"language":"tr","tag":"Bakım","count":9},{"language":"uk","tag":"Огляд","count":9},{"language":"uk","tag":"Обслуговування","count":9},{"language":"vi","tag":"Tổng quan","count":9},{"language":"vi","tag":"Bảo trì","count":9},{"language":"zh-CN","tag":"概览","count":9},{"language":"zh-CN","tag":"维护","count":9},{"language":"zh-Hans","tag":"概览","count":9},{"language":"zh-Hans","tag":"维护","count":9},{"language":"zh-Hant","tag":"概覽","count":9},{"language":"zh-Hant","tag":"維護","count":9},{"language":"zh-TW","tag":"概覽","count":9},{"language":"zh-TW","tag":"維護","count":9}],"searchSettings":{"maxResults":6}},"assistantConfig":{"enableAskAiButton":false,"enableStarterQuestions":false,"enableContextualStarterQuestions":false,"enableAskAiSearchBar":true},"basePath":"","hasChatPermissions":true,"hasWebMcpPermissions":true,"toggles":[{"name":"kill-isr","enabled":true,"variant":{"name":"disabled","enabled":false,"feature_enabled":true},"impressionData":false},{"name":"agent-mintlify-slack","enabled":true,"variant":{"name":"disabled","enabled":false,"feature_enabled":true},"impressionData":false},{"name":"agent-integrations-settings","enabled":true,"variant":{"name":"disabled","enabled":false,"feature_enabled":true},"impressionData":false},{"name":"rbac-expansion","enabled":true,"variant":{"name":"disabled","enabled":false,"feature_enabled":true},"impressionData":false},{"name":"automations-pr-grouping","enabled":true,"variant":{"name":"disabled","enabled":false,"feature_enabled":true},"impressionData":false},{"name":"custom-prefix","enabled":true,"variant":{"name":"disabled","enabled":false,"feature_enabled":true},"impressionData":false},{"name":"analytics-v7","enabled":true,"variant":{"name":"disabled","enabled":false,"feature_enabled":true},"impressionData":false},{"name":"user-flows-analytics","enabled":true,"variant":{"name":"disabled","enabled":false,"feature_enabled":true},"impressionData":false},{"name":"no-publish-flow","enabled":true,"variant":{"name":"disabled","enabled":false,"feature_enabled":true},"impressionData":false},{"name":"workos-onboarding","enabled":true,"variant":{"name":"disabled","enabled":false,"feature_enabled":true},"impressionData":false},{"name":"llms-txt-v2","enabled":true,"variant":{"name":"disabled","enabled":false,"feature_enabled":true},"impressionData":false},{"name":"snapshot-serving-live","enabled":true,"variant":{"name":"disabled","enabled":false,"feature_enabled":true},"impressionData":false},{"name":"stripTemperatureMiddleware","enabled":true,"variant":{"name":"disabled","enabled":false,"feature_enabled":true},"impressionData":false},{"name":"support-platform-pylon-zendesk","enabled":true,"variant":{"name":"disabled","enabled":false,"feature_enabled":true},"impressionData":false},{"name":"snapshot-serving","enabled":true,"variant":{"name":"disabled","enabled":false,"feature_enabled":true},"impressionData":false},{"name":"instant-rollback","enabled":true,"variant":{"name":"disabled","enabled":false,"feature_enabled":true},"impressionData":false},{"name":"granular-notifications-server","enabled":true,"variant":{"name":"disabled","enabled":false,"feature_enabled":true},"impressionData":false},{"name":"granular-notifications","enabled":true,"variant":{"name":"disabled","enabled":false,"feature_enabled":true},"impressionData":false},{"name":"automations-fable","enabled":true,"variant":{"name":"disabled","enabled":false,"feature_enabled":true},"impressionData":false},{"name":"fixed-ai-action-pricing","enabled":true,"variant":{"name":"disabled","enabled":false,"feature_enabled":true},"impressionData":false},{"name":"automation-resolve-merge-conflict","enabled":true,"variant":{"name":"disabled","enabled":false,"feature_enabled":true},"impressionData":false},{"name":"scoped-publishing","enabled":true,"variant":{"name":"disabled","enabled":false,"feature_enabled":true},"impressionData":false},{"name":"mintql","enabled":true,"variant":{"name":"disabled","enabled":false,"feature_enabled":true},"impressionData":false},{"name":"page-level-analytics","enabled":true,"variant":{"name":"disabled","enabled":false,"feature_enabled":true},"impressionData":false},{"name":"editor-version-history-v2","enabled":true,"variant":{"name":"disabled","enabled":false,"feature_enabled":true},"impressionData":false},{"name":"billing-page-v2","enabled":true,"variant":{"name":"disabled","enabled":false,"feature_enabled":true},"impressionData":false},{"name":"full-page-search","enabled":true,"variant":{"name":"disabled","enabled":false,"feature_enabled":true},"impressionData":false},{"name":"workspace-projects","enabled":true,"variant":{"name":"disabled","enabled":false,"feature_enabled":true},"impressionData":false},{"name":"assistant-v5","enabled":true,"variant":{"name":"disabled","enabled":false,"feature_enabled":true},"impressionData":false},{"name":"fork-pr-previews","enabled":true,"variant":{"name":"disabled","enabled":false,"feature_enabled":true},"impressionData":false},{"name":"revalidation-jwt","enabled":true,"variant":{"name":"disabled","enabled":false,"feature_enabled":true},"impressionData":false},{"name":"workos-sso-scim","enabled":true,"variant":{"name":"disabled","enabled":false,"feature_enabled":true},"impressionData":false},{"name":"hobby-abuse-scan","enabled":true,"variant":{"name":"disabled","enabled":false,"feature_enabled":true},"impressionData":false},{"name":"dashboard-inbox","enabled":true,"variant":{"name":"disabled","enabled":false,"feature_enabled":true},"impressionData":false},{"name":"workos-signup","enabled":true,"variant":{"name":"disabled","enabled":false,"feature_enabled":true},"impressionData":false},{"name":"turbopuffer-dual-write","enabled":true,"variant":{"name":"disabled","enabled":false,"feature_enabled":true},"impressionData":false},{"name":"workos-enabled","enabled":true,"variant":{"name":"disabled","enabled":false,"feature_enabled":true},"impressionData":false},{"name":"approve-review-flow","enabled":true,"variant":{"name":"disabled","enabled":false,"feature_enabled":true},"impressionData":false},{"name":"editor-metadata","enabled":true,"variant":{"name":"disabled","enabled":false,"feature_enabled":true},"impressionData":false},{"name":"sso-setup-deadline-banner","enabled":true,"variant":{"name":"disabled","enabled":false,"feature_enabled":true},"impressionData":false},{"name":"turbopuffer-serve","enabled":true,"variant":{"name":"disabled","enabled":false,"feature_enabled":true},"impressionData":false},{"name":"live-agents","enabled":true,"variant":{"name":"disabled","enabled":false,"feature_enabled":true},"impressionData":false},{"name":"comment-mode","enabled":true,"variant":{"name":"disabled","enabled":false,"feature_enabled":true},"impressionData":false}],"googleFontsInlined":false},"customCss":[{"filePath":"style.css","content":"@font-face{font-family:\"Site Sans\";src:url(\"/fonts/SiteSans-Text-Regular-Static.otf\") format(\"opentype\");font-weight:400;font-style:normal;font-display:swap}@font-face{font-family:\"Site Sans\";src:url(\"/fonts/SiteSans-Text-RegularItalic-Static.otf\") format(\"opentype\");font-weight:400;font-style:italic;font-display:swap}@font-face{font-family:\"Site Sans\";src:url(\"/fonts/SiteSans-Text-Medium-Static.otf\") format(\"opentype\");font-weight:500;font-style:normal;font-display:swap}@font-face{font-family:\"Site Sans\";src:url(\"/fonts/SiteSans-Text-MediumItalic-Static.otf\") format(\"opentype\");font-weight:500;font-style:italic;font-display:swap}@font-face{font-family:\"Site Sans\";src:url(\"/fonts/SiteSans-Text-Semibold-Static.otf\") format(\"opentype\");font-weight:600;font-style:normal;font-display:swap}@font-face{font-family:\"Site Sans\";src:url(\"/fonts/SiteSans-Text-SemiboldItalic-Static.otf\") format(\"opentype\");font-weight:600;font-style:italic;font-display:swap}@font-face{font-family:\"Site Sans\";src:url(\"/fonts/SiteSans-Text-Bold-Static.otf\") format(\"opentype\");font-weight:700;font-style:normal;font-display:swap}@font-face{font-family:\"Site Sans\";src:url(\"/fonts/SiteSans-Text-BoldItalic-Static.otf\") format(\"opentype\");font-weight:700;font-style:italic;font-display:swap}@font-face{font-family:\"Site Serif Display\";src:url(\"/fonts/SiteSerif-Display-Regular-Static.otf\") format(\"opentype\");font-weight:400;font-style:normal;font-display:swap}@font-face{font-family:\"Site Serif Display\";src:url(\"/fonts/SiteSerif-Display-RegularItalic-Static.otf\") format(\"opentype\");font-weight:400;font-style:italic;font-display:swap}@font-face{font-family:\"Site Serif Display\";src:url(\"/fonts/SiteSerif-Display-Medium-Static.otf\") format(\"opentype\");font-weight:500;font-style:normal;font-display:swap}@font-face{font-family:\"Site Serif Display\";src:url(\"/fonts/SiteSerif-Display-Semibold-Static.otf\") format(\"opentype\");font-weight:600;font-style:normal;font-display:swap}@font-face{font-family:\"Site Serif Display\";src:url(\"/fonts/SiteSerif-Display-Bold-Static.otf\") format(\"opentype\");font-weight:700;font-style:normal;font-display:swap}@font-face{font-family:\"Site Serif\";src:url(\"/fonts/SiteSerif-Text-Regular-Static.otf\") format(\"opentype\");font-weight:400;font-style:normal;font-display:swap}@font-face{font-family:\"Site Serif\";src:url(\"/fonts/SiteSerif-Text-RegularItalic-Static.otf\") format(\"opentype\");font-weight:400;font-style:italic;font-display:swap}@font-face{font-family:\"Site Serif\";src:url(\"/fonts/SiteSerif-Text-Medium-Static.otf\") format(\"opentype\");font-weight:500;font-style:normal;font-display:swap}@font-face{font-family:\"Site Serif\";src:url(\"/fonts/SiteSerif-Text-MediumItalic-Static.otf\") format(\"opentype\");font-weight:500;font-style:italic;font-display:swap}@font-face{font-family:\"Site Serif\";src:url(\"/fonts/SiteSerif-Text-Semibold-Static.otf\") format(\"opentype\");font-weight:600;font-style:normal;font-display:swap}@font-face{font-family:\"Site Serif\";src:url(\"/fonts/SiteSerif-Text-SemiboldItalic-Static.otf\") format(\"opentype\");font-weight:600;font-style:italic;font-display:swap}@font-face{font-family:\"Site Serif\";src:url(\"/fonts/SiteSerif-Text-Bold-Static.otf\") format(\"opentype\");font-weight:700;font-style:normal;font-display:swap}@font-face{font-family:\"Site Serif\";src:url(\"/fonts/SiteSerif-Text-BoldItalic-Static.otf\") format(\"opentype\");font-weight:700;font-style:italic;font-display:swap}:root{--always-white: 0 0% 100%;--always-black: 0 0% 0%;--constant-book-cloth: 15 55% 80%;--constant-clay: 15 60% 85%;--constant-kraft: 25 40% 83%;--constant-manilla: 40 20% 92%;--constant-slate-000: 0 0% 100%;--constant-slate-050: 48 33.3% 97.1%;--constant-slate-100: 53 28.6% 94.5%;--constant-slate-150: 48 25% 92.2%;--constant-slate-200: 50 20.7% 88.6%;--constant-slate-250: 51 16.5% 84.5%;--constant-slate-300: 50 11.5% 79.6%;--constant-slate-350: 50 9% 73.7%;--constant-slate-400: 49 6.5% 66.9%;--constant-slate-450: 48 4.8% 59.2%;--constant-slate-500: 53 3.2% 51.4%;--constant-slate-550: 51 3.1% 43.7%;--constant-slate-600: 48 2.7% 35.9%;--constant-slate-650: 48 3.4% 29.2%;--constant-slate-700: 60 2.5% 23.3%;--constant-slate-750: 60 2.1% 18.4%;--constant-slate-800: 60 2.7% 14.5%;--constant-slate-850: 30 3.3% 11.8%;--constant-slate-900: 30 4% 9.8%;--constant-slate-950: 60 2.6% 7.6%;--constant-slate-1000: 60 3.4% 5.7%}:root:not(.dark){--accent-brand: 15 63.1% 59.6%;--accent-main-000: 15 55.6% 52.4%;--accent-main-100: 15 55.6% 52.4%;--accent-main-200: 15 63.1% 59.6%;--accent-main-900: 0 0% 0%;--accent-pro-000: 251 34.2% 33.3%;--accent-pro-100: 251 40% 45.1%;--accent-pro-200: 251 61% 72.2%;--accent-pro-900: 253 33.3% 91.8%;--accent-secondary-000: 210 73.7% 40.2%;--accent-secondary-100: 210 70.9% 51.6%;--accent-secondary-200: 210 70.9% 51.6%;--accent-secondary-900: 211 72% 90%;--bg-000: 0 0% 100%;--bg-100: 48 33.3% 97.1%;--bg-200: 53 28.6% 94.5%;--bg-300: 48 25% 92.2%;--bg-400: 50 20.7% 88.6%;--bg-500: 50 20.7% 88.6%;--border-100: 30 3.3% 11.8%;--border-200: 30 3.3% 11.8%;--border-300: 30 3.3% 11.8%;--border-400: 30 3.3% 11.8%;--danger-000: 0 61.4% 22.4%;--danger-100: 0 58.6% 34.1%;--danger-200: 0 58.6% 34.1%;--danger-900: 0 50% 95%;--oncolor-100: 0 0% 100%;--oncolor-200: 60 6.7% 97.1%;--oncolor-300: 60 6.7% 97.1%;--text-000: 60 2.6% 7.6%;--text-100: 60 2.6% 7.6%;--text-200: 60 2.5% 23.3%;--text-300: 60 2.5% 23.3%;--text-400: 51 3.1% 43.7%;--text-500: 51 3.1% 43.7%}:root.dark{--accent-brand: 15 63.1% 59.6%;--accent-main-000: 15 55.6% 52.4%;--accent-main-100: 15 63.1% 59.6%;--accent-main-200: 15 63.1% 59.6%;--accent-main-900: 0 0% 0%;--accent-pro-000: 251 84.6% 74.5%;--accent-pro-100: 251 40.2% 54.1%;--accent-pro-200: 251 40% 45.1%;--accent-pro-900: 250 25.3% 19.4%;--accent-secondary-000: 210 71.1% 62%;--accent-secondary-100: 210 70.9% 51.6%;--accent-secondary-200: 210 70.9% 51.6%;--accent-secondary-900: 210 55.9% 24.6%;--bg-000: 60 2.1% 18.4%;--bg-100: 60 2.7% 14.5%;--bg-200: 30 3.3% 11.8%;--bg-300: 60 2.6% 7.6%;--bg-400: 60 3.4% 5.7%;--bg-500: 60 3.4% 5.7%;--border-100: 51 16.5% 84.5%;--border-200: 51 16.5% 84.5%;--border-300: 51 16.5% 84.5%;--border-400: 51 16.5% 84.5%;--danger-000: 0 73.1% 66.5%;--danger-100: 0 58.6% 34.1%;--danger-200: 0 58.6% 34.1%;--danger-900: 0 23% 15.6%;--oncolor-100: 0 0% 100%;--oncolor-200: 60 6.7% 97.1%;--oncolor-300: 60 6.7% 97.1%;--text-000: 48 33.3% 97.1%;--text-100: 48 33.3% 97.1%;--text-200: 50 9% 73.7%;--text-300: 50 9% 73.7%;--text-400: 48 4.8% 59.2%;--text-500: 48 4.8% 59.2%}#home-header{font-family:\"Site Sans\", system-ui, \"Segoe UI\", Roboto, Helvetica, Arial, sans-serif;font-weight:400!important;font-size:50px;line-height:1.2;margin-bottom:1rem;color:--text-000;display:flex;align-items:baseline;justify-content:center;flex-wrap:nowrap}#localization-select-trigger>:has(img[src*=\"flags\"]){display:none}div[id^=\"localization-select-item\"]>:has(img[src*=\"flags\"]){display:none}@media (min-width: 768px){#home-header{justify-content:center}}.build-with{font-family:\"Site Sans\", system-ui, \"Segoe UI\", Roboto, Helvetica, Arial, sans-serif;letter-spacing:-0.02em}.claude-wordmark-wrapper{display:inline-flex;align-items:baseline;margin-left:10px}.claude-wordmark{height:40px;width:auto;position:relative}.dark #home-header{color:white}.description-text{color:black}.dark .description-text{color:white}.dark .claude-wordmark{filter:invert(1)}:root{--bg-color: #f0efea}.dark{--bg-color: #2b2b2b}body,input,#category-select,.dropdown-item,#table-of-contents{font-family:\"Site Sans\", system-ui, \"Segoe UI\", Roboto, Helvetica, Arial, sans-serif}.eyebrow{font-family:\"Site Sans\", system-ui, \"Segoe UI\", Roboto, Helvetica, Arial, sans-serif;text-transform:uppercase;letter-spacing:0.02rem}#content-container{font-family:\"Site Sans\", system-ui, \"Segoe UI\", Roboto, Helvetica, Arial, sans-serif}#content-container h1,#content-container h2,#content-container h3,#content-container h4,#content-container h5,#content-container h6{font-family:\"Site Serif Display\", Georgia, \"Times New Roman\", Times, serif;font-weight:400;letter-spacing:0;word-spacing:0.1em}#content-container p{font-size:1rem;line-height:1.65rem}.font-extrabold{font-weight:600!important}.wide-table{width:100%;overflow-x:auto}.wide-table table{width:175%;margin-bottom:0}#prompt-library-container{margin:4rem auto;max-width:48rem;padding-left:1.25rem;padding-right:1.25rem}.prompt-library-title{font-size:24px;text-align:center;font-weight:700;color:#1f2937}.dark .prompt-library-title{color:#e5e7eb}.prompt-library-description{margin-top:1rem;text-align:center}.main-content{margin-bottom:10rem;max-width:64rem;margin-left:auto;margin-right:auto;padding-left:1.25rem;padding-right:1.25rem}.prompt-controllers{display:flex;gap:0.5rem}.prompt-search-container{position:relative;flex:1 1 0%}.prompt-search-icon-container{display:flex;position:absolute;top:0;bottom:0;left:0;align-items:center;padding-left:0.75rem}.prompt-search-icon{margin-left:0.25rem;margin-right:0.75rem;flex:none;width:1rem;height:1rem;background-color:#6b7280;mask-image:url(https://mintlify.b-cdn.net/v6.5.1/solid/magnifying-glass.svg);mask-repeat:no-repeat;mask-position:center center}input.prompt-search-bar{display:block;height:2.5rem;padding-left:2.5rem;border-radius:0.75rem;border-width:1px;background-color:#ffffff;width:100%;color:#111827;box-shadow:0 1px 2px 0 rgba(0, 0, 0, 0.05)}.dark input.prompt-search-bar{color:#ffffff;background-color:rgb(var(--background-dark));border-color:#d1d5db1a}input.prompt-search-bar:focus{outline-color:rgb(var(--primary))}.dark input.prompt-search-bar:focus{outline-color:rgb(var(--primary-light))}.dark .prompt-search-icon{background-color:#ffffff80}#category-select{padding-left:1rem;padding-right:2.5rem;height:2.5rem;display:flex;align-items:center;border-radius:0.75rem;border-width:1px;color:#111827;background-color:#ffffff;cursor:pointer;box-shadow:0 1px 2px 0 rgba(0, 0, 0, 0.05);white-space:nowrap}.dark #category-select{background-color:rgb(var(--background-dark));border-color:#d1d5db1a;color:#ffffff}#category-select:hover{background-color:#f9fafb}.dark #category-select:hover{background-color:#ffffff0d}#category-select:focus{outline-color:rgb(var(--primary))}.dark #category-select:focus{outline-color:rgb(var(--primary-light))}#categories-dropdown{top:calc(100% + 4px);padding:0.5rem 0.5rem;display:none;position:absolute;z-index:10;border-radius:0.75rem;border-width:1px;width:100%;color:#111827;background-color:#ffffff;box-shadow:0 1px 2px 0 rgba(0, 0, 0, 0.05)}.dark #categories-dropdown{background-color:rgb(var(--background-dark));border-color:#d1d5db1a;color:#ffffff}#categories-dropdown-clickout{position:fixed;top:0;right:0;bottom:0;left:0;z-index:0}.dropdown-icon-container{display:flex;position:absolute;top:0;bottom:0;right:0;align-items:center;padding-right:0.25rem}.dropdown-icon{margin-left:0.25rem;margin-right:0.75rem;flex:none;width:0.75rem;height:0.75rem;background-color:#6b7280;mask-image:url(https://mintlify.b-cdn.net/v6.5.1/solid/caret-down.svg);mask-repeat:no-repeat;mask-position:center center}.dark .dropdown-icon{background-color:#ffffff80}#prompts-container{grid-template-columns:repeat(1, minmax(0, 1fr));gap:2rem}.dropdown-item{padding:0.25rem 0.5rem;border-radius:0.375rem;display:flex;align-items:center;cursor:pointer}.dropdown-item:hover{background-color:#f9fafb}.dark .dropdown-item:hover{background-color:#ffffff0d}.check-icon{mask-image:url(https://mintlify.b-cdn.net/v6.5.1/solid/check.svg);height:0.875rem;width:1rem;background-color:rgb(var(--primary-light));mask-repeat:no-repeat;mask-position:center center}.prompt-card{margin:-0.75rem;padding:0.75rem;display:flex;border-radius:1rem}.prompt-card:hover{background-color:#03071208}.dark .prompt-card:hover{background-color:#ffffff08}.prompt-icon-container{display:flex;flex:none;align-items:center;justify-content:center;margin-right:1.5rem;border-radius:0.75rem;height:4rem;width:4rem;background-color:#cb785c1a}.prompt-icon{height:1.5rem;width:1.5rem;background-color:rgb(var(--primary-light));mask-repeat:no-repeat;mask-position:center center}.prompt-title{color:rgb(31 41 55);font-weight:600}.dark .prompt-title{color:rgb(229 231 235)}.prompt-description{margin-top:0.25rem}#prompts-container{display:grid;margin-top:2.5rem}@media (min-width: 640px){#category-select{width:16rem}}@media (min-width: 1024px){#prompts-container{grid-template-columns:repeat(2, minmax(0, 1fr))}}.home-cards-custom{display:grid;grid-template-columns:repeat(3, 1fr);grid-template-rows:repeat(2, auto);gap:1.5rem}.home-cards-custom .card{background:transparent;border:0.5px solid hsl(var(--border-300));border-radius:12px;padding:0.25rem}@media (max-width: 1024px){.home-cards-custom{grid-template-columns:repeat(2, 1fr);grid-template-rows:repeat(3, auto)}}@media (max-width: 768px){.home-cards-custom{grid-template-columns:1fr;grid-template-rows:repeat(6, auto)}}.relative{position:relative}.flex-1{flex:1 1 0%}.mermaid{position:relative;background-color:#FDFDFB;background-image:linear-gradient(rgba(235, 219, 188, .25) 1px, transparent 1px), /* Secondary color #EBDBBC with low opacity */\n linear-gradient(90deg, rgba(235, 219, 188, .25) 1px, transparent 1px),\n linear-gradient(rgba(235, 219, 188, .1) 1px, transparent 1px),\n linear-gradient(90deg, rgba(235, 219, 188, .1) 1px, transparent 1px);background-size:20px 20px,\n 20px 20px,\n 4px 4px,\n 4px 4px;background-position:-1px -1px,\n -1px -1px,\n -1px -1px,\n -1px -1px;padding:20px;border-radius:8px;border:1px solid rgba(235, 219, 188, .4);box-shadow:0 2px 4px rgba(64, 64, 62, 0.08)}.dark .mermaid{background-color:#1a1918;background-image:linear-gradient(rgba(212, 162, 127, .15) 1px, transparent 1px), /* Tertiary color #D4A27F with low opacity */\n linear-gradient(90deg, rgba(212, 162, 127, .15) 1px, transparent 1px),\n linear-gradient(rgba(212, 162, 127, .08) 1px, transparent 1px),\n linear-gradient(90deg, rgba(212, 162, 127, .08) 1px, transparent 1px);border:1px solid rgba(102, 102, 99, .5);box-shadow:0 2px 4px rgba(0, 0, 0, 0.2)}.digest-meta{display:flex;align-items:center;justify-content:space-between;flex-wrap:wrap;gap:0.5rem 1rem;padding:0.75rem 1rem;margin:1.5rem 0 2.5rem;border:1px solid hsl(var(--border-300) / 0.15);background:hsl(var(--bg-200));font-variant-numeric:tabular-nums;font-size:0.875rem;color:hsl(var(--text-400))}#content-container .digest-meta a{color:hsl(var(--accent-main-100));font-weight:500;text-decoration:none;border-bottom:none}#content-container .digest-meta a:hover{text-decoration:underline}.digest-feature{position:relative;margin:2.5rem 0;padding:1.875rem 1.875rem 1.625rem;background:radial-gradient(circle, hsl(var(--text-000) / 0.025) 1px, transparent 1px) 0 0 / 18px 18px,\n linear-gradient(180deg, hsl(var(--constant-manilla) / 0.55), hsl(var(--constant-manilla) / 0.38));border:1px solid hsl(var(--border-300) / 0.12);box-shadow:inset 0 1px 0 hsl(var(--text-000) / 0.04),\n 0 1px 2px hsl(var(--always-black) / 0.04)}.digest-feature::before{content:\"\";position:absolute;inset:0 auto 0 0;width:4px;background:hsl(var(--accent-brand))}.dark .digest-feature{background:radial-gradient(circle, hsl(var(--text-000) / 0.02) 1px, transparent 1px) 0 0 / 18px 18px,\n linear-gradient(180deg, hsl(var(--bg-000) / 0.75), hsl(var(--bg-000) / 0.5));border-color:hsl(var(--border-300) / 0.1);box-shadow:inset 0 1px 0 hsl(var(--text-000) / 0.03),\n 0 1px 2px hsl(var(--always-black) / 0.25)}.digest-feature>:first-child{margin-top:0}.digest-feature>:last-child{margin-bottom:0}.digest-feature-header{display:flex;align-items:center;flex-wrap:wrap;gap:0.625rem;margin:0 0 0.75rem}#content-container .digest-feature-title{font-family:\"Site Serif Display\", Georgia, serif;font-size:1.75rem;line-height:1.15;font-weight:500;letter-spacing:-0.015em;color:hsl(var(--text-000));margin:0}#content-container .digest-feature-pill{font-family:ui-monospace, \"SF Mono\", Menlo, Consolas, monospace;font-size:0.75rem;line-height:1;letter-spacing:0.01em;padding:0.3rem 0.6rem;border-radius:999px;background:hsl(var(--accent-brand) / 0.12);color:hsl(var(--accent-main-000));border:1px solid hsl(var(--accent-brand) / 0.25);white-space:nowrap;transform:translateY(1px)}#content-container .digest-feature-lede{font-size:1.0625rem;line-height:1.65;color:hsl(var(--text-100));margin:0 0 1.25rem;max-width:none}#content-container .digest-feature-lede code{font-size:0.875em;padding:0.1em 0.35em}#content-container .digest-feature-try{font-size:0.875rem;color:hsl(var(--text-400));margin:1.25rem 0 0.5rem}#content-container .digest-feature .frame{margin:1rem 0;border-radius:0;padding:0}#content-container .digest-feature .frame>*{border-radius:0}#content-container .digest-feature pre,#content-container .digest-feature [class*=\"CodeBlock\"]{border-radius:0}#content-container .digest-feature-link{display:inline-flex;align-items:center;gap:0.35rem;font-size:0.875rem;font-weight:500;color:hsl(var(--accent-main-100));text-decoration:none;border-bottom:none;margin-top:0.75rem}#content-container .digest-feature-link::after{content:\"→\";transition:transform 120ms ease-out}#content-container .digest-feature-link:hover::after{transform:translateX(3px)}.digest-wins{margin:2.5rem 0;padding:1.5rem 1.75rem 1.25rem;background:hsl(var(--bg-200));border:1px solid hsl(var(--border-300) / 0.1)}.dark .digest-wins{background:hsl(var(--bg-200) / 0.6)}#content-container .digest-wins-title{font-family:\"Site Serif Display\", Georgia, serif;font-size:1.25rem;font-weight:500;color:hsl(var(--text-000));margin:0 0 0.75rem}.digest-wins-grid{display:grid;grid-template-columns:repeat(auto-fit, minmax(16rem, 1fr));column-gap:2rem}#content-container .digest-wins-grid>div{position:relative;font-size:0.875rem;line-height:1.5;color:hsl(var(--text-300));padding:0.5rem 0 0.5rem 1.125rem;border-top:1px solid hsl(var(--border-300) / 0.06);margin:0}#content-container .digest-wins-grid>div::before{content:\"+\";position:absolute;left:0;top:0.5rem;font-family:ui-monospace, \"SF Mono\", Menlo, Consolas, monospace;font-size:0.8125rem;font-weight:600;color:hsl(var(--accent-brand))}#content-container .digest-wins-grid>div:first-child,#content-container .digest-wins-grid>div:nth-child(2){border-top:none;padding-top:0}#content-container .digest-wins-grid>div:first-child::before,#content-container .digest-wins-grid>div:nth-child(2)::before{top:0}#content-container .digest-wins-grid code{font-size:0.8125rem;padding:0.1em 0.3em}:root{--toc-wrapper-max: 92rem;--toc-wrapper-pad: 2rem;--toc-col: 19rem;--toc-side: 28rem;--toc-btn-size: 1.75rem}#toc-collapse-toggle{display:none;align-items:center;justify-content:center;position:fixed;top:10rem;right:calc(\n max((100% - var(--toc-wrapper-max)) / 2, 0px) + var(--toc-wrapper-pad) +\n var(--toc-col) - var(--toc-btn-size) - 0.35rem\n );transition:right 200ms ease-out;z-index:30;width:var(--toc-btn-size);height:var(--toc-btn-size);border-radius:9999px;border:1px solid hsl(var(--border-300) / 0.15);background:hsl(var(--bg-100));color:hsl(var(--text-400));cursor:pointer}#toc-collapse-toggle:hover{background:hsl(var(--bg-300));color:hsl(var(--text-100))}#toc-collapse-toggle svg{width:14px;height:14px;fill:none;stroke:currentColor;stroke-width:2.5;stroke-linecap:round;stroke-linejoin:round}#toc-collapse-toggle .toc-glyph{display:none;stroke-width:2}@media print{#toc-collapse-toggle{display:none!important}}@media (prefers-reduced-motion: reduce){#toc-collapse-toggle{transition:none}}@media (min-width: 1280px){html:has(#table-of-contents-layout) #toc-collapse-toggle{display:flex}html.toc-collapsed #toc-collapse-toggle .toc-chevron{transform:rotate(180deg)}html.toc-collapsed #toc-collapse-toggle{right:0.5rem;width:auto;padding:0 0.5rem;gap:0.25rem}html.toc-collapsed #toc-collapse-toggle .toc-glyph{display:block}html.toc-collapsed #table-of-contents-layout{display:none!important}html.toc-collapsed #content-side-layout:has(#table-of-contents-layout){display:none!important}html.toc-collapsed #content-container:has(#table-of-contents-layout) #content-area{width:100%!important}html.toc-collapsed #content-container:has(#table-of-contents-layout) #content-area>*{max-width:calc(var(--toc-wrapper-max) - var(--toc-side))}}@media (max-width: 640px){.digest-feature{padding:1.25rem 1rem 1rem;margin:1.5rem 0}#content-container .digest-feature-title{font-size:1.375rem}.digest-wins{padding:1.25rem 1rem 1rem}.digest-wins-grid{grid-template-columns:1fr}#content-container .digest-wins-grid>div:nth-child(2){border-top:1px solid hsl(var(--border-300) / 0.06);padding-top:0.5rem}#content-container .digest-wins-grid>div:nth-child(2)::before{top:0.5rem}}img[data-component-part=\"card-image\"]{aspect-ratio:16 / 9;height:auto;object-fit:cover;object-position:top center}"},{"filePath":"button.css","content":".btn{position:relative;display:inline-flex;gap:0.5rem;align-items:center;justify-content:center;flex-shrink:0;min-width:5rem;height:2.25rem;padding:0.5rem 1rem;white-space:nowrap;font-family:Styrene;font-weight:600;border-radius:0.5rem;\u0026:active{transform:scale(0.985)}\u0026.size-xs{height:1.75rem;min-width:3.5rem;padding:0 0.5rem;border-radius:0.25rem;font-size:0.75rem;gap:0.25rem}\u0026.size-sm{height:2rem;min-width:4rem;padding:0 0.75rem;border-radius:0.375rem;font-size:0.75rem}\u0026.size-lg{height:2.75rem;min-width:6rem;padding:0 1.25rem;border-radius:0.6rem}\u0026:disabled{pointer-events:none;opacity:0.5;box-shadow:none}\u0026:focus-visible{outline:none;--tw-ring-offset-shadow: var(--tw-ring-inset) 0 0 0 var(--tw-ring-offset-width) var(--tw-ring-offset-color);--tw-ring-shadow: var(--tw-ring-inset) 0 0 0 calc(1px + var(--tw-ring-offset-width)) var(--tw-ring-color);box-shadow:var(--tw-ring-offset-shadow), var(--tw-ring-shadow)}\u0026.primary{font-weight:600;color:hsl(var(--oncolor-100));background-color:hsl(var(--accent-main-100));background-image:linear-gradient(\n to right,\n hsl(var(--accent-main-100)) 0%,\n hsl(var(--accent-main-200) / 0.5) 50%,\n hsl(var(--accent-main-200)) 100%\n );background-size:200% 100%;background-position:0% 0%;border:0.5px solid hsl(var(--border-300) / 0.25);box-shadow:inset 0 0.5px 0px rgba(255, 255, 0, 0.15),\n 0 1px 1px rgba(0, 0, 0, 0.05);text-shadow:0 1px 2px rgb(0 0 0 / 10%);transition:all 150ms cubic-bezier(0.4, 0, 0.2, 1);\u0026:hover{background-position:100% 0%;background-image:linear-gradient(\n to right,\n hsl(var(--accent-main-200)) 0%,\n hsl(var(--accent-main-200)) 100%\n )}\u0026:active{background-color:hsl(var(--accent-main-000));box-shadow:inset 0 1px 6px rgba(0, 0, 0, 0.2);transform:scale(0.985)}}\u0026.flat{font-weight:500;color:hsl(var(--oncolor-100));background-color:hsl(var(--accent-main-100));transition:background-color 150ms;\u0026:hover{background-color:hsl(var(--accent-main-200))}}\u0026.secondary{font-weight:600;color:hsl(var(--text-100) / 0.9);background-image:radial-gradient(\n ellipse at center,\n hsl(var(--bg-500) / 0.1) 50%,\n hsl(var(--bg-500) / 0.3) 100%\n );border:0.5px solid hsl(var(--border-400));transition:color 150ms, background-color 150ms;\u0026:hover{color:hsl(var(--text-000));background-color:hsl(var(--bg-500) / 0.6)}\u0026:active{background-color:hsl(var(--bg-500) / 0.5)}}\u0026.outline{font-weight:600;color:hsl(var(--text-200));background-color:transparent;border:1.5px solid currentColor;transition:color 150ms, background-color 150ms;\u0026:hover{color:hsl(var(--text-100));background-color:hsl(var(--bg-400));border-color:hsl(var(--bg-400))}}\u0026.ghost{color:hsl(var(--text-200));border-color:transparent;transition:color 150ms, background-color 150ms;\u0026:hover{color:hsl(var(--text-100));background-color:hsl(var(--bg-500) / 0.4)}\u0026:active{background-color:hsl(var(--bg-400))}}\u0026.underline{opacity:0.8;text-decoration-line:none;text-underline-offset:3px;transition:all 150ms;\u0026:hover{opacity:1;text-decoration-line:underline}\u0026:active{transform:scale(0.985)}}\u0026.danger{font-weight:600;color:hsl(var(--oncolor-100));background-color:hsl(var(--danger-100));transition:background-color 150ms;\u0026:hover{background-color:hsl(var(--danger-200))}}}"}],"page":{"pagePath":"on-premises/user-guide/users/github-synchronisation","slug":"/on-premises/user-guide/users/github-synchronisation","pageMetadata":{"title":"GitHub Synchronisation","description":"Link your GitHub account, import or export a project, sync changes both ways and unlink.","icon":"https://d3gk2c5xim1je2.cloudfront.net/fontawesome/v7.2.0/brands/github.svg","href":"/on-premises/user-guide/users/github-synchronisation"},"description":{"compiledSource":"\"use strict\";\nconst {jsx: _jsx} = arguments[0];\nconst {useMDXComponents: _provideComponents} = arguments[0];\nfunction _createMdxContent(props) {\n const _components = {\n p: \"p\",\n ..._provideComponents(),\n ...props.components\n };\n return _jsx(_components.p, {\n children: \"Link your GitHub account, import or export a project, sync changes both ways and unlink.\"\n });\n}\nfunction MDXContent(props = {}) {\n const {wrapper: MDXLayout} = {\n ..._provideComponents(),\n ...props.components\n };\n return MDXLayout ? _jsx(MDXLayout, {\n ...props,\n children: _jsx(_createMdxContent, {\n ...props\n })\n }) : _createMdxContent(props);\n}\nreturn {\n default: MDXContent\n};\n","frontmatter":{},"scope":{}},"pageType":"default","mdx":{"mdxSource":{"compiledSource":"\"use strict\";const{Fragment:_Fragment,jsx:_jsx,jsxs:_jsxs}=arguments[0];const{useMDXComponents:_provideComponents}=arguments[0];function _createMdxContent(props){const _components={a:`a`,code:`code`,li:`li`,ol:`ol`,p:`p`,strong:`strong`,..._provideComponents(),...props.components},{Frame,Heading,Info,OptimizedImage,Step,Steps}=_components;if(!Frame)_missingMdxReference(`Frame`,true);if(!Heading)_missingMdxReference(`Heading`,true);if(!Info)_missingMdxReference(`Info`,true);if(!OptimizedImage)_missingMdxReference(`OptimizedImage`,true);if(!Step)_missingMdxReference(`Step`,true);if(!Steps)_missingMdxReference(`Steps`,true);return _jsxs(_Fragment,{children:[_jsxs(_components.p,{children:[`Connect a project to a GitHub repository. Changes go both ways, and only when you click `,_jsx(_components.strong,{children:`Sync`}),`: nothing syncs on its own.`]}),`\n`,_jsx(Info,{children:_jsxs(_components.p,{children:[`If you see no GitHub option in `,_jsx(_components.strong,{children:`Account settings`}),` or in the editor, ask your administrator to turn on `,_jsx(_components.a,{href:`/on-premises/configuration/overleaf-toolkit/integrations/github-synchronisation`,children:`GitHub Synchronisation`}),`.`]})}),`\n`,_jsx(Heading,{level:`2`,id:`link-your-github-account`,children:`Link your GitHub account`}),`\n`,_jsx(_components.p,{children:`You do this once.`}),`\n`,_jsxs(Steps,{children:[_jsxs(Step,{title:`Open your account settings`,children:[_jsxs(_components.p,{children:[`Click `,_jsx(_components.strong,{children:`Account`}),`, then `,_jsx(_components.strong,{children:`Account settings`}),`. Scroll to `,_jsx(_components.strong,{children:`GitHub`}),` and click `,_jsx(_components.strong,{children:`Link`}),`.`]}),_jsx(Frame,{caption:`GitHub in the account settings`,children:_jsx(OptimizedImage,{src:`https://mintcdn.com/ayakaleaf-pro/IsGnx0wnzqtV4hI8/images/on-premises/github-sync-link.png?fit=max\u0026auto=format\u0026n=IsGnx0wnzqtV4hI8\u0026q=85\u0026s=8812ab1604914a8aa6c1f0937f0e1b2e`,alt:`The GitHub section of the account settings with a Link button`,\"data-og-width\":`1050`,width:`1050`,\"data-og-height\":`132`,height:`132`,\"data-path\":`images/on-premises/github-sync-link.png`,\"data-optimize\":`true`,\"data-opv\":`3`,srcset:`https://mintcdn.com/ayakaleaf-pro/IsGnx0wnzqtV4hI8/images/on-premises/github-sync-link.png?w=280\u0026fit=max\u0026auto=format\u0026n=IsGnx0wnzqtV4hI8\u0026q=85\u0026s=2ded6af61ba9e65263fec18974303484 280w, https://mintcdn.com/ayakaleaf-pro/IsGnx0wnzqtV4hI8/images/on-premises/github-sync-link.png?w=560\u0026fit=max\u0026auto=format\u0026n=IsGnx0wnzqtV4hI8\u0026q=85\u0026s=c5373657f615c83633af3f042b6f0daf 560w, https://mintcdn.com/ayakaleaf-pro/IsGnx0wnzqtV4hI8/images/on-premises/github-sync-link.png?w=840\u0026fit=max\u0026auto=format\u0026n=IsGnx0wnzqtV4hI8\u0026q=85\u0026s=32b65a34aa9d29513be8bcdcf122f200 840w, https://mintcdn.com/ayakaleaf-pro/IsGnx0wnzqtV4hI8/images/on-premises/github-sync-link.png?w=1100\u0026fit=max\u0026auto=format\u0026n=IsGnx0wnzqtV4hI8\u0026q=85\u0026s=569b61ad0b62cf35e1bc881c81dafd99 1100w, https://mintcdn.com/ayakaleaf-pro/IsGnx0wnzqtV4hI8/images/on-premises/github-sync-link.png?w=1650\u0026fit=max\u0026auto=format\u0026n=IsGnx0wnzqtV4hI8\u0026q=85\u0026s=89d453847bbb183c3219b3b5dbe4a957 1650w, https://mintcdn.com/ayakaleaf-pro/IsGnx0wnzqtV4hI8/images/on-premises/github-sync-link.png?w=2500\u0026fit=max\u0026auto=format\u0026n=IsGnx0wnzqtV4hI8\u0026q=85\u0026s=d864f3d5375bd6939e1d03e9c4f5af24 2500w`})})]}),_jsx(Step,{title:`Authorize on GitHub`,children:_jsx(_components.p,{children:`GitHub opens. Sign in if you are asked to, then authorize the application.`})}),_jsxs(Step,{title:`Check the link`,children:[_jsxs(_components.p,{children:[`You are back in the account settings, and the button now says `,_jsx(_components.strong,{children:`Unlink`}),`.`]}),_jsx(Frame,{caption:`Your GitHub account is linked`,children:_jsx(OptimizedImage,{src:`https://mintcdn.com/ayakaleaf-pro/IsGnx0wnzqtV4hI8/images/on-premises/github-sync-linked.png?fit=max\u0026auto=format\u0026n=IsGnx0wnzqtV4hI8\u0026q=85\u0026s=910b756aa0adea66bda5bb2e5776214e`,alt:`The GitHub section of the account settings with an Unlink button`,\"data-og-width\":`1050`,width:`1050`,\"data-og-height\":`132`,height:`132`,\"data-path\":`images/on-premises/github-sync-linked.png`,\"data-optimize\":`true`,\"data-opv\":`3`,srcset:`https://mintcdn.com/ayakaleaf-pro/IsGnx0wnzqtV4hI8/images/on-premises/github-sync-linked.png?w=280\u0026fit=max\u0026auto=format\u0026n=IsGnx0wnzqtV4hI8\u0026q=85\u0026s=e132fe0d64697180969abd8e8116fdbf 280w, https://mintcdn.com/ayakaleaf-pro/IsGnx0wnzqtV4hI8/images/on-premises/github-sync-linked.png?w=560\u0026fit=max\u0026auto=format\u0026n=IsGnx0wnzqtV4hI8\u0026q=85\u0026s=6f922d6dda035bdee41ff869d29d0bd9 560w, https://mintcdn.com/ayakaleaf-pro/IsGnx0wnzqtV4hI8/images/on-premises/github-sync-linked.png?w=840\u0026fit=max\u0026auto=format\u0026n=IsGnx0wnzqtV4hI8\u0026q=85\u0026s=6af76a1f152da03321a52a2015885d9f 840w, https://mintcdn.com/ayakaleaf-pro/IsGnx0wnzqtV4hI8/images/on-premises/github-sync-linked.png?w=1100\u0026fit=max\u0026auto=format\u0026n=IsGnx0wnzqtV4hI8\u0026q=85\u0026s=dbd133e7980dd77a19f4e5c726383c7e 1100w, https://mintcdn.com/ayakaleaf-pro/IsGnx0wnzqtV4hI8/images/on-premises/github-sync-linked.png?w=1650\u0026fit=max\u0026auto=format\u0026n=IsGnx0wnzqtV4hI8\u0026q=85\u0026s=94f84745cfc68976e194ffc8c6630e62 1650w, https://mintcdn.com/ayakaleaf-pro/IsGnx0wnzqtV4hI8/images/on-premises/github-sync-linked.png?w=2500\u0026fit=max\u0026auto=format\u0026n=IsGnx0wnzqtV4hI8\u0026q=85\u0026s=1a862d949503dbba42a9a16a98375372 2500w`})})]})]}),`\n`,_jsxs(_components.p,{children:[`If your account is not linked yet, `,_jsx(_components.strong,{children:`Import from GitHub`}),` and the `,_jsx(_components.strong,{children:`GitHub`}),` card in the editor ask you to link it first. Click `,_jsx(_components.strong,{children:`Link to your GitHub account`}),`. You also end up in the account settings, in a new tab if you started in the editor. Then go back and start again.`]}),`\n`,_jsx(Frame,{caption:`The prompt when your account is not linked`,children:_jsx(OptimizedImage,{src:`https://mintcdn.com/ayakaleaf-pro/IsGnx0wnzqtV4hI8/images/on-premises/github-sync-link-prompt.png?fit=max\u0026auto=format\u0026n=IsGnx0wnzqtV4hI8\u0026q=85\u0026s=05546893169a57f837a8938f904db194`,alt:`The Import from GitHub dialog with a Link to your GitHub account button`,\"data-og-width\":`984`,width:`984`,\"data-og-height\":`196`,height:`196`,\"data-path\":`images/on-premises/github-sync-link-prompt.png`,\"data-optimize\":`true`,\"data-opv\":`3`,srcset:`https://mintcdn.com/ayakaleaf-pro/IsGnx0wnzqtV4hI8/images/on-premises/github-sync-link-prompt.png?w=280\u0026fit=max\u0026auto=format\u0026n=IsGnx0wnzqtV4hI8\u0026q=85\u0026s=3d76fee7ebb0db7bee6b4c9f9e4c3d74 280w, https://mintcdn.com/ayakaleaf-pro/IsGnx0wnzqtV4hI8/images/on-premises/github-sync-link-prompt.png?w=560\u0026fit=max\u0026auto=format\u0026n=IsGnx0wnzqtV4hI8\u0026q=85\u0026s=dd7c7b24cdd541cc02fa58235aaae25a 560w, https://mintcdn.com/ayakaleaf-pro/IsGnx0wnzqtV4hI8/images/on-premises/github-sync-link-prompt.png?w=840\u0026fit=max\u0026auto=format\u0026n=IsGnx0wnzqtV4hI8\u0026q=85\u0026s=6ac14153f157b1766f68d7bcd1cdaab7 840w, https://mintcdn.com/ayakaleaf-pro/IsGnx0wnzqtV4hI8/images/on-premises/github-sync-link-prompt.png?w=1100\u0026fit=max\u0026auto=format\u0026n=IsGnx0wnzqtV4hI8\u0026q=85\u0026s=682592a84766c77cfb73778f780d7394 1100w, https://mintcdn.com/ayakaleaf-pro/IsGnx0wnzqtV4hI8/images/on-premises/github-sync-link-prompt.png?w=1650\u0026fit=max\u0026auto=format\u0026n=IsGnx0wnzqtV4hI8\u0026q=85\u0026s=247f5cb2678927938d34d694dfe65a3e 1650w, https://mintcdn.com/ayakaleaf-pro/IsGnx0wnzqtV4hI8/images/on-premises/github-sync-link-prompt.png?w=2500\u0026fit=max\u0026auto=format\u0026n=IsGnx0wnzqtV4hI8\u0026q=85\u0026s=6d1335fcdf9c88586588a35637330a7a 2500w`})}),`\n`,_jsx(Heading,{level:`2`,id:`import-a-repository`,children:`Import a repository`}),`\n`,_jsx(_components.p,{children:`This creates a new project from a GitHub repository, already linked to it.`}),`\n`,_jsxs(Steps,{children:[_jsxs(Step,{title:`Open the import dialog`,children:[_jsxs(_components.p,{children:[`On the projects page, click `,_jsx(_components.strong,{children:`New project`}),`, then `,_jsx(_components.strong,{children:`Import from GitHub`}),`.`]}),_jsx(Frame,{caption:`The New project menu`,children:_jsx(OptimizedImage,{src:`https://mintcdn.com/ayakaleaf-pro/IsGnx0wnzqtV4hI8/images/on-premises/github-sync-new-project-menu.png?fit=max\u0026auto=format\u0026n=IsGnx0wnzqtV4hI8\u0026q=85\u0026s=384e6663f982016a5c295f35c4709413`,alt:`The New project menu with Import from GitHub`,\"data-og-width\":`270`,width:`270`,\"data-og-height\":`290`,height:`290`,\"data-path\":`images/on-premises/github-sync-new-project-menu.png`,\"data-optimize\":`true`,\"data-opv\":`3`,srcset:`https://mintcdn.com/ayakaleaf-pro/IsGnx0wnzqtV4hI8/images/on-premises/github-sync-new-project-menu.png?w=280\u0026fit=max\u0026auto=format\u0026n=IsGnx0wnzqtV4hI8\u0026q=85\u0026s=49bc2324ef3014a0b32f12451c575ea0 280w, https://mintcdn.com/ayakaleaf-pro/IsGnx0wnzqtV4hI8/images/on-premises/github-sync-new-project-menu.png?w=560\u0026fit=max\u0026auto=format\u0026n=IsGnx0wnzqtV4hI8\u0026q=85\u0026s=e44155acbd26bd4e830322dfe36c3cce 560w, https://mintcdn.com/ayakaleaf-pro/IsGnx0wnzqtV4hI8/images/on-premises/github-sync-new-project-menu.png?w=840\u0026fit=max\u0026auto=format\u0026n=IsGnx0wnzqtV4hI8\u0026q=85\u0026s=ce0dfa6cd028ebfff2d9133af46eaf2e 840w, https://mintcdn.com/ayakaleaf-pro/IsGnx0wnzqtV4hI8/images/on-premises/github-sync-new-project-menu.png?w=1100\u0026fit=max\u0026auto=format\u0026n=IsGnx0wnzqtV4hI8\u0026q=85\u0026s=89a25168510b36806791f34d19115c38 1100w, https://mintcdn.com/ayakaleaf-pro/IsGnx0wnzqtV4hI8/images/on-premises/github-sync-new-project-menu.png?w=1650\u0026fit=max\u0026auto=format\u0026n=IsGnx0wnzqtV4hI8\u0026q=85\u0026s=3079065241fe36be465b15f3d3c1d8d6 1650w, https://mintcdn.com/ayakaleaf-pro/IsGnx0wnzqtV4hI8/images/on-premises/github-sync-new-project-menu.png?w=2500\u0026fit=max\u0026auto=format\u0026n=IsGnx0wnzqtV4hI8\u0026q=85\u0026s=c318642e9156f26287eb8416b906875c 2500w`})}),_jsx(Info,{children:_jsxs(_components.p,{children:[_jsx(_components.strong,{children:`New project`}),` appears once you have a project. The `,_jsx(_components.strong,{children:`Create a new project`}),` menu on the welcome page has no import, so create a blank project first.`]})})]}),_jsxs(Step,{title:`Choose the repository`,children:[_jsxs(_components.p,{children:[`Click `,_jsx(_components.strong,{children:`Import to Overleaf`}),` next to the repository. The list includes your repositories and those of your organizations.`]}),_jsx(Frame,{caption:`Your GitHub repositories`,children:_jsx(OptimizedImage,{src:`https://mintcdn.com/ayakaleaf-pro/IsGnx0wnzqtV4hI8/images/on-premises/github-sync-import.png?fit=max\u0026auto=format\u0026n=IsGnx0wnzqtV4hI8\u0026q=85\u0026s=54a0bd11655ddbfad4ae16e5e7473b74`,alt:`The Import from GitHub dialog listing four repositories`,\"data-og-width\":`984`,width:`984`,\"data-og-height\":`503`,height:`503`,\"data-path\":`images/on-premises/github-sync-import.png`,\"data-optimize\":`true`,\"data-opv\":`3`,srcset:`https://mintcdn.com/ayakaleaf-pro/IsGnx0wnzqtV4hI8/images/on-premises/github-sync-import.png?w=280\u0026fit=max\u0026auto=format\u0026n=IsGnx0wnzqtV4hI8\u0026q=85\u0026s=acd9879af83e45e3776fc78b63806800 280w, https://mintcdn.com/ayakaleaf-pro/IsGnx0wnzqtV4hI8/images/on-premises/github-sync-import.png?w=560\u0026fit=max\u0026auto=format\u0026n=IsGnx0wnzqtV4hI8\u0026q=85\u0026s=85b1ca70dd8179da3824c60a5510ff03 560w, https://mintcdn.com/ayakaleaf-pro/IsGnx0wnzqtV4hI8/images/on-premises/github-sync-import.png?w=840\u0026fit=max\u0026auto=format\u0026n=IsGnx0wnzqtV4hI8\u0026q=85\u0026s=e9c747bb645ad3b047923d42685dd414 840w, https://mintcdn.com/ayakaleaf-pro/IsGnx0wnzqtV4hI8/images/on-premises/github-sync-import.png?w=1100\u0026fit=max\u0026auto=format\u0026n=IsGnx0wnzqtV4hI8\u0026q=85\u0026s=aed8ec5fef3130ee3f4667c9853ecf96 1100w, https://mintcdn.com/ayakaleaf-pro/IsGnx0wnzqtV4hI8/images/on-premises/github-sync-import.png?w=1650\u0026fit=max\u0026auto=format\u0026n=IsGnx0wnzqtV4hI8\u0026q=85\u0026s=aad7133e932b7fed94523d2f9baa9bfd 1650w, https://mintcdn.com/ayakaleaf-pro/IsGnx0wnzqtV4hI8/images/on-premises/github-sync-import.png?w=2500\u0026fit=max\u0026auto=format\u0026n=IsGnx0wnzqtV4hI8\u0026q=85\u0026s=2f1cde5c9badb9ec9fec0d246a760275 2500w`})}),_jsxs(_components.p,{children:[`If an organization’s repository is missing, click `,_jsx(`strong`,{children:`Can’t see what you’re looking for?`}),` for GitHub’s help on approving the application for that organization.`]})]}),_jsxs(Step,{title:`Check the project`,children:[_jsx(_components.p,{children:`The new project opens with the files of the repository.`}),_jsx(Frame,{caption:`The imported project`,children:_jsx(OptimizedImage,{src:`https://mintcdn.com/ayakaleaf-pro/IsGnx0wnzqtV4hI8/images/on-premises/github-sync-imported.png?fit=max\u0026auto=format\u0026n=IsGnx0wnzqtV4hI8\u0026q=85\u0026s=90dfe6947c2e0ed420abfc8c81992768`,alt:`The editor showing the imported project with its files and compiled PDF`,\"data-og-width\":`1440`,width:`1440`,\"data-og-height\":`900`,height:`900`,\"data-path\":`images/on-premises/github-sync-imported.png`,\"data-optimize\":`true`,\"data-opv\":`3`,srcset:`https://mintcdn.com/ayakaleaf-pro/IsGnx0wnzqtV4hI8/images/on-premises/github-sync-imported.png?w=280\u0026fit=max\u0026auto=format\u0026n=IsGnx0wnzqtV4hI8\u0026q=85\u0026s=cec0af52c7321bc100d0a782ca165307 280w, https://mintcdn.com/ayakaleaf-pro/IsGnx0wnzqtV4hI8/images/on-premises/github-sync-imported.png?w=560\u0026fit=max\u0026auto=format\u0026n=IsGnx0wnzqtV4hI8\u0026q=85\u0026s=e6ebcf7d60cca6ada7026d21b2ef87c7 560w, https://mintcdn.com/ayakaleaf-pro/IsGnx0wnzqtV4hI8/images/on-premises/github-sync-imported.png?w=840\u0026fit=max\u0026auto=format\u0026n=IsGnx0wnzqtV4hI8\u0026q=85\u0026s=042448b1db37502251ddfb653410f57a 840w, https://mintcdn.com/ayakaleaf-pro/IsGnx0wnzqtV4hI8/images/on-premises/github-sync-imported.png?w=1100\u0026fit=max\u0026auto=format\u0026n=IsGnx0wnzqtV4hI8\u0026q=85\u0026s=de3fff8d480ac3019627fe53718f38a2 1100w, https://mintcdn.com/ayakaleaf-pro/IsGnx0wnzqtV4hI8/images/on-premises/github-sync-imported.png?w=1650\u0026fit=max\u0026auto=format\u0026n=IsGnx0wnzqtV4hI8\u0026q=85\u0026s=5ea8d4b598db03fe49edfd9dfb9eca4c 1650w, https://mintcdn.com/ayakaleaf-pro/IsGnx0wnzqtV4hI8/images/on-premises/github-sync-imported.png?w=2500\u0026fit=max\u0026auto=format\u0026n=IsGnx0wnzqtV4hI8\u0026q=85\u0026s=23c519cb358018c3e91107f1e0dfee3e 2500w`})})]})]}),`\n`,_jsx(Heading,{level:`2`,id:`export-a-project-to-a-new-repository`,children:`Export a project to a new repository`}),`\n`,_jsx(_components.p,{children:`This creates a repository from a project you own and links them. A project can only be linked this way or by importing: you cannot link it to a repository that already exists.`}),`\n`,_jsxs(Steps,{children:[_jsxs(Step,{title:`Open GitHub in the editor`,children:[_jsxs(_components.p,{children:[`Open the project. In the left bar, click `,_jsx(_components.strong,{children:`Integrations`}),`, then `,_jsx(_components.strong,{children:`GitHub`}),`.`]}),_jsx(Frame,{caption:`The Integrations panel`,children:_jsx(OptimizedImage,{src:`https://mintcdn.com/ayakaleaf-pro/IsGnx0wnzqtV4hI8/images/on-premises/github-sync-integrations.png?fit=max\u0026auto=format\u0026n=IsGnx0wnzqtV4hI8\u0026q=85\u0026s=5c96ec0031a5940c337393254b06e0d3`,alt:`The Integrations panel with the GitHub card`,\"data-og-width\":`250`,width:`250`,\"data-og-height\":`250`,height:`250`,\"data-path\":`images/on-premises/github-sync-integrations.png`,\"data-optimize\":`true`,\"data-opv\":`3`,srcset:`https://mintcdn.com/ayakaleaf-pro/IsGnx0wnzqtV4hI8/images/on-premises/github-sync-integrations.png?w=280\u0026fit=max\u0026auto=format\u0026n=IsGnx0wnzqtV4hI8\u0026q=85\u0026s=04cb3814ca60f78b459463333a7ae6a7 280w, https://mintcdn.com/ayakaleaf-pro/IsGnx0wnzqtV4hI8/images/on-premises/github-sync-integrations.png?w=560\u0026fit=max\u0026auto=format\u0026n=IsGnx0wnzqtV4hI8\u0026q=85\u0026s=f046c827abd754cd9f899cc6279c6a87 560w, https://mintcdn.com/ayakaleaf-pro/IsGnx0wnzqtV4hI8/images/on-premises/github-sync-integrations.png?w=840\u0026fit=max\u0026auto=format\u0026n=IsGnx0wnzqtV4hI8\u0026q=85\u0026s=64e685621eb8332072b0b9d00ace378c 840w, https://mintcdn.com/ayakaleaf-pro/IsGnx0wnzqtV4hI8/images/on-premises/github-sync-integrations.png?w=1100\u0026fit=max\u0026auto=format\u0026n=IsGnx0wnzqtV4hI8\u0026q=85\u0026s=e69a61590f50a39cdc82e2be059464e2 1100w, https://mintcdn.com/ayakaleaf-pro/IsGnx0wnzqtV4hI8/images/on-premises/github-sync-integrations.png?w=1650\u0026fit=max\u0026auto=format\u0026n=IsGnx0wnzqtV4hI8\u0026q=85\u0026s=7190f3c3ec2a95c71f9accfe497a103f 1650w, https://mintcdn.com/ayakaleaf-pro/IsGnx0wnzqtV4hI8/images/on-premises/github-sync-integrations.png?w=2500\u0026fit=max\u0026auto=format\u0026n=IsGnx0wnzqtV4hI8\u0026q=85\u0026s=84733af569d5c96debedeae64aecd2cc 2500w`})})]}),_jsxs(Step,{title:`Fill in the repository`,children:[_jsxs(_components.p,{children:[`Choose the `,_jsx(_components.strong,{children:`Owner`}),`, which can be you or one of your organizations. `,_jsx(_components.strong,{children:`Repository Name`}),` starts as the project’s name. The description is optional, and `,_jsx(_components.strong,{children:`Private`}),` is selected by default. Click `,_jsx(_components.strong,{children:`Create a GitHub repository`}),`.`]}),_jsx(Frame,{caption:`Export Project to GitHub`,children:_jsx(OptimizedImage,{src:`https://mintcdn.com/ayakaleaf-pro/IsGnx0wnzqtV4hI8/images/on-premises/github-sync-export.png?fit=max\u0026auto=format\u0026n=IsGnx0wnzqtV4hI8\u0026q=85\u0026s=24bd26a171943d43efaa3c4aed69d1e8`,alt:`The Export Project to GitHub form filled in`,\"data-og-width\":`664`,width:`664`,\"data-og-height\":`614`,height:`614`,\"data-path\":`images/on-premises/github-sync-export.png`,\"data-optimize\":`true`,\"data-opv\":`3`,srcset:`https://mintcdn.com/ayakaleaf-pro/IsGnx0wnzqtV4hI8/images/on-premises/github-sync-export.png?w=280\u0026fit=max\u0026auto=format\u0026n=IsGnx0wnzqtV4hI8\u0026q=85\u0026s=af2aa4234c2920225bce8e6fc2219396 280w, https://mintcdn.com/ayakaleaf-pro/IsGnx0wnzqtV4hI8/images/on-premises/github-sync-export.png?w=560\u0026fit=max\u0026auto=format\u0026n=IsGnx0wnzqtV4hI8\u0026q=85\u0026s=9edcd8b536c4e105d2537c920cef2841 560w, https://mintcdn.com/ayakaleaf-pro/IsGnx0wnzqtV4hI8/images/on-premises/github-sync-export.png?w=840\u0026fit=max\u0026auto=format\u0026n=IsGnx0wnzqtV4hI8\u0026q=85\u0026s=c82f5e3ae61fcb552d5e3bbfff0a800d 840w, https://mintcdn.com/ayakaleaf-pro/IsGnx0wnzqtV4hI8/images/on-premises/github-sync-export.png?w=1100\u0026fit=max\u0026auto=format\u0026n=IsGnx0wnzqtV4hI8\u0026q=85\u0026s=9c02a51b349b9672d85f72ff7172ea4d 1100w, https://mintcdn.com/ayakaleaf-pro/IsGnx0wnzqtV4hI8/images/on-premises/github-sync-export.png?w=1650\u0026fit=max\u0026auto=format\u0026n=IsGnx0wnzqtV4hI8\u0026q=85\u0026s=44fcb3c7185fda086b5c3a5053076844 1650w, https://mintcdn.com/ayakaleaf-pro/IsGnx0wnzqtV4hI8/images/on-premises/github-sync-export.png?w=2500\u0026fit=max\u0026auto=format\u0026n=IsGnx0wnzqtV4hI8\u0026q=85\u0026s=d18daef89c10d6fcac533bb9da3b3569 2500w`})})]}),_jsxs(Step,{title:`Check the link`,children:[_jsxs(_components.p,{children:[`The dialog now says `,_jsx(_components.strong,{children:`This project is linked to`}),` and names the repository.`]}),_jsx(Frame,{caption:`The project is linked`,children:_jsx(OptimizedImage,{src:`https://mintcdn.com/ayakaleaf-pro/IsGnx0wnzqtV4hI8/images/on-premises/github-sync-exported.png?fit=max\u0026auto=format\u0026n=IsGnx0wnzqtV4hI8\u0026q=85\u0026s=93ebf2c62d4a34c7d2c41ffbca9d0740`,alt:`The Sync with GitHub dialog after the export`,\"data-og-width\":`664`,width:`664`,\"data-og-height\":`334`,height:`334`,\"data-path\":`images/on-premises/github-sync-exported.png`,\"data-optimize\":`true`,\"data-opv\":`3`,srcset:`https://mintcdn.com/ayakaleaf-pro/IsGnx0wnzqtV4hI8/images/on-premises/github-sync-exported.png?w=280\u0026fit=max\u0026auto=format\u0026n=IsGnx0wnzqtV4hI8\u0026q=85\u0026s=ce6c2e123c2852176c6352f748551636 280w, https://mintcdn.com/ayakaleaf-pro/IsGnx0wnzqtV4hI8/images/on-premises/github-sync-exported.png?w=560\u0026fit=max\u0026auto=format\u0026n=IsGnx0wnzqtV4hI8\u0026q=85\u0026s=ca9e389348b34a65afdcc671f4cc71c5 560w, https://mintcdn.com/ayakaleaf-pro/IsGnx0wnzqtV4hI8/images/on-premises/github-sync-exported.png?w=840\u0026fit=max\u0026auto=format\u0026n=IsGnx0wnzqtV4hI8\u0026q=85\u0026s=9c68aefea43542876921ccf55f573561 840w, https://mintcdn.com/ayakaleaf-pro/IsGnx0wnzqtV4hI8/images/on-premises/github-sync-exported.png?w=1100\u0026fit=max\u0026auto=format\u0026n=IsGnx0wnzqtV4hI8\u0026q=85\u0026s=43bd7a5c2a33a9e9db8bd65f0fde609c 1100w, https://mintcdn.com/ayakaleaf-pro/IsGnx0wnzqtV4hI8/images/on-premises/github-sync-exported.png?w=1650\u0026fit=max\u0026auto=format\u0026n=IsGnx0wnzqtV4hI8\u0026q=85\u0026s=eeeadca5176dab3b0f08ee3a54afbcbf 1650w, https://mintcdn.com/ayakaleaf-pro/IsGnx0wnzqtV4hI8/images/on-premises/github-sync-exported.png?w=2500\u0026fit=max\u0026auto=format\u0026n=IsGnx0wnzqtV4hI8\u0026q=85\u0026s=d4c227459b89a9aa6068b1964b45b73d 2500w`})})]})]}),`\n`,_jsx(Heading,{level:`2`,id:`sync`,children:`Sync`}),`\n`,_jsxs(Steps,{children:[_jsxs(Step,{title:`Open the sync dialog`,children:[_jsxs(_components.p,{children:[`Open a linked project. In the left bar, click `,_jsx(_components.strong,{children:`Integrations`}),`, then `,_jsx(_components.strong,{children:`GitHub`}),`.`]}),_jsxs(_components.p,{children:[_jsx(_components.strong,{children:`Recent commits in GitHub`}),` lists what will come into the project.`]}),_jsx(Frame,{caption:`A new commit waiting in GitHub`,children:_jsx(OptimizedImage,{src:`https://mintcdn.com/ayakaleaf-pro/IsGnx0wnzqtV4hI8/images/on-premises/github-sync-new-commits.png?fit=max\u0026auto=format\u0026n=IsGnx0wnzqtV4hI8\u0026q=85\u0026s=6a3c23a6993f04d0fa818bceb565ce3e`,alt:`The Sync with GitHub dialog listing one new commit`,\"data-og-width\":`664`,width:`664`,\"data-og-height\":`342`,height:`342`,\"data-path\":`images/on-premises/github-sync-new-commits.png`,\"data-optimize\":`true`,\"data-opv\":`3`,srcset:`https://mintcdn.com/ayakaleaf-pro/IsGnx0wnzqtV4hI8/images/on-premises/github-sync-new-commits.png?w=280\u0026fit=max\u0026auto=format\u0026n=IsGnx0wnzqtV4hI8\u0026q=85\u0026s=824ae229b8fdc6652390a9008dd3aa12 280w, https://mintcdn.com/ayakaleaf-pro/IsGnx0wnzqtV4hI8/images/on-premises/github-sync-new-commits.png?w=560\u0026fit=max\u0026auto=format\u0026n=IsGnx0wnzqtV4hI8\u0026q=85\u0026s=c4eec9fd3de8b5703ef46df58bf56f2b 560w, https://mintcdn.com/ayakaleaf-pro/IsGnx0wnzqtV4hI8/images/on-premises/github-sync-new-commits.png?w=840\u0026fit=max\u0026auto=format\u0026n=IsGnx0wnzqtV4hI8\u0026q=85\u0026s=94fddcf5acdf7e3a4e084dd30ce21429 840w, https://mintcdn.com/ayakaleaf-pro/IsGnx0wnzqtV4hI8/images/on-premises/github-sync-new-commits.png?w=1100\u0026fit=max\u0026auto=format\u0026n=IsGnx0wnzqtV4hI8\u0026q=85\u0026s=cef7dc92bcb6f837397d60459c0a7027 1100w, https://mintcdn.com/ayakaleaf-pro/IsGnx0wnzqtV4hI8/images/on-premises/github-sync-new-commits.png?w=1650\u0026fit=max\u0026auto=format\u0026n=IsGnx0wnzqtV4hI8\u0026q=85\u0026s=ede49ab85058d8de809f5965584363f4 1650w, https://mintcdn.com/ayakaleaf-pro/IsGnx0wnzqtV4hI8/images/on-premises/github-sync-new-commits.png?w=2500\u0026fit=max\u0026auto=format\u0026n=IsGnx0wnzqtV4hI8\u0026q=85\u0026s=446540aaa3c637ca1282709c315a0f2f 2500w`})})]}),_jsxs(Step,{title:`Describe your changes`,children:[_jsxs(_components.p,{children:[`If you changed something in the project, a commit message box appears. It is optional: when you leave it empty, the commit is called `,_jsx(_components.code,{children:`Updates from Overleaf`}),`.`]}),_jsx(Frame,{caption:`The commit message for your changes`,children:_jsx(OptimizedImage,{src:`https://mintcdn.com/ayakaleaf-pro/IsGnx0wnzqtV4hI8/images/on-premises/github-sync-commit-message.png?fit=max\u0026auto=format\u0026n=IsGnx0wnzqtV4hI8\u0026q=85\u0026s=b3fe2cbcae8335c7363fcd220d2b993c`,alt:`The Sync with GitHub dialog with a commit message filled in`,\"data-og-width\":`664`,width:`664`,\"data-og-height\":`485`,height:`485`,\"data-path\":`images/on-premises/github-sync-commit-message.png`,\"data-optimize\":`true`,\"data-opv\":`3`,srcset:`https://mintcdn.com/ayakaleaf-pro/IsGnx0wnzqtV4hI8/images/on-premises/github-sync-commit-message.png?w=280\u0026fit=max\u0026auto=format\u0026n=IsGnx0wnzqtV4hI8\u0026q=85\u0026s=609be9d3724afd944077b11ba2c6ebb0 280w, https://mintcdn.com/ayakaleaf-pro/IsGnx0wnzqtV4hI8/images/on-premises/github-sync-commit-message.png?w=560\u0026fit=max\u0026auto=format\u0026n=IsGnx0wnzqtV4hI8\u0026q=85\u0026s=05991467825d361b7f2c7d1614553a4a 560w, https://mintcdn.com/ayakaleaf-pro/IsGnx0wnzqtV4hI8/images/on-premises/github-sync-commit-message.png?w=840\u0026fit=max\u0026auto=format\u0026n=IsGnx0wnzqtV4hI8\u0026q=85\u0026s=dff84e3a4135166fb6c84b3b4d49f53e 840w, https://mintcdn.com/ayakaleaf-pro/IsGnx0wnzqtV4hI8/images/on-premises/github-sync-commit-message.png?w=1100\u0026fit=max\u0026auto=format\u0026n=IsGnx0wnzqtV4hI8\u0026q=85\u0026s=13d37ea301114649332c46bf4e60d26e 1100w, https://mintcdn.com/ayakaleaf-pro/IsGnx0wnzqtV4hI8/images/on-premises/github-sync-commit-message.png?w=1650\u0026fit=max\u0026auto=format\u0026n=IsGnx0wnzqtV4hI8\u0026q=85\u0026s=1ec32d38cef52af11ac0dc1a9588285c 1650w, https://mintcdn.com/ayakaleaf-pro/IsGnx0wnzqtV4hI8/images/on-premises/github-sync-commit-message.png?w=2500\u0026fit=max\u0026auto=format\u0026n=IsGnx0wnzqtV4hI8\u0026q=85\u0026s=469c44634d7ee322e862ec9f4e2ace3f 2500w`})})]}),_jsx(Step,{title:`Click Sync`,children:_jsxs(_components.p,{children:[`Click `,_jsx(_components.strong,{children:`Sync`}),`. New commits from GitHub come into the project, and your changes go to the default branch of the repository. If both sides changed different things, they are merged for you.`]})}),_jsxs(Step,{title:`Check the result`,children:[_jsxs(_components.p,{children:[`The dialog shows `,_jsx(`strong`,{children:`No new commits in GitHub since last merge.`}),` and the commit message box is gone. The files in the editor and the commits on GitHub are up to date.`]}),_jsx(Frame,{caption:`Everything is in sync`,children:_jsx(OptimizedImage,{src:`https://mintcdn.com/ayakaleaf-pro/IsGnx0wnzqtV4hI8/images/on-premises/github-sync-done.png?fit=max\u0026auto=format\u0026n=IsGnx0wnzqtV4hI8\u0026q=85\u0026s=851a620d8601a3ebaf9260f0f1c1685a`,alt:`The Sync with GitHub dialog after syncing, with no new commits`,\"data-og-width\":`664`,width:`664`,\"data-og-height\":`334`,height:`334`,\"data-path\":`images/on-premises/github-sync-done.png`,\"data-optimize\":`true`,\"data-opv\":`3`,srcset:`https://mintcdn.com/ayakaleaf-pro/IsGnx0wnzqtV4hI8/images/on-premises/github-sync-done.png?w=280\u0026fit=max\u0026auto=format\u0026n=IsGnx0wnzqtV4hI8\u0026q=85\u0026s=c3007a6706cfb4348820329950aad463 280w, https://mintcdn.com/ayakaleaf-pro/IsGnx0wnzqtV4hI8/images/on-premises/github-sync-done.png?w=560\u0026fit=max\u0026auto=format\u0026n=IsGnx0wnzqtV4hI8\u0026q=85\u0026s=76b5e01e3817d73ee7d485cf44ad935f 560w, https://mintcdn.com/ayakaleaf-pro/IsGnx0wnzqtV4hI8/images/on-premises/github-sync-done.png?w=840\u0026fit=max\u0026auto=format\u0026n=IsGnx0wnzqtV4hI8\u0026q=85\u0026s=06c930f96bdf38805a93c4635152ae41 840w, https://mintcdn.com/ayakaleaf-pro/IsGnx0wnzqtV4hI8/images/on-premises/github-sync-done.png?w=1100\u0026fit=max\u0026auto=format\u0026n=IsGnx0wnzqtV4hI8\u0026q=85\u0026s=32dd9a5ffbc80347400e06847f14c846 1100w, https://mintcdn.com/ayakaleaf-pro/IsGnx0wnzqtV4hI8/images/on-premises/github-sync-done.png?w=1650\u0026fit=max\u0026auto=format\u0026n=IsGnx0wnzqtV4hI8\u0026q=85\u0026s=0270e1cfbfc9db457a8ae163128fe612 1650w, https://mintcdn.com/ayakaleaf-pro/IsGnx0wnzqtV4hI8/images/on-premises/github-sync-done.png?w=2500\u0026fit=max\u0026auto=format\u0026n=IsGnx0wnzqtV4hI8\u0026q=85\u0026s=e6f0322cd52bc67ecebf3e97926ef857 2500w`})})]})]}),`\n`,_jsx(Heading,{level:`3`,id:`if-the-same-lines-changed-on-both-sides`,children:`If the same lines changed on both sides`}),`\n`,_jsxs(_components.p,{children:[`The dialog says the changes could not be merged and names a new branch, `,_jsx(_components.code,{children:`overleaf-YYYY-MM-DD-HHMMSS`}),`, which holds your changes.`]}),`\n`,_jsx(Frame,{caption:`A conflict`,children:_jsx(OptimizedImage,{src:`https://mintcdn.com/ayakaleaf-pro/IsGnx0wnzqtV4hI8/images/on-premises/github-sync-conflict.png?fit=max\u0026auto=format\u0026n=IsGnx0wnzqtV4hI8\u0026q=85\u0026s=b67dd69bb98605672da34b3a372be582`,alt:`The Sync with GitHub dialog with a merge conflict warning`,\"data-og-width\":`664`,width:`664`,\"data-og-height\":`355`,height:`355`,\"data-path\":`images/on-premises/github-sync-conflict.png`,\"data-optimize\":`true`,\"data-opv\":`3`,srcset:`https://mintcdn.com/ayakaleaf-pro/IsGnx0wnzqtV4hI8/images/on-premises/github-sync-conflict.png?w=280\u0026fit=max\u0026auto=format\u0026n=IsGnx0wnzqtV4hI8\u0026q=85\u0026s=f0e330f6eadc8985521cfdecdbc5df19 280w, https://mintcdn.com/ayakaleaf-pro/IsGnx0wnzqtV4hI8/images/on-premises/github-sync-conflict.png?w=560\u0026fit=max\u0026auto=format\u0026n=IsGnx0wnzqtV4hI8\u0026q=85\u0026s=1e447c64263eeadb547b625daf57f4ce 560w, https://mintcdn.com/ayakaleaf-pro/IsGnx0wnzqtV4hI8/images/on-premises/github-sync-conflict.png?w=840\u0026fit=max\u0026auto=format\u0026n=IsGnx0wnzqtV4hI8\u0026q=85\u0026s=077ac38b22ae0a2f3f64cffafc693406 840w, https://mintcdn.com/ayakaleaf-pro/IsGnx0wnzqtV4hI8/images/on-premises/github-sync-conflict.png?w=1100\u0026fit=max\u0026auto=format\u0026n=IsGnx0wnzqtV4hI8\u0026q=85\u0026s=bcfc4ad30b598528900671b6c6174f73 1100w, https://mintcdn.com/ayakaleaf-pro/IsGnx0wnzqtV4hI8/images/on-premises/github-sync-conflict.png?w=1650\u0026fit=max\u0026auto=format\u0026n=IsGnx0wnzqtV4hI8\u0026q=85\u0026s=2681a8b179e5f9c91dc32062e99a95ea 1650w, https://mintcdn.com/ayakaleaf-pro/IsGnx0wnzqtV4hI8/images/on-premises/github-sync-conflict.png?w=2500\u0026fit=max\u0026auto=format\u0026n=IsGnx0wnzqtV4hI8\u0026q=85\u0026s=2a5e0bd2eefe8096d2771eaeaeb9dc6e 2500w`})}),`\n`,_jsxs(_components.ol,{children:[`\n`,_jsx(_components.li,{children:`Merge that branch into the default branch on GitHub or with Git. You can close the dialog in the meantime: it shows the same message when you open it again.`}),`\n`,_jsxs(_components.li,{children:[`Click `,_jsx(_components.strong,{children:`I have manually merged. Continue`}),`. The merged result comes into the project.`]}),`\n`,_jsx(_components.li,{children:`The branch stays on GitHub. Delete it when you no longer need it.`}),`\n`]}),`\n`,_jsx(Heading,{level:`2`,id:`unlink-a-project`,children:`Unlink a project`}),`\n`,_jsx(_components.p,{children:`Do this when you no longer want the project to sync. Only the project owner can.`}),`\n`,_jsxs(Steps,{children:[_jsx(Step,{title:`Click Unlink`,children:_jsxs(_components.p,{children:[`In the sync dialog, click `,_jsx(_components.strong,{children:`Unlink`}),`.`]})}),_jsxs(Step,{title:`Confirm`,children:[_jsxs(_components.p,{children:[`Click `,_jsx(_components.strong,{children:`Confirm`}),`. The note about a subscription does not stop you from linking the project again.`]}),_jsx(Frame,{caption:`Confirm the unlink`,children:_jsx(OptimizedImage,{src:`https://mintcdn.com/ayakaleaf-pro/IsGnx0wnzqtV4hI8/images/on-premises/github-sync-unlink-project.png?fit=max\u0026auto=format\u0026n=IsGnx0wnzqtV4hI8\u0026q=85\u0026s=e2f2e541c2e9e8d000baa0dacd28a328`,alt:`The Sync with GitHub dialog asking to confirm the unlink`,\"data-og-width\":`664`,width:`664`,\"data-og-height\":`388`,height:`388`,\"data-path\":`images/on-premises/github-sync-unlink-project.png`,\"data-optimize\":`true`,\"data-opv\":`3`,srcset:`https://mintcdn.com/ayakaleaf-pro/IsGnx0wnzqtV4hI8/images/on-premises/github-sync-unlink-project.png?w=280\u0026fit=max\u0026auto=format\u0026n=IsGnx0wnzqtV4hI8\u0026q=85\u0026s=0d4cc972db69c54d0e1ccf789e02e8c2 280w, https://mintcdn.com/ayakaleaf-pro/IsGnx0wnzqtV4hI8/images/on-premises/github-sync-unlink-project.png?w=560\u0026fit=max\u0026auto=format\u0026n=IsGnx0wnzqtV4hI8\u0026q=85\u0026s=1208cf40f048032b3309c6dba75b2de6 560w, https://mintcdn.com/ayakaleaf-pro/IsGnx0wnzqtV4hI8/images/on-premises/github-sync-unlink-project.png?w=840\u0026fit=max\u0026auto=format\u0026n=IsGnx0wnzqtV4hI8\u0026q=85\u0026s=7730d8d9106f9d5f37e8ed9885be0e72 840w, https://mintcdn.com/ayakaleaf-pro/IsGnx0wnzqtV4hI8/images/on-premises/github-sync-unlink-project.png?w=1100\u0026fit=max\u0026auto=format\u0026n=IsGnx0wnzqtV4hI8\u0026q=85\u0026s=90db7a1bf23a4b58e1690e88f6ad4f14 1100w, https://mintcdn.com/ayakaleaf-pro/IsGnx0wnzqtV4hI8/images/on-premises/github-sync-unlink-project.png?w=1650\u0026fit=max\u0026auto=format\u0026n=IsGnx0wnzqtV4hI8\u0026q=85\u0026s=293f8fa2f391ae1e080c2f9d791a4277 1650w, https://mintcdn.com/ayakaleaf-pro/IsGnx0wnzqtV4hI8/images/on-premises/github-sync-unlink-project.png?w=2500\u0026fit=max\u0026auto=format\u0026n=IsGnx0wnzqtV4hI8\u0026q=85\u0026s=5315de365f1d32b8148072db509c3858 2500w`})})]}),_jsx(Step,{title:`Check the result`,children:_jsxs(_components.p,{children:[`The dialog now shows `,_jsx(_components.strong,{children:`Export Project to GitHub`}),`. The project and the repository both keep their content. To sync again, export the project to a new repository, or import the repository into a new project.`]})})]}),`\n`,_jsx(Heading,{level:`2`,id:`unlink-your-github-account`,children:`Unlink your GitHub account`}),`\n`,_jsxs(_components.p,{children:[`In `,_jsx(_components.strong,{children:`Account settings`}),`, under `,_jsx(_components.strong,{children:`GitHub`}),`, click `,_jsx(_components.strong,{children:`Unlink`}),`, then `,_jsx(_components.strong,{children:`Unlink`}),` again in the dialog.`]}),`\n`,_jsx(Frame,{caption:`Unlink your account`,children:_jsx(OptimizedImage,{src:`https://mintcdn.com/ayakaleaf-pro/IsGnx0wnzqtV4hI8/images/on-premises/github-sync-unlink-account.png?fit=max\u0026auto=format\u0026n=IsGnx0wnzqtV4hI8\u0026q=85\u0026s=94ce090cb4d8b98231886319d6e6d903`,alt:`The Unlink GitHub Account dialog`,\"data-og-width\":`664`,width:`664`,\"data-og-height\":`277`,height:`277`,\"data-path\":`images/on-premises/github-sync-unlink-account.png`,\"data-optimize\":`true`,\"data-opv\":`3`,srcset:`https://mintcdn.com/ayakaleaf-pro/IsGnx0wnzqtV4hI8/images/on-premises/github-sync-unlink-account.png?w=280\u0026fit=max\u0026auto=format\u0026n=IsGnx0wnzqtV4hI8\u0026q=85\u0026s=ad41070a246fbcfc063502af5f411964 280w, https://mintcdn.com/ayakaleaf-pro/IsGnx0wnzqtV4hI8/images/on-premises/github-sync-unlink-account.png?w=560\u0026fit=max\u0026auto=format\u0026n=IsGnx0wnzqtV4hI8\u0026q=85\u0026s=964bcdadd74e1b689f5cc08c3d3c778e 560w, https://mintcdn.com/ayakaleaf-pro/IsGnx0wnzqtV4hI8/images/on-premises/github-sync-unlink-account.png?w=840\u0026fit=max\u0026auto=format\u0026n=IsGnx0wnzqtV4hI8\u0026q=85\u0026s=b001469a0d200b21da298e6557f27769 840w, https://mintcdn.com/ayakaleaf-pro/IsGnx0wnzqtV4hI8/images/on-premises/github-sync-unlink-account.png?w=1100\u0026fit=max\u0026auto=format\u0026n=IsGnx0wnzqtV4hI8\u0026q=85\u0026s=06a156cab71d097c937fb62289f548ca 1100w, https://mintcdn.com/ayakaleaf-pro/IsGnx0wnzqtV4hI8/images/on-premises/github-sync-unlink-account.png?w=1650\u0026fit=max\u0026auto=format\u0026n=IsGnx0wnzqtV4hI8\u0026q=85\u0026s=9c3c2cab3f9065021b2490eb5671360a 1650w, https://mintcdn.com/ayakaleaf-pro/IsGnx0wnzqtV4hI8/images/on-premises/github-sync-unlink-account.png?w=2500\u0026fit=max\u0026auto=format\u0026n=IsGnx0wnzqtV4hI8\u0026q=85\u0026s=0cda754b49b9486ce6550ff2b7d17607 2500w`})}),`\n`,_jsx(_components.p,{children:`Your projects stay linked to their repositories. You cannot sync them until you link your account again.`}),`\n`,_jsx(Info,{children:_jsxs(_components.p,{children:[`For who can do what in a shared project, see `,_jsx(_components.a,{href:`/on-premises/configuration/overleaf-toolkit/integrations/github-synchronisation#who-can-link-and-sync`,children:`Who can link and sync`}),`. Every collaborator who syncs links their own GitHub account.`]})})]})}function MDXContent(props={}){const{wrapper:MDXLayout}={..._provideComponents(),...props.components};return MDXLayout?_jsx(MDXLayout,{...props,children:_jsx(_createMdxContent,{...props})}):_createMdxContent(props)}return{default:MDXContent};function _missingMdxReference(id,component){throw new Error(`Expected `+(component?`component`:`object`)+\" `\"+id+\"` to be defined: you likely forgot to import, pass, or provide it.\")}","frontmatter":{},"scope":{"config":{},"pageMetadata":{"title":"GitHub Synchronisation","description":"Link your GitHub account, import or export a project, sync changes both ways and unlink.","icon":"https://d3gk2c5xim1je2.cloudfront.net/fontawesome/v7.2.0/brands/github.svg","href":"/on-premises/user-guide/users/github-synchronisation"}}},"mdxSourceWithNoJs":null},"mdxExtracts":{"tableOfContents":[{"title":"Link your GitHub account","slug":"link-your-github-account","depth":2,"children":[]},{"title":"Import a repository","slug":"import-a-repository","depth":2,"children":[]},{"title":"Export a project to a new repository","slug":"export-a-project-to-a-new-repository","depth":2,"children":[]},{"title":"Sync","slug":"sync","depth":2,"children":[{"title":"If the same lines changed on both sides","slug":"if-the-same-lines-changed-on-both-sides","depth":3,"children":[]}]},{"title":"Unlink a project","slug":"unlink-a-project","depth":2,"children":[]},{"title":"Unlink your GitHub account","slug":"unlink-your-github-account","depth":2,"children":[]}],"codeExamples":{}},"jsLinks":[],"subdomain":"ayakaleaf-pro","siteName":"Ayakaleaf Pro","title":"GitHub Synchronisation - Ayakaleaf Pro","navMaps":{"firstHrefInVersion":{},"firstHrefInLanguage":{"en":{"href":"/on-premises/user-guide/users/github-synchronisation","matchLevel":0},"zh-CN":{"href":"/zh-CN","matchLevel":4},"zh-TW":{"href":"/zh-TW","matchLevel":4},"ja":{"href":"/ja","matchLevel":4},"de":{"href":"/de","matchLevel":4},"fr":{"href":"/fr","matchLevel":4},"es":{"href":"/es","matchLevel":4},"it":{"href":"/it","matchLevel":4},"ko":{"href":"/ko","matchLevel":4},"ru":{"href":"/ru","matchLevel":4},"nl":{"href":"/nl","matchLevel":4},"pt":{"href":"/pt","matchLevel":4},"tr":{"href":"/tr","matchLevel":4},"uk":{"href":"/uk","matchLevel":4},"pl":{"href":"/pl","matchLevel":4},"cs":{"href":"/cs","matchLevel":4},"sv":{"href":"/sv","matchLevel":4},"fi":{"href":"/fi","matchLevel":4},"ar":{"href":"/ar","matchLevel":4},"vi":{"href":"/vi","matchLevel":4},"no":{"href":"/no","matchLevel":4},"da":{"href":"/da","matchLevel":4},"id":{"href":"/id","matchLevel":4},"zh-Hans":{"href":"/zh-Hans","matchLevel":4},"zh-Hant":{"href":"/zh-Hant","matchLevel":4}}},"lastModified":"2026-11-07T03:05:41.654Z","gitLastModified":"2026-11-07T03:05:24.000Z","originalFileLocation":"on-premises/user-guide/users/github-synchronisation.mdx","locale":"en"},"headHtml":"\u003cscript data-mint-head>(function(){var d=document.documentElement,p=null;if(!p){try{p=localStorage.getItem(\"isDarkMode\")}catch(e){}if(p==='true')p='dark';else if(p==='false')p='light';if(p!=='light'\u0026\u0026p!=='dark'\u0026\u0026p!=='system')p=\"system\"}var r=p==='system'?(matchMedia(\"(prefers-color-scheme: dark)\").matches?'dark':'light'):p;d.classList.remove(r==='dark'?'light':'dark');d.classList.add(r);d.setAttribute(\"data-theme-preference\",p)})();\u003c/script>\u003cmeta data-mint-head name=\"description\" content=\"Link your GitHub account, import or export a project, sync changes both ways and unlink.\">\u003cmeta data-mint-head name=\"application-name\" content=\"Ayakaleaf Pro\">\u003cmeta data-mint-head name=\"generator\" content=\"Mintlify\">\u003clink data-mint-head rel=\"icon\" type=\"image/png\" sizes=\"192x192\" href=\"/mintlify-assets/_mintlify/favicons/ayakaleaf-pro/o_LAbiVNKQm96Y75/_generated/favicon/android-chrome-192x192.png\" media=\"(prefers-color-scheme: light)\">\u003clink data-mint-head rel=\"apple-touch-icon\" type=\"image/png\" sizes=\"180x180\" href=\"/mintlify-assets/_mintlify/favicons/ayakaleaf-pro/o_LAbiVNKQm96Y75/_generated/favicon/apple-touch-icon.png\">\u003clink data-mint-head rel=\"icon\" type=\"image/png\" sizes=\"16x16\" href=\"/mintlify-assets/_mintlify/favicons/ayakaleaf-pro/o_LAbiVNKQm96Y75/_generated/favicon/favicon-16x16.png\" media=\"(prefers-color-scheme: light)\">\u003clink data-mint-head rel=\"icon\" type=\"image/png\" sizes=\"32x32\" href=\"/mintlify-assets/_mintlify/favicons/ayakaleaf-pro/o_LAbiVNKQm96Y75/_generated/favicon/favicon-32x32.png\" media=\"(prefers-color-scheme: light)\">\u003clink data-mint-head rel=\"shortcut icon\" type=\"image/x-icon\" href=\"/mintlify-assets/_mintlify/favicons/ayakaleaf-pro/o_LAbiVNKQm96Y75/_generated/favicon/favicon.ico\" media=\"(prefers-color-scheme: light)\">\u003clink data-mint-head rel=\"icon\" type=\"image/png\" sizes=\"192x192\" href=\"/mintlify-assets/_mintlify/favicons/ayakaleaf-pro/o_LAbiVNKQm96Y75/_generated/favicon-dark/android-chrome-192x192.png\" media=\"(prefers-color-scheme: dark)\">\u003clink data-mint-head rel=\"icon\" type=\"image/png\" sizes=\"16x16\" href=\"/mintlify-assets/_mintlify/favicons/ayakaleaf-pro/o_LAbiVNKQm96Y75/_generated/favicon-dark/favicon-16x16.png\" media=\"(prefers-color-scheme: dark)\">\u003clink data-mint-head rel=\"icon\" type=\"image/png\" sizes=\"32x32\" href=\"/mintlify-assets/_mintlify/favicons/ayakaleaf-pro/o_LAbiVNKQm96Y75/_generated/favicon-dark/favicon-32x32.png\" media=\"(prefers-color-scheme: dark)\">\u003clink data-mint-head rel=\"shortcut icon\" type=\"image/x-icon\" href=\"/mintlify-assets/_mintlify/favicons/ayakaleaf-pro/o_LAbiVNKQm96Y75/_generated/favicon-dark/favicon.ico\" media=\"(prefers-color-scheme: dark)\">\u003cmeta data-mint-head property=\"og:title\" content=\"GitHub Synchronisation - Ayakaleaf Pro\">\u003cmeta data-mint-head property=\"og:description\" content=\"Link your GitHub account, import or export a project, sync changes both ways and unlink.\">\u003cmeta data-mint-head property=\"og:site_name\" content=\"Ayakaleaf Pro\">\u003cmeta data-mint-head property=\"og:url\" content=\"https://ayakaleaf-pro.mintlify.app/on-premises/user-guide/users/github-synchronisation\">\u003cmeta data-mint-head property=\"og:type\" content=\"website\">\u003cmeta data-mint-head property=\"og:image\" content=\"https://ayakaleaf-pro.mintlify.site/_mintlify/api/og/v2?division=For+users\u0026amp;title=GitHub+Synchronisation\u0026amp;description=Link+your+GitHub+account%2C+import+or+export+a+project%2C+sync+changes+both+ways+and+unlink.\u0026amp;theme=a852d976fde0e13c2ab73efd\u0026amp;signature=a614c78526c562222c59ca3733bf235e758feee6e8577b9aed52dad8d946d301\">\u003cmeta data-mint-head property=\"og:image:width\" content=\"1200\">\u003cmeta data-mint-head property=\"og:image:height\" content=\"630\">\u003cmeta data-mint-head name=\"twitter:card\" content=\"summary_large_image\">\u003cmeta data-mint-head name=\"twitter:title\" content=\"GitHub Synchronisation - Ayakaleaf Pro\">\u003cmeta data-mint-head name=\"twitter:description\" content=\"Link your GitHub account, import or export a project, sync changes both ways and unlink.\">\u003cmeta data-mint-head name=\"twitter:image\" content=\"https://ayakaleaf-pro.mintlify.site/_mintlify/api/og/v2?division=For+users\u0026amp;title=GitHub+Synchronisation\u0026amp;description=Link+your+GitHub+account%2C+import+or+export+a+project%2C+sync+changes+both+ways+and+unlink.\u0026amp;theme=a852d976fde0e13c2ab73efd\u0026amp;signature=a614c78526c562222c59ca3733bf235e758feee6e8577b9aed52dad8d946d301\">\u003cmeta data-mint-head name=\"twitter:image:width\" content=\"1200\">\u003cmeta data-mint-head name=\"twitter:image:height\" content=\"630\">\u003cmeta data-mint-head name=\"msapplication-config\" content=\"/mintlify-assets/_mintlify/favicons/ayakaleaf-pro/o_LAbiVNKQm96Y75/_generated/favicon/browserconfig.xml\">\u003cmeta data-mint-head name=\"apple-mobile-web-app-title\" content=\"Ayakaleaf Pro\">\u003cmeta data-mint-head name=\"msapplication-TileColor\" content=\"#0E0E0E\">\u003clink data-mint-head rel=\"canonical\" href=\"https://ayakaleaf-pro.mintlify.app/on-premises/user-guide/users/github-synchronisation\">\u003clink data-mint-head rel=\"alternate\" type=\"application/xml\" href=\"/sitemap.xml\">\u003clink data-mint-head rel=\"alternate\" type=\"text/markdown\" href=\"/on-premises/user-guide/users/github-synchronisation.md\">\u003cscript data-mint-head type=\"application/ld+json\">{\"@context\":\"https://schema.org\",\"@graph\":[{\"@type\":\"Organization\",\"@id\":\"https://ayakaleaf-pro.mintlify.app/#organization\",\"name\":\"Ayakaleaf Pro\",\"url\":\"https://ayakaleaf-pro.mintlify.app\",\"logo\":{\"@type\":\"ImageObject\",\"url\":\"https://mintcdn.com/ayakaleaf-pro/JetHeEeglWIIXNds/logo/light.png?fit=max\u0026auto=format\u0026n=JetHeEeglWIIXNds\u0026q=85\u0026s=7f1abd8dcc74dd3b7cdafac9e6e82092\"}},{\"@type\":\"WebSite\",\"@id\":\"https://ayakaleaf-pro.mintlify.app#website\",\"name\":\"Ayakaleaf Pro\",\"url\":\"https://ayakaleaf-pro.mintlify.app\",\"publisher\":{\"@id\":\"https://ayakaleaf-pro.mintlify.app/#organization\"}},{\"@type\":\"WebPage\",\"@id\":\"https://ayakaleaf-pro.mintlify.app/on-premises/user-guide/users/github-synchronisation#webpage\",\"url\":\"https://ayakaleaf-pro.mintlify.app/on-premises/user-guide/users/github-synchronisation\",\"name\":\"GitHub Synchronisation\",\"description\":\"Link your GitHub account, import or export a project, sync changes both ways and unlink.\",\"dateModified\":\"2026-11-07T03:05:24.000Z\",\"isPartOf\":{\"@id\":\"https://ayakaleaf-pro.mintlify.app#website\"},\"breadcrumb\":{\"@id\":\"https://ayakaleaf-pro.mintlify.app/on-premises/user-guide/users/github-synchronisation#breadcrumb\"}},{\"@type\":\"BreadcrumbList\",\"@id\":\"https://ayakaleaf-pro.mintlify.app/on-premises/user-guide/users/github-synchronisation#breadcrumb\",\"itemListElement\":[{\"@type\":\"ListItem\",\"position\":1,\"name\":\"User guide\",\"item\":\"https://ayakaleaf-pro.mintlify.app/on-premises/user-guide/administrators/onboarding\"},{\"@type\":\"ListItem\",\"position\":2,\"name\":\"For users\",\"item\":\"https://ayakaleaf-pro.mintlify.app/on-premises/user-guide/users/index\"},{\"@type\":\"ListItem\",\"position\":3,\"name\":\"GitHub Synchronisation\",\"item\":\"https://ayakaleaf-pro.mintlify.app/on-premises/user-guide/users/github-synchronisation\"}]},{\"@type\":[\"Article\",\"TechArticle\"],\"@id\":\"https://ayakaleaf-pro.mintlify.app/on-premises/user-guide/users/github-synchronisation#article\",\"headline\":\"GitHub Synchronisation\",\"name\":\"GitHub Synchronisation\",\"description\":\"Link your GitHub account, import or export a project, sync changes both ways and unlink.\",\"url\":\"https://ayakaleaf-pro.mintlify.app/on-premises/user-guide/users/github-synchronisation\",\"mainEntityOfPage\":{\"@id\":\"https://ayakaleaf-pro.mintlify.app/on-premises/user-guide/users/github-synchronisation#webpage\"},\"dateModified\":\"2026-11-07T03:05:24.000Z\",\"publisher\":{\"@id\":\"https://ayakaleaf-pro.mintlify.app/#organization\"},\"isPartOf\":{\"@id\":\"https://ayakaleaf-pro.mintlify.app#website\"}}]}\u003c/script>\u003cscript data-mint-head type=\"application/ld+json\">{\"@context\":\"https://schema.org\",\"@type\":\"WebSite\",\"name\":\"Ayakaleaf Pro\",\"creator\":{\"@type\":\"Organization\",\"name\":\"Mintlify\",\"url\":\"https://mintlify.com\"}}\u003c/script>","siteName":"Ayakaleaf Pro","nav":{"global":null,"languages":[{"language":"en","default":true,"tabs":[{"tab":"Home","icon":"house-chimney","pages":[{"title":"Home","href":""}]},{"tab":"On-Premises","icon":"server","groups":[{"group":"Overview","pages":[{"group":"Welcome","icon":"hand-wave","root":{"title":"Welcome","icon":"hand-wave","href":"/on-premises"},"pages":[{"title":"Features and Copyright","icon":"layer-plus","href":"/on-premises/readme/features-and-copyright"},{"title":"Trust and Security","icon":"https://d3gk2c5xim1je2.cloudfront.net/fontawesome/v7.2.0/brands/expeditedssl.svg","href":"/on-premises/readme/trust-and-security"},{"title":"Overleaf Server Pro vs. Ayakaleaf Pro","icon":"scale-balanced","href":"/on-premises/readme/ayakaleaf-pro-vs-server-pro"},{"title":"Question and Answer","icon":"comment-question","href":"/on-premises/readme/question-and-answer"}]},{"group":"Release notes","icon":"code-branch","root":{"title":"Release notes","icon":"code-branch","href":"/on-premises/release-notes/index"},"pages":[{"title":"Release notes 6.x.x","href":"/on-premises/release-notes/release-notes-6.x.x"}]}]},{"group":"Installation","pages":[{"title":"Introduction","icon":"map-location","href":"/on-premises/installation/introduction"},{"group":"Using Docker Compose","icon":"https://d3gk2c5xim1je2.cloudfront.net/fontawesome/v7.2.0/brands/docker.svg","root":{"title":"Using Docker Compose","icon":"https://d3gk2c5xim1je2.cloudfront.net/fontawesome/v7.2.0/brands/docker.svg","href":"/on-premises/installation/using-docker-compose/index"},"pages":[{"group":"Linux","icon":"https://d3gk2c5xim1je2.cloudfront.net/fontawesome/v7.2.0/brands/linux.svg","root":{"title":"Linux","icon":"https://d3gk2c5xim1je2.cloudfront.net/fontawesome/v7.2.0/brands/linux.svg","href":"/on-premises/installation/using-docker-compose/linux/index"},"pages":[{"title":"0. Setup Docker","icon":"https://d3gk2c5xim1je2.cloudfront.net/fontawesome/v7.2.0/brands/docker.svg","href":"/on-premises/installation/using-docker-compose/linux/0.-setup-docker"},{"title":"1. Download the Toolkit","icon":"arrow-down-to-bracket","href":"/on-premises/installation/using-docker-compose/linux/1.-download-the-toolkit"},{"title":"2. Familiarize yourself with the Toolkit","icon":"magnifying-glass","href":"/on-premises/installation/using-docker-compose/linux/2.-familiarize-yourself-with-the-toolkit"},{"title":"3. Initialize the configuration","icon":"circle-play","href":"/on-premises/installation/using-docker-compose/linux/3.-initialize-the-configuration"},{"title":"4. Get Ayakaleaf Pro Images","icon":"split","href":"/on-premises/installation/using-docker-compose/linux/4.-get-overleaf-pro-images"},{"title":"5. Personalizing your instance","icon":"square-sliders","href":"/on-premises/installation/using-docker-compose/linux/5.-personalizing-your-instance"},{"title":"6. Post-installation tasks","icon":"ballot-check","href":"/on-premises/installation/using-docker-compose/linux/6.-post-installation-tasks"}]},{"group":"macOS","icon":"https://d3gk2c5xim1je2.cloudfront.net/fontawesome/v7.2.0/brands/apple.svg","root":{"title":"macOS","icon":"https://d3gk2c5xim1je2.cloudfront.net/fontawesome/v7.2.0/brands/apple.svg","href":"/on-premises/installation/using-docker-compose/macos/index"},"pages":[{"title":"0. Setup Docker Desktop","icon":"https://d3gk2c5xim1je2.cloudfront.net/fontawesome/v7.2.0/brands/docker.svg","href":"/on-premises/installation/using-docker-compose/macos/0.-setup-docker-desktop"},{"title":"1. Download the Toolkit","icon":"arrow-down-to-bracket","href":"/on-premises/installation/using-docker-compose/macos/1.-download-the-toolkit"},{"title":"2. Familiarize yourself with the Toolkit","icon":"magnifying-glass","href":"/on-premises/installation/using-docker-compose/macos/2.-familiarize-yourself-with-the-toolkit"},{"title":"3. Initialize the configuration","icon":"circle-play","href":"/on-premises/installation/using-docker-compose/macos/3.-initialize-the-configuration"},{"title":"4. Get Ayakaleaf Pro Images","icon":"split","href":"/on-premises/installation/using-docker-compose/macos/4.-get-ayakaleaf-pro-images"},{"title":"5. Personalizing your instance","icon":"square-sliders","href":"/on-premises/installation/using-docker-compose/macos/5.-personalizing-your-instance"},{"title":"6. Post-installation tasks","icon":"ballot-check","href":"/on-premises/installation/using-docker-compose/macos/6.-post-installation-tasks"},{"title":"Troubleshooting","icon":"screwdriver-wrench","href":"/on-premises/installation/using-docker-compose/macos/troubleshooting"}]},{"group":"Windows","icon":"https://d3gk2c5xim1je2.cloudfront.net/fontawesome/v7.2.0/brands/windows.svg","root":{"title":"Windows","icon":"https://d3gk2c5xim1je2.cloudfront.net/fontawesome/v7.2.0/brands/windows.svg","href":"/on-premises/installation/using-docker-compose/windows/index"},"pages":[{"title":"0. Setup WSL 2 and Docker Desktop","icon":"https://d3gk2c5xim1je2.cloudfront.net/fontawesome/v7.2.0/brands/docker.svg","href":"/on-premises/installation/using-docker-compose/windows/0.-setup-wsl-and-docker-desktop"},{"title":"1. Download the Toolkit","icon":"arrow-down-to-bracket","href":"/on-premises/installation/using-docker-compose/windows/1.-download-the-toolkit"},{"title":"2. Familiarize yourself with the Toolkit","icon":"magnifying-glass","href":"/on-premises/installation/using-docker-compose/windows/2.-familiarize-yourself-with-the-toolkit"},{"title":"3. Initialize the configuration","icon":"circle-play","href":"/on-premises/installation/using-docker-compose/windows/3.-initialize-the-configuration"},{"title":"4. Get Ayakaleaf Pro Images","icon":"split","href":"/on-premises/installation/using-docker-compose/windows/4.-get-ayakaleaf-pro-images"},{"title":"5. Personalizing your instance","icon":"square-sliders","href":"/on-premises/installation/using-docker-compose/windows/5.-personalizing-your-instance"},{"title":"6. Post-installation tasks","icon":"ballot-check","href":"/on-premises/installation/using-docker-compose/windows/6.-post-installation-tasks"},{"title":"Troubleshooting","icon":"wrench","href":"/on-premises/installation/using-docker-compose/windows/troubleshooting"}]}]},{"group":"Using Kubernetes","icon":"dharmachakra","root":{"title":"Using Kubernetes","icon":"dharmachakra","href":"/on-premises/installation/using-kubernetes/index"},"pages":[{"title":"0. Prepare the nodes","icon":"server","href":"/on-premises/installation/using-kubernetes/0.-prepare-the-nodes"},{"title":"1. Get Ayakaleaf Pro Images","icon":"split","href":"/on-premises/installation/using-kubernetes/1.-get-ayakaleaf-pro-images"},{"title":"2. Create the namespace and secrets","icon":"key","href":"/on-premises/installation/using-kubernetes/2.-create-the-namespace-and-secrets"},{"title":"3. Deploy MongoDB and Redis","icon":"database","href":"/on-premises/installation/using-kubernetes/3.-deploy-mongodb-and-redis"},{"title":"4. Personalizing your instance","icon":"square-sliders","href":"/on-premises/installation/using-kubernetes/4.-personalizing-your-instance"},{"title":"5. Deploy Ayakaleaf Pro","icon":"rocket-launch","href":"/on-premises/installation/using-kubernetes/5.-deploy-ayakaleaf-pro"},{"title":"6. Post-installation tasks","icon":"ballot-check","href":"/on-premises/installation/using-kubernetes/6.-post-installation-tasks"}]},{"title":"Using Claude or Codex","icon":"https://d3gk2c5xim1je2.cloudfront.net/fontawesome/v7.2.0/brands/claude.svg","href":"/on-premises/installation/using-claude-or-codex"},{"title":"Using GitHub Codespace","icon":"https://d3gk2c5xim1je2.cloudfront.net/fontawesome/v7.2.0/brands/github.svg","href":"/on-premises/installation/using-the-github-codespace"},{"title":"Air-gapped/offline deployments","icon":"block-brick","href":"/on-premises/installation/air-gapped-offline-deployments"},{"title":"Migrate from Existing","icon":"u-turn-up-right","href":"/on-premises/installation/migrate-from-existing"}]},{"group":"Configuration","pages":[{"group":"Docker Compose","icon":"https://d3gk2c5xim1je2.cloudfront.net/fontawesome/v7.2.0/brands/docker.svg","root":{"title":"Docker Compose","icon":"https://d3gk2c5xim1je2.cloudfront.net/fontawesome/v7.2.0/brands/docker.svg","href":"/on-premises/configuration/overleaf-toolkit/index"},"pages":[{"title":"Files and locations","icon":"folder-open","href":"/on-premises/configuration/overleaf-toolkit/files-and-locations"},{"title":"Toolkit settings","icon":"gear-complex","href":"/on-premises/configuration/overleaf-toolkit/toolkit-settings"},{"title":"Environment variables","icon":"seedling","href":"/on-premises/configuration/overleaf-toolkit/environment-variables"},{"group":"Authentication","icon":"address-card","root":{"title":"Authentication","icon":"address-card","href":"/on-premises/configuration/overleaf-toolkit/authentication/index"},"pages":[{"title":"OIDC Authentication","icon":"id-card-clip","href":"/on-premises/configuration/overleaf-toolkit/authentication/oidc-authentication"},{"title":"SAML Authentication","icon":"key","href":"/on-premises/configuration/overleaf-toolkit/authentication/saml-authentication"},{"title":"LDAP Authentication","icon":"lock","href":"/on-premises/configuration/overleaf-toolkit/authentication/ldap-authentication"},{"title":"Public Access","icon":"lock-open","href":"/on-premises/configuration/overleaf-toolkit/authentication/public-access"},{"title":"reCAPTCHA","icon":"robot","href":"/on-premises/configuration/overleaf-toolkit/authentication/recaptcha"},{"title":"Password restrictions","icon":"key","href":"/on-premises/configuration/overleaf-toolkit/authentication/password-restrictions"}]},{"title":"Sandboxed Compiles","icon":"gear-code","href":"/on-premises/configuration/overleaf-toolkit/sandboxed-compiles"},{"title":"Pandoc Import and Export","icon":"file-lines","href":"/on-premises/configuration/overleaf-toolkit/pandoc-import-and-export"},{"group":"Integrations","icon":"puzzle-piece","root":{"title":"Integrations","icon":"puzzle-piece","href":"/on-premises/configuration/overleaf-toolkit/integrations/index"},"pages":[{"title":"Git integration","icon":"https://d3gk2c5xim1je2.cloudfront.net/fontawesome/v7.2.0/brands/git-alt.svg","href":"/on-premises/configuration/overleaf-toolkit/integrations/git-integration"},{"title":"GitHub Synchronisation","icon":"https://d3gk2c5xim1je2.cloudfront.net/fontawesome/v7.2.0/brands/github.svg","href":"/on-premises/configuration/overleaf-toolkit/integrations/github-synchronisation"},{"title":"GitLab Synchronisation","icon":"https://d3gk2c5xim1je2.cloudfront.net/fontawesome/v7.2.0/brands/gitlab.svg","href":"/on-premises/configuration/overleaf-toolkit/integrations/gitlab-synchronisation"},{"title":"Gitea Synchronisation","icon":"mug-hot","href":"/on-premises/configuration/overleaf-toolkit/integrations/gitea-synchronisation"},{"title":"Dropbox Synchronisation","icon":"https://d3gk2c5xim1je2.cloudfront.net/fontawesome/v7.2.0/brands/dropbox.svg","href":"/on-premises/configuration/overleaf-toolkit/integrations/dropbox-synchronisation"},{"title":"Zotero Integration","icon":"z","href":"/on-premises/configuration/overleaf-toolkit/integrations/zotero-integration"},{"title":"Mendeley Integration","icon":"https://d3gk2c5xim1je2.cloudfront.net/fontawesome/v7.2.0/brands/mendeley.svg","href":"/on-premises/configuration/overleaf-toolkit/integrations/mendeley-integration"},{"title":"MCP Server","icon":"plug","href":"/on-premises/configuration/overleaf-toolkit/integrations/mcp-server"},{"title":"AI Integration","icon":"https://d3gk2c5xim1je2.cloudfront.net/fontawesome/v7.2.0/brands/openai.svg","href":"/on-premises/configuration/overleaf-toolkit/integrations/ai-integration"},{"title":"Overleaf Import API","icon":"rectangle-api","href":"/on-premises/configuration/overleaf-toolkit/integrations/overleaf-import-api"}]},{"title":"Templates","icon":"paste","href":"/on-premises/configuration/overleaf-toolkit/templates"},{"title":"External URL","icon":"link","href":"/on-premises/configuration/overleaf-toolkit/external-url"},{"title":"Logging","icon":"memo-circle-info","href":"/on-premises/configuration/overleaf-toolkit/logging"},{"title":"TLS proxy","icon":"lock","href":"/on-premises/configuration/overleaf-toolkit/tls-proxy"},{"title":"Branding","icon":"copyright","href":"/on-premises/configuration/overleaf-toolkit/branding"},{"title":"Localization","icon":"globe-pointer","href":"/on-premises/configuration/overleaf-toolkit/localization"},{"title":"Email delivery","icon":"paper-plane-top","href":"/on-premises/configuration/overleaf-toolkit/email-delivery"},{"title":"Redis","icon":"memory","href":"/on-premises/configuration/overleaf-toolkit/redis"},{"title":"S3","icon":"https://d3gk2c5xim1je2.cloudfront.net/fontawesome/v7.2.0/brands/aws.svg","href":"/on-premises/configuration/overleaf-toolkit/s3"},{"title":"Adding LaTeX user help","icon":"graduation-cap","href":"/on-premises/configuration/overleaf-toolkit/adding-latex-user-help"}]},{"group":"Kubernetes","icon":"dharmachakra","root":{"title":"Kubernetes","icon":"dharmachakra","href":"/on-premises/configuration/kubernetes/index"},"pages":[{"group":"Authentication","icon":"address-card","root":{"title":"Authentication","icon":"address-card","href":"/on-premises/configuration/kubernetes/authentication/index"},"pages":[{"title":"OIDC Authentication","icon":"id-card-clip","href":"/on-premises/configuration/kubernetes/authentication/oidc-authentication"},{"title":"SAML Authentication","icon":"building-columns","href":"/on-premises/configuration/kubernetes/authentication/saml-authentication"},{"title":"LDAP Authentication","icon":"address-book","href":"/on-premises/configuration/kubernetes/authentication/ldap-authentication"},{"title":"Public Access","icon":"lock-open","href":"/on-premises/configuration/kubernetes/authentication/public-access"},{"title":"reCAPTCHA","icon":"robot","href":"/on-premises/configuration/kubernetes/authentication/recaptcha"},{"title":"Password restrictions","icon":"key","href":"/on-premises/configuration/kubernetes/authentication/password-restrictions"}]},{"title":"Sandboxed Compiles","icon":"gear-code","href":"/on-premises/configuration/kubernetes/sandboxed-compiles"},{"title":"Pandoc Import and Export","icon":"file-lines","href":"/on-premises/configuration/kubernetes/pandoc-import-and-export"},{"group":"Integrations","icon":"puzzle-piece","root":{"title":"Integrations","icon":"puzzle-piece","href":"/on-premises/configuration/kubernetes/integrations/index"},"pages":[{"title":"Git integration","icon":"code-branch","href":"/on-premises/configuration/kubernetes/integrations/git-integration"},{"title":"GitHub Synchronisation","icon":"https://d3gk2c5xim1je2.cloudfront.net/fontawesome/v7.2.0/brands/github.svg","href":"/on-premises/configuration/kubernetes/integrations/github-synchronisation"},{"title":"GitLab Synchronisation","icon":"https://d3gk2c5xim1je2.cloudfront.net/fontawesome/v7.2.0/brands/gitlab.svg","href":"/on-premises/configuration/kubernetes/integrations/gitlab-synchronisation"},{"title":"Gitea Synchronisation","icon":"mug-hot","href":"/on-premises/configuration/kubernetes/integrations/gitea-synchronisation"},{"title":"Dropbox Synchronisation","icon":"https://d3gk2c5xim1je2.cloudfront.net/fontawesome/v7.2.0/brands/dropbox.svg","href":"/on-premises/configuration/kubernetes/integrations/dropbox-synchronisation"},{"title":"Zotero Integration","icon":"z","href":"/on-premises/configuration/kubernetes/integrations/zotero-integration"},{"title":"Mendeley Integration","icon":"https://d3gk2c5xim1je2.cloudfront.net/fontawesome/v7.2.0/brands/mendeley.svg","href":"/on-premises/configuration/kubernetes/integrations/mendeley-integration"},{"title":"MCP Server","icon":"plug","href":"/on-premises/configuration/kubernetes/integrations/mcp-server"},{"title":"AI Integration","icon":"https://d3gk2c5xim1je2.cloudfront.net/fontawesome/v7.2.0/brands/openai.svg","href":"/on-premises/configuration/kubernetes/integrations/ai-integration"},{"title":"Overleaf Import API","icon":"rectangle-api","href":"/on-premises/configuration/kubernetes/integrations/overleaf-import-api"}]},{"title":"Templates","icon":"paste","href":"/on-premises/configuration/kubernetes/templates"},{"title":"External URL","icon":"link","href":"/on-premises/configuration/kubernetes/external-url"},{"title":"Logging","icon":"memo-circle-info","href":"/on-premises/configuration/kubernetes/logging"},{"title":"TLS proxy","icon":"lock","href":"/on-premises/configuration/kubernetes/tls-proxy"},{"title":"Branding","icon":"copyright","href":"/on-premises/configuration/kubernetes/branding"},{"title":"Localization","icon":"globe-pointer","href":"/on-premises/configuration/kubernetes/localization"},{"title":"Email delivery","icon":"paper-plane-top","href":"/on-premises/configuration/kubernetes/email-delivery"},{"title":"Redis","icon":"memory","href":"/on-premises/configuration/kubernetes/redis"},{"title":"S3","icon":"https://d3gk2c5xim1je2.cloudfront.net/fontawesome/v7.2.0/brands/aws.svg","href":"/on-premises/configuration/kubernetes/s3"},{"title":"Adding LaTeX user help","icon":"graduation-cap","href":"/on-premises/configuration/kubernetes/adding-latex-user-help"},{"title":"Horizontal scaling","icon":"layer-group","href":"/on-premises/configuration/kubernetes/horizontal-scaling"}]}]},{"group":"User guide","pages":[{"group":"For administrators","icon":"user-gear","root":{"title":"For administrators","icon":"user-gear","href":"/on-premises/user-guide/administrators/index"},"pages":[{"title":"Onboarding","icon":"user-plus","href":"/on-premises/user-guide/administrators/onboarding"},{"title":"Basic management","icon":"sliders","href":"/on-premises/user-guide/administrators/basic-management"},{"title":"User management","icon":"users-gear","href":"/on-premises/user-guide/administrators/user-management"},{"title":"Project management","icon":"folder-gear","href":"/on-premises/user-guide/administrators/project-management"},{"title":"Template management","icon":"paste","href":"/on-premises/user-guide/administrators/template-management"}]},{"group":"For users","icon":"users","root":{"title":"For users","icon":"users","href":"/on-premises/user-guide/users/index"},"pages":[{"title":"Git integration","description":"Create an access token, clone a project with Git, then pull and push.","icon":"https://d3gk2c5xim1je2.cloudfront.net/fontawesome/v7.2.0/brands/git-alt.svg","href":"/on-premises/user-guide/users/git-integration"},{"title":"GitHub Synchronisation","icon":"https://d3gk2c5xim1je2.cloudfront.net/fontawesome/v7.2.0/brands/github.svg","href":"/on-premises/user-guide/users/github-synchronisation"},{"title":"GitLab Synchronisation","description":"Link your GitLab account, import or export a project, sync changes both ways and unlink.","icon":"https://d3gk2c5xim1je2.cloudfront.net/fontawesome/v7.2.0/brands/gitlab.svg","href":"/on-premises/user-guide/users/gitlab-synchronisation"},{"title":"Gitea Synchronisation","icon":"mug-hot","href":"/on-premises/user-guide/users/gitea-synchronisation"},{"title":"Dropbox Synchronisation","icon":"https://d3gk2c5xim1je2.cloudfront.net/fontawesome/v7.2.0/brands/dropbox.svg","href":"/on-premises/user-guide/users/dropbox-synchronisation"},{"title":"Zotero Integration","icon":"z","href":"/on-premises/user-guide/users/zotero-integration"},{"title":"Mendeley Integration","icon":"https://d3gk2c5xim1je2.cloudfront.net/fontawesome/v7.2.0/brands/mendeley.svg","href":"/on-premises/user-guide/users/mendeley-integration"},{"title":"Templates","icon":"paste","href":"/on-premises/user-guide/users/templates"},{"title":"Symbol Palette","icon":"omega","href":"/on-premises/user-guide/users/symbol-palette"},{"title":"Advanced Reference Search","icon":"magnifying-glass","href":"/on-premises/user-guide/users/advanced-reference-search"},{"title":"AI Assistant","icon":"sparkles","href":"/on-premises/user-guide/users/ai-assistant"},{"title":"Error Assistant","icon":"wand-magic-sparkles","href":"/on-premises/user-guide/users/error-assistant"},{"title":"MCP Server","icon":"plug","href":"/on-premises/user-guide/users/mcp-server"},{"title":"Python Runner","icon":"https://d3gk2c5xim1je2.cloudfront.net/fontawesome/v7.2.0/brands/python.svg","href":"/on-premises/user-guide/users/python-runner"},{"title":"Word import and export","icon":"file-word","href":"/on-premises/user-guide/users/word-import-export"},{"title":"Open in Overleaf","icon":"arrow-up-right-from-square","href":"/on-premises/user-guide/users/open-in-overleaf"}]}]},{"group":"Maintenance","pages":[{"title":"docker-compose.yml to Toolkit migration","icon":"right-left","href":"/on-premises/maintenance/docker-compose.yml-to-toolkit-migration"},{"title":"Upgrading your deployment","icon":"arrow-up-from-square","href":"/on-premises/maintenance/upgrading-your-deployment"},{"title":"Upgrading on Kubernetes","icon":"arrow-up-from-square","href":"/on-premises/maintenance/upgrading-on-kubernetes"},{"group":"Data and backups","icon":"database","root":{"title":"Data and backups","icon":"database","href":"/on-premises/maintenance/data-and-backups/index"},"pages":[{"title":"Exporting projects","icon":"file-export","href":"/on-premises/maintenance/data-and-backups/exporting-projects"}]},{"title":"Extending TeX Live","icon":"rectangle-pro","href":"/on-premises/maintenance/extending-tex-live"},{"title":"Updating TeX Live Full Images Automatically","icon":"arrows-rotate","href":"/on-premises/maintenance/updating-tex-live-full-images-automatically"},{"title":"Horizontal scaling","icon":"distribute-spacing-horizontal","href":"/on-premises/maintenance/horizontal-scaling"},{"title":"S3 migration","icon":"https://d3gk2c5xim1je2.cloudfront.net/fontawesome/v7.2.0/brands/aws.svg","href":"/on-premises/maintenance/s3-migration"},{"title":"Updating MongoDB","icon":"database","href":"/on-premises/maintenance/updating-mongodb"}]},{"group":"User and project management","pages":[{"title":"Roles and permissions","icon":"list-check","href":"/on-premises/user-and-project-management/roles-and-permissions"},{"group":"User management","icon":"users-between-lines","root":{"title":"User management","icon":"users-between-lines","href":"/on-premises/user-and-project-management/user-management/index"},"pages":[{"title":"Username migration","icon":"lock","href":"/on-premises/user-and-project-management/user-management/username-migration"},{"title":"Migrating to LDAP or SAML","icon":"rectangle-pro","href":"/on-premises/user-and-project-management/user-management/migrating-to-ldap-or-saml"}]},{"group":"Project management","icon":"rectangle-history","root":{"title":"Project management","icon":"rectangle-history","href":"/on-premises/user-and-project-management/project-management/index"},"pages":[{"title":"Bulk transfer of project ownership","icon":"lock","href":"/on-premises/user-and-project-management/project-management/bulk-transfer-of-project-ownership"}]}]},{"group":"Support","pages":[{"title":"Project limits","icon":"list-check","href":"/on-premises/support/project-limits"},{"title":"Troubleshooting","icon":"comments-question-check","href":"/on-premises/support/troubleshooting"},{"title":"Getting help","icon":"truck-medical","href":"/on-premises/support/getting-help"},{"group":"Support guides","icon":"message-question","root":{"title":"Support guides","icon":"message-question","href":"/on-premises/support/support-guides/index"},"pages":[{"title":"Using templates as an individual","icon":"rectangle-vertical-history","href":"/on-premises/support/support-guides/using-templates-as-an-individual"}]}]}]},{"tab":"Blog","icon":"rss","pages":[{"title":"Blog","href":"/blog"}]},{"tab":"TeXLive","icon":"compact-disc","pages":[{"title":"TeXLive","href":"/texlive"}]},{"tab":"Developer","icon":"rectangle-terminal","pages":[{"title":"Developer","href":"/dev"}]}]},{"language":"zh-CN","pages":[{"title":"zh-CN","href":"/zh-CN"}]},{"language":"zh-TW","pages":[{"title":"zh-TW","href":"/zh-TW"}]},{"language":"ja","pages":[{"title":"ja","href":"/ja"}]},{"language":"de","pages":[{"title":"de","href":"/de"}]},{"language":"fr","pages":[{"title":"fr","href":"/fr"}]},{"language":"es","pages":[{"title":"es","href":"/es"}]},{"language":"it","pages":[{"title":"it","href":"/it"}]},{"language":"ko","pages":[{"title":"ko","href":"/ko"}]},{"language":"ru","pages":[{"title":"ru","href":"/ru"}]},{"language":"nl","pages":[{"title":"nl","href":"/nl"}]},{"language":"pt","pages":[{"title":"pt","href":"/pt"}]},{"language":"tr","pages":[{"title":"tr","href":"/tr"}]},{"language":"uk","pages":[{"title":"uk","href":"/uk"}]},{"language":"pl","pages":[{"title":"pl","href":"/pl"}]},{"language":"cs","pages":[{"title":"cs","href":"/cs"}]},{"language":"sv","pages":[{"title":"sv","href":"/sv"}]},{"language":"fi","pages":[{"title":"fi","href":"/fi"}]},{"language":"ar","pages":[{"title":"ar","href":"/ar"}]},{"language":"vi","pages":[{"title":"vi","href":"/vi"}]},{"language":"no","pages":[{"title":"no","href":"/no"}]},{"language":"da","pages":[{"title":"da","href":"/da"}]},{"language":"id","pages":[{"title":"id","href":"/id"}]},{"language":"zh-Hans","pages":[{"title":"zh-Hans","href":"/zh-Hans"}]},{"language":"zh-Hant","pages":[{"title":"zh-Hant","href":"/zh-Hant"}]}]},"basePath":"","title":"GitHub Synchronisation - Ayakaleaf Pro","buildId":"dpl_8LJbrAiZvr1K98WQNZXCyY5AvT34","deploymentId":"dpl_8LJbrAiZvr1K98WQNZXCyY5AvT34","dynamics":["07c022d89b","a74be98ba7"],"chunks":["Frame-NdetNziF.js","DynamicMarkdown-CD8713Yy.js","zoom-image-lightbox-DMoL6lHz.js","lightbox-handle-r17bVUz3.js"]}