Click Account, then Account settings. Under Project synchronisation, find Gitea and click Link.
Gitea in the account settings
2
Authorize on Gitea
Gitea opens. Sign in if you are asked to, then authorize the application.
3
Check the link
You are back in the account settings. A green message says your Gitea account is linked, and the button now says Unlink.
Your Gitea account is linked
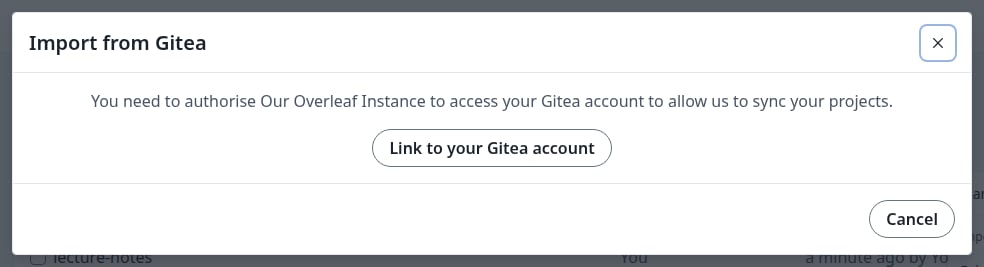
If your account is not linked yet, Import from Gitea and the Gitea card in the editor ask you to link it first. Click Link to your Gitea account. You also end up in the account settings, in a new tab if you started in the editor. Then go back and start again.
This creates a new project from a Gitea repository, already linked to it.
1
Open the import dialog
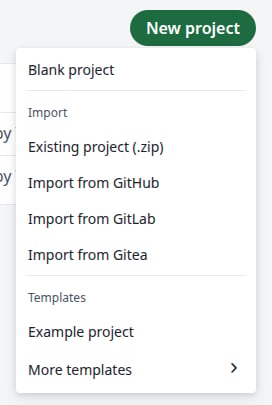
On the projects page, click New project, then Import from Gitea.
The New project menu
2
Choose the repository
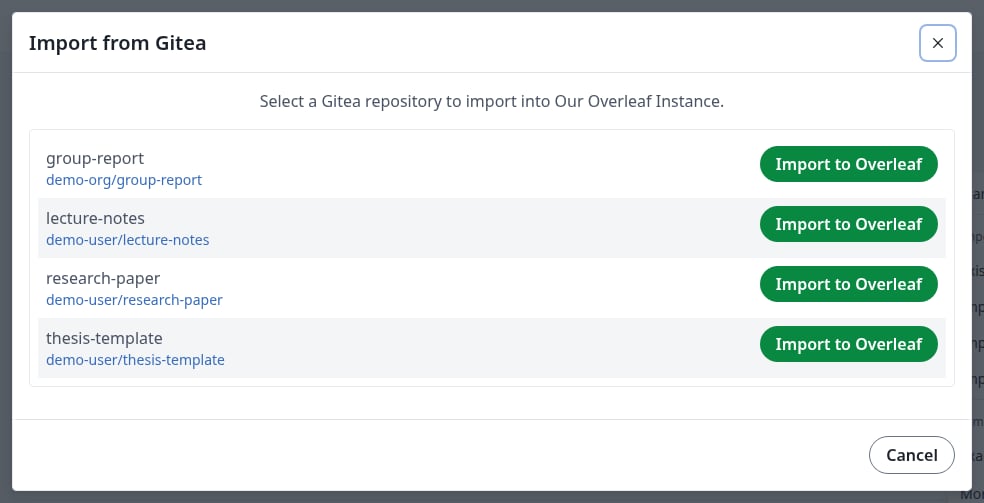
Click Import to Overleaf next to the repository. The list includes your repositories and those of your organizations. An empty repository is not listed: it needs at least one commit.
Your Gitea repositories
3
Check the project
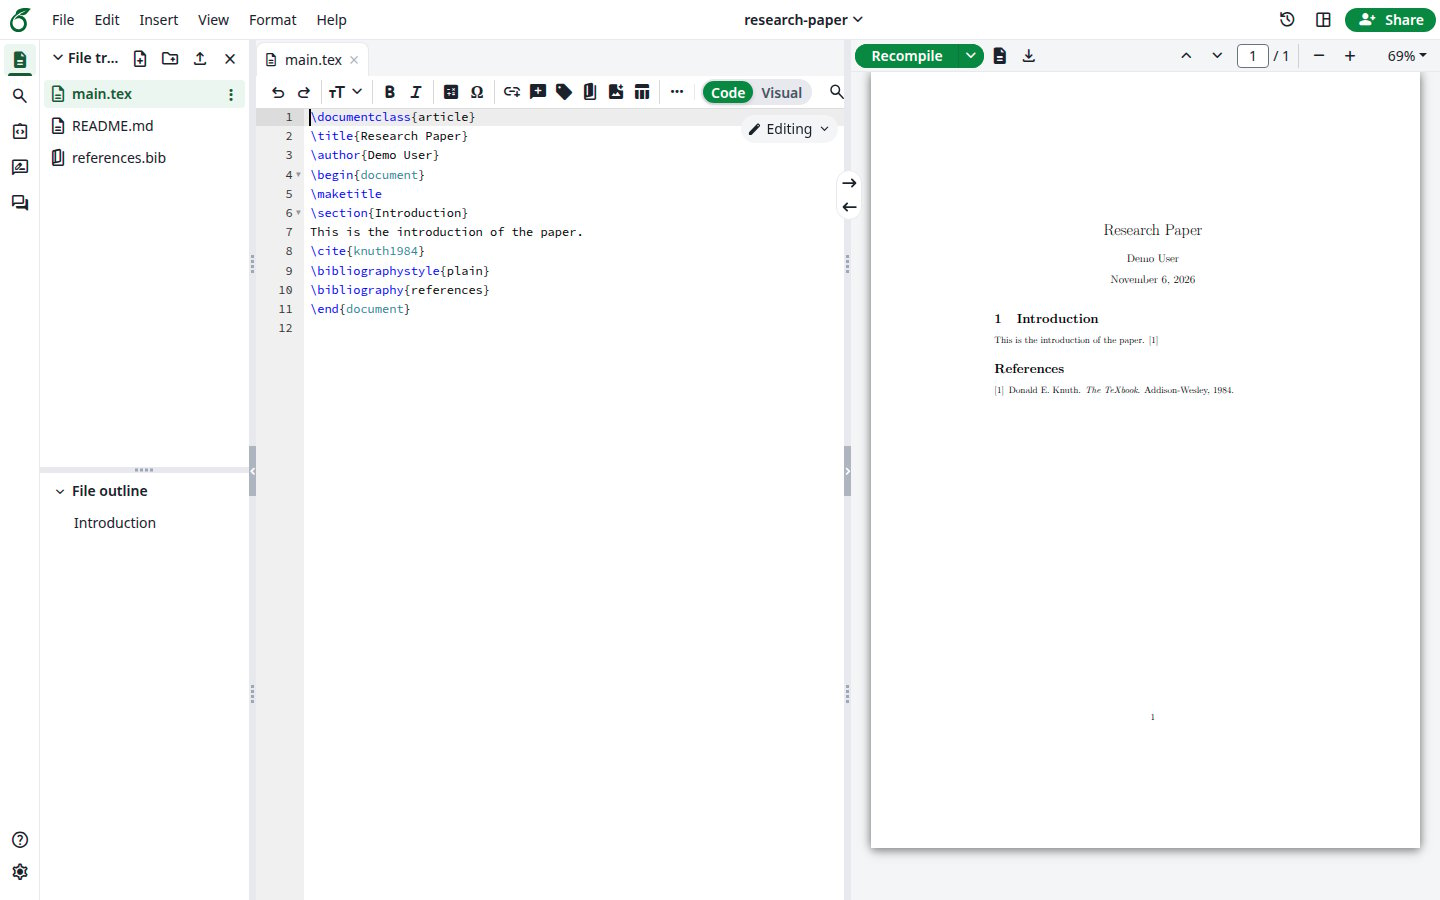
The new project opens with the files of the repository.
This creates a repository from a project and links them. A project can only be linked this way or by importing: you cannot link it to a repository that already exists.
1
Open Gitea in the editor
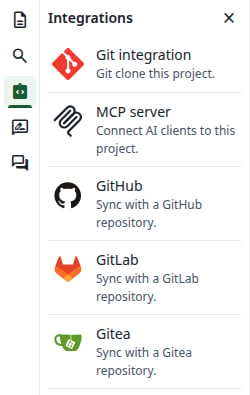
Open the project. In the left bar, click Integrations, then Gitea.
The Integrations panel
2
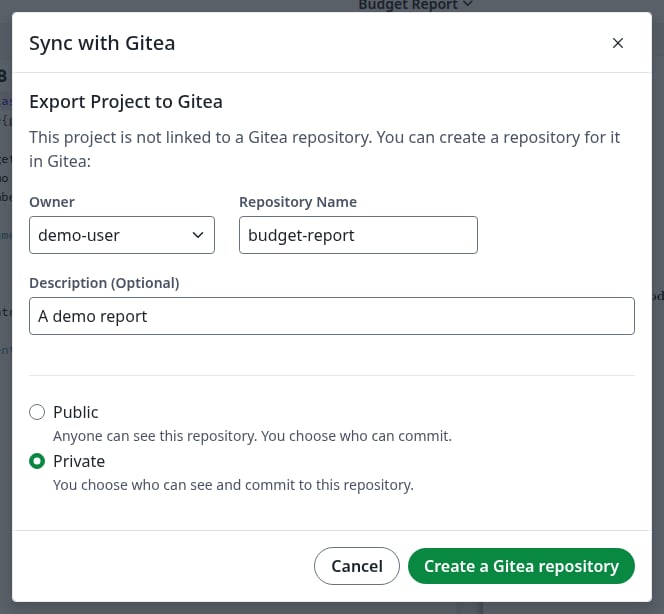
Fill in the repository
Choose the Owner, which can be you or one of your organizations. When you pick an organization, this field is called Organization. Repository Name starts as the project’s name: if that name has spaces, change it, because Gitea does not accept them. The description is optional, and Private is selected by default. Click Create a Gitea repository.
Export Project to Gitea
If the name has spaces or is already taken, the dialog says Please check that the repository name is valid, and that you have permission to create the repository. Change the name and click the button again.
3
Check the link
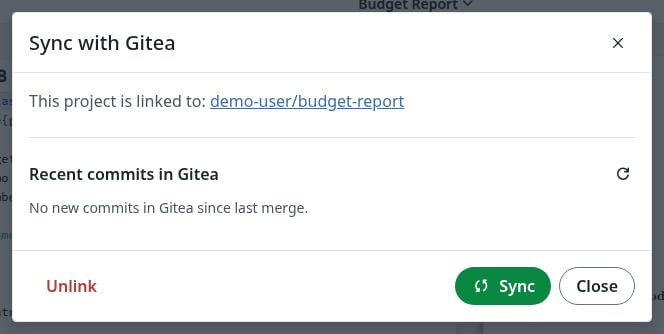
The dialog now says This project is linked to and names the repository.
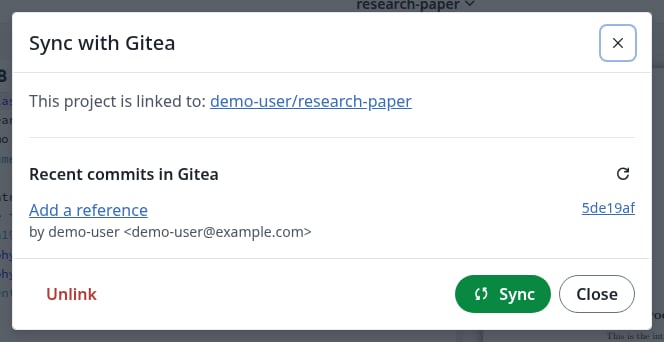
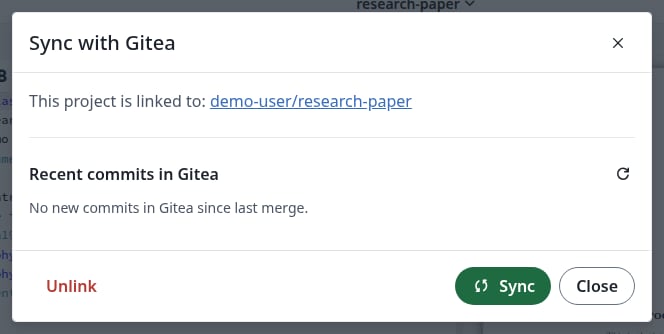
Open a linked project. In the left bar, click Integrations, then Gitea.Recent commits in Gitea lists what will come into the project.
A new commit waiting in Gitea
2
Describe your changes
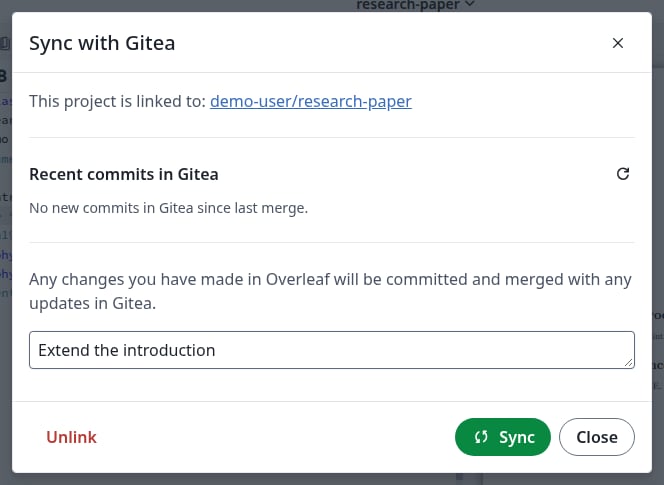
If you changed something in the project, a commit message box appears. It is optional: when you leave it empty, the commit is called Updates from Overleaf.
The commit message for your changes
3
Click Sync
Click Sync. New commits from Gitea come into the project, and your changes go to the default branch of the repository. If both sides changed different things, they are merged for you through a pull request, which stays on Gitea as a record.
4
Check the result
The dialog shows No new commits in Gitea since last merge. and the commit message box is gone. The files in the editor and the commits on Gitea are up to date.
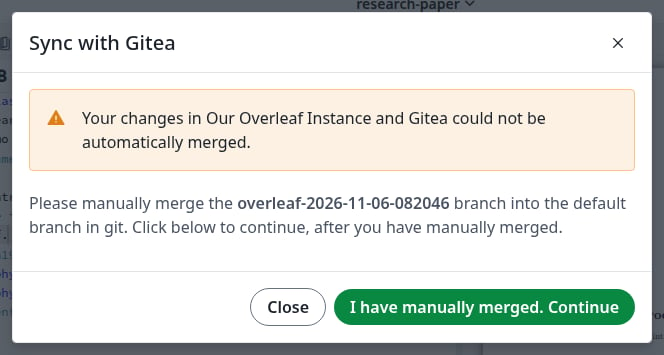
The dialog says the changes could not be merged and names a new branch, overleaf-YYYY-MM-DD-HHMMSS, which holds your changes. Overleaf also opens a pull request from that branch on Gitea.
A conflict
Merge that branch into the default branch with Git, and fix the conflict. You can close the dialog in the meantime: it shows the same message when you open it again.
git clone <repository-address>cd <repository-name>git merge origin/overleaf-YYYY-MM-DD-HHMMSS# fix the conflict in the file Git namesgit add <file>git commitgit push
Click I have manually merged. Continue. The merged result comes into the project. If you click it before the branch is merged, the dialog stays as it is.
The branch stays on Gitea and its pull request stays open. Close the pull request and delete the branch when you no longer need them.
The same dialog appears when a branch protection rule holds the pull request back, for example when it needs an approval, even if no lines conflict. Once the rule allows it, merge the pull request on Gitea and click I have manually merged. Continue. See How syncing works with Gitea.
Do this when you no longer want the project to sync.
1
Click Unlink
In the sync dialog, click Unlink.
2
Confirm
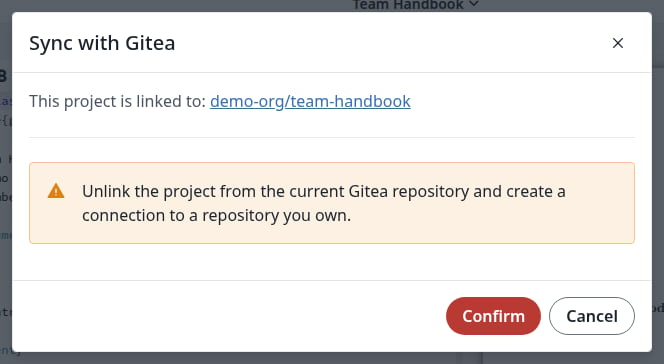
Click Confirm. This only removes the link: the connection to a repository you own, which the warning mentions, is an option you have afterwards, not something that happens now.
Confirm the unlink
3
Check the result
The dialog now shows Export Project to Gitea. The project and the repository both keep their content. To sync again, export the project to a new repository, or import the repository into a new project.
{"docsConfig":{"theme":"mint","$schema":"https://mintlify.com/docs.json","name":"Ayakaleaf Pro","description":"Overleaf Community Edition enhanced with all Pro features: open source, free to use, self-hostable.","colors":{"primary":"#0E0E0E","light":"#D4A27F","dark":"#0E0E0E"},"logo":{"light":"https://mintcdn.com/ayakaleaf-pro/JetHeEeglWIIXNds/logo/light.png?fit=max\u0026auto=format\u0026n=JetHeEeglWIIXNds\u0026q=85\u0026s=7f1abd8dcc74dd3b7cdafac9e6e82092","dark":"https://mintcdn.com/ayakaleaf-pro/JetHeEeglWIIXNds/logo/dark.png?fit=max\u0026auto=format\u0026n=JetHeEeglWIIXNds\u0026q=85\u0026s=4e369d29a8c5a6cd8b4b7697ddb1f7e2","href":"/"},"favicon":"https://mintcdn.com/ayakaleaf-pro/x9kfDjtWlyyhG_mR/favicon.png?fit=max\u0026auto=format\u0026n=x9kfDjtWlyyhG_mR\u0026q=85\u0026s=832c6bfafce5eb69ebc83783083a4a85","background":{"color":{"light":"#FDFDF7","dark":"#09090B"}},"navbar":{"links":[{"href":"https://github.com/ayaka-notes/ayakaleaf-pro-playground","label":"Playground"},{"href":"https://github.com/orgs/ayaka-notes/packages/container/package/overleaf-pro","label":"Docker Image"},{"href":"https://github.com/ayaka-notes/texlive-full","label":"TeXLive Full"}],"primary":{"type":"button","label":"Open GitHub","href":"https://github.com/ayaka-notes/ayakaleaf-pro"}},"footer":{"socials":{"github":"https://github.com/ayaka-notes"}},"styling":{"latex":true},"contextual":{"options":["copy","view","chatgpt","claude","perplexity","mcp","cursor","vscode","assistant","download-pdf","download-spec"],"display":"header"},"metadata":{"timestamp":true},"navigation":{"languages":[{"language":"en","default":true,"href":""},{"language":"zh-CN","href":"zh-CN"},{"language":"zh-TW","href":"zh-TW"},{"language":"ja","href":"ja"},{"language":"de","href":"de"},{"language":"fr","href":"fr"},{"language":"es","href":"es"},{"language":"it","href":"it"},{"language":"ko","href":"ko"},{"language":"ru","href":"ru"},{"language":"nl","href":"nl"},{"language":"pt","href":"pt"},{"language":"tr","href":"tr"},{"language":"uk","href":"uk"},{"language":"pl","href":"pl"},{"language":"cs","href":"cs"},{"language":"sv","href":"sv"},{"language":"fi","href":"fi"},{"language":"ar","href":"ar"},{"language":"vi","href":"vi"},{"language":"no","href":"no"},{"language":"da","href":"da"},{"language":"id","href":"id"},{"language":"zh-Hans","href":"zh-Hans"},{"language":"zh-Hant","href":"zh-Hant"}]}},"deployment":{"deploymentMetadataValue":{"subdomain":"ayakaleaf-pro","hasAudioNarration":false,"actualSubdomain":"ayakaleaf-pro","customDomains":[],"gitSource":{"type":"github","owner":"ayaka-notes","repo":"docs","deployBranch":"main","contentDirectory":"","isPrivate":false,"mountPath":"","label":""},"feedback":{"thumbs":true},"entitlements":{"AI_CHAT":{"status":"ENABLED"},"WEB_MCP":{"status":"ENABLED"},"NARRATION":{"status":"ENABLED"}},"buildId":"6aee957818cb0ff786610e20","clientVersion":"0.0.4076","searchFilterCounts":[{"language":"en","tag":"On-Premises","count":138},{"language":"ar","tag":"الاستضافة المحلية","count":101},{"language":"cs","tag":"On-Premises","count":101},{"language":"da","tag":"On-premises","count":101},{"language":"de","tag":"On-Premises","count":101},{"language":"es","tag":"Local","count":101},{"language":"fi","tag":"Paikallinen asennus","count":101},{"language":"fr","tag":"Sur site","count":101},{"language":"id","tag":"On-Premises","count":101},{"language":"it","tag":"On-premise","count":101},{"language":"ja","tag":"オンプレミス","count":101},{"language":"ko","tag":"온프레미스","count":101},{"language":"nl","tag":"On-premises","count":101},{"language":"no","tag":"Lokal drift","count":101},{"language":"pl","tag":"On-Premises","count":101},{"language":"pt","tag":"On-Premises","count":101},{"language":"ru","tag":"Локальное развертывание","count":101},{"language":"sv","tag":"On-Premises","count":101},{"language":"tr","tag":"Şirket İçi Kurulum","count":101},{"language":"uk","tag":"Локальне розгортання","count":101},{"language":"vi","tag":"Tự triển khai (On-Premises)","count":101},{"language":"zh-CN","tag":"本地部署","count":101},{"language":"zh-Hans","tag":"本地部署","count":101},{"language":"zh-Hant","tag":"本地部署","count":101},{"language":"zh-TW","tag":"本地部署","count":101},{"language":"ar","tag":"الإعداد","count":60},{"language":"en","tag":"Configuration","count":60},{"language":"cs","tag":"Konfigurace","count":60},{"language":"da","tag":"Konfiguration","count":60},{"language":"de","tag":"Konfiguration","count":60},{"language":"es","tag":"Configuración","count":60},{"language":"fi","tag":"Määritys","count":60},{"language":"fr","tag":"Configuration","count":60},{"language":"id","tag":"Konfigurasi","count":60},{"language":"it","tag":"Configurazione","count":60},{"language":"ja","tag":"設定","count":60},{"language":"ko","tag":"구성","count":60},{"language":"nl","tag":"Configuratie","count":60},{"language":"no","tag":"Konfigurasjon","count":60},{"language":"pl","tag":"Konfiguracja","count":60},{"language":"pt","tag":"Configuração","count":60},{"language":"ru","tag":"Настройка","count":60},{"language":"sv","tag":"Konfiguration","count":60},{"language":"tr","tag":"Yapılandırma","count":60},{"language":"uk","tag":"Конфігурація","count":60},{"language":"vi","tag":"Cấu hình","count":60},{"language":"zh-CN","tag":"配置","count":60},{"language":"zh-Hans","tag":"配置","count":60},{"language":"zh-Hant","tag":"設定","count":60},{"language":"zh-TW","tag":"設定","count":60},{"language":"en","tag":"Installation","count":35},{"language":"ar","tag":"Ayakaleaf Toolkit","count":31},{"language":"en","tag":"Docker Compose","count":31},{"language":"cs","tag":"Ayakaleaf Toolkit","count":31},{"language":"da","tag":"Ayakaleaf Toolkit","count":31},{"language":"de","tag":"Ayakaleaf Toolkit","count":31},{"language":"es","tag":"Ayakaleaf Toolkit","count":31},{"language":"fi","tag":"Ayakaleaf Toolkit","count":31},{"language":"fr","tag":"Ayakaleaf Toolkit","count":31},{"language":"id","tag":"Ayakaleaf Toolkit","count":31},{"language":"it","tag":"Ayakaleaf Toolkit","count":31},{"language":"ja","tag":"Ayakaleaf Toolkit","count":31},{"language":"ko","tag":"Ayakaleaf Toolkit","count":31},{"language":"nl","tag":"Ayakaleaf Toolkit","count":31},{"language":"no","tag":"Ayakaleaf Toolkit","count":31},{"language":"pl","tag":"Ayakaleaf Toolkit","count":31},{"language":"pt","tag":"Ayakaleaf Toolkit","count":31},{"language":"ru","tag":"Ayakaleaf Toolkit","count":31},{"language":"sv","tag":"Ayakaleaf Toolkit","count":31},{"language":"tr","tag":"Ayakaleaf Toolkit","count":31},{"language":"uk","tag":"Ayakaleaf Toolkit","count":31},{"language":"vi","tag":"Ayakaleaf Toolkit","count":31},{"language":"zh-CN","tag":"Ayakaleaf Toolkit","count":31},{"language":"zh-Hans","tag":"Ayakaleaf Toolkit","count":31},{"language":"zh-Hant","tag":"Ayakaleaf Toolkit","count":31},{"language":"zh-TW","tag":"Ayakaleaf Toolkit","count":31},{"language":"ar","tag":"Kubernetes","count":29},{"language":"en","tag":"Kubernetes","count":29},{"language":"cs","tag":"Kubernetes","count":29},{"language":"da","tag":"Kubernetes","count":29},{"language":"de","tag":"Kubernetes","count":29},{"language":"es","tag":"Kubernetes","count":29},{"language":"fi","tag":"Kubernetes","count":29},{"language":"fr","tag":"Kubernetes","count":29},{"language":"id","tag":"Kubernetes","count":29},{"language":"it","tag":"Kubernetes","count":29},{"language":"ja","tag":"Kubernetes","count":29},{"language":"ko","tag":"Kubernetes","count":29},{"language":"nl","tag":"Kubernetes","count":29},{"language":"no","tag":"Kubernetes","count":29},{"language":"pl","tag":"Kubernetes","count":29},{"language":"pt","tag":"Kubernetes","count":29},{"language":"ru","tag":"Kubernetes","count":29},{"language":"sv","tag":"Kubernetes","count":29},{"language":"tr","tag":"Kubernetes","count":29},{"language":"uk","tag":"Kubernetes","count":29},{"language":"vi","tag":"Kubernetes","count":29},{"language":"zh-CN","tag":"Kubernetes","count":29},{"language":"zh-Hans","tag":"Kubernetes","count":29},{"language":"zh-Hant","tag":"Kubernetes","count":29},{"language":"zh-TW","tag":"Kubernetes","count":29},{"language":"en","tag":"Using Docker Compose","count":23},{"language":"en","tag":"User guide","count":21},{"language":"ar","tag":"التكاملات","count":20},{"language":"en","tag":"Integrations","count":20},{"language":"cs","tag":"Integrace","count":20},{"language":"da","tag":"Integrationer","count":20},{"language":"de","tag":"Integrationen","count":20},{"language":"es","tag":"Integraciones","count":20},{"language":"fi","tag":"Integraatiot","count":20},{"language":"fr","tag":"Intégrations","count":20},{"language":"id","tag":"Integrasi","count":20},{"language":"it","tag":"Integrazioni","count":20},{"language":"ja","tag":"連携","count":20},{"language":"ko","tag":"통합","count":20},{"language":"nl","tag":"Integraties","count":20},{"language":"no","tag":"Integrasjoner","count":20},{"language":"pl","tag":"Integracje","count":20},{"language":"pt","tag":"Integrações","count":20},{"language":"ru","tag":"Интеграции","count":20},{"language":"sv","tag":"Integrationer","count":20},{"language":"tr","tag":"Entegrasyonlar","count":20},{"language":"uk","tag":"Інтеграції","count":20},{"language":"vi","tag":"Tích hợp","count":20},{"language":"zh-CN","tag":"集成","count":20},{"language":"zh-Hans","tag":"集成","count":20},{"language":"zh-Hant","tag":"整合","count":20},{"language":"zh-TW","tag":"整合","count":20},{"language":"ar","tag":"التثبيت","count":19},{"language":"cs","tag":"Instalace","count":19},{"language":"da","tag":"Installation","count":19},{"language":"de","tag":"Installation","count":19},{"language":"es","tag":"Instalación","count":19},{"language":"fi","tag":"Asennus","count":19},{"language":"fr","tag":"Installation","count":19},{"language":"id","tag":"Instalasi","count":19},{"language":"it","tag":"Installazione","count":19},{"language":"ja","tag":"インストール","count":19},{"language":"ko","tag":"설치","count":19},{"language":"nl","tag":"Installatie","count":19},{"language":"no","tag":"Installasjon","count":19},{"language":"pl","tag":"Instalacja","count":19},{"language":"pt","tag":"Instalação","count":19},{"language":"ru","tag":"Установка","count":19},{"language":"sv","tag":"Installation","count":19},{"language":"tr","tag":"Kurulum","count":19},{"language":"uk","tag":"Встановлення","count":19},{"language":"vi","tag":"Cài đặt","count":19},{"language":"zh-CN","tag":"安装","count":19},{"language":"zh-Hans","tag":"安装","count":19},{"language":"zh-Hant","tag":"安裝","count":19},{"language":"zh-TW","tag":"安裝","count":19},{"language":"en","tag":"For users","count":16},{"language":"ar","tag":"المصادقة","count":12},{"language":"en","tag":"Authentication","count":12},{"language":"cs","tag":"Ověřování","count":12},{"language":"da","tag":"Godkendelse","count":12},{"language":"de","tag":"Authentifizierung","count":12},{"language":"es","tag":"Autenticación","count":12},{"language":"fi","tag":"Todennus","count":12},{"language":"fr","tag":"Authentification","count":12},{"language":"id","tag":"Autentikasi","count":12},{"language":"it","tag":"Autenticazione","count":12},{"language":"ja","tag":"認証","count":12},{"language":"ko","tag":"인증","count":12},{"language":"nl","tag":"Authenticatie","count":12},{"language":"no","tag":"Autentisering","count":12},{"language":"pl","tag":"Uwierzytelnianie","count":12},{"language":"pt","tag":"Autenticação","count":12},{"language":"ru","tag":"Аутентификация","count":12},{"language":"sv","tag":"Autentisering","count":12},{"language":"tr","tag":"Kimlik Doğrulama","count":12},{"language":"uk","tag":"Автентифікація","count":12},{"language":"vi","tag":"Xác thực","count":12},{"language":"zh-CN","tag":"身份验证","count":12},{"language":"zh-Hans","tag":"身份验证","count":12},{"language":"zh-Hant","tag":"身分驗證","count":12},{"language":"zh-TW","tag":"身分驗證","count":12},{"language":"ar","tag":"المطوّرون","count":11},{"language":"cs","tag":"Vývojáři","count":11},{"language":"da","tag":"Udvikler","count":11},{"language":"de","tag":"Entwickler","count":11},{"language":"es","tag":"Desarrollador","count":11},{"language":"fi","tag":"Kehittäjä","count":11},{"language":"fr","tag":"Développeur","count":11},{"language":"id","tag":"Pengembang","count":11},{"language":"it","tag":"Sviluppatore","count":11},{"language":"ja","tag":"開発者","count":11},{"language":"ko","tag":"개발자","count":11},{"language":"nl","tag":"Ontwikkelaar","count":11},{"language":"no","tag":"Utvikler","count":11},{"language":"pl","tag":"Dla deweloperów","count":11},{"language":"pt","tag":"Desenvolvedor","count":11},{"language":"ru","tag":"Разработчикам","count":11},{"language":"sv","tag":"Utvecklare","count":11},{"language":"tr","tag":"Geliştirici","count":11},{"language":"uk","tag":"Розробникам","count":11},{"language":"vi","tag":"Nhà phát triển","count":11},{"language":"zh-CN","tag":"开发者","count":11},{"language":"zh-Hans","tag":"开发者","count":11},{"language":"zh-Hant","tag":"開發者","count":11},{"language":"zh-TW","tag":"開發者","count":11},{"language":"ar","tag":"نظرة عامة","count":9},{"language":"ar","tag":"الصيانة","count":9},{"language":"cs","tag":"Přehled","count":9},{"language":"cs","tag":"Údržba","count":9},{"language":"da","tag":"Oversigt","count":9},{"language":"da","tag":"Vedligeholdelse","count":9},{"language":"de","tag":"Überblick","count":9},{"language":"de","tag":"Wartung","count":9},{"language":"es","tag":"Descripción general","count":9},{"language":"es","tag":"Mantenimiento","count":9},{"language":"fi","tag":"Yleiskatsaus","count":9},{"language":"fi","tag":"Ylläpito","count":9},{"language":"fr","tag":"Aperçu","count":9},{"language":"fr","tag":"Maintenance","count":9},{"language":"id","tag":"Ikhtisar","count":9},{"language":"id","tag":"Pemeliharaan","count":9},{"language":"it","tag":"Panoramica","count":9},{"language":"it","tag":"Manutenzione","count":9},{"language":"ja","tag":"概要","count":9},{"language":"ja","tag":"メンテナンス","count":9},{"language":"ko","tag":"개요","count":9},{"language":"ko","tag":"유지 관리","count":9},{"language":"nl","tag":"Overzicht","count":9},{"language":"nl","tag":"Onderhoud","count":9},{"language":"no","tag":"Oversikt","count":9},{"language":"no","tag":"Vedlikehold","count":9},{"language":"pl","tag":"Przegląd","count":9},{"language":"pl","tag":"Utrzymanie","count":9},{"language":"pt","tag":"Visão geral","count":9},{"language":"pt","tag":"Manutenção","count":9},{"language":"ru","tag":"Обзор","count":9},{"language":"ru","tag":"Обслуживание","count":9},{"language":"sv","tag":"Översikt","count":9},{"language":"sv","tag":"Underhåll","count":9},{"language":"tr","tag":"Genel Bakış","count":9},{"language":"tr","tag":"Bakım","count":9},{"language":"uk","tag":"Огляд","count":9},{"language":"uk","tag":"Обслуговування","count":9},{"language":"vi","tag":"Tổng quan","count":9},{"language":"vi","tag":"Bảo trì","count":9},{"language":"zh-CN","tag":"概览","count":9},{"language":"zh-CN","tag":"维护","count":9},{"language":"zh-Hans","tag":"概览","count":9},{"language":"zh-Hans","tag":"维护","count":9},{"language":"zh-Hant","tag":"概覽","count":9},{"language":"zh-Hant","tag":"維護","count":9},{"language":"zh-TW","tag":"概覽","count":9},{"language":"zh-TW","tag":"維護","count":9}],"searchSettings":{"maxResults":6}},"assistantConfig":{"enableAskAiButton":false,"enableStarterQuestions":false,"enableContextualStarterQuestions":false,"enableAskAiSearchBar":true},"basePath":"","hasChatPermissions":true,"hasWebMcpPermissions":true,"toggles":[{"name":"kill-isr","enabled":true,"variant":{"name":"disabled","enabled":false,"feature_enabled":true},"impressionData":false},{"name":"agent-mintlify-slack","enabled":true,"variant":{"name":"disabled","enabled":false,"feature_enabled":true},"impressionData":false},{"name":"agent-integrations-settings","enabled":true,"variant":{"name":"disabled","enabled":false,"feature_enabled":true},"impressionData":false},{"name":"rbac-expansion","enabled":true,"variant":{"name":"disabled","enabled":false,"feature_enabled":true},"impressionData":false},{"name":"automations-pr-grouping","enabled":true,"variant":{"name":"disabled","enabled":false,"feature_enabled":true},"impressionData":false},{"name":"custom-prefix","enabled":true,"variant":{"name":"disabled","enabled":false,"feature_enabled":true},"impressionData":false},{"name":"analytics-v7","enabled":true,"variant":{"name":"disabled","enabled":false,"feature_enabled":true},"impressionData":false},{"name":"user-flows-analytics","enabled":true,"variant":{"name":"disabled","enabled":false,"feature_enabled":true},"impressionData":false},{"name":"no-publish-flow","enabled":true,"variant":{"name":"disabled","enabled":false,"feature_enabled":true},"impressionData":false},{"name":"workos-onboarding","enabled":true,"variant":{"name":"disabled","enabled":false,"feature_enabled":true},"impressionData":false},{"name":"llms-txt-v2","enabled":true,"variant":{"name":"disabled","enabled":false,"feature_enabled":true},"impressionData":false},{"name":"snapshot-serving-live","enabled":true,"variant":{"name":"disabled","enabled":false,"feature_enabled":true},"impressionData":false},{"name":"stripTemperatureMiddleware","enabled":true,"variant":{"name":"disabled","enabled":false,"feature_enabled":true},"impressionData":false},{"name":"support-platform-pylon-zendesk","enabled":true,"variant":{"name":"disabled","enabled":false,"feature_enabled":true},"impressionData":false},{"name":"snapshot-serving","enabled":true,"variant":{"name":"disabled","enabled":false,"feature_enabled":true},"impressionData":false},{"name":"instant-rollback","enabled":true,"variant":{"name":"disabled","enabled":false,"feature_enabled":true},"impressionData":false},{"name":"granular-notifications-server","enabled":true,"variant":{"name":"disabled","enabled":false,"feature_enabled":true},"impressionData":false},{"name":"granular-notifications","enabled":true,"variant":{"name":"disabled","enabled":false,"feature_enabled":true},"impressionData":false},{"name":"automations-fable","enabled":true,"variant":{"name":"disabled","enabled":false,"feature_enabled":true},"impressionData":false},{"name":"fixed-ai-action-pricing","enabled":true,"variant":{"name":"disabled","enabled":false,"feature_enabled":true},"impressionData":false},{"name":"automation-resolve-merge-conflict","enabled":true,"variant":{"name":"disabled","enabled":false,"feature_enabled":true},"impressionData":false},{"name":"scoped-publishing","enabled":true,"variant":{"name":"disabled","enabled":false,"feature_enabled":true},"impressionData":false},{"name":"mintql","enabled":true,"variant":{"name":"disabled","enabled":false,"feature_enabled":true},"impressionData":false},{"name":"page-level-analytics","enabled":true,"variant":{"name":"disabled","enabled":false,"feature_enabled":true},"impressionData":false},{"name":"editor-version-history-v2","enabled":true,"variant":{"name":"disabled","enabled":false,"feature_enabled":true},"impressionData":false},{"name":"billing-page-v2","enabled":true,"variant":{"name":"disabled","enabled":false,"feature_enabled":true},"impressionData":false},{"name":"full-page-search","enabled":true,"variant":{"name":"disabled","enabled":false,"feature_enabled":true},"impressionData":false},{"name":"workspace-projects","enabled":true,"variant":{"name":"disabled","enabled":false,"feature_enabled":true},"impressionData":false},{"name":"assistant-v5","enabled":true,"variant":{"name":"disabled","enabled":false,"feature_enabled":true},"impressionData":false},{"name":"fork-pr-previews","enabled":true,"variant":{"name":"disabled","enabled":false,"feature_enabled":true},"impressionData":false},{"name":"revalidation-jwt","enabled":true,"variant":{"name":"disabled","enabled":false,"feature_enabled":true},"impressionData":false},{"name":"workos-sso-scim","enabled":true,"variant":{"name":"disabled","enabled":false,"feature_enabled":true},"impressionData":false},{"name":"hobby-abuse-scan","enabled":true,"variant":{"name":"disabled","enabled":false,"feature_enabled":true},"impressionData":false},{"name":"dashboard-inbox","enabled":true,"variant":{"name":"disabled","enabled":false,"feature_enabled":true},"impressionData":false},{"name":"workos-signup","enabled":true,"variant":{"name":"disabled","enabled":false,"feature_enabled":true},"impressionData":false},{"name":"turbopuffer-dual-write","enabled":true,"variant":{"name":"disabled","enabled":false,"feature_enabled":true},"impressionData":false},{"name":"workos-enabled","enabled":true,"variant":{"name":"disabled","enabled":false,"feature_enabled":true},"impressionData":false},{"name":"approve-review-flow","enabled":true,"variant":{"name":"disabled","enabled":false,"feature_enabled":true},"impressionData":false},{"name":"editor-metadata","enabled":true,"variant":{"name":"disabled","enabled":false,"feature_enabled":true},"impressionData":false},{"name":"sso-setup-deadline-banner","enabled":true,"variant":{"name":"disabled","enabled":false,"feature_enabled":true},"impressionData":false},{"name":"turbopuffer-serve","enabled":true,"variant":{"name":"disabled","enabled":false,"feature_enabled":true},"impressionData":false},{"name":"live-agents","enabled":true,"variant":{"name":"disabled","enabled":false,"feature_enabled":true},"impressionData":false},{"name":"comment-mode","enabled":true,"variant":{"name":"disabled","enabled":false,"feature_enabled":true},"impressionData":false}],"googleFontsInlined":false},"customCss":[{"filePath":"style.css","content":"@font-face{font-family:\"Site Sans\";src:url(\"/fonts/SiteSans-Text-Regular-Static.otf\") format(\"opentype\");font-weight:400;font-style:normal;font-display:swap}@font-face{font-family:\"Site Sans\";src:url(\"/fonts/SiteSans-Text-RegularItalic-Static.otf\") format(\"opentype\");font-weight:400;font-style:italic;font-display:swap}@font-face{font-family:\"Site Sans\";src:url(\"/fonts/SiteSans-Text-Medium-Static.otf\") format(\"opentype\");font-weight:500;font-style:normal;font-display:swap}@font-face{font-family:\"Site Sans\";src:url(\"/fonts/SiteSans-Text-MediumItalic-Static.otf\") format(\"opentype\");font-weight:500;font-style:italic;font-display:swap}@font-face{font-family:\"Site Sans\";src:url(\"/fonts/SiteSans-Text-Semibold-Static.otf\") format(\"opentype\");font-weight:600;font-style:normal;font-display:swap}@font-face{font-family:\"Site Sans\";src:url(\"/fonts/SiteSans-Text-SemiboldItalic-Static.otf\") format(\"opentype\");font-weight:600;font-style:italic;font-display:swap}@font-face{font-family:\"Site Sans\";src:url(\"/fonts/SiteSans-Text-Bold-Static.otf\") format(\"opentype\");font-weight:700;font-style:normal;font-display:swap}@font-face{font-family:\"Site Sans\";src:url(\"/fonts/SiteSans-Text-BoldItalic-Static.otf\") format(\"opentype\");font-weight:700;font-style:italic;font-display:swap}@font-face{font-family:\"Site Serif Display\";src:url(\"/fonts/SiteSerif-Display-Regular-Static.otf\") format(\"opentype\");font-weight:400;font-style:normal;font-display:swap}@font-face{font-family:\"Site Serif Display\";src:url(\"/fonts/SiteSerif-Display-RegularItalic-Static.otf\") format(\"opentype\");font-weight:400;font-style:italic;font-display:swap}@font-face{font-family:\"Site Serif Display\";src:url(\"/fonts/SiteSerif-Display-Medium-Static.otf\") format(\"opentype\");font-weight:500;font-style:normal;font-display:swap}@font-face{font-family:\"Site Serif Display\";src:url(\"/fonts/SiteSerif-Display-Semibold-Static.otf\") format(\"opentype\");font-weight:600;font-style:normal;font-display:swap}@font-face{font-family:\"Site Serif Display\";src:url(\"/fonts/SiteSerif-Display-Bold-Static.otf\") format(\"opentype\");font-weight:700;font-style:normal;font-display:swap}@font-face{font-family:\"Site Serif\";src:url(\"/fonts/SiteSerif-Text-Regular-Static.otf\") format(\"opentype\");font-weight:400;font-style:normal;font-display:swap}@font-face{font-family:\"Site Serif\";src:url(\"/fonts/SiteSerif-Text-RegularItalic-Static.otf\") format(\"opentype\");font-weight:400;font-style:italic;font-display:swap}@font-face{font-family:\"Site Serif\";src:url(\"/fonts/SiteSerif-Text-Medium-Static.otf\") format(\"opentype\");font-weight:500;font-style:normal;font-display:swap}@font-face{font-family:\"Site Serif\";src:url(\"/fonts/SiteSerif-Text-MediumItalic-Static.otf\") format(\"opentype\");font-weight:500;font-style:italic;font-display:swap}@font-face{font-family:\"Site Serif\";src:url(\"/fonts/SiteSerif-Text-Semibold-Static.otf\") format(\"opentype\");font-weight:600;font-style:normal;font-display:swap}@font-face{font-family:\"Site Serif\";src:url(\"/fonts/SiteSerif-Text-SemiboldItalic-Static.otf\") format(\"opentype\");font-weight:600;font-style:italic;font-display:swap}@font-face{font-family:\"Site Serif\";src:url(\"/fonts/SiteSerif-Text-Bold-Static.otf\") format(\"opentype\");font-weight:700;font-style:normal;font-display:swap}@font-face{font-family:\"Site Serif\";src:url(\"/fonts/SiteSerif-Text-BoldItalic-Static.otf\") format(\"opentype\");font-weight:700;font-style:italic;font-display:swap}:root{--always-white: 0 0% 100%;--always-black: 0 0% 0%;--constant-book-cloth: 15 55% 80%;--constant-clay: 15 60% 85%;--constant-kraft: 25 40% 83%;--constant-manilla: 40 20% 92%;--constant-slate-000: 0 0% 100%;--constant-slate-050: 48 33.3% 97.1%;--constant-slate-100: 53 28.6% 94.5%;--constant-slate-150: 48 25% 92.2%;--constant-slate-200: 50 20.7% 88.6%;--constant-slate-250: 51 16.5% 84.5%;--constant-slate-300: 50 11.5% 79.6%;--constant-slate-350: 50 9% 73.7%;--constant-slate-400: 49 6.5% 66.9%;--constant-slate-450: 48 4.8% 59.2%;--constant-slate-500: 53 3.2% 51.4%;--constant-slate-550: 51 3.1% 43.7%;--constant-slate-600: 48 2.7% 35.9%;--constant-slate-650: 48 3.4% 29.2%;--constant-slate-700: 60 2.5% 23.3%;--constant-slate-750: 60 2.1% 18.4%;--constant-slate-800: 60 2.7% 14.5%;--constant-slate-850: 30 3.3% 11.8%;--constant-slate-900: 30 4% 9.8%;--constant-slate-950: 60 2.6% 7.6%;--constant-slate-1000: 60 3.4% 5.7%}:root:not(.dark){--accent-brand: 15 63.1% 59.6%;--accent-main-000: 15 55.6% 52.4%;--accent-main-100: 15 55.6% 52.4%;--accent-main-200: 15 63.1% 59.6%;--accent-main-900: 0 0% 0%;--accent-pro-000: 251 34.2% 33.3%;--accent-pro-100: 251 40% 45.1%;--accent-pro-200: 251 61% 72.2%;--accent-pro-900: 253 33.3% 91.8%;--accent-secondary-000: 210 73.7% 40.2%;--accent-secondary-100: 210 70.9% 51.6%;--accent-secondary-200: 210 70.9% 51.6%;--accent-secondary-900: 211 72% 90%;--bg-000: 0 0% 100%;--bg-100: 48 33.3% 97.1%;--bg-200: 53 28.6% 94.5%;--bg-300: 48 25% 92.2%;--bg-400: 50 20.7% 88.6%;--bg-500: 50 20.7% 88.6%;--border-100: 30 3.3% 11.8%;--border-200: 30 3.3% 11.8%;--border-300: 30 3.3% 11.8%;--border-400: 30 3.3% 11.8%;--danger-000: 0 61.4% 22.4%;--danger-100: 0 58.6% 34.1%;--danger-200: 0 58.6% 34.1%;--danger-900: 0 50% 95%;--oncolor-100: 0 0% 100%;--oncolor-200: 60 6.7% 97.1%;--oncolor-300: 60 6.7% 97.1%;--text-000: 60 2.6% 7.6%;--text-100: 60 2.6% 7.6%;--text-200: 60 2.5% 23.3%;--text-300: 60 2.5% 23.3%;--text-400: 51 3.1% 43.7%;--text-500: 51 3.1% 43.7%}:root.dark{--accent-brand: 15 63.1% 59.6%;--accent-main-000: 15 55.6% 52.4%;--accent-main-100: 15 63.1% 59.6%;--accent-main-200: 15 63.1% 59.6%;--accent-main-900: 0 0% 0%;--accent-pro-000: 251 84.6% 74.5%;--accent-pro-100: 251 40.2% 54.1%;--accent-pro-200: 251 40% 45.1%;--accent-pro-900: 250 25.3% 19.4%;--accent-secondary-000: 210 71.1% 62%;--accent-secondary-100: 210 70.9% 51.6%;--accent-secondary-200: 210 70.9% 51.6%;--accent-secondary-900: 210 55.9% 24.6%;--bg-000: 60 2.1% 18.4%;--bg-100: 60 2.7% 14.5%;--bg-200: 30 3.3% 11.8%;--bg-300: 60 2.6% 7.6%;--bg-400: 60 3.4% 5.7%;--bg-500: 60 3.4% 5.7%;--border-100: 51 16.5% 84.5%;--border-200: 51 16.5% 84.5%;--border-300: 51 16.5% 84.5%;--border-400: 51 16.5% 84.5%;--danger-000: 0 73.1% 66.5%;--danger-100: 0 58.6% 34.1%;--danger-200: 0 58.6% 34.1%;--danger-900: 0 23% 15.6%;--oncolor-100: 0 0% 100%;--oncolor-200: 60 6.7% 97.1%;--oncolor-300: 60 6.7% 97.1%;--text-000: 48 33.3% 97.1%;--text-100: 48 33.3% 97.1%;--text-200: 50 9% 73.7%;--text-300: 50 9% 73.7%;--text-400: 48 4.8% 59.2%;--text-500: 48 4.8% 59.2%}#home-header{font-family:\"Site Sans\", system-ui, \"Segoe UI\", Roboto, Helvetica, Arial, sans-serif;font-weight:400!important;font-size:50px;line-height:1.2;margin-bottom:1rem;color:--text-000;display:flex;align-items:baseline;justify-content:center;flex-wrap:nowrap}#localization-select-trigger>:has(img[src*=\"flags\"]){display:none}div[id^=\"localization-select-item\"]>:has(img[src*=\"flags\"]){display:none}@media (min-width: 768px){#home-header{justify-content:center}}.build-with{font-family:\"Site Sans\", system-ui, \"Segoe UI\", Roboto, Helvetica, Arial, sans-serif;letter-spacing:-0.02em}.claude-wordmark-wrapper{display:inline-flex;align-items:baseline;margin-left:10px}.claude-wordmark{height:40px;width:auto;position:relative}.dark #home-header{color:white}.description-text{color:black}.dark .description-text{color:white}.dark .claude-wordmark{filter:invert(1)}:root{--bg-color: #f0efea}.dark{--bg-color: #2b2b2b}body,input,#category-select,.dropdown-item,#table-of-contents{font-family:\"Site Sans\", system-ui, \"Segoe UI\", Roboto, Helvetica, Arial, sans-serif}.eyebrow{font-family:\"Site Sans\", system-ui, \"Segoe UI\", Roboto, Helvetica, Arial, sans-serif;text-transform:uppercase;letter-spacing:0.02rem}#content-container{font-family:\"Site Sans\", system-ui, \"Segoe UI\", Roboto, Helvetica, Arial, sans-serif}#content-container h1,#content-container h2,#content-container h3,#content-container h4,#content-container h5,#content-container h6{font-family:\"Site Serif Display\", Georgia, \"Times New Roman\", Times, serif;font-weight:400;letter-spacing:0;word-spacing:0.1em}#content-container p{font-size:1rem;line-height:1.65rem}.font-extrabold{font-weight:600!important}.wide-table{width:100%;overflow-x:auto}.wide-table table{width:175%;margin-bottom:0}#prompt-library-container{margin:4rem auto;max-width:48rem;padding-left:1.25rem;padding-right:1.25rem}.prompt-library-title{font-size:24px;text-align:center;font-weight:700;color:#1f2937}.dark .prompt-library-title{color:#e5e7eb}.prompt-library-description{margin-top:1rem;text-align:center}.main-content{margin-bottom:10rem;max-width:64rem;margin-left:auto;margin-right:auto;padding-left:1.25rem;padding-right:1.25rem}.prompt-controllers{display:flex;gap:0.5rem}.prompt-search-container{position:relative;flex:1 1 0%}.prompt-search-icon-container{display:flex;position:absolute;top:0;bottom:0;left:0;align-items:center;padding-left:0.75rem}.prompt-search-icon{margin-left:0.25rem;margin-right:0.75rem;flex:none;width:1rem;height:1rem;background-color:#6b7280;mask-image:url(https://mintlify.b-cdn.net/v6.5.1/solid/magnifying-glass.svg);mask-repeat:no-repeat;mask-position:center center}input.prompt-search-bar{display:block;height:2.5rem;padding-left:2.5rem;border-radius:0.75rem;border-width:1px;background-color:#ffffff;width:100%;color:#111827;box-shadow:0 1px 2px 0 rgba(0, 0, 0, 0.05)}.dark input.prompt-search-bar{color:#ffffff;background-color:rgb(var(--background-dark));border-color:#d1d5db1a}input.prompt-search-bar:focus{outline-color:rgb(var(--primary))}.dark input.prompt-search-bar:focus{outline-color:rgb(var(--primary-light))}.dark .prompt-search-icon{background-color:#ffffff80}#category-select{padding-left:1rem;padding-right:2.5rem;height:2.5rem;display:flex;align-items:center;border-radius:0.75rem;border-width:1px;color:#111827;background-color:#ffffff;cursor:pointer;box-shadow:0 1px 2px 0 rgba(0, 0, 0, 0.05);white-space:nowrap}.dark #category-select{background-color:rgb(var(--background-dark));border-color:#d1d5db1a;color:#ffffff}#category-select:hover{background-color:#f9fafb}.dark #category-select:hover{background-color:#ffffff0d}#category-select:focus{outline-color:rgb(var(--primary))}.dark #category-select:focus{outline-color:rgb(var(--primary-light))}#categories-dropdown{top:calc(100% + 4px);padding:0.5rem 0.5rem;display:none;position:absolute;z-index:10;border-radius:0.75rem;border-width:1px;width:100%;color:#111827;background-color:#ffffff;box-shadow:0 1px 2px 0 rgba(0, 0, 0, 0.05)}.dark #categories-dropdown{background-color:rgb(var(--background-dark));border-color:#d1d5db1a;color:#ffffff}#categories-dropdown-clickout{position:fixed;top:0;right:0;bottom:0;left:0;z-index:0}.dropdown-icon-container{display:flex;position:absolute;top:0;bottom:0;right:0;align-items:center;padding-right:0.25rem}.dropdown-icon{margin-left:0.25rem;margin-right:0.75rem;flex:none;width:0.75rem;height:0.75rem;background-color:#6b7280;mask-image:url(https://mintlify.b-cdn.net/v6.5.1/solid/caret-down.svg);mask-repeat:no-repeat;mask-position:center center}.dark .dropdown-icon{background-color:#ffffff80}#prompts-container{grid-template-columns:repeat(1, minmax(0, 1fr));gap:2rem}.dropdown-item{padding:0.25rem 0.5rem;border-radius:0.375rem;display:flex;align-items:center;cursor:pointer}.dropdown-item:hover{background-color:#f9fafb}.dark .dropdown-item:hover{background-color:#ffffff0d}.check-icon{mask-image:url(https://mintlify.b-cdn.net/v6.5.1/solid/check.svg);height:0.875rem;width:1rem;background-color:rgb(var(--primary-light));mask-repeat:no-repeat;mask-position:center center}.prompt-card{margin:-0.75rem;padding:0.75rem;display:flex;border-radius:1rem}.prompt-card:hover{background-color:#03071208}.dark .prompt-card:hover{background-color:#ffffff08}.prompt-icon-container{display:flex;flex:none;align-items:center;justify-content:center;margin-right:1.5rem;border-radius:0.75rem;height:4rem;width:4rem;background-color:#cb785c1a}.prompt-icon{height:1.5rem;width:1.5rem;background-color:rgb(var(--primary-light));mask-repeat:no-repeat;mask-position:center center}.prompt-title{color:rgb(31 41 55);font-weight:600}.dark .prompt-title{color:rgb(229 231 235)}.prompt-description{margin-top:0.25rem}#prompts-container{display:grid;margin-top:2.5rem}@media (min-width: 640px){#category-select{width:16rem}}@media (min-width: 1024px){#prompts-container{grid-template-columns:repeat(2, minmax(0, 1fr))}}.home-cards-custom{display:grid;grid-template-columns:repeat(3, 1fr);grid-template-rows:repeat(2, auto);gap:1.5rem}.home-cards-custom .card{background:transparent;border:0.5px solid hsl(var(--border-300));border-radius:12px;padding:0.25rem}@media (max-width: 1024px){.home-cards-custom{grid-template-columns:repeat(2, 1fr);grid-template-rows:repeat(3, auto)}}@media (max-width: 768px){.home-cards-custom{grid-template-columns:1fr;grid-template-rows:repeat(6, auto)}}.relative{position:relative}.flex-1{flex:1 1 0%}.mermaid{position:relative;background-color:#FDFDFB;background-image:linear-gradient(rgba(235, 219, 188, .25) 1px, transparent 1px), /* Secondary color #EBDBBC with low opacity */\n linear-gradient(90deg, rgba(235, 219, 188, .25) 1px, transparent 1px),\n linear-gradient(rgba(235, 219, 188, .1) 1px, transparent 1px),\n linear-gradient(90deg, rgba(235, 219, 188, .1) 1px, transparent 1px);background-size:20px 20px,\n 20px 20px,\n 4px 4px,\n 4px 4px;background-position:-1px -1px,\n -1px -1px,\n -1px -1px,\n -1px -1px;padding:20px;border-radius:8px;border:1px solid rgba(235, 219, 188, .4);box-shadow:0 2px 4px rgba(64, 64, 62, 0.08)}.dark .mermaid{background-color:#1a1918;background-image:linear-gradient(rgba(212, 162, 127, .15) 1px, transparent 1px), /* Tertiary color #D4A27F with low opacity */\n linear-gradient(90deg, rgba(212, 162, 127, .15) 1px, transparent 1px),\n linear-gradient(rgba(212, 162, 127, .08) 1px, transparent 1px),\n linear-gradient(90deg, rgba(212, 162, 127, .08) 1px, transparent 1px);border:1px solid rgba(102, 102, 99, .5);box-shadow:0 2px 4px rgba(0, 0, 0, 0.2)}.digest-meta{display:flex;align-items:center;justify-content:space-between;flex-wrap:wrap;gap:0.5rem 1rem;padding:0.75rem 1rem;margin:1.5rem 0 2.5rem;border:1px solid hsl(var(--border-300) / 0.15);background:hsl(var(--bg-200));font-variant-numeric:tabular-nums;font-size:0.875rem;color:hsl(var(--text-400))}#content-container .digest-meta a{color:hsl(var(--accent-main-100));font-weight:500;text-decoration:none;border-bottom:none}#content-container .digest-meta a:hover{text-decoration:underline}.digest-feature{position:relative;margin:2.5rem 0;padding:1.875rem 1.875rem 1.625rem;background:radial-gradient(circle, hsl(var(--text-000) / 0.025) 1px, transparent 1px) 0 0 / 18px 18px,\n linear-gradient(180deg, hsl(var(--constant-manilla) / 0.55), hsl(var(--constant-manilla) / 0.38));border:1px solid hsl(var(--border-300) / 0.12);box-shadow:inset 0 1px 0 hsl(var(--text-000) / 0.04),\n 0 1px 2px hsl(var(--always-black) / 0.04)}.digest-feature::before{content:\"\";position:absolute;inset:0 auto 0 0;width:4px;background:hsl(var(--accent-brand))}.dark .digest-feature{background:radial-gradient(circle, hsl(var(--text-000) / 0.02) 1px, transparent 1px) 0 0 / 18px 18px,\n linear-gradient(180deg, hsl(var(--bg-000) / 0.75), hsl(var(--bg-000) / 0.5));border-color:hsl(var(--border-300) / 0.1);box-shadow:inset 0 1px 0 hsl(var(--text-000) / 0.03),\n 0 1px 2px hsl(var(--always-black) / 0.25)}.digest-feature>:first-child{margin-top:0}.digest-feature>:last-child{margin-bottom:0}.digest-feature-header{display:flex;align-items:center;flex-wrap:wrap;gap:0.625rem;margin:0 0 0.75rem}#content-container .digest-feature-title{font-family:\"Site Serif Display\", Georgia, serif;font-size:1.75rem;line-height:1.15;font-weight:500;letter-spacing:-0.015em;color:hsl(var(--text-000));margin:0}#content-container .digest-feature-pill{font-family:ui-monospace, \"SF Mono\", Menlo, Consolas, monospace;font-size:0.75rem;line-height:1;letter-spacing:0.01em;padding:0.3rem 0.6rem;border-radius:999px;background:hsl(var(--accent-brand) / 0.12);color:hsl(var(--accent-main-000));border:1px solid hsl(var(--accent-brand) / 0.25);white-space:nowrap;transform:translateY(1px)}#content-container .digest-feature-lede{font-size:1.0625rem;line-height:1.65;color:hsl(var(--text-100));margin:0 0 1.25rem;max-width:none}#content-container .digest-feature-lede code{font-size:0.875em;padding:0.1em 0.35em}#content-container .digest-feature-try{font-size:0.875rem;color:hsl(var(--text-400));margin:1.25rem 0 0.5rem}#content-container .digest-feature .frame{margin:1rem 0;border-radius:0;padding:0}#content-container .digest-feature .frame>*{border-radius:0}#content-container .digest-feature pre,#content-container .digest-feature [class*=\"CodeBlock\"]{border-radius:0}#content-container .digest-feature-link{display:inline-flex;align-items:center;gap:0.35rem;font-size:0.875rem;font-weight:500;color:hsl(var(--accent-main-100));text-decoration:none;border-bottom:none;margin-top:0.75rem}#content-container .digest-feature-link::after{content:\"→\";transition:transform 120ms ease-out}#content-container .digest-feature-link:hover::after{transform:translateX(3px)}.digest-wins{margin:2.5rem 0;padding:1.5rem 1.75rem 1.25rem;background:hsl(var(--bg-200));border:1px solid hsl(var(--border-300) / 0.1)}.dark .digest-wins{background:hsl(var(--bg-200) / 0.6)}#content-container .digest-wins-title{font-family:\"Site Serif Display\", Georgia, serif;font-size:1.25rem;font-weight:500;color:hsl(var(--text-000));margin:0 0 0.75rem}.digest-wins-grid{display:grid;grid-template-columns:repeat(auto-fit, minmax(16rem, 1fr));column-gap:2rem}#content-container .digest-wins-grid>div{position:relative;font-size:0.875rem;line-height:1.5;color:hsl(var(--text-300));padding:0.5rem 0 0.5rem 1.125rem;border-top:1px solid hsl(var(--border-300) / 0.06);margin:0}#content-container .digest-wins-grid>div::before{content:\"+\";position:absolute;left:0;top:0.5rem;font-family:ui-monospace, \"SF Mono\", Menlo, Consolas, monospace;font-size:0.8125rem;font-weight:600;color:hsl(var(--accent-brand))}#content-container .digest-wins-grid>div:first-child,#content-container .digest-wins-grid>div:nth-child(2){border-top:none;padding-top:0}#content-container .digest-wins-grid>div:first-child::before,#content-container .digest-wins-grid>div:nth-child(2)::before{top:0}#content-container .digest-wins-grid code{font-size:0.8125rem;padding:0.1em 0.3em}:root{--toc-wrapper-max: 92rem;--toc-wrapper-pad: 2rem;--toc-col: 19rem;--toc-side: 28rem;--toc-btn-size: 1.75rem}#toc-collapse-toggle{display:none;align-items:center;justify-content:center;position:fixed;top:10rem;right:calc(\n max((100% - var(--toc-wrapper-max)) / 2, 0px) + var(--toc-wrapper-pad) +\n var(--toc-col) - var(--toc-btn-size) - 0.35rem\n );transition:right 200ms ease-out;z-index:30;width:var(--toc-btn-size);height:var(--toc-btn-size);border-radius:9999px;border:1px solid hsl(var(--border-300) / 0.15);background:hsl(var(--bg-100));color:hsl(var(--text-400));cursor:pointer}#toc-collapse-toggle:hover{background:hsl(var(--bg-300));color:hsl(var(--text-100))}#toc-collapse-toggle svg{width:14px;height:14px;fill:none;stroke:currentColor;stroke-width:2.5;stroke-linecap:round;stroke-linejoin:round}#toc-collapse-toggle .toc-glyph{display:none;stroke-width:2}@media print{#toc-collapse-toggle{display:none!important}}@media (prefers-reduced-motion: reduce){#toc-collapse-toggle{transition:none}}@media (min-width: 1280px){html:has(#table-of-contents-layout) #toc-collapse-toggle{display:flex}html.toc-collapsed #toc-collapse-toggle .toc-chevron{transform:rotate(180deg)}html.toc-collapsed #toc-collapse-toggle{right:0.5rem;width:auto;padding:0 0.5rem;gap:0.25rem}html.toc-collapsed #toc-collapse-toggle .toc-glyph{display:block}html.toc-collapsed #table-of-contents-layout{display:none!important}html.toc-collapsed #content-side-layout:has(#table-of-contents-layout){display:none!important}html.toc-collapsed #content-container:has(#table-of-contents-layout) #content-area{width:100%!important}html.toc-collapsed #content-container:has(#table-of-contents-layout) #content-area>*{max-width:calc(var(--toc-wrapper-max) - var(--toc-side))}}@media (max-width: 640px){.digest-feature{padding:1.25rem 1rem 1rem;margin:1.5rem 0}#content-container .digest-feature-title{font-size:1.375rem}.digest-wins{padding:1.25rem 1rem 1rem}.digest-wins-grid{grid-template-columns:1fr}#content-container .digest-wins-grid>div:nth-child(2){border-top:1px solid hsl(var(--border-300) / 0.06);padding-top:0.5rem}#content-container .digest-wins-grid>div:nth-child(2)::before{top:0.5rem}}img[data-component-part=\"card-image\"]{aspect-ratio:16 / 9;height:auto;object-fit:cover;object-position:top center}"},{"filePath":"button.css","content":".btn{position:relative;display:inline-flex;gap:0.5rem;align-items:center;justify-content:center;flex-shrink:0;min-width:5rem;height:2.25rem;padding:0.5rem 1rem;white-space:nowrap;font-family:Styrene;font-weight:600;border-radius:0.5rem;\u0026:active{transform:scale(0.985)}\u0026.size-xs{height:1.75rem;min-width:3.5rem;padding:0 0.5rem;border-radius:0.25rem;font-size:0.75rem;gap:0.25rem}\u0026.size-sm{height:2rem;min-width:4rem;padding:0 0.75rem;border-radius:0.375rem;font-size:0.75rem}\u0026.size-lg{height:2.75rem;min-width:6rem;padding:0 1.25rem;border-radius:0.6rem}\u0026:disabled{pointer-events:none;opacity:0.5;box-shadow:none}\u0026:focus-visible{outline:none;--tw-ring-offset-shadow: var(--tw-ring-inset) 0 0 0 var(--tw-ring-offset-width) var(--tw-ring-offset-color);--tw-ring-shadow: var(--tw-ring-inset) 0 0 0 calc(1px + var(--tw-ring-offset-width)) var(--tw-ring-color);box-shadow:var(--tw-ring-offset-shadow), var(--tw-ring-shadow)}\u0026.primary{font-weight:600;color:hsl(var(--oncolor-100));background-color:hsl(var(--accent-main-100));background-image:linear-gradient(\n to right,\n hsl(var(--accent-main-100)) 0%,\n hsl(var(--accent-main-200) / 0.5) 50%,\n hsl(var(--accent-main-200)) 100%\n );background-size:200% 100%;background-position:0% 0%;border:0.5px solid hsl(var(--border-300) / 0.25);box-shadow:inset 0 0.5px 0px rgba(255, 255, 0, 0.15),\n 0 1px 1px rgba(0, 0, 0, 0.05);text-shadow:0 1px 2px rgb(0 0 0 / 10%);transition:all 150ms cubic-bezier(0.4, 0, 0.2, 1);\u0026:hover{background-position:100% 0%;background-image:linear-gradient(\n to right,\n hsl(var(--accent-main-200)) 0%,\n hsl(var(--accent-main-200)) 100%\n )}\u0026:active{background-color:hsl(var(--accent-main-000));box-shadow:inset 0 1px 6px rgba(0, 0, 0, 0.2);transform:scale(0.985)}}\u0026.flat{font-weight:500;color:hsl(var(--oncolor-100));background-color:hsl(var(--accent-main-100));transition:background-color 150ms;\u0026:hover{background-color:hsl(var(--accent-main-200))}}\u0026.secondary{font-weight:600;color:hsl(var(--text-100) / 0.9);background-image:radial-gradient(\n ellipse at center,\n hsl(var(--bg-500) / 0.1) 50%,\n hsl(var(--bg-500) / 0.3) 100%\n );border:0.5px solid hsl(var(--border-400));transition:color 150ms, background-color 150ms;\u0026:hover{color:hsl(var(--text-000));background-color:hsl(var(--bg-500) / 0.6)}\u0026:active{background-color:hsl(var(--bg-500) / 0.5)}}\u0026.outline{font-weight:600;color:hsl(var(--text-200));background-color:transparent;border:1.5px solid currentColor;transition:color 150ms, background-color 150ms;\u0026:hover{color:hsl(var(--text-100));background-color:hsl(var(--bg-400));border-color:hsl(var(--bg-400))}}\u0026.ghost{color:hsl(var(--text-200));border-color:transparent;transition:color 150ms, background-color 150ms;\u0026:hover{color:hsl(var(--text-100));background-color:hsl(var(--bg-500) / 0.4)}\u0026:active{background-color:hsl(var(--bg-400))}}\u0026.underline{opacity:0.8;text-decoration-line:none;text-underline-offset:3px;transition:all 150ms;\u0026:hover{opacity:1;text-decoration-line:underline}\u0026:active{transform:scale(0.985)}}\u0026.danger{font-weight:600;color:hsl(var(--oncolor-100));background-color:hsl(var(--danger-100));transition:background-color 150ms;\u0026:hover{background-color:hsl(var(--danger-200))}}}"}],"page":{"pagePath":"on-premises/user-guide/users/gitea-synchronisation","slug":"/on-premises/user-guide/users/gitea-synchronisation","pageMetadata":{"title":"Gitea Synchronisation","description":"Link your Gitea account, import or export a project, sync changes both ways and unlink.","icon":"mug-hot","href":"/on-premises/user-guide/users/gitea-synchronisation"},"description":{"compiledSource":"\"use strict\";\nconst {jsx: _jsx} = arguments[0];\nconst {useMDXComponents: _provideComponents} = arguments[0];\nfunction _createMdxContent(props) {\n const _components = {\n p: \"p\",\n ..._provideComponents(),\n ...props.components\n };\n return _jsx(_components.p, {\n children: \"Link your Gitea account, import or export a project, sync changes both ways and unlink.\"\n });\n}\nfunction MDXContent(props = {}) {\n const {wrapper: MDXLayout} = {\n ..._provideComponents(),\n ...props.components\n };\n return MDXLayout ? _jsx(MDXLayout, {\n ...props,\n children: _jsx(_createMdxContent, {\n ...props\n })\n }) : _createMdxContent(props);\n}\nreturn {\n default: MDXContent\n};\n","frontmatter":{},"scope":{}},"pageType":"default","mdx":{"mdxSource":{"compiledSource":"\"use strict\";const{Fragment:_Fragment,jsx:_jsx,jsxs:_jsxs}=arguments[0];const{useMDXComponents:_provideComponents}=arguments[0];function _createMdxContent(props){const _components={a:`a`,code:`code`,li:`li`,ol:`ol`,p:`p`,pre:`pre`,span:`span`,strong:`strong`,..._provideComponents(),...props.components},{CodeBlock,Frame,Heading,Info,OptimizedImage,Step,Steps}=_components;if(!CodeBlock)_missingMdxReference(`CodeBlock`,true);if(!Frame)_missingMdxReference(`Frame`,true);if(!Heading)_missingMdxReference(`Heading`,true);if(!Info)_missingMdxReference(`Info`,true);if(!OptimizedImage)_missingMdxReference(`OptimizedImage`,true);if(!Step)_missingMdxReference(`Step`,true);if(!Steps)_missingMdxReference(`Steps`,true);return _jsxs(_Fragment,{children:[_jsxs(_components.p,{children:[`Connect a project to a Gitea repository. Changes go both ways, and only when you click `,_jsx(_components.strong,{children:`Sync`}),`: nothing syncs on its own.`]}),`\n`,_jsx(Info,{children:_jsxs(_components.p,{children:[`An administrator has to turn on `,_jsx(_components.a,{href:`/on-premises/configuration/overleaf-toolkit/integrations/gitea-synchronisation`,children:`Gitea Synchronisation`}),` first.`]})}),`\n`,_jsx(Heading,{level:`2`,id:`link-your-gitea-account`,children:`Link your Gitea account`}),`\n`,_jsx(_components.p,{children:`You do this once.`}),`\n`,_jsxs(Steps,{children:[_jsxs(Step,{title:`Open your account settings`,children:[_jsxs(_components.p,{children:[`Click `,_jsx(_components.strong,{children:`Account`}),`, then `,_jsx(_components.strong,{children:`Account settings`}),`. Under `,_jsx(_components.strong,{children:`Project synchronisation`}),`, find `,_jsx(_components.strong,{children:`Gitea`}),` and click `,_jsx(_components.strong,{children:`Link`}),`.`]}),_jsx(Frame,{caption:`Gitea in the account settings`,children:_jsx(OptimizedImage,{src:`https://mintcdn.com/ayakaleaf-pro/IsGnx0wnzqtV4hI8/images/on-premises/gitea-sync-link.png?fit=max\u0026auto=format\u0026n=IsGnx0wnzqtV4hI8\u0026q=85\u0026s=5514bcd66b524c3dde2376db09935feb`,alt:`The Gitea section of the account settings with a Link button`,\"data-og-width\":`1050`,width:`1050`,\"data-og-height\":`120`,height:`120`,\"data-path\":`images/on-premises/gitea-sync-link.png`,\"data-optimize\":`true`,\"data-opv\":`3`,srcset:`https://mintcdn.com/ayakaleaf-pro/IsGnx0wnzqtV4hI8/images/on-premises/gitea-sync-link.png?w=280\u0026fit=max\u0026auto=format\u0026n=IsGnx0wnzqtV4hI8\u0026q=85\u0026s=3080e587eadb9470e4f613e3783b7210 280w, https://mintcdn.com/ayakaleaf-pro/IsGnx0wnzqtV4hI8/images/on-premises/gitea-sync-link.png?w=560\u0026fit=max\u0026auto=format\u0026n=IsGnx0wnzqtV4hI8\u0026q=85\u0026s=9e29600cc82c13868439a43ea021a3f1 560w, https://mintcdn.com/ayakaleaf-pro/IsGnx0wnzqtV4hI8/images/on-premises/gitea-sync-link.png?w=840\u0026fit=max\u0026auto=format\u0026n=IsGnx0wnzqtV4hI8\u0026q=85\u0026s=178f4b6a47eb436b06c466b9cc903e10 840w, https://mintcdn.com/ayakaleaf-pro/IsGnx0wnzqtV4hI8/images/on-premises/gitea-sync-link.png?w=1100\u0026fit=max\u0026auto=format\u0026n=IsGnx0wnzqtV4hI8\u0026q=85\u0026s=3acdd8a740b19dab98f2f13dec00bfdc 1100w, https://mintcdn.com/ayakaleaf-pro/IsGnx0wnzqtV4hI8/images/on-premises/gitea-sync-link.png?w=1650\u0026fit=max\u0026auto=format\u0026n=IsGnx0wnzqtV4hI8\u0026q=85\u0026s=6d850f4b1eecb1ec5087434b746585d1 1650w, https://mintcdn.com/ayakaleaf-pro/IsGnx0wnzqtV4hI8/images/on-premises/gitea-sync-link.png?w=2500\u0026fit=max\u0026auto=format\u0026n=IsGnx0wnzqtV4hI8\u0026q=85\u0026s=1449daf0d4d2af571868f3feb32ea00e 2500w`})})]}),_jsx(Step,{title:`Authorize on Gitea`,children:_jsx(_components.p,{children:`Gitea opens. Sign in if you are asked to, then authorize the application.`})}),_jsxs(Step,{title:`Check the link`,children:[_jsxs(_components.p,{children:[`You are back in the account settings. A green message says your Gitea account is linked, and the button now says `,_jsx(_components.strong,{children:`Unlink`}),`.`]}),_jsx(Frame,{caption:`Your Gitea account is linked`,children:_jsx(OptimizedImage,{src:`https://mintcdn.com/ayakaleaf-pro/IsGnx0wnzqtV4hI8/images/on-premises/gitea-sync-linked.png?fit=max\u0026auto=format\u0026n=IsGnx0wnzqtV4hI8\u0026q=85\u0026s=b0eb94a11ff546a6770d4f5a8b5250de`,alt:`The Gitea section of the account settings with an Unlink button`,\"data-og-width\":`1050`,width:`1050`,\"data-og-height\":`132`,height:`132`,\"data-path\":`images/on-premises/gitea-sync-linked.png`,\"data-optimize\":`true`,\"data-opv\":`3`,srcset:`https://mintcdn.com/ayakaleaf-pro/IsGnx0wnzqtV4hI8/images/on-premises/gitea-sync-linked.png?w=280\u0026fit=max\u0026auto=format\u0026n=IsGnx0wnzqtV4hI8\u0026q=85\u0026s=34d4aca5c3866212d365d51dee7e20e1 280w, https://mintcdn.com/ayakaleaf-pro/IsGnx0wnzqtV4hI8/images/on-premises/gitea-sync-linked.png?w=560\u0026fit=max\u0026auto=format\u0026n=IsGnx0wnzqtV4hI8\u0026q=85\u0026s=caefd6f45d126ee4be7c8b192291e325 560w, https://mintcdn.com/ayakaleaf-pro/IsGnx0wnzqtV4hI8/images/on-premises/gitea-sync-linked.png?w=840\u0026fit=max\u0026auto=format\u0026n=IsGnx0wnzqtV4hI8\u0026q=85\u0026s=7294c5ebcd4b5fb0f80c872f9401f6da 840w, https://mintcdn.com/ayakaleaf-pro/IsGnx0wnzqtV4hI8/images/on-premises/gitea-sync-linked.png?w=1100\u0026fit=max\u0026auto=format\u0026n=IsGnx0wnzqtV4hI8\u0026q=85\u0026s=657202c8dfcbc9ec9d0b4554bda7e70d 1100w, https://mintcdn.com/ayakaleaf-pro/IsGnx0wnzqtV4hI8/images/on-premises/gitea-sync-linked.png?w=1650\u0026fit=max\u0026auto=format\u0026n=IsGnx0wnzqtV4hI8\u0026q=85\u0026s=68f46ac6764f888be63cb4ab13521850 1650w, https://mintcdn.com/ayakaleaf-pro/IsGnx0wnzqtV4hI8/images/on-premises/gitea-sync-linked.png?w=2500\u0026fit=max\u0026auto=format\u0026n=IsGnx0wnzqtV4hI8\u0026q=85\u0026s=de3142a94c12494e5ca4f196d6571785 2500w`})})]})]}),`\n`,_jsxs(_components.p,{children:[`If your account is not linked yet, `,_jsx(_components.strong,{children:`Import from Gitea`}),` and the `,_jsx(_components.strong,{children:`Gitea`}),` card in the editor ask you to link it first. Click `,_jsx(_components.strong,{children:`Link to your Gitea account`}),`. You also end up in the account settings, in a new tab if you started in the editor. Then go back and start again.`]}),`\n`,_jsx(Frame,{caption:`The prompt when your account is not linked`,children:_jsx(OptimizedImage,{src:`https://mintcdn.com/ayakaleaf-pro/IsGnx0wnzqtV4hI8/images/on-premises/gitea-sync-link-prompt.png?fit=max\u0026auto=format\u0026n=IsGnx0wnzqtV4hI8\u0026q=85\u0026s=b9f6e8fc7d3aa2d3328423f660de5a9c`,alt:`The Import from Gitea dialog with a Link to your Gitea account button`,\"data-og-width\":`984`,width:`984`,\"data-og-height\":`267`,height:`267`,\"data-path\":`images/on-premises/gitea-sync-link-prompt.png`,\"data-optimize\":`true`,\"data-opv\":`3`,srcset:`https://mintcdn.com/ayakaleaf-pro/IsGnx0wnzqtV4hI8/images/on-premises/gitea-sync-link-prompt.png?w=280\u0026fit=max\u0026auto=format\u0026n=IsGnx0wnzqtV4hI8\u0026q=85\u0026s=65d9b9b2a9bab59dfac04576955792dc 280w, https://mintcdn.com/ayakaleaf-pro/IsGnx0wnzqtV4hI8/images/on-premises/gitea-sync-link-prompt.png?w=560\u0026fit=max\u0026auto=format\u0026n=IsGnx0wnzqtV4hI8\u0026q=85\u0026s=492cbb08d4faff0b32f825fdfe47d841 560w, https://mintcdn.com/ayakaleaf-pro/IsGnx0wnzqtV4hI8/images/on-premises/gitea-sync-link-prompt.png?w=840\u0026fit=max\u0026auto=format\u0026n=IsGnx0wnzqtV4hI8\u0026q=85\u0026s=91e2087fe7ce9a999d029a5c040338b9 840w, https://mintcdn.com/ayakaleaf-pro/IsGnx0wnzqtV4hI8/images/on-premises/gitea-sync-link-prompt.png?w=1100\u0026fit=max\u0026auto=format\u0026n=IsGnx0wnzqtV4hI8\u0026q=85\u0026s=82b6eb2a06a06f2aaa2e66fdfeb72f02 1100w, https://mintcdn.com/ayakaleaf-pro/IsGnx0wnzqtV4hI8/images/on-premises/gitea-sync-link-prompt.png?w=1650\u0026fit=max\u0026auto=format\u0026n=IsGnx0wnzqtV4hI8\u0026q=85\u0026s=5ec59c2a1f6786d38154ea5674461257 1650w, https://mintcdn.com/ayakaleaf-pro/IsGnx0wnzqtV4hI8/images/on-premises/gitea-sync-link-prompt.png?w=2500\u0026fit=max\u0026auto=format\u0026n=IsGnx0wnzqtV4hI8\u0026q=85\u0026s=dc511ae5667e0f72c3928bdb552fc651 2500w`})}),`\n`,_jsx(Heading,{level:`2`,id:`import-a-repository`,children:`Import a repository`}),`\n`,_jsx(_components.p,{children:`This creates a new project from a Gitea repository, already linked to it.`}),`\n`,_jsxs(Steps,{children:[_jsxs(Step,{title:`Open the import dialog`,children:[_jsxs(_components.p,{children:[`On the projects page, click `,_jsx(_components.strong,{children:`New project`}),`, then `,_jsx(_components.strong,{children:`Import from Gitea`}),`.`]}),_jsx(Frame,{caption:`The New project menu`,children:_jsx(OptimizedImage,{src:`https://mintcdn.com/ayakaleaf-pro/IsGnx0wnzqtV4hI8/images/on-premises/gitea-sync-new-project-menu.png?fit=max\u0026auto=format\u0026n=IsGnx0wnzqtV4hI8\u0026q=85\u0026s=de3258081da7ec5af1083ae6c127d510`,alt:`The New project menu with Import from Gitea`,\"data-og-width\":`272`,width:`272`,\"data-og-height\":`405`,height:`405`,\"data-path\":`images/on-premises/gitea-sync-new-project-menu.png`,\"data-optimize\":`true`,\"data-opv\":`3`,srcset:`https://mintcdn.com/ayakaleaf-pro/IsGnx0wnzqtV4hI8/images/on-premises/gitea-sync-new-project-menu.png?w=280\u0026fit=max\u0026auto=format\u0026n=IsGnx0wnzqtV4hI8\u0026q=85\u0026s=9e3b26fdbedce726bf6fdbbdb5a9cfa5 280w, https://mintcdn.com/ayakaleaf-pro/IsGnx0wnzqtV4hI8/images/on-premises/gitea-sync-new-project-menu.png?w=560\u0026fit=max\u0026auto=format\u0026n=IsGnx0wnzqtV4hI8\u0026q=85\u0026s=c6159140fa4df56f1bc000b04818dcb3 560w, https://mintcdn.com/ayakaleaf-pro/IsGnx0wnzqtV4hI8/images/on-premises/gitea-sync-new-project-menu.png?w=840\u0026fit=max\u0026auto=format\u0026n=IsGnx0wnzqtV4hI8\u0026q=85\u0026s=d1b4c28c06cac2ab5b832ced070070a2 840w, https://mintcdn.com/ayakaleaf-pro/IsGnx0wnzqtV4hI8/images/on-premises/gitea-sync-new-project-menu.png?w=1100\u0026fit=max\u0026auto=format\u0026n=IsGnx0wnzqtV4hI8\u0026q=85\u0026s=2238fde644845ee3931e8929ef105db4 1100w, https://mintcdn.com/ayakaleaf-pro/IsGnx0wnzqtV4hI8/images/on-premises/gitea-sync-new-project-menu.png?w=1650\u0026fit=max\u0026auto=format\u0026n=IsGnx0wnzqtV4hI8\u0026q=85\u0026s=efca3920e3bc58bbd37a9624b6f2836b 1650w, https://mintcdn.com/ayakaleaf-pro/IsGnx0wnzqtV4hI8/images/on-premises/gitea-sync-new-project-menu.png?w=2500\u0026fit=max\u0026auto=format\u0026n=IsGnx0wnzqtV4hI8\u0026q=85\u0026s=d4c47ce4cef7d595e95d45033b856ad4 2500w`})})]}),_jsxs(Step,{title:`Choose the repository`,children:[_jsxs(_components.p,{children:[`Click `,_jsx(_components.strong,{children:`Import to Overleaf`}),` next to the repository. The list includes your repositories and those of your organizations. An empty repository is not listed: it needs at least one commit.`]}),_jsx(Frame,{caption:`Your Gitea repositories`,children:_jsx(OptimizedImage,{src:`https://mintcdn.com/ayakaleaf-pro/IsGnx0wnzqtV4hI8/images/on-premises/gitea-sync-import.png?fit=max\u0026auto=format\u0026n=IsGnx0wnzqtV4hI8\u0026q=85\u0026s=9b8c86ed6705efddab590e0e8f62892c`,alt:`The Import from Gitea dialog listing four repositories`,\"data-og-width\":`984`,width:`984`,\"data-og-height\":`503`,height:`503`,\"data-path\":`images/on-premises/gitea-sync-import.png`,\"data-optimize\":`true`,\"data-opv\":`3`,srcset:`https://mintcdn.com/ayakaleaf-pro/IsGnx0wnzqtV4hI8/images/on-premises/gitea-sync-import.png?w=280\u0026fit=max\u0026auto=format\u0026n=IsGnx0wnzqtV4hI8\u0026q=85\u0026s=e05d647e565008d36961f58e75328a80 280w, https://mintcdn.com/ayakaleaf-pro/IsGnx0wnzqtV4hI8/images/on-premises/gitea-sync-import.png?w=560\u0026fit=max\u0026auto=format\u0026n=IsGnx0wnzqtV4hI8\u0026q=85\u0026s=88e0db1bf2a072a54ec1d7e9b54747f0 560w, https://mintcdn.com/ayakaleaf-pro/IsGnx0wnzqtV4hI8/images/on-premises/gitea-sync-import.png?w=840\u0026fit=max\u0026auto=format\u0026n=IsGnx0wnzqtV4hI8\u0026q=85\u0026s=2c0320e4e80991addb7a6bdcb79d5edf 840w, https://mintcdn.com/ayakaleaf-pro/IsGnx0wnzqtV4hI8/images/on-premises/gitea-sync-import.png?w=1100\u0026fit=max\u0026auto=format\u0026n=IsGnx0wnzqtV4hI8\u0026q=85\u0026s=b296bfb25e45a37167e73eb81a55eac4 1100w, https://mintcdn.com/ayakaleaf-pro/IsGnx0wnzqtV4hI8/images/on-premises/gitea-sync-import.png?w=1650\u0026fit=max\u0026auto=format\u0026n=IsGnx0wnzqtV4hI8\u0026q=85\u0026s=d8963099d67db0ab70490abbfa9095ff 1650w, https://mintcdn.com/ayakaleaf-pro/IsGnx0wnzqtV4hI8/images/on-premises/gitea-sync-import.png?w=2500\u0026fit=max\u0026auto=format\u0026n=IsGnx0wnzqtV4hI8\u0026q=85\u0026s=14c3f40dbda4c05085d0318e77c83de1 2500w`})})]}),_jsxs(Step,{title:`Check the project`,children:[_jsx(_components.p,{children:`The new project opens with the files of the repository.`}),_jsx(Frame,{caption:`The imported project`,children:_jsx(OptimizedImage,{src:`https://mintcdn.com/ayakaleaf-pro/IsGnx0wnzqtV4hI8/images/on-premises/gitea-sync-imported.png?fit=max\u0026auto=format\u0026n=IsGnx0wnzqtV4hI8\u0026q=85\u0026s=bd72f7c7594e0f80e0966d4691598db3`,alt:`The editor showing the imported project with its files and compiled PDF`,\"data-og-width\":`1440`,width:`1440`,\"data-og-height\":`900`,height:`900`,\"data-path\":`images/on-premises/gitea-sync-imported.png`,\"data-optimize\":`true`,\"data-opv\":`3`,srcset:`https://mintcdn.com/ayakaleaf-pro/IsGnx0wnzqtV4hI8/images/on-premises/gitea-sync-imported.png?w=280\u0026fit=max\u0026auto=format\u0026n=IsGnx0wnzqtV4hI8\u0026q=85\u0026s=b5391ec505aeb11e5ab78aa42374c8ce 280w, https://mintcdn.com/ayakaleaf-pro/IsGnx0wnzqtV4hI8/images/on-premises/gitea-sync-imported.png?w=560\u0026fit=max\u0026auto=format\u0026n=IsGnx0wnzqtV4hI8\u0026q=85\u0026s=38e7539e30ee009cba61195253b2c6c7 560w, https://mintcdn.com/ayakaleaf-pro/IsGnx0wnzqtV4hI8/images/on-premises/gitea-sync-imported.png?w=840\u0026fit=max\u0026auto=format\u0026n=IsGnx0wnzqtV4hI8\u0026q=85\u0026s=96a35cc57fa76bea5e1d599301f9960d 840w, https://mintcdn.com/ayakaleaf-pro/IsGnx0wnzqtV4hI8/images/on-premises/gitea-sync-imported.png?w=1100\u0026fit=max\u0026auto=format\u0026n=IsGnx0wnzqtV4hI8\u0026q=85\u0026s=98f9ca9eddf2b6b63d83eac5e978d83e 1100w, https://mintcdn.com/ayakaleaf-pro/IsGnx0wnzqtV4hI8/images/on-premises/gitea-sync-imported.png?w=1650\u0026fit=max\u0026auto=format\u0026n=IsGnx0wnzqtV4hI8\u0026q=85\u0026s=f6520b57c6d02bed9db9f582515b9aa8 1650w, https://mintcdn.com/ayakaleaf-pro/IsGnx0wnzqtV4hI8/images/on-premises/gitea-sync-imported.png?w=2500\u0026fit=max\u0026auto=format\u0026n=IsGnx0wnzqtV4hI8\u0026q=85\u0026s=a639179bffe452b39ecfbf3f77bcae75 2500w`})})]})]}),`\n`,_jsx(Heading,{level:`2`,id:`export-a-project-to-a-new-repository`,children:`Export a project to a new repository`}),`\n`,_jsx(_components.p,{children:`This creates a repository from a project and links them. A project can only be linked this way or by importing: you cannot link it to a repository that already exists.`}),`\n`,_jsxs(Steps,{children:[_jsxs(Step,{title:`Open Gitea in the editor`,children:[_jsxs(_components.p,{children:[`Open the project. In the left bar, click `,_jsx(_components.strong,{children:`Integrations`}),`, then `,_jsx(_components.strong,{children:`Gitea`}),`.`]}),_jsx(Frame,{caption:`The Integrations panel`,children:_jsx(OptimizedImage,{src:`https://mintcdn.com/ayakaleaf-pro/IsGnx0wnzqtV4hI8/images/on-premises/gitea-sync-integrations.png?fit=max\u0026auto=format\u0026n=IsGnx0wnzqtV4hI8\u0026q=85\u0026s=12710e50eecf8f3b385565c85b4a45a4`,alt:`The Integrations panel with the Gitea card`,\"data-og-width\":`250`,width:`250`,\"data-og-height\":`395`,height:`395`,\"data-path\":`images/on-premises/gitea-sync-integrations.png`,\"data-optimize\":`true`,\"data-opv\":`3`,srcset:`https://mintcdn.com/ayakaleaf-pro/IsGnx0wnzqtV4hI8/images/on-premises/gitea-sync-integrations.png?w=280\u0026fit=max\u0026auto=format\u0026n=IsGnx0wnzqtV4hI8\u0026q=85\u0026s=94a931d89c7d72754e2772a1755c8685 280w, https://mintcdn.com/ayakaleaf-pro/IsGnx0wnzqtV4hI8/images/on-premises/gitea-sync-integrations.png?w=560\u0026fit=max\u0026auto=format\u0026n=IsGnx0wnzqtV4hI8\u0026q=85\u0026s=0d9e4af1bc7254f7fe64d859e3c1a283 560w, https://mintcdn.com/ayakaleaf-pro/IsGnx0wnzqtV4hI8/images/on-premises/gitea-sync-integrations.png?w=840\u0026fit=max\u0026auto=format\u0026n=IsGnx0wnzqtV4hI8\u0026q=85\u0026s=401e52f2066e049668d1c91c1c4f55c9 840w, https://mintcdn.com/ayakaleaf-pro/IsGnx0wnzqtV4hI8/images/on-premises/gitea-sync-integrations.png?w=1100\u0026fit=max\u0026auto=format\u0026n=IsGnx0wnzqtV4hI8\u0026q=85\u0026s=ba1e65cbb207c12c3bd41aa561cf3cb1 1100w, https://mintcdn.com/ayakaleaf-pro/IsGnx0wnzqtV4hI8/images/on-premises/gitea-sync-integrations.png?w=1650\u0026fit=max\u0026auto=format\u0026n=IsGnx0wnzqtV4hI8\u0026q=85\u0026s=c746b06c0612ac7cc0c46a77f28d85b8 1650w, https://mintcdn.com/ayakaleaf-pro/IsGnx0wnzqtV4hI8/images/on-premises/gitea-sync-integrations.png?w=2500\u0026fit=max\u0026auto=format\u0026n=IsGnx0wnzqtV4hI8\u0026q=85\u0026s=c09866b42716b711bbe105dc7602142e 2500w`})})]}),_jsxs(Step,{title:`Fill in the repository`,children:[_jsxs(_components.p,{children:[`Choose the `,_jsx(_components.strong,{children:`Owner`}),`, which can be you or one of your organizations. When you pick an organization, this field is called `,_jsx(_components.strong,{children:`Organization`}),`. `,_jsx(_components.strong,{children:`Repository Name`}),` starts as the project’s name: if that name has spaces, change it, because Gitea does not accept them. The description is optional, and `,_jsx(_components.strong,{children:`Private`}),` is selected by default. Click `,_jsx(_components.strong,{children:`Create a Gitea repository`}),`.`]}),_jsx(Frame,{caption:`Export Project to Gitea`,children:_jsx(OptimizedImage,{src:`https://mintcdn.com/ayakaleaf-pro/IsGnx0wnzqtV4hI8/images/on-premises/gitea-sync-export.png?fit=max\u0026auto=format\u0026n=IsGnx0wnzqtV4hI8\u0026q=85\u0026s=867cf2d205d151a87dd35529b4e40d56`,alt:`The Export Project to Gitea form filled in`,\"data-og-width\":`664`,width:`664`,\"data-og-height\":`614`,height:`614`,\"data-path\":`images/on-premises/gitea-sync-export.png`,\"data-optimize\":`true`,\"data-opv\":`3`,srcset:`https://mintcdn.com/ayakaleaf-pro/IsGnx0wnzqtV4hI8/images/on-premises/gitea-sync-export.png?w=280\u0026fit=max\u0026auto=format\u0026n=IsGnx0wnzqtV4hI8\u0026q=85\u0026s=97df205f9d47389acb7d1054eed970ae 280w, https://mintcdn.com/ayakaleaf-pro/IsGnx0wnzqtV4hI8/images/on-premises/gitea-sync-export.png?w=560\u0026fit=max\u0026auto=format\u0026n=IsGnx0wnzqtV4hI8\u0026q=85\u0026s=380c6c1a19e427ef47fb6be276ed8781 560w, https://mintcdn.com/ayakaleaf-pro/IsGnx0wnzqtV4hI8/images/on-premises/gitea-sync-export.png?w=840\u0026fit=max\u0026auto=format\u0026n=IsGnx0wnzqtV4hI8\u0026q=85\u0026s=30a3e3067155adbf523110dddb152d6a 840w, https://mintcdn.com/ayakaleaf-pro/IsGnx0wnzqtV4hI8/images/on-premises/gitea-sync-export.png?w=1100\u0026fit=max\u0026auto=format\u0026n=IsGnx0wnzqtV4hI8\u0026q=85\u0026s=4ff04cad4f4db6134ef06d3da4f313b2 1100w, https://mintcdn.com/ayakaleaf-pro/IsGnx0wnzqtV4hI8/images/on-premises/gitea-sync-export.png?w=1650\u0026fit=max\u0026auto=format\u0026n=IsGnx0wnzqtV4hI8\u0026q=85\u0026s=315ee9cd2d62e8f851899195a4f7bc90 1650w, https://mintcdn.com/ayakaleaf-pro/IsGnx0wnzqtV4hI8/images/on-premises/gitea-sync-export.png?w=2500\u0026fit=max\u0026auto=format\u0026n=IsGnx0wnzqtV4hI8\u0026q=85\u0026s=1c77c71e5e03af3f0cac61ccadfbf9ff 2500w`})}),_jsxs(_components.p,{children:[`If the name has spaces or is already taken, the dialog says `,_jsx(`strong`,{children:`Please check that the repository name is valid, and that you have permission to create the repository.`}),` Change the name and click the button again.`]})]}),_jsxs(Step,{title:`Check the link`,children:[_jsxs(_components.p,{children:[`The dialog now says `,_jsx(_components.strong,{children:`This project is linked to`}),` and names the repository.`]}),_jsx(Frame,{caption:`The project is linked`,children:_jsx(OptimizedImage,{src:`https://mintcdn.com/ayakaleaf-pro/IsGnx0wnzqtV4hI8/images/on-premises/gitea-sync-exported.png?fit=max\u0026auto=format\u0026n=IsGnx0wnzqtV4hI8\u0026q=85\u0026s=aa8d526d60f9733ba1885e73621ab8d6`,alt:`The Sync with Gitea dialog after the export`,\"data-og-width\":`664`,width:`664`,\"data-og-height\":`334`,height:`334`,\"data-path\":`images/on-premises/gitea-sync-exported.png`,\"data-optimize\":`true`,\"data-opv\":`3`,srcset:`https://mintcdn.com/ayakaleaf-pro/IsGnx0wnzqtV4hI8/images/on-premises/gitea-sync-exported.png?w=280\u0026fit=max\u0026auto=format\u0026n=IsGnx0wnzqtV4hI8\u0026q=85\u0026s=8b32ffb584e0f56d30fe904e25996f9d 280w, https://mintcdn.com/ayakaleaf-pro/IsGnx0wnzqtV4hI8/images/on-premises/gitea-sync-exported.png?w=560\u0026fit=max\u0026auto=format\u0026n=IsGnx0wnzqtV4hI8\u0026q=85\u0026s=892e43bbbdc6e8e7a695893a8f99ca5e 560w, https://mintcdn.com/ayakaleaf-pro/IsGnx0wnzqtV4hI8/images/on-premises/gitea-sync-exported.png?w=840\u0026fit=max\u0026auto=format\u0026n=IsGnx0wnzqtV4hI8\u0026q=85\u0026s=9f2f7daf8566a6d547d3405b439920f5 840w, https://mintcdn.com/ayakaleaf-pro/IsGnx0wnzqtV4hI8/images/on-premises/gitea-sync-exported.png?w=1100\u0026fit=max\u0026auto=format\u0026n=IsGnx0wnzqtV4hI8\u0026q=85\u0026s=9434723b40aebb22f7b6720963f452b2 1100w, https://mintcdn.com/ayakaleaf-pro/IsGnx0wnzqtV4hI8/images/on-premises/gitea-sync-exported.png?w=1650\u0026fit=max\u0026auto=format\u0026n=IsGnx0wnzqtV4hI8\u0026q=85\u0026s=5f54b4192c9983c1fe8299c1a635e3a2 1650w, https://mintcdn.com/ayakaleaf-pro/IsGnx0wnzqtV4hI8/images/on-premises/gitea-sync-exported.png?w=2500\u0026fit=max\u0026auto=format\u0026n=IsGnx0wnzqtV4hI8\u0026q=85\u0026s=3bc3f6a443406bbdcebe6814b90004e6 2500w`})})]})]}),`\n`,_jsx(Heading,{level:`2`,id:`sync`,children:`Sync`}),`\n`,_jsxs(Steps,{children:[_jsxs(Step,{title:`Open the sync dialog`,children:[_jsxs(_components.p,{children:[`Open a linked project. In the left bar, click `,_jsx(_components.strong,{children:`Integrations`}),`, then `,_jsx(_components.strong,{children:`Gitea`}),`.`]}),_jsxs(_components.p,{children:[_jsx(_components.strong,{children:`Recent commits in Gitea`}),` lists what will come into the project.`]}),_jsx(Frame,{caption:`A new commit waiting in Gitea`,children:_jsx(OptimizedImage,{src:`https://mintcdn.com/ayakaleaf-pro/IsGnx0wnzqtV4hI8/images/on-premises/gitea-sync-new-commits.png?fit=max\u0026auto=format\u0026n=IsGnx0wnzqtV4hI8\u0026q=85\u0026s=0403560179cb63a6b5d3853f4590e6a5`,alt:`The Sync with Gitea dialog listing one new commit`,\"data-og-width\":`664`,width:`664`,\"data-og-height\":`342`,height:`342`,\"data-path\":`images/on-premises/gitea-sync-new-commits.png`,\"data-optimize\":`true`,\"data-opv\":`3`,srcset:`https://mintcdn.com/ayakaleaf-pro/IsGnx0wnzqtV4hI8/images/on-premises/gitea-sync-new-commits.png?w=280\u0026fit=max\u0026auto=format\u0026n=IsGnx0wnzqtV4hI8\u0026q=85\u0026s=140b3e7a9de7f09c557cdd9fd615ecfe 280w, https://mintcdn.com/ayakaleaf-pro/IsGnx0wnzqtV4hI8/images/on-premises/gitea-sync-new-commits.png?w=560\u0026fit=max\u0026auto=format\u0026n=IsGnx0wnzqtV4hI8\u0026q=85\u0026s=82757aa44ba7d77fd528992bc2a4209c 560w, https://mintcdn.com/ayakaleaf-pro/IsGnx0wnzqtV4hI8/images/on-premises/gitea-sync-new-commits.png?w=840\u0026fit=max\u0026auto=format\u0026n=IsGnx0wnzqtV4hI8\u0026q=85\u0026s=27e8c8aff621c1003f52a12b9659844e 840w, https://mintcdn.com/ayakaleaf-pro/IsGnx0wnzqtV4hI8/images/on-premises/gitea-sync-new-commits.png?w=1100\u0026fit=max\u0026auto=format\u0026n=IsGnx0wnzqtV4hI8\u0026q=85\u0026s=759de1c62f2309c2cfe2bb2ea2d4516c 1100w, https://mintcdn.com/ayakaleaf-pro/IsGnx0wnzqtV4hI8/images/on-premises/gitea-sync-new-commits.png?w=1650\u0026fit=max\u0026auto=format\u0026n=IsGnx0wnzqtV4hI8\u0026q=85\u0026s=4577b94c951569d95ecb90c2f373ea5f 1650w, https://mintcdn.com/ayakaleaf-pro/IsGnx0wnzqtV4hI8/images/on-premises/gitea-sync-new-commits.png?w=2500\u0026fit=max\u0026auto=format\u0026n=IsGnx0wnzqtV4hI8\u0026q=85\u0026s=a1c786855ae88b6fa39be41a9235d557 2500w`})})]}),_jsxs(Step,{title:`Describe your changes`,children:[_jsxs(_components.p,{children:[`If you changed something in the project, a commit message box appears. It is optional: when you leave it empty, the commit is called `,_jsx(_components.code,{children:`Updates from Overleaf`}),`.`]}),_jsx(Frame,{caption:`The commit message for your changes`,children:_jsx(OptimizedImage,{src:`https://mintcdn.com/ayakaleaf-pro/IsGnx0wnzqtV4hI8/images/on-premises/gitea-sync-commit-message.png?fit=max\u0026auto=format\u0026n=IsGnx0wnzqtV4hI8\u0026q=85\u0026s=014cd300d4deff341310920221c63a30`,alt:`The Sync with Gitea dialog with a commit message filled in`,\"data-og-width\":`664`,width:`664`,\"data-og-height\":`485`,height:`485`,\"data-path\":`images/on-premises/gitea-sync-commit-message.png`,\"data-optimize\":`true`,\"data-opv\":`3`,srcset:`https://mintcdn.com/ayakaleaf-pro/IsGnx0wnzqtV4hI8/images/on-premises/gitea-sync-commit-message.png?w=280\u0026fit=max\u0026auto=format\u0026n=IsGnx0wnzqtV4hI8\u0026q=85\u0026s=fde00cc1d8dad5c2d4ff44e2ff3fd76a 280w, https://mintcdn.com/ayakaleaf-pro/IsGnx0wnzqtV4hI8/images/on-premises/gitea-sync-commit-message.png?w=560\u0026fit=max\u0026auto=format\u0026n=IsGnx0wnzqtV4hI8\u0026q=85\u0026s=30be24e4b9fc80c3d63f11c6b279d9c0 560w, https://mintcdn.com/ayakaleaf-pro/IsGnx0wnzqtV4hI8/images/on-premises/gitea-sync-commit-message.png?w=840\u0026fit=max\u0026auto=format\u0026n=IsGnx0wnzqtV4hI8\u0026q=85\u0026s=639930acc221c691d474611a103c7fa4 840w, https://mintcdn.com/ayakaleaf-pro/IsGnx0wnzqtV4hI8/images/on-premises/gitea-sync-commit-message.png?w=1100\u0026fit=max\u0026auto=format\u0026n=IsGnx0wnzqtV4hI8\u0026q=85\u0026s=e262627466c957bdd66247c5e1298d11 1100w, https://mintcdn.com/ayakaleaf-pro/IsGnx0wnzqtV4hI8/images/on-premises/gitea-sync-commit-message.png?w=1650\u0026fit=max\u0026auto=format\u0026n=IsGnx0wnzqtV4hI8\u0026q=85\u0026s=286c7d7c56c2e676490b49e76140a971 1650w, https://mintcdn.com/ayakaleaf-pro/IsGnx0wnzqtV4hI8/images/on-premises/gitea-sync-commit-message.png?w=2500\u0026fit=max\u0026auto=format\u0026n=IsGnx0wnzqtV4hI8\u0026q=85\u0026s=c4af3218ea07986802b5b6eb286aab36 2500w`})})]}),_jsx(Step,{title:`Click Sync`,children:_jsxs(_components.p,{children:[`Click `,_jsx(_components.strong,{children:`Sync`}),`. New commits from Gitea come into the project, and your changes go to the default branch of the repository. If both sides changed different things, they are merged for you through a pull request, which stays on Gitea as a record.`]})}),_jsxs(Step,{title:`Check the result`,children:[_jsxs(_components.p,{children:[`The dialog shows `,_jsx(`strong`,{children:`No new commits in Gitea since last merge.`}),` and the commit message box is gone. The files in the editor and the commits on Gitea are up to date.`]}),_jsx(Frame,{caption:`Everything is in sync`,children:_jsx(OptimizedImage,{src:`https://mintcdn.com/ayakaleaf-pro/IsGnx0wnzqtV4hI8/images/on-premises/gitea-sync-done.png?fit=max\u0026auto=format\u0026n=IsGnx0wnzqtV4hI8\u0026q=85\u0026s=7a53483772e17e5ad75d5ceb7f44e34e`,alt:`The Sync with Gitea dialog after syncing, with no new commits`,\"data-og-width\":`664`,width:`664`,\"data-og-height\":`334`,height:`334`,\"data-path\":`images/on-premises/gitea-sync-done.png`,\"data-optimize\":`true`,\"data-opv\":`3`,srcset:`https://mintcdn.com/ayakaleaf-pro/IsGnx0wnzqtV4hI8/images/on-premises/gitea-sync-done.png?w=280\u0026fit=max\u0026auto=format\u0026n=IsGnx0wnzqtV4hI8\u0026q=85\u0026s=92245adc1880f4f31e17b4220af27e14 280w, https://mintcdn.com/ayakaleaf-pro/IsGnx0wnzqtV4hI8/images/on-premises/gitea-sync-done.png?w=560\u0026fit=max\u0026auto=format\u0026n=IsGnx0wnzqtV4hI8\u0026q=85\u0026s=fb34087ddc7d529d98e527e0d3e203fd 560w, https://mintcdn.com/ayakaleaf-pro/IsGnx0wnzqtV4hI8/images/on-premises/gitea-sync-done.png?w=840\u0026fit=max\u0026auto=format\u0026n=IsGnx0wnzqtV4hI8\u0026q=85\u0026s=70a6c4626d12c11ad3b9601745fb7442 840w, https://mintcdn.com/ayakaleaf-pro/IsGnx0wnzqtV4hI8/images/on-premises/gitea-sync-done.png?w=1100\u0026fit=max\u0026auto=format\u0026n=IsGnx0wnzqtV4hI8\u0026q=85\u0026s=d0ffb1fe560f6360bc69e5869c078079 1100w, https://mintcdn.com/ayakaleaf-pro/IsGnx0wnzqtV4hI8/images/on-premises/gitea-sync-done.png?w=1650\u0026fit=max\u0026auto=format\u0026n=IsGnx0wnzqtV4hI8\u0026q=85\u0026s=4a58ad118c2fa6f287e11d7f32e8e213 1650w, https://mintcdn.com/ayakaleaf-pro/IsGnx0wnzqtV4hI8/images/on-premises/gitea-sync-done.png?w=2500\u0026fit=max\u0026auto=format\u0026n=IsGnx0wnzqtV4hI8\u0026q=85\u0026s=5e2b785a8c359a2671a8f32cd890e44e 2500w`})})]})]}),`\n`,_jsx(Heading,{level:`3`,id:`if-the-same-lines-changed-on-both-sides`,children:`If the same lines changed on both sides`}),`\n`,_jsxs(_components.p,{children:[`The dialog says the changes could not be merged and names a new branch, `,_jsx(_components.code,{children:`overleaf-YYYY-MM-DD-HHMMSS`}),`, which holds your changes. Overleaf also opens a pull request from that branch on Gitea.`]}),`\n`,_jsx(Frame,{caption:`A conflict`,children:_jsx(OptimizedImage,{src:`https://mintcdn.com/ayakaleaf-pro/IsGnx0wnzqtV4hI8/images/on-premises/gitea-sync-conflict.png?fit=max\u0026auto=format\u0026n=IsGnx0wnzqtV4hI8\u0026q=85\u0026s=9acaf32d0930decd2cfce516037a37b1`,alt:`The Sync with Gitea dialog with a merge conflict warning`,\"data-og-width\":`664`,width:`664`,\"data-og-height\":`355`,height:`355`,\"data-path\":`images/on-premises/gitea-sync-conflict.png`,\"data-optimize\":`true`,\"data-opv\":`3`,srcset:`https://mintcdn.com/ayakaleaf-pro/IsGnx0wnzqtV4hI8/images/on-premises/gitea-sync-conflict.png?w=280\u0026fit=max\u0026auto=format\u0026n=IsGnx0wnzqtV4hI8\u0026q=85\u0026s=ef966cebcdae6e03279a2f7f1ca1df65 280w, https://mintcdn.com/ayakaleaf-pro/IsGnx0wnzqtV4hI8/images/on-premises/gitea-sync-conflict.png?w=560\u0026fit=max\u0026auto=format\u0026n=IsGnx0wnzqtV4hI8\u0026q=85\u0026s=f5574f260a85dacd1d85464b327b24bb 560w, https://mintcdn.com/ayakaleaf-pro/IsGnx0wnzqtV4hI8/images/on-premises/gitea-sync-conflict.png?w=840\u0026fit=max\u0026auto=format\u0026n=IsGnx0wnzqtV4hI8\u0026q=85\u0026s=f310d6eabdf674a5bf444166840ced7b 840w, https://mintcdn.com/ayakaleaf-pro/IsGnx0wnzqtV4hI8/images/on-premises/gitea-sync-conflict.png?w=1100\u0026fit=max\u0026auto=format\u0026n=IsGnx0wnzqtV4hI8\u0026q=85\u0026s=04e0b5ca8d3da67fbe3011c65db68043 1100w, https://mintcdn.com/ayakaleaf-pro/IsGnx0wnzqtV4hI8/images/on-premises/gitea-sync-conflict.png?w=1650\u0026fit=max\u0026auto=format\u0026n=IsGnx0wnzqtV4hI8\u0026q=85\u0026s=bb7a5bf0a87e36ef553c66109d3d6aef 1650w, https://mintcdn.com/ayakaleaf-pro/IsGnx0wnzqtV4hI8/images/on-premises/gitea-sync-conflict.png?w=2500\u0026fit=max\u0026auto=format\u0026n=IsGnx0wnzqtV4hI8\u0026q=85\u0026s=c10207a8c7593264a6cd0742fb71849d 2500w`})}),`\n`,_jsxs(_components.ol,{children:[`\n`,_jsxs(_components.li,{children:[`\n`,_jsx(_components.p,{children:`Merge that branch into the default branch with Git, and fix the conflict. You can close the dialog in the meantime: it shows the same message when you open it again.`}),`\n`,_jsx(CodeBlock,{filename:``,numberOfLines:`7`,language:`shellscript`,children:_jsx(_components.pre,{className:`shiki shiki-themes github-light-default dark-plus`,style:{backgroundColor:`#ffffff`,\"--shiki-dark-bg\":`#0B0C0E`,color:`#1f2328`,\"--shiki-dark\":`#D4D4D4`},language:`shellscript`,children:_jsxs(_components.code,{language:`shellscript`,numberOfLines:`7`,children:[_jsxs(_components.span,{className:`line`,children:[_jsx(_components.span,{style:{color:`#953800`,\"--shiki-dark\":`#DCDCAA`},children:`git`}),_jsx(_components.span,{style:{color:`#0A3069`,\"--shiki-dark\":`#CE9178`},children:` clone`}),_jsx(_components.span,{style:{color:`#CF222E`,\"--shiki-dark\":`#D4D4D4`},children:` \u003c`}),_jsx(_components.span,{style:{color:`#0A3069`,\"--shiki-dark\":`#CE9178`},children:`repository-addres`}),_jsx(_components.span,{style:{color:`#0A3069`,\"--shiki-dark\":`#CE9178`},children:`s`}),_jsx(_components.span,{style:{color:`#CF222E`,\"--shiki-dark\":`#D4D4D4`},children:`>`})]}),`\n`,_jsxs(_components.span,{className:`line`,children:[_jsx(_components.span,{style:{color:`#0550AE`,\"--shiki-dark\":`#DCDCAA`},children:`cd`}),_jsx(_components.span,{style:{color:`#CF222E`,\"--shiki-dark\":`#D4D4D4`},children:` \u003c`}),_jsx(_components.span,{style:{color:`#0A3069`,\"--shiki-dark\":`#CE9178`},children:`repository-nam`}),_jsx(_components.span,{style:{color:`#0A3069`,\"--shiki-dark\":`#CE9178`},children:`e`}),_jsx(_components.span,{style:{color:`#CF222E`,\"--shiki-dark\":`#D4D4D4`},children:`>`})]}),`\n`,_jsxs(_components.span,{className:`line`,children:[_jsx(_components.span,{style:{color:`#953800`,\"--shiki-dark\":`#DCDCAA`},children:`git`}),_jsx(_components.span,{style:{color:`#0A3069`,\"--shiki-dark\":`#CE9178`},children:` merge`}),_jsx(_components.span,{style:{color:`#0A3069`,\"--shiki-dark\":`#CE9178`},children:` origin/overleaf-YYYY-MM-DD-HHMMSS`})]}),`\n`,_jsx(_components.span,{className:`line`,children:_jsx(_components.span,{style:{color:`#6E7781`,\"--shiki-dark\":`#6A9955`},children:`# fix the conflict in the file Git names`})}),`\n`,_jsxs(_components.span,{className:`line`,children:[_jsx(_components.span,{style:{color:`#953800`,\"--shiki-dark\":`#DCDCAA`},children:`git`}),_jsx(_components.span,{style:{color:`#0A3069`,\"--shiki-dark\":`#CE9178`},children:` add`}),_jsx(_components.span,{style:{color:`#CF222E`,\"--shiki-dark\":`#D4D4D4`},children:` \u003c`}),_jsx(_components.span,{style:{color:`#0A3069`,\"--shiki-dark\":`#CE9178`},children:`fil`}),_jsx(_components.span,{style:{color:`#0A3069`,\"--shiki-dark\":`#CE9178`},children:`e`}),_jsx(_components.span,{style:{color:`#CF222E`,\"--shiki-dark\":`#D4D4D4`},children:`>`})]}),`\n`,_jsxs(_components.span,{className:`line`,children:[_jsx(_components.span,{style:{color:`#953800`,\"--shiki-dark\":`#DCDCAA`},children:`git`}),_jsx(_components.span,{style:{color:`#0A3069`,\"--shiki-dark\":`#CE9178`},children:` commit`})]}),`\n`,_jsxs(_components.span,{className:`line`,children:[_jsx(_components.span,{style:{color:`#953800`,\"--shiki-dark\":`#DCDCAA`},children:`git`}),_jsx(_components.span,{style:{color:`#0A3069`,\"--shiki-dark\":`#CE9178`},children:` push`})]}),`\n`]})})}),`\n`]}),`\n`,_jsxs(_components.li,{children:[`\n`,_jsxs(_components.p,{children:[`Click `,_jsx(_components.strong,{children:`I have manually merged. Continue`}),`. The merged result comes into the project. If you click it before the branch is merged, the dialog stays as it is.`]}),`\n`]}),`\n`,_jsxs(_components.li,{children:[`\n`,_jsx(_components.p,{children:`The branch stays on Gitea and its pull request stays open. Close the pull request and delete the branch when you no longer need them.`}),`\n`]}),`\n`]}),`\n`,_jsxs(_components.p,{children:[`The same dialog appears when a branch protection rule holds the pull request back, for example when it needs an approval, even if no lines conflict. Once the rule allows it, merge the pull request on Gitea and click `,_jsx(_components.strong,{children:`I have manually merged. Continue`}),`. See `,_jsx(_components.a,{href:`/on-premises/configuration/overleaf-toolkit/integrations/gitea-synchronisation#how-syncing-works-with-gitea`,children:`How syncing works with Gitea`}),`.`]}),`\n`,_jsx(Heading,{level:`2`,id:`unlink-a-project`,children:`Unlink a project`}),`\n`,_jsx(_components.p,{children:`Do this when you no longer want the project to sync.`}),`\n`,_jsxs(Steps,{children:[_jsx(Step,{title:`Click Unlink`,children:_jsxs(_components.p,{children:[`In the sync dialog, click `,_jsx(_components.strong,{children:`Unlink`}),`.`]})}),_jsxs(Step,{title:`Confirm`,children:[_jsxs(_components.p,{children:[`Click `,_jsx(_components.strong,{children:`Confirm`}),`. This only removes the link: the connection to a repository you own, which the warning mentions, is an option you have afterwards, not something that happens now.`]}),_jsx(Frame,{caption:`Confirm the unlink`,children:_jsx(OptimizedImage,{src:`https://mintcdn.com/ayakaleaf-pro/IsGnx0wnzqtV4hI8/images/on-premises/gitea-sync-unlink-project.png?fit=max\u0026auto=format\u0026n=IsGnx0wnzqtV4hI8\u0026q=85\u0026s=796d5581463a481fed1772d6695430d1`,alt:`The Sync with Gitea dialog asking to confirm the unlink`,\"data-og-width\":`664`,width:`664`,\"data-og-height\":`364`,height:`364`,\"data-path\":`images/on-premises/gitea-sync-unlink-project.png`,\"data-optimize\":`true`,\"data-opv\":`3`,srcset:`https://mintcdn.com/ayakaleaf-pro/IsGnx0wnzqtV4hI8/images/on-premises/gitea-sync-unlink-project.png?w=280\u0026fit=max\u0026auto=format\u0026n=IsGnx0wnzqtV4hI8\u0026q=85\u0026s=2a3ba5c753d60341822c8c8290550d44 280w, https://mintcdn.com/ayakaleaf-pro/IsGnx0wnzqtV4hI8/images/on-premises/gitea-sync-unlink-project.png?w=560\u0026fit=max\u0026auto=format\u0026n=IsGnx0wnzqtV4hI8\u0026q=85\u0026s=adbb3d6bf433114ddc8ac2cee3d1394a 560w, https://mintcdn.com/ayakaleaf-pro/IsGnx0wnzqtV4hI8/images/on-premises/gitea-sync-unlink-project.png?w=840\u0026fit=max\u0026auto=format\u0026n=IsGnx0wnzqtV4hI8\u0026q=85\u0026s=85df0f4b0abec86e28af3999e15cebfe 840w, https://mintcdn.com/ayakaleaf-pro/IsGnx0wnzqtV4hI8/images/on-premises/gitea-sync-unlink-project.png?w=1100\u0026fit=max\u0026auto=format\u0026n=IsGnx0wnzqtV4hI8\u0026q=85\u0026s=3e8220d7964be0f75eeae31c7e74d06a 1100w, https://mintcdn.com/ayakaleaf-pro/IsGnx0wnzqtV4hI8/images/on-premises/gitea-sync-unlink-project.png?w=1650\u0026fit=max\u0026auto=format\u0026n=IsGnx0wnzqtV4hI8\u0026q=85\u0026s=17f0907b4d670c235f5a9e9d8ed05494 1650w, https://mintcdn.com/ayakaleaf-pro/IsGnx0wnzqtV4hI8/images/on-premises/gitea-sync-unlink-project.png?w=2500\u0026fit=max\u0026auto=format\u0026n=IsGnx0wnzqtV4hI8\u0026q=85\u0026s=6901454a662cc27090cfcbc00395a00b 2500w`})})]}),_jsx(Step,{title:`Check the result`,children:_jsxs(_components.p,{children:[`The dialog now shows `,_jsx(_components.strong,{children:`Export Project to Gitea`}),`. The project and the repository both keep their content. To sync again, export the project to a new repository, or import the repository into a new project.`]})})]}),`\n`,_jsx(Heading,{level:`2`,id:`unlink-your-gitea-account`,children:`Unlink your Gitea account`}),`\n`,_jsxs(_components.p,{children:[`In `,_jsx(_components.strong,{children:`Account settings`}),`, under `,_jsx(_components.strong,{children:`Gitea`}),`, click `,_jsx(_components.strong,{children:`Unlink`}),`, then `,_jsx(_components.strong,{children:`Unlink`}),` again in the dialog.`]}),`\n`,_jsx(Frame,{caption:`Unlink your account`,children:_jsx(OptimizedImage,{src:`https://mintcdn.com/ayakaleaf-pro/IsGnx0wnzqtV4hI8/images/on-premises/gitea-sync-unlink-account.png?fit=max\u0026auto=format\u0026n=IsGnx0wnzqtV4hI8\u0026q=85\u0026s=b3995614c688a587c031de666d71ce64`,alt:`The Unlink Gitea Account dialog`,\"data-og-width\":`664`,width:`664`,\"data-og-height\":`277`,height:`277`,\"data-path\":`images/on-premises/gitea-sync-unlink-account.png`,\"data-optimize\":`true`,\"data-opv\":`3`,srcset:`https://mintcdn.com/ayakaleaf-pro/IsGnx0wnzqtV4hI8/images/on-premises/gitea-sync-unlink-account.png?w=280\u0026fit=max\u0026auto=format\u0026n=IsGnx0wnzqtV4hI8\u0026q=85\u0026s=15187cc0c9a4fa008d14557334958707 280w, https://mintcdn.com/ayakaleaf-pro/IsGnx0wnzqtV4hI8/images/on-premises/gitea-sync-unlink-account.png?w=560\u0026fit=max\u0026auto=format\u0026n=IsGnx0wnzqtV4hI8\u0026q=85\u0026s=f30441cf902a2ca93ef44d0751a618c7 560w, https://mintcdn.com/ayakaleaf-pro/IsGnx0wnzqtV4hI8/images/on-premises/gitea-sync-unlink-account.png?w=840\u0026fit=max\u0026auto=format\u0026n=IsGnx0wnzqtV4hI8\u0026q=85\u0026s=771e93e2c008412633f21e836817e710 840w, https://mintcdn.com/ayakaleaf-pro/IsGnx0wnzqtV4hI8/images/on-premises/gitea-sync-unlink-account.png?w=1100\u0026fit=max\u0026auto=format\u0026n=IsGnx0wnzqtV4hI8\u0026q=85\u0026s=c9546237f470c1dba897f69f1c701251 1100w, https://mintcdn.com/ayakaleaf-pro/IsGnx0wnzqtV4hI8/images/on-premises/gitea-sync-unlink-account.png?w=1650\u0026fit=max\u0026auto=format\u0026n=IsGnx0wnzqtV4hI8\u0026q=85\u0026s=827adbb72a5d4e7effc80aec65a45870 1650w, https://mintcdn.com/ayakaleaf-pro/IsGnx0wnzqtV4hI8/images/on-premises/gitea-sync-unlink-account.png?w=2500\u0026fit=max\u0026auto=format\u0026n=IsGnx0wnzqtV4hI8\u0026q=85\u0026s=c95fd3aaee3af34c638b8b5ba0fbaa2a 2500w`})}),`\n`,_jsx(_components.p,{children:`Your projects stay linked to their repositories. You cannot sync them until you link your account again.`}),`\n`,_jsx(Info,{children:_jsxs(_components.p,{children:[`For who can do what in a shared project, see `,_jsx(_components.a,{href:`/on-premises/configuration/overleaf-toolkit/integrations/gitea-synchronisation#who-can-link-and-sync`,children:`Who can link and sync`}),`.`]})})]})}function MDXContent(props={}){const{wrapper:MDXLayout}={..._provideComponents(),...props.components};return MDXLayout?_jsx(MDXLayout,{...props,children:_jsx(_createMdxContent,{...props})}):_createMdxContent(props)}return{default:MDXContent};function _missingMdxReference(id,component){throw new Error(`Expected `+(component?`component`:`object`)+\" `\"+id+\"` to be defined: you likely forgot to import, pass, or provide it.\")}","frontmatter":{},"scope":{"config":{},"pageMetadata":{"title":"Gitea Synchronisation","description":"Link your Gitea account, import or export a project, sync changes both ways and unlink.","icon":"mug-hot","href":"/on-premises/user-guide/users/gitea-synchronisation"}}},"mdxSourceWithNoJs":null},"mdxExtracts":{"tableOfContents":[{"title":"Link your Gitea account","slug":"link-your-gitea-account","depth":2,"children":[]},{"title":"Import a repository","slug":"import-a-repository","depth":2,"children":[]},{"title":"Export a project to a new repository","slug":"export-a-project-to-a-new-repository","depth":2,"children":[]},{"title":"Sync","slug":"sync","depth":2,"children":[{"title":"If the same lines changed on both sides","slug":"if-the-same-lines-changed-on-both-sides","depth":3,"children":[]}]},{"title":"Unlink a project","slug":"unlink-a-project","depth":2,"children":[]},{"title":"Unlink your Gitea account","slug":"unlink-your-gitea-account","depth":2,"children":[]}],"codeExamples":{}},"jsLinks":[],"subdomain":"ayakaleaf-pro","siteName":"Ayakaleaf Pro","title":"Gitea Synchronisation - Ayakaleaf Pro","navMaps":{"firstHrefInVersion":{},"firstHrefInLanguage":{"en":{"href":"/on-premises/user-guide/users/gitea-synchronisation","matchLevel":0},"zh-CN":{"href":"/zh-CN","matchLevel":4},"zh-TW":{"href":"/zh-TW","matchLevel":4},"ja":{"href":"/ja","matchLevel":4},"de":{"href":"/de","matchLevel":4},"fr":{"href":"/fr","matchLevel":4},"es":{"href":"/es","matchLevel":4},"it":{"href":"/it","matchLevel":4},"ko":{"href":"/ko","matchLevel":4},"ru":{"href":"/ru","matchLevel":4},"nl":{"href":"/nl","matchLevel":4},"pt":{"href":"/pt","matchLevel":4},"tr":{"href":"/tr","matchLevel":4},"uk":{"href":"/uk","matchLevel":4},"pl":{"href":"/pl","matchLevel":4},"cs":{"href":"/cs","matchLevel":4},"sv":{"href":"/sv","matchLevel":4},"fi":{"href":"/fi","matchLevel":4},"ar":{"href":"/ar","matchLevel":4},"vi":{"href":"/vi","matchLevel":4},"no":{"href":"/no","matchLevel":4},"da":{"href":"/da","matchLevel":4},"id":{"href":"/id","matchLevel":4},"zh-Hans":{"href":"/zh-Hans","matchLevel":4},"zh-Hant":{"href":"/zh-Hant","matchLevel":4}}},"lastModified":"2026-11-07T03:05:41.654Z","gitLastModified":"2026-11-07T03:05:24.000Z","originalFileLocation":"on-premises/user-guide/users/gitea-synchronisation.mdx","locale":"en"},"headHtml":"\u003cscript data-mint-head>(function(){var d=document.documentElement,p=null;if(!p){try{p=localStorage.getItem(\"isDarkMode\")}catch(e){}if(p==='true')p='dark';else if(p==='false')p='light';if(p!=='light'\u0026\u0026p!=='dark'\u0026\u0026p!=='system')p=\"system\"}var r=p==='system'?(matchMedia(\"(prefers-color-scheme: dark)\").matches?'dark':'light'):p;d.classList.remove(r==='dark'?'light':'dark');d.classList.add(r);d.setAttribute(\"data-theme-preference\",p)})();\u003c/script>\u003cmeta data-mint-head name=\"description\" content=\"Link your Gitea account, import or export a project, sync changes both ways and unlink.\">\u003cmeta data-mint-head name=\"application-name\" content=\"Ayakaleaf Pro\">\u003cmeta data-mint-head name=\"generator\" content=\"Mintlify\">\u003clink data-mint-head rel=\"icon\" type=\"image/png\" sizes=\"192x192\" href=\"/mintlify-assets/_mintlify/favicons/ayakaleaf-pro/o_LAbiVNKQm96Y75/_generated/favicon/android-chrome-192x192.png\" media=\"(prefers-color-scheme: light)\">\u003clink data-mint-head rel=\"apple-touch-icon\" type=\"image/png\" sizes=\"180x180\" href=\"/mintlify-assets/_mintlify/favicons/ayakaleaf-pro/o_LAbiVNKQm96Y75/_generated/favicon/apple-touch-icon.png\">\u003clink data-mint-head rel=\"icon\" type=\"image/png\" sizes=\"16x16\" href=\"/mintlify-assets/_mintlify/favicons/ayakaleaf-pro/o_LAbiVNKQm96Y75/_generated/favicon/favicon-16x16.png\" media=\"(prefers-color-scheme: light)\">\u003clink data-mint-head rel=\"icon\" type=\"image/png\" sizes=\"32x32\" href=\"/mintlify-assets/_mintlify/favicons/ayakaleaf-pro/o_LAbiVNKQm96Y75/_generated/favicon/favicon-32x32.png\" media=\"(prefers-color-scheme: light)\">\u003clink data-mint-head rel=\"shortcut icon\" type=\"image/x-icon\" href=\"/mintlify-assets/_mintlify/favicons/ayakaleaf-pro/o_LAbiVNKQm96Y75/_generated/favicon/favicon.ico\" media=\"(prefers-color-scheme: light)\">\u003clink data-mint-head rel=\"icon\" type=\"image/png\" sizes=\"192x192\" href=\"/mintlify-assets/_mintlify/favicons/ayakaleaf-pro/o_LAbiVNKQm96Y75/_generated/favicon-dark/android-chrome-192x192.png\" media=\"(prefers-color-scheme: dark)\">\u003clink data-mint-head rel=\"icon\" type=\"image/png\" sizes=\"16x16\" href=\"/mintlify-assets/_mintlify/favicons/ayakaleaf-pro/o_LAbiVNKQm96Y75/_generated/favicon-dark/favicon-16x16.png\" media=\"(prefers-color-scheme: dark)\">\u003clink data-mint-head rel=\"icon\" type=\"image/png\" sizes=\"32x32\" href=\"/mintlify-assets/_mintlify/favicons/ayakaleaf-pro/o_LAbiVNKQm96Y75/_generated/favicon-dark/favicon-32x32.png\" media=\"(prefers-color-scheme: dark)\">\u003clink data-mint-head rel=\"shortcut icon\" type=\"image/x-icon\" href=\"/mintlify-assets/_mintlify/favicons/ayakaleaf-pro/o_LAbiVNKQm96Y75/_generated/favicon-dark/favicon.ico\" media=\"(prefers-color-scheme: dark)\">\u003cmeta data-mint-head property=\"og:title\" content=\"Gitea Synchronisation - Ayakaleaf Pro\">\u003cmeta data-mint-head property=\"og:description\" content=\"Link your Gitea account, import or export a project, sync changes both ways and unlink.\">\u003cmeta data-mint-head property=\"og:site_name\" content=\"Ayakaleaf Pro\">\u003cmeta data-mint-head property=\"og:url\" content=\"https://ayakaleaf-pro.mintlify.app/on-premises/user-guide/users/gitea-synchronisation\">\u003cmeta data-mint-head property=\"og:type\" content=\"website\">\u003cmeta data-mint-head property=\"og:image\" content=\"https://ayakaleaf-pro.mintlify.site/_mintlify/api/og/v2?division=For+users\u0026amp;title=Gitea+Synchronisation\u0026amp;description=Link+your+Gitea+account%2C+import+or+export+a+project%2C+sync+changes+both+ways+and+unlink.\u0026amp;theme=a852d976fde0e13c2ab73efd\u0026amp;signature=2606b9464660b71b5fef3fc79744a0ea149d8aa5064a63a66b303e69807d9ce4\">\u003cmeta data-mint-head property=\"og:image:width\" content=\"1200\">\u003cmeta data-mint-head property=\"og:image:height\" content=\"630\">\u003cmeta data-mint-head name=\"twitter:card\" content=\"summary_large_image\">\u003cmeta data-mint-head name=\"twitter:title\" content=\"Gitea Synchronisation - Ayakaleaf Pro\">\u003cmeta data-mint-head name=\"twitter:description\" content=\"Link your Gitea account, import or export a project, sync changes both ways and unlink.\">\u003cmeta data-mint-head name=\"twitter:image\" content=\"https://ayakaleaf-pro.mintlify.site/_mintlify/api/og/v2?division=For+users\u0026amp;title=Gitea+Synchronisation\u0026amp;description=Link+your+Gitea+account%2C+import+or+export+a+project%2C+sync+changes+both+ways+and+unlink.\u0026amp;theme=a852d976fde0e13c2ab73efd\u0026amp;signature=2606b9464660b71b5fef3fc79744a0ea149d8aa5064a63a66b303e69807d9ce4\">\u003cmeta data-mint-head name=\"twitter:image:width\" content=\"1200\">\u003cmeta data-mint-head name=\"twitter:image:height\" content=\"630\">\u003cmeta data-mint-head name=\"msapplication-config\" content=\"/mintlify-assets/_mintlify/favicons/ayakaleaf-pro/o_LAbiVNKQm96Y75/_generated/favicon/browserconfig.xml\">\u003cmeta data-mint-head name=\"apple-mobile-web-app-title\" content=\"Ayakaleaf Pro\">\u003cmeta data-mint-head name=\"msapplication-TileColor\" content=\"#0E0E0E\">\u003clink data-mint-head rel=\"canonical\" href=\"https://ayakaleaf-pro.mintlify.app/on-premises/user-guide/users/gitea-synchronisation\">\u003clink data-mint-head rel=\"alternate\" type=\"application/xml\" href=\"/sitemap.xml\">\u003clink data-mint-head rel=\"alternate\" type=\"text/markdown\" href=\"/on-premises/user-guide/users/gitea-synchronisation.md\">\u003cscript data-mint-head type=\"application/ld+json\">{\"@context\":\"https://schema.org\",\"@graph\":[{\"@type\":\"Organization\",\"@id\":\"https://ayakaleaf-pro.mintlify.app/#organization\",\"name\":\"Ayakaleaf Pro\",\"url\":\"https://ayakaleaf-pro.mintlify.app\",\"logo\":{\"@type\":\"ImageObject\",\"url\":\"https://mintcdn.com/ayakaleaf-pro/JetHeEeglWIIXNds/logo/light.png?fit=max\u0026auto=format\u0026n=JetHeEeglWIIXNds\u0026q=85\u0026s=7f1abd8dcc74dd3b7cdafac9e6e82092\"}},{\"@type\":\"WebSite\",\"@id\":\"https://ayakaleaf-pro.mintlify.app#website\",\"name\":\"Ayakaleaf Pro\",\"url\":\"https://ayakaleaf-pro.mintlify.app\",\"publisher\":{\"@id\":\"https://ayakaleaf-pro.mintlify.app/#organization\"}},{\"@type\":\"WebPage\",\"@id\":\"https://ayakaleaf-pro.mintlify.app/on-premises/user-guide/users/gitea-synchronisation#webpage\",\"url\":\"https://ayakaleaf-pro.mintlify.app/on-premises/user-guide/users/gitea-synchronisation\",\"name\":\"Gitea Synchronisation\",\"description\":\"Link your Gitea account, import or export a project, sync changes both ways and unlink.\",\"dateModified\":\"2026-11-07T03:05:24.000Z\",\"isPartOf\":{\"@id\":\"https://ayakaleaf-pro.mintlify.app#website\"},\"breadcrumb\":{\"@id\":\"https://ayakaleaf-pro.mintlify.app/on-premises/user-guide/users/gitea-synchronisation#breadcrumb\"}},{\"@type\":\"BreadcrumbList\",\"@id\":\"https://ayakaleaf-pro.mintlify.app/on-premises/user-guide/users/gitea-synchronisation#breadcrumb\",\"itemListElement\":[{\"@type\":\"ListItem\",\"position\":1,\"name\":\"User guide\",\"item\":\"https://ayakaleaf-pro.mintlify.app/on-premises/user-guide/administrators/onboarding\"},{\"@type\":\"ListItem\",\"position\":2,\"name\":\"For users\",\"item\":\"https://ayakaleaf-pro.mintlify.app/on-premises/user-guide/users/index\"},{\"@type\":\"ListItem\",\"position\":3,\"name\":\"Gitea Synchronisation\",\"item\":\"https://ayakaleaf-pro.mintlify.app/on-premises/user-guide/users/gitea-synchronisation\"}]},{\"@type\":[\"Article\",\"TechArticle\"],\"@id\":\"https://ayakaleaf-pro.mintlify.app/on-premises/user-guide/users/gitea-synchronisation#article\",\"headline\":\"Gitea Synchronisation\",\"name\":\"Gitea Synchronisation\",\"description\":\"Link your Gitea account, import or export a project, sync changes both ways and unlink.\",\"url\":\"https://ayakaleaf-pro.mintlify.app/on-premises/user-guide/users/gitea-synchronisation\",\"mainEntityOfPage\":{\"@id\":\"https://ayakaleaf-pro.mintlify.app/on-premises/user-guide/users/gitea-synchronisation#webpage\"},\"dateModified\":\"2026-11-07T03:05:24.000Z\",\"publisher\":{\"@id\":\"https://ayakaleaf-pro.mintlify.app/#organization\"},\"isPartOf\":{\"@id\":\"https://ayakaleaf-pro.mintlify.app#website\"}}]}\u003c/script>\u003cscript data-mint-head type=\"application/ld+json\">{\"@context\":\"https://schema.org\",\"@type\":\"WebSite\",\"name\":\"Ayakaleaf Pro\",\"creator\":{\"@type\":\"Organization\",\"name\":\"Mintlify\",\"url\":\"https://mintlify.com\"}}\u003c/script>","siteName":"Ayakaleaf Pro","nav":{"global":null,"languages":[{"language":"en","default":true,"tabs":[{"tab":"Home","icon":"house-chimney","pages":[{"title":"Home","href":""}]},{"tab":"On-Premises","icon":"server","groups":[{"group":"Overview","pages":[{"group":"Welcome","icon":"hand-wave","root":{"title":"Welcome","icon":"hand-wave","href":"/on-premises"},"pages":[{"title":"Features and Copyright","icon":"layer-plus","href":"/on-premises/readme/features-and-copyright"},{"title":"Trust and Security","icon":"https://d3gk2c5xim1je2.cloudfront.net/fontawesome/v7.2.0/brands/expeditedssl.svg","href":"/on-premises/readme/trust-and-security"},{"title":"Overleaf Server Pro vs. Ayakaleaf Pro","icon":"scale-balanced","href":"/on-premises/readme/ayakaleaf-pro-vs-server-pro"},{"title":"Question and Answer","icon":"comment-question","href":"/on-premises/readme/question-and-answer"}]},{"group":"Release notes","icon":"code-branch","root":{"title":"Release notes","icon":"code-branch","href":"/on-premises/release-notes/index"},"pages":[{"title":"Release notes 6.x.x","href":"/on-premises/release-notes/release-notes-6.x.x"}]}]},{"group":"Installation","pages":[{"title":"Introduction","icon":"map-location","href":"/on-premises/installation/introduction"},{"group":"Using Docker Compose","icon":"https://d3gk2c5xim1je2.cloudfront.net/fontawesome/v7.2.0/brands/docker.svg","root":{"title":"Using Docker Compose","icon":"https://d3gk2c5xim1je2.cloudfront.net/fontawesome/v7.2.0/brands/docker.svg","href":"/on-premises/installation/using-docker-compose/index"},"pages":[{"group":"Linux","icon":"https://d3gk2c5xim1je2.cloudfront.net/fontawesome/v7.2.0/brands/linux.svg","root":{"title":"Linux","icon":"https://d3gk2c5xim1je2.cloudfront.net/fontawesome/v7.2.0/brands/linux.svg","href":"/on-premises/installation/using-docker-compose/linux/index"},"pages":[{"title":"0. Setup Docker","icon":"https://d3gk2c5xim1je2.cloudfront.net/fontawesome/v7.2.0/brands/docker.svg","href":"/on-premises/installation/using-docker-compose/linux/0.-setup-docker"},{"title":"1. Download the Toolkit","icon":"arrow-down-to-bracket","href":"/on-premises/installation/using-docker-compose/linux/1.-download-the-toolkit"},{"title":"2. Familiarize yourself with the Toolkit","icon":"magnifying-glass","href":"/on-premises/installation/using-docker-compose/linux/2.-familiarize-yourself-with-the-toolkit"},{"title":"3. Initialize the configuration","icon":"circle-play","href":"/on-premises/installation/using-docker-compose/linux/3.-initialize-the-configuration"},{"title":"4. Get Ayakaleaf Pro Images","icon":"split","href":"/on-premises/installation/using-docker-compose/linux/4.-get-overleaf-pro-images"},{"title":"5. Personalizing your instance","icon":"square-sliders","href":"/on-premises/installation/using-docker-compose/linux/5.-personalizing-your-instance"},{"title":"6. Post-installation tasks","icon":"ballot-check","href":"/on-premises/installation/using-docker-compose/linux/6.-post-installation-tasks"}]},{"group":"macOS","icon":"https://d3gk2c5xim1je2.cloudfront.net/fontawesome/v7.2.0/brands/apple.svg","root":{"title":"macOS","icon":"https://d3gk2c5xim1je2.cloudfront.net/fontawesome/v7.2.0/brands/apple.svg","href":"/on-premises/installation/using-docker-compose/macos/index"},"pages":[{"title":"0. Setup Docker Desktop","icon":"https://d3gk2c5xim1je2.cloudfront.net/fontawesome/v7.2.0/brands/docker.svg","href":"/on-premises/installation/using-docker-compose/macos/0.-setup-docker-desktop"},{"title":"1. Download the Toolkit","icon":"arrow-down-to-bracket","href":"/on-premises/installation/using-docker-compose/macos/1.-download-the-toolkit"},{"title":"2. Familiarize yourself with the Toolkit","icon":"magnifying-glass","href":"/on-premises/installation/using-docker-compose/macos/2.-familiarize-yourself-with-the-toolkit"},{"title":"3. Initialize the configuration","icon":"circle-play","href":"/on-premises/installation/using-docker-compose/macos/3.-initialize-the-configuration"},{"title":"4. Get Ayakaleaf Pro Images","icon":"split","href":"/on-premises/installation/using-docker-compose/macos/4.-get-ayakaleaf-pro-images"},{"title":"5. Personalizing your instance","icon":"square-sliders","href":"/on-premises/installation/using-docker-compose/macos/5.-personalizing-your-instance"},{"title":"6. Post-installation tasks","icon":"ballot-check","href":"/on-premises/installation/using-docker-compose/macos/6.-post-installation-tasks"},{"title":"Troubleshooting","icon":"screwdriver-wrench","href":"/on-premises/installation/using-docker-compose/macos/troubleshooting"}]},{"group":"Windows","icon":"https://d3gk2c5xim1je2.cloudfront.net/fontawesome/v7.2.0/brands/windows.svg","root":{"title":"Windows","icon":"https://d3gk2c5xim1je2.cloudfront.net/fontawesome/v7.2.0/brands/windows.svg","href":"/on-premises/installation/using-docker-compose/windows/index"},"pages":[{"title":"0. Setup WSL 2 and Docker Desktop","icon":"https://d3gk2c5xim1je2.cloudfront.net/fontawesome/v7.2.0/brands/docker.svg","href":"/on-premises/installation/using-docker-compose/windows/0.-setup-wsl-and-docker-desktop"},{"title":"1. Download the Toolkit","icon":"arrow-down-to-bracket","href":"/on-premises/installation/using-docker-compose/windows/1.-download-the-toolkit"},{"title":"2. Familiarize yourself with the Toolkit","icon":"magnifying-glass","href":"/on-premises/installation/using-docker-compose/windows/2.-familiarize-yourself-with-the-toolkit"},{"title":"3. Initialize the configuration","icon":"circle-play","href":"/on-premises/installation/using-docker-compose/windows/3.-initialize-the-configuration"},{"title":"4. Get Ayakaleaf Pro Images","icon":"split","href":"/on-premises/installation/using-docker-compose/windows/4.-get-ayakaleaf-pro-images"},{"title":"5. Personalizing your instance","icon":"square-sliders","href":"/on-premises/installation/using-docker-compose/windows/5.-personalizing-your-instance"},{"title":"6. Post-installation tasks","icon":"ballot-check","href":"/on-premises/installation/using-docker-compose/windows/6.-post-installation-tasks"},{"title":"Troubleshooting","icon":"wrench","href":"/on-premises/installation/using-docker-compose/windows/troubleshooting"}]}]},{"group":"Using Kubernetes","icon":"dharmachakra","root":{"title":"Using Kubernetes","icon":"dharmachakra","href":"/on-premises/installation/using-kubernetes/index"},"pages":[{"title":"0. Prepare the nodes","icon":"server","href":"/on-premises/installation/using-kubernetes/0.-prepare-the-nodes"},{"title":"1. Get Ayakaleaf Pro Images","icon":"split","href":"/on-premises/installation/using-kubernetes/1.-get-ayakaleaf-pro-images"},{"title":"2. Create the namespace and secrets","icon":"key","href":"/on-premises/installation/using-kubernetes/2.-create-the-namespace-and-secrets"},{"title":"3. Deploy MongoDB and Redis","icon":"database","href":"/on-premises/installation/using-kubernetes/3.-deploy-mongodb-and-redis"},{"title":"4. Personalizing your instance","icon":"square-sliders","href":"/on-premises/installation/using-kubernetes/4.-personalizing-your-instance"},{"title":"5. Deploy Ayakaleaf Pro","icon":"rocket-launch","href":"/on-premises/installation/using-kubernetes/5.-deploy-ayakaleaf-pro"},{"title":"6. Post-installation tasks","icon":"ballot-check","href":"/on-premises/installation/using-kubernetes/6.-post-installation-tasks"}]},{"title":"Using Claude or Codex","icon":"https://d3gk2c5xim1je2.cloudfront.net/fontawesome/v7.2.0/brands/claude.svg","href":"/on-premises/installation/using-claude-or-codex"},{"title":"Using GitHub Codespace","icon":"https://d3gk2c5xim1je2.cloudfront.net/fontawesome/v7.2.0/brands/github.svg","href":"/on-premises/installation/using-the-github-codespace"},{"title":"Air-gapped/offline deployments","icon":"block-brick","href":"/on-premises/installation/air-gapped-offline-deployments"},{"title":"Migrate from Existing","icon":"u-turn-up-right","href":"/on-premises/installation/migrate-from-existing"}]},{"group":"Configuration","pages":[{"group":"Docker Compose","icon":"https://d3gk2c5xim1je2.cloudfront.net/fontawesome/v7.2.0/brands/docker.svg","root":{"title":"Docker Compose","icon":"https://d3gk2c5xim1je2.cloudfront.net/fontawesome/v7.2.0/brands/docker.svg","href":"/on-premises/configuration/overleaf-toolkit/index"},"pages":[{"title":"Files and locations","icon":"folder-open","href":"/on-premises/configuration/overleaf-toolkit/files-and-locations"},{"title":"Toolkit settings","icon":"gear-complex","href":"/on-premises/configuration/overleaf-toolkit/toolkit-settings"},{"title":"Environment variables","icon":"seedling","href":"/on-premises/configuration/overleaf-toolkit/environment-variables"},{"group":"Authentication","icon":"address-card","root":{"title":"Authentication","icon":"address-card","href":"/on-premises/configuration/overleaf-toolkit/authentication/index"},"pages":[{"title":"OIDC Authentication","icon":"id-card-clip","href":"/on-premises/configuration/overleaf-toolkit/authentication/oidc-authentication"},{"title":"SAML Authentication","icon":"key","href":"/on-premises/configuration/overleaf-toolkit/authentication/saml-authentication"},{"title":"LDAP Authentication","icon":"lock","href":"/on-premises/configuration/overleaf-toolkit/authentication/ldap-authentication"},{"title":"Public Access","icon":"lock-open","href":"/on-premises/configuration/overleaf-toolkit/authentication/public-access"},{"title":"reCAPTCHA","icon":"robot","href":"/on-premises/configuration/overleaf-toolkit/authentication/recaptcha"},{"title":"Password restrictions","icon":"key","href":"/on-premises/configuration/overleaf-toolkit/authentication/password-restrictions"}]},{"title":"Sandboxed Compiles","icon":"gear-code","href":"/on-premises/configuration/overleaf-toolkit/sandboxed-compiles"},{"title":"Pandoc Import and Export","icon":"file-lines","href":"/on-premises/configuration/overleaf-toolkit/pandoc-import-and-export"},{"group":"Integrations","icon":"puzzle-piece","root":{"title":"Integrations","icon":"puzzle-piece","href":"/on-premises/configuration/overleaf-toolkit/integrations/index"},"pages":[{"title":"Git integration","icon":"https://d3gk2c5xim1je2.cloudfront.net/fontawesome/v7.2.0/brands/git-alt.svg","href":"/on-premises/configuration/overleaf-toolkit/integrations/git-integration"},{"title":"GitHub Synchronisation","icon":"https://d3gk2c5xim1je2.cloudfront.net/fontawesome/v7.2.0/brands/github.svg","href":"/on-premises/configuration/overleaf-toolkit/integrations/github-synchronisation"},{"title":"GitLab Synchronisation","icon":"https://d3gk2c5xim1je2.cloudfront.net/fontawesome/v7.2.0/brands/gitlab.svg","href":"/on-premises/configuration/overleaf-toolkit/integrations/gitlab-synchronisation"},{"title":"Gitea Synchronisation","icon":"mug-hot","href":"/on-premises/configuration/overleaf-toolkit/integrations/gitea-synchronisation"},{"title":"Dropbox Synchronisation","icon":"https://d3gk2c5xim1je2.cloudfront.net/fontawesome/v7.2.0/brands/dropbox.svg","href":"/on-premises/configuration/overleaf-toolkit/integrations/dropbox-synchronisation"},{"title":"Zotero Integration","icon":"z","href":"/on-premises/configuration/overleaf-toolkit/integrations/zotero-integration"},{"title":"Mendeley Integration","icon":"https://d3gk2c5xim1je2.cloudfront.net/fontawesome/v7.2.0/brands/mendeley.svg","href":"/on-premises/configuration/overleaf-toolkit/integrations/mendeley-integration"},{"title":"MCP Server","icon":"plug","href":"/on-premises/configuration/overleaf-toolkit/integrations/mcp-server"},{"title":"AI Integration","icon":"https://d3gk2c5xim1je2.cloudfront.net/fontawesome/v7.2.0/brands/openai.svg","href":"/on-premises/configuration/overleaf-toolkit/integrations/ai-integration"},{"title":"Overleaf Import API","icon":"rectangle-api","href":"/on-premises/configuration/overleaf-toolkit/integrations/overleaf-import-api"}]},{"title":"Templates","icon":"paste","href":"/on-premises/configuration/overleaf-toolkit/templates"},{"title":"External URL","icon":"link","href":"/on-premises/configuration/overleaf-toolkit/external-url"},{"title":"Logging","icon":"memo-circle-info","href":"/on-premises/configuration/overleaf-toolkit/logging"},{"title":"TLS proxy","icon":"lock","href":"/on-premises/configuration/overleaf-toolkit/tls-proxy"},{"title":"Branding","icon":"copyright","href":"/on-premises/configuration/overleaf-toolkit/branding"},{"title":"Localization","icon":"globe-pointer","href":"/on-premises/configuration/overleaf-toolkit/localization"},{"title":"Email delivery","icon":"paper-plane-top","href":"/on-premises/configuration/overleaf-toolkit/email-delivery"},{"title":"Redis","icon":"memory","href":"/on-premises/configuration/overleaf-toolkit/redis"},{"title":"S3","icon":"https://d3gk2c5xim1je2.cloudfront.net/fontawesome/v7.2.0/brands/aws.svg","href":"/on-premises/configuration/overleaf-toolkit/s3"},{"title":"Adding LaTeX user help","icon":"graduation-cap","href":"/on-premises/configuration/overleaf-toolkit/adding-latex-user-help"}]},{"group":"Kubernetes","icon":"dharmachakra","root":{"title":"Kubernetes","icon":"dharmachakra","href":"/on-premises/configuration/kubernetes/index"},"pages":[{"group":"Authentication","icon":"address-card","root":{"title":"Authentication","icon":"address-card","href":"/on-premises/configuration/kubernetes/authentication/index"},"pages":[{"title":"OIDC Authentication","icon":"id-card-clip","href":"/on-premises/configuration/kubernetes/authentication/oidc-authentication"},{"title":"SAML Authentication","icon":"building-columns","href":"/on-premises/configuration/kubernetes/authentication/saml-authentication"},{"title":"LDAP Authentication","icon":"address-book","href":"/on-premises/configuration/kubernetes/authentication/ldap-authentication"},{"title":"Public Access","icon":"lock-open","href":"/on-premises/configuration/kubernetes/authentication/public-access"},{"title":"reCAPTCHA","icon":"robot","href":"/on-premises/configuration/kubernetes/authentication/recaptcha"},{"title":"Password restrictions","icon":"key","href":"/on-premises/configuration/kubernetes/authentication/password-restrictions"}]},{"title":"Sandboxed Compiles","icon":"gear-code","href":"/on-premises/configuration/kubernetes/sandboxed-compiles"},{"title":"Pandoc Import and Export","icon":"file-lines","href":"/on-premises/configuration/kubernetes/pandoc-import-and-export"},{"group":"Integrations","icon":"puzzle-piece","root":{"title":"Integrations","icon":"puzzle-piece","href":"/on-premises/configuration/kubernetes/integrations/index"},"pages":[{"title":"Git integration","icon":"code-branch","href":"/on-premises/configuration/kubernetes/integrations/git-integration"},{"title":"GitHub Synchronisation","icon":"https://d3gk2c5xim1je2.cloudfront.net/fontawesome/v7.2.0/brands/github.svg","href":"/on-premises/configuration/kubernetes/integrations/github-synchronisation"},{"title":"GitLab Synchronisation","icon":"https://d3gk2c5xim1je2.cloudfront.net/fontawesome/v7.2.0/brands/gitlab.svg","href":"/on-premises/configuration/kubernetes/integrations/gitlab-synchronisation"},{"title":"Gitea Synchronisation","icon":"mug-hot","href":"/on-premises/configuration/kubernetes/integrations/gitea-synchronisation"},{"title":"Dropbox Synchronisation","icon":"https://d3gk2c5xim1je2.cloudfront.net/fontawesome/v7.2.0/brands/dropbox.svg","href":"/on-premises/configuration/kubernetes/integrations/dropbox-synchronisation"},{"title":"Zotero Integration","icon":"z","href":"/on-premises/configuration/kubernetes/integrations/zotero-integration"},{"title":"Mendeley Integration","icon":"https://d3gk2c5xim1je2.cloudfront.net/fontawesome/v7.2.0/brands/mendeley.svg","href":"/on-premises/configuration/kubernetes/integrations/mendeley-integration"},{"title":"MCP Server","icon":"plug","href":"/on-premises/configuration/kubernetes/integrations/mcp-server"},{"title":"AI Integration","icon":"https://d3gk2c5xim1je2.cloudfront.net/fontawesome/v7.2.0/brands/openai.svg","href":"/on-premises/configuration/kubernetes/integrations/ai-integration"},{"title":"Overleaf Import API","icon":"rectangle-api","href":"/on-premises/configuration/kubernetes/integrations/overleaf-import-api"}]},{"title":"Templates","icon":"paste","href":"/on-premises/configuration/kubernetes/templates"},{"title":"External URL","icon":"link","href":"/on-premises/configuration/kubernetes/external-url"},{"title":"Logging","icon":"memo-circle-info","href":"/on-premises/configuration/kubernetes/logging"},{"title":"TLS proxy","icon":"lock","href":"/on-premises/configuration/kubernetes/tls-proxy"},{"title":"Branding","icon":"copyright","href":"/on-premises/configuration/kubernetes/branding"},{"title":"Localization","icon":"globe-pointer","href":"/on-premises/configuration/kubernetes/localization"},{"title":"Email delivery","icon":"paper-plane-top","href":"/on-premises/configuration/kubernetes/email-delivery"},{"title":"Redis","icon":"memory","href":"/on-premises/configuration/kubernetes/redis"},{"title":"S3","icon":"https://d3gk2c5xim1je2.cloudfront.net/fontawesome/v7.2.0/brands/aws.svg","href":"/on-premises/configuration/kubernetes/s3"},{"title":"Adding LaTeX user help","icon":"graduation-cap","href":"/on-premises/configuration/kubernetes/adding-latex-user-help"},{"title":"Horizontal scaling","icon":"layer-group","href":"/on-premises/configuration/kubernetes/horizontal-scaling"}]}]},{"group":"User guide","pages":[{"group":"For administrators","icon":"user-gear","root":{"title":"For administrators","icon":"user-gear","href":"/on-premises/user-guide/administrators/index"},"pages":[{"title":"Onboarding","icon":"user-plus","href":"/on-premises/user-guide/administrators/onboarding"},{"title":"Basic management","icon":"sliders","href":"/on-premises/user-guide/administrators/basic-management"},{"title":"User management","icon":"users-gear","href":"/on-premises/user-guide/administrators/user-management"},{"title":"Project management","icon":"folder-gear","href":"/on-premises/user-guide/administrators/project-management"},{"title":"Template management","icon":"paste","href":"/on-premises/user-guide/administrators/template-management"}]},{"group":"For users","icon":"users","root":{"title":"For users","icon":"users","href":"/on-premises/user-guide/users/index"},"pages":[{"title":"Git integration","icon":"https://d3gk2c5xim1je2.cloudfront.net/fontawesome/v7.2.0/brands/git-alt.svg","href":"/on-premises/user-guide/users/git-integration"},{"title":"GitHub Synchronisation","icon":"https://d3gk2c5xim1je2.cloudfront.net/fontawesome/v7.2.0/brands/github.svg","href":"/on-premises/user-guide/users/github-synchronisation"},{"title":"GitLab Synchronisation","description":"Link your GitLab account, import or export a project, sync changes both ways and unlink.","icon":"https://d3gk2c5xim1je2.cloudfront.net/fontawesome/v7.2.0/brands/gitlab.svg","href":"/on-premises/user-guide/users/gitlab-synchronisation"},{"title":"Gitea Synchronisation","icon":"mug-hot","href":"/on-premises/user-guide/users/gitea-synchronisation"},{"title":"Dropbox Synchronisation","description":"Link your Dropbox account, find your projects in Dropbox, let changes sync both ways, force a sync and unlink.","icon":"https://d3gk2c5xim1je2.cloudfront.net/fontawesome/v7.2.0/brands/dropbox.svg","href":"/on-premises/user-guide/users/dropbox-synchronisation"},{"title":"Zotero Integration","icon":"z","href":"/on-premises/user-guide/users/zotero-integration"},{"title":"Mendeley Integration","icon":"https://d3gk2c5xim1je2.cloudfront.net/fontawesome/v7.2.0/brands/mendeley.svg","href":"/on-premises/user-guide/users/mendeley-integration"},{"title":"Templates","icon":"paste","href":"/on-premises/user-guide/users/templates"},{"title":"Symbol Palette","icon":"omega","href":"/on-premises/user-guide/users/symbol-palette"},{"title":"Advanced Reference Search","icon":"magnifying-glass","href":"/on-premises/user-guide/users/advanced-reference-search"},{"title":"AI Assistant","icon":"sparkles","href":"/on-premises/user-guide/users/ai-assistant"},{"title":"Error Assistant","icon":"wand-magic-sparkles","href":"/on-premises/user-guide/users/error-assistant"},{"title":"MCP Server","icon":"plug","href":"/on-premises/user-guide/users/mcp-server"},{"title":"Python Runner","icon":"https://d3gk2c5xim1je2.cloudfront.net/fontawesome/v7.2.0/brands/python.svg","href":"/on-premises/user-guide/users/python-runner"},{"title":"Word import and export","icon":"file-word","href":"/on-premises/user-guide/users/word-import-export"},{"title":"Open in Overleaf","icon":"arrow-up-right-from-square","href":"/on-premises/user-guide/users/open-in-overleaf"}]}]},{"group":"Maintenance","pages":[{"title":"docker-compose.yml to Toolkit migration","icon":"right-left","href":"/on-premises/maintenance/docker-compose.yml-to-toolkit-migration"},{"title":"Upgrading your deployment","icon":"arrow-up-from-square","href":"/on-premises/maintenance/upgrading-your-deployment"},{"title":"Upgrading on Kubernetes","icon":"arrow-up-from-square","href":"/on-premises/maintenance/upgrading-on-kubernetes"},{"group":"Data and backups","icon":"database","root":{"title":"Data and backups","icon":"database","href":"/on-premises/maintenance/data-and-backups/index"},"pages":[{"title":"Exporting projects","icon":"file-export","href":"/on-premises/maintenance/data-and-backups/exporting-projects"}]},{"title":"Extending TeX Live","icon":"rectangle-pro","href":"/on-premises/maintenance/extending-tex-live"},{"title":"Updating TeX Live Full Images Automatically","icon":"arrows-rotate","href":"/on-premises/maintenance/updating-tex-live-full-images-automatically"},{"title":"Horizontal scaling","icon":"distribute-spacing-horizontal","href":"/on-premises/maintenance/horizontal-scaling"},{"title":"S3 migration","icon":"https://d3gk2c5xim1je2.cloudfront.net/fontawesome/v7.2.0/brands/aws.svg","href":"/on-premises/maintenance/s3-migration"},{"title":"Updating MongoDB","icon":"database","href":"/on-premises/maintenance/updating-mongodb"}]},{"group":"User and project management","pages":[{"title":"Roles and permissions","icon":"list-check","href":"/on-premises/user-and-project-management/roles-and-permissions"},{"group":"User management","icon":"users-between-lines","root":{"title":"User management","icon":"users-between-lines","href":"/on-premises/user-and-project-management/user-management/index"},"pages":[{"title":"Username migration","icon":"lock","href":"/on-premises/user-and-project-management/user-management/username-migration"},{"title":"Migrating to LDAP or SAML","icon":"rectangle-pro","href":"/on-premises/user-and-project-management/user-management/migrating-to-ldap-or-saml"}]},{"group":"Project management","icon":"rectangle-history","root":{"title":"Project management","icon":"rectangle-history","href":"/on-premises/user-and-project-management/project-management/index"},"pages":[{"title":"Bulk transfer of project ownership","icon":"lock","href":"/on-premises/user-and-project-management/project-management/bulk-transfer-of-project-ownership"}]}]},{"group":"Support","pages":[{"title":"Project limits","icon":"list-check","href":"/on-premises/support/project-limits"},{"title":"Troubleshooting","icon":"comments-question-check","href":"/on-premises/support/troubleshooting"},{"title":"Getting help","icon":"truck-medical","href":"/on-premises/support/getting-help"},{"group":"Support guides","icon":"message-question","root":{"title":"Support guides","icon":"message-question","href":"/on-premises/support/support-guides/index"},"pages":[{"title":"Using templates as an individual","icon":"rectangle-vertical-history","href":"/on-premises/support/support-guides/using-templates-as-an-individual"}]}]}]},{"tab":"Blog","icon":"rss","pages":[{"title":"Blog","href":"/blog"}]},{"tab":"TeXLive","icon":"compact-disc","pages":[{"title":"TeXLive","href":"/texlive"}]},{"tab":"Developer","icon":"rectangle-terminal","pages":[{"title":"Developer","href":"/dev"}]}]},{"language":"zh-CN","pages":[{"title":"zh-CN","href":"/zh-CN"}]},{"language":"zh-TW","pages":[{"title":"zh-TW","href":"/zh-TW"}]},{"language":"ja","pages":[{"title":"ja","href":"/ja"}]},{"language":"de","pages":[{"title":"de","href":"/de"}]},{"language":"fr","pages":[{"title":"fr","href":"/fr"}]},{"language":"es","pages":[{"title":"es","href":"/es"}]},{"language":"it","pages":[{"title":"it","href":"/it"}]},{"language":"ko","pages":[{"title":"ko","href":"/ko"}]},{"language":"ru","pages":[{"title":"ru","href":"/ru"}]},{"language":"nl","pages":[{"title":"nl","href":"/nl"}]},{"language":"pt","pages":[{"title":"pt","href":"/pt"}]},{"language":"tr","pages":[{"title":"tr","href":"/tr"}]},{"language":"uk","pages":[{"title":"uk","href":"/uk"}]},{"language":"pl","pages":[{"title":"pl","href":"/pl"}]},{"language":"cs","pages":[{"title":"cs","href":"/cs"}]},{"language":"sv","pages":[{"title":"sv","href":"/sv"}]},{"language":"fi","pages":[{"title":"fi","href":"/fi"}]},{"language":"ar","pages":[{"title":"ar","href":"/ar"}]},{"language":"vi","pages":[{"title":"vi","href":"/vi"}]},{"language":"no","pages":[{"title":"no","href":"/no"}]},{"language":"da","pages":[{"title":"da","href":"/da"}]},{"language":"id","pages":[{"title":"id","href":"/id"}]},{"language":"zh-Hans","pages":[{"title":"zh-Hans","href":"/zh-Hans"}]},{"language":"zh-Hant","pages":[{"title":"zh-Hant","href":"/zh-Hant"}]}]},"basePath":"","title":"Gitea Synchronisation - Ayakaleaf Pro","buildId":"dpl_8LJbrAiZvr1K98WQNZXCyY5AvT34","deploymentId":"dpl_8LJbrAiZvr1K98WQNZXCyY5AvT34","dynamics":["07c022d89b","a74be98ba7"],"chunks":["Frame-NdetNziF.js","DynamicMarkdown-CD8713Yy.js","zoom-image-lightbox-DMoL6lHz.js","lightbox-handle-r17bVUz3.js"]}