Click Account, then Account settings. Under Project synchronisation, find GitLab and click Link.
GitLab in the account settings
2
Authorize on GitLab
GitLab opens. Sign in if you are asked to, then authorize the application.
3
Check the link
You are back in the account settings. A green message says your GitLab account is linked, and the button now says Unlink.
Your GitLab account is linked
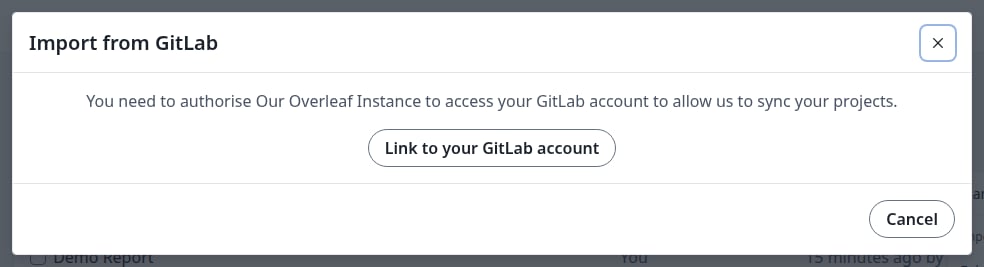
If your account is not linked yet, Import from GitLab and the GitLab card in the editor ask you to link it first. Click Link to your GitLab account. You also end up in the account settings, in a new tab if you started in the editor. Then go back and start again.
This creates a repository from a project and links them. A project can only be linked this way or by importing: you cannot link it to a repository that already exists.
1
Open GitLab in the editor
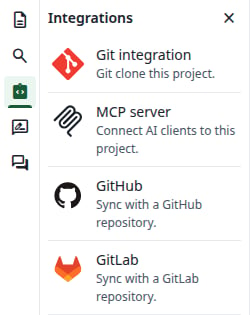
Open the project. In the left bar, click Integrations, then GitLab.
The Integrations panel
2
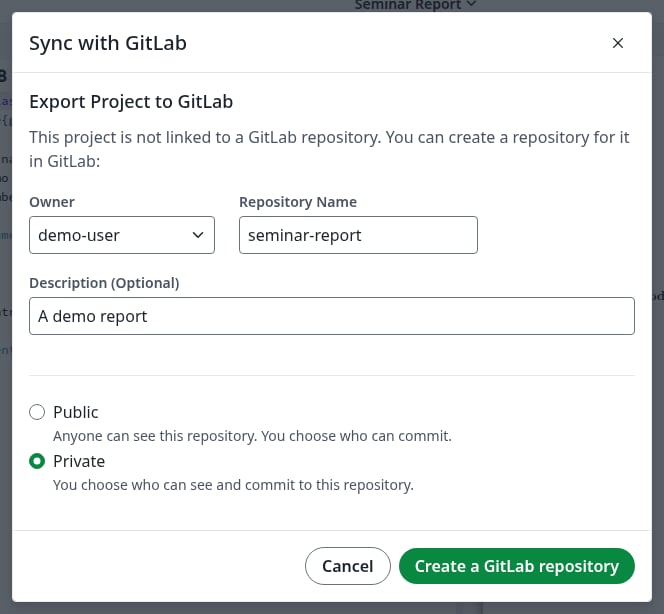
Fill in the repository
Choose the Owner, which can be you or one of your groups. When you pick a group, this field is called Organization. Repository Name starts as the project’s name. The description is optional, and Private is selected by default. Click Create a GitLab repository.
Export Project to GitLab
If the name is already taken, the dialog says Please check that the repository name is valid, and that you have permission to create the repository. Change the name and click the button again.
3
Check the link
The dialog now says This project is linked to and names the repository.
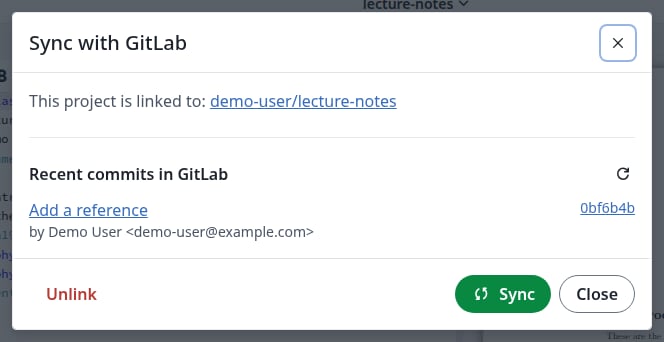
Open a linked project. In the left bar, click Integrations, then GitLab.Recent commits in GitLab lists what will come into the project.
A new commit waiting in GitLab
2
Describe your changes
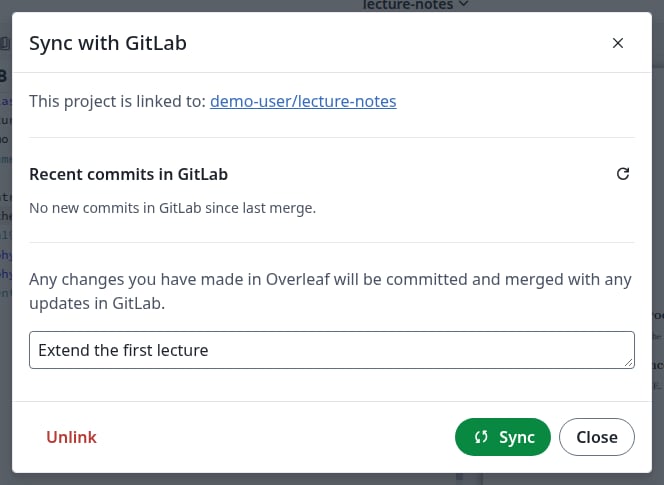
If you changed something in the project, a commit message box appears. It is optional: when you leave it empty, the commit is called Updates from Overleaf.
The commit message for your changes
3
Click Sync
Click Sync. New commits from GitLab come into the project, and your changes go to the default branch of the repository. If both sides changed different things, they are merged for you.
4
Check the result
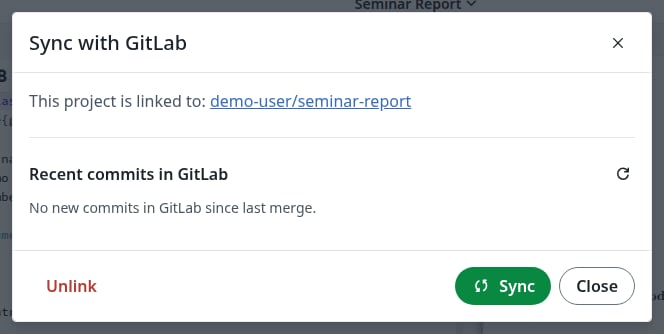
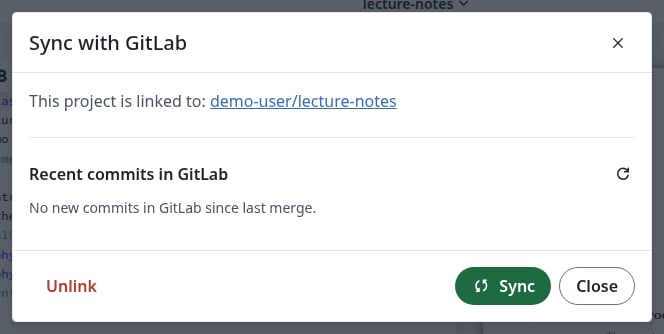
The dialog shows No new commits in GitLab since last merge. and the commit message box is gone. The files in the editor and the commits on GitLab are up to date.
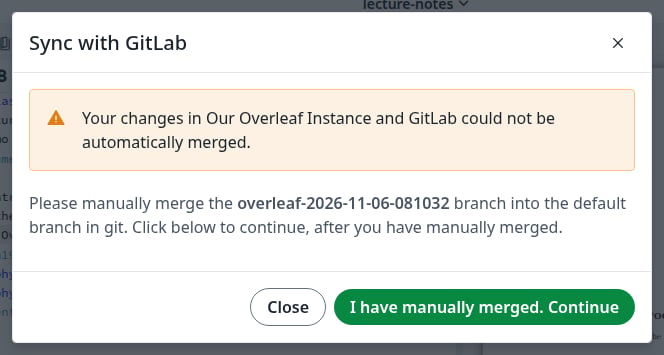
The dialog says the changes could not be merged and names a new branch, overleaf-YYYY-MM-DD-HHMMSS, which holds your changes. Overleaf also opens a merge request from that branch on GitLab.
A conflict
Merge that branch into the default branch on GitLab or with Git. You can close the dialog in the meantime: it shows the same message when you open it again.
Click I have manually merged. Continue. The merged result comes into the project. If you click it before the branch is merged, the dialog stays as it is.
The branch stays on GitLab, unless you deleted it when merging. Delete it when you no longer need it.
The same dialog appears when the repository’s merge rules hold the merge request back, for example when it needs an approval, even if no lines conflict. Once the rule allows it, merge the merge request on GitLab and click I have manually merged. Continue. See How syncing works with GitLab.
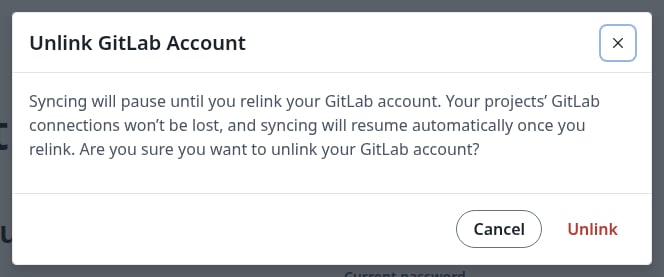
Do this when you no longer want the project to sync.
1
Click Unlink
In the sync dialog, click Unlink.
2
Confirm
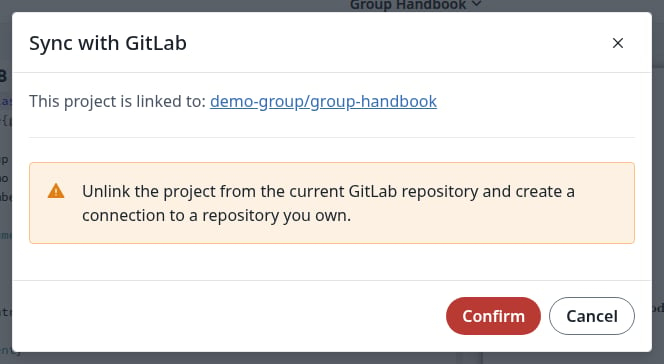
Click Confirm. This only removes the link: the connection to a repository you own, which the warning mentions, is an option you have afterwards, not something that happens now.
Confirm the unlink
3
Check the result
The dialog now shows Export Project to GitLab. The project and the repository both keep their content. To sync again, export the project to a new repository, or import the repository into a new project.
{"docsConfig":{"theme":"mint","$schema":"https://mintlify.com/docs.json","name":"Ayakaleaf Pro","description":"Overleaf Community Edition enhanced with all Pro features: open source, free to use, self-hostable.","colors":{"primary":"#0E0E0E","light":"#D4A27F","dark":"#0E0E0E"},"logo":{"light":"https://mintcdn.com/ayakaleaf-pro/JetHeEeglWIIXNds/logo/light.png?fit=max\u0026auto=format\u0026n=JetHeEeglWIIXNds\u0026q=85\u0026s=7f1abd8dcc74dd3b7cdafac9e6e82092","dark":"https://mintcdn.com/ayakaleaf-pro/JetHeEeglWIIXNds/logo/dark.png?fit=max\u0026auto=format\u0026n=JetHeEeglWIIXNds\u0026q=85\u0026s=4e369d29a8c5a6cd8b4b7697ddb1f7e2","href":"/"},"favicon":"https://mintcdn.com/ayakaleaf-pro/x9kfDjtWlyyhG_mR/favicon.png?fit=max\u0026auto=format\u0026n=x9kfDjtWlyyhG_mR\u0026q=85\u0026s=832c6bfafce5eb69ebc83783083a4a85","background":{"color":{"light":"#FDFDF7","dark":"#09090B"}},"navbar":{"links":[{"href":"https://github.com/ayaka-notes/ayakaleaf-pro-playground","label":"Playground"},{"href":"https://github.com/orgs/ayaka-notes/packages/container/package/overleaf-pro","label":"Docker Image"},{"href":"https://github.com/ayaka-notes/texlive-full","label":"TeXLive Full"}],"primary":{"type":"button","label":"Open GitHub","href":"https://github.com/ayaka-notes/ayakaleaf-pro"}},"footer":{"socials":{"github":"https://github.com/ayaka-notes"}},"styling":{"latex":true},"contextual":{"options":["copy","view","chatgpt","claude","perplexity","mcp","cursor","vscode","assistant","download-pdf","download-spec"],"display":"header"},"metadata":{"timestamp":true},"navigation":{"languages":[{"language":"en","default":true,"href":""},{"language":"zh-CN","href":"zh-CN"},{"language":"zh-TW","href":"zh-TW"},{"language":"ja","href":"ja"},{"language":"de","href":"de"},{"language":"fr","href":"fr"},{"language":"es","href":"es"},{"language":"it","href":"it"},{"language":"ko","href":"ko"},{"language":"ru","href":"ru"},{"language":"nl","href":"nl"},{"language":"pt","href":"pt"},{"language":"tr","href":"tr"},{"language":"uk","href":"uk"},{"language":"pl","href":"pl"},{"language":"cs","href":"cs"},{"language":"sv","href":"sv"},{"language":"fi","href":"fi"},{"language":"ar","href":"ar"},{"language":"vi","href":"vi"},{"language":"no","href":"no"},{"language":"da","href":"da"},{"language":"id","href":"id"},{"language":"zh-Hans","href":"zh-Hans"},{"language":"zh-Hant","href":"zh-Hant"}]}},"deployment":{"deploymentMetadataValue":{"subdomain":"ayakaleaf-pro","hasAudioNarration":false,"actualSubdomain":"ayakaleaf-pro","customDomains":[],"gitSource":{"type":"github","owner":"ayaka-notes","repo":"docs","deployBranch":"main","contentDirectory":"","isPrivate":false,"mountPath":"","label":""},"feedback":{"thumbs":true},"entitlements":{"AI_CHAT":{"status":"ENABLED"},"WEB_MCP":{"status":"ENABLED"},"NARRATION":{"status":"ENABLED"}},"buildId":"6aee957818cb0ff786610e20","clientVersion":"0.0.4076","searchFilterCounts":[{"language":"en","tag":"On-Premises","count":138},{"language":"ar","tag":"الاستضافة المحلية","count":101},{"language":"cs","tag":"On-Premises","count":101},{"language":"da","tag":"On-premises","count":101},{"language":"de","tag":"On-Premises","count":101},{"language":"es","tag":"Local","count":101},{"language":"fi","tag":"Paikallinen asennus","count":101},{"language":"fr","tag":"Sur site","count":101},{"language":"id","tag":"On-Premises","count":101},{"language":"it","tag":"On-premise","count":101},{"language":"ja","tag":"オンプレミス","count":101},{"language":"ko","tag":"온프레미스","count":101},{"language":"nl","tag":"On-premises","count":101},{"language":"no","tag":"Lokal drift","count":101},{"language":"pl","tag":"On-Premises","count":101},{"language":"pt","tag":"On-Premises","count":101},{"language":"ru","tag":"Локальное развертывание","count":101},{"language":"sv","tag":"On-Premises","count":101},{"language":"tr","tag":"Şirket İçi Kurulum","count":101},{"language":"uk","tag":"Локальне розгортання","count":101},{"language":"vi","tag":"Tự triển khai (On-Premises)","count":101},{"language":"zh-CN","tag":"本地部署","count":101},{"language":"zh-Hans","tag":"本地部署","count":101},{"language":"zh-Hant","tag":"本地部署","count":101},{"language":"zh-TW","tag":"本地部署","count":101},{"language":"ar","tag":"الإعداد","count":60},{"language":"en","tag":"Configuration","count":60},{"language":"cs","tag":"Konfigurace","count":60},{"language":"da","tag":"Konfiguration","count":60},{"language":"de","tag":"Konfiguration","count":60},{"language":"es","tag":"Configuración","count":60},{"language":"fi","tag":"Määritys","count":60},{"language":"fr","tag":"Configuration","count":60},{"language":"id","tag":"Konfigurasi","count":60},{"language":"it","tag":"Configurazione","count":60},{"language":"ja","tag":"設定","count":60},{"language":"ko","tag":"구성","count":60},{"language":"nl","tag":"Configuratie","count":60},{"language":"no","tag":"Konfigurasjon","count":60},{"language":"pl","tag":"Konfiguracja","count":60},{"language":"pt","tag":"Configuração","count":60},{"language":"ru","tag":"Настройка","count":60},{"language":"sv","tag":"Konfiguration","count":60},{"language":"tr","tag":"Yapılandırma","count":60},{"language":"uk","tag":"Конфігурація","count":60},{"language":"vi","tag":"Cấu hình","count":60},{"language":"zh-CN","tag":"配置","count":60},{"language":"zh-Hans","tag":"配置","count":60},{"language":"zh-Hant","tag":"設定","count":60},{"language":"zh-TW","tag":"設定","count":60},{"language":"en","tag":"Installation","count":35},{"language":"ar","tag":"Ayakaleaf Toolkit","count":31},{"language":"en","tag":"Docker Compose","count":31},{"language":"cs","tag":"Ayakaleaf Toolkit","count":31},{"language":"da","tag":"Ayakaleaf Toolkit","count":31},{"language":"de","tag":"Ayakaleaf Toolkit","count":31},{"language":"es","tag":"Ayakaleaf Toolkit","count":31},{"language":"fi","tag":"Ayakaleaf Toolkit","count":31},{"language":"fr","tag":"Ayakaleaf Toolkit","count":31},{"language":"id","tag":"Ayakaleaf Toolkit","count":31},{"language":"it","tag":"Ayakaleaf Toolkit","count":31},{"language":"ja","tag":"Ayakaleaf Toolkit","count":31},{"language":"ko","tag":"Ayakaleaf Toolkit","count":31},{"language":"nl","tag":"Ayakaleaf Toolkit","count":31},{"language":"no","tag":"Ayakaleaf Toolkit","count":31},{"language":"pl","tag":"Ayakaleaf Toolkit","count":31},{"language":"pt","tag":"Ayakaleaf Toolkit","count":31},{"language":"ru","tag":"Ayakaleaf Toolkit","count":31},{"language":"sv","tag":"Ayakaleaf Toolkit","count":31},{"language":"tr","tag":"Ayakaleaf Toolkit","count":31},{"language":"uk","tag":"Ayakaleaf Toolkit","count":31},{"language":"vi","tag":"Ayakaleaf Toolkit","count":31},{"language":"zh-CN","tag":"Ayakaleaf Toolkit","count":31},{"language":"zh-Hans","tag":"Ayakaleaf Toolkit","count":31},{"language":"zh-Hant","tag":"Ayakaleaf Toolkit","count":31},{"language":"zh-TW","tag":"Ayakaleaf Toolkit","count":31},{"language":"ar","tag":"Kubernetes","count":29},{"language":"en","tag":"Kubernetes","count":29},{"language":"cs","tag":"Kubernetes","count":29},{"language":"da","tag":"Kubernetes","count":29},{"language":"de","tag":"Kubernetes","count":29},{"language":"es","tag":"Kubernetes","count":29},{"language":"fi","tag":"Kubernetes","count":29},{"language":"fr","tag":"Kubernetes","count":29},{"language":"id","tag":"Kubernetes","count":29},{"language":"it","tag":"Kubernetes","count":29},{"language":"ja","tag":"Kubernetes","count":29},{"language":"ko","tag":"Kubernetes","count":29},{"language":"nl","tag":"Kubernetes","count":29},{"language":"no","tag":"Kubernetes","count":29},{"language":"pl","tag":"Kubernetes","count":29},{"language":"pt","tag":"Kubernetes","count":29},{"language":"ru","tag":"Kubernetes","count":29},{"language":"sv","tag":"Kubernetes","count":29},{"language":"tr","tag":"Kubernetes","count":29},{"language":"uk","tag":"Kubernetes","count":29},{"language":"vi","tag":"Kubernetes","count":29},{"language":"zh-CN","tag":"Kubernetes","count":29},{"language":"zh-Hans","tag":"Kubernetes","count":29},{"language":"zh-Hant","tag":"Kubernetes","count":29},{"language":"zh-TW","tag":"Kubernetes","count":29},{"language":"en","tag":"Using Docker Compose","count":23},{"language":"en","tag":"User guide","count":21},{"language":"ar","tag":"التكاملات","count":20},{"language":"en","tag":"Integrations","count":20},{"language":"cs","tag":"Integrace","count":20},{"language":"da","tag":"Integrationer","count":20},{"language":"de","tag":"Integrationen","count":20},{"language":"es","tag":"Integraciones","count":20},{"language":"fi","tag":"Integraatiot","count":20},{"language":"fr","tag":"Intégrations","count":20},{"language":"id","tag":"Integrasi","count":20},{"language":"it","tag":"Integrazioni","count":20},{"language":"ja","tag":"連携","count":20},{"language":"ko","tag":"통합","count":20},{"language":"nl","tag":"Integraties","count":20},{"language":"no","tag":"Integrasjoner","count":20},{"language":"pl","tag":"Integracje","count":20},{"language":"pt","tag":"Integrações","count":20},{"language":"ru","tag":"Интеграции","count":20},{"language":"sv","tag":"Integrationer","count":20},{"language":"tr","tag":"Entegrasyonlar","count":20},{"language":"uk","tag":"Інтеграції","count":20},{"language":"vi","tag":"Tích hợp","count":20},{"language":"zh-CN","tag":"集成","count":20},{"language":"zh-Hans","tag":"集成","count":20},{"language":"zh-Hant","tag":"整合","count":20},{"language":"zh-TW","tag":"整合","count":20},{"language":"ar","tag":"التثبيت","count":19},{"language":"cs","tag":"Instalace","count":19},{"language":"da","tag":"Installation","count":19},{"language":"de","tag":"Installation","count":19},{"language":"es","tag":"Instalación","count":19},{"language":"fi","tag":"Asennus","count":19},{"language":"fr","tag":"Installation","count":19},{"language":"id","tag":"Instalasi","count":19},{"language":"it","tag":"Installazione","count":19},{"language":"ja","tag":"インストール","count":19},{"language":"ko","tag":"설치","count":19},{"language":"nl","tag":"Installatie","count":19},{"language":"no","tag":"Installasjon","count":19},{"language":"pl","tag":"Instalacja","count":19},{"language":"pt","tag":"Instalação","count":19},{"language":"ru","tag":"Установка","count":19},{"language":"sv","tag":"Installation","count":19},{"language":"tr","tag":"Kurulum","count":19},{"language":"uk","tag":"Встановлення","count":19},{"language":"vi","tag":"Cài đặt","count":19},{"language":"zh-CN","tag":"安装","count":19},{"language":"zh-Hans","tag":"安装","count":19},{"language":"zh-Hant","tag":"安裝","count":19},{"language":"zh-TW","tag":"安裝","count":19},{"language":"en","tag":"For users","count":16},{"language":"ar","tag":"المصادقة","count":12},{"language":"en","tag":"Authentication","count":12},{"language":"cs","tag":"Ověřování","count":12},{"language":"da","tag":"Godkendelse","count":12},{"language":"de","tag":"Authentifizierung","count":12},{"language":"es","tag":"Autenticación","count":12},{"language":"fi","tag":"Todennus","count":12},{"language":"fr","tag":"Authentification","count":12},{"language":"id","tag":"Autentikasi","count":12},{"language":"it","tag":"Autenticazione","count":12},{"language":"ja","tag":"認証","count":12},{"language":"ko","tag":"인증","count":12},{"language":"nl","tag":"Authenticatie","count":12},{"language":"no","tag":"Autentisering","count":12},{"language":"pl","tag":"Uwierzytelnianie","count":12},{"language":"pt","tag":"Autenticação","count":12},{"language":"ru","tag":"Аутентификация","count":12},{"language":"sv","tag":"Autentisering","count":12},{"language":"tr","tag":"Kimlik Doğrulama","count":12},{"language":"uk","tag":"Автентифікація","count":12},{"language":"vi","tag":"Xác thực","count":12},{"language":"zh-CN","tag":"身份验证","count":12},{"language":"zh-Hans","tag":"身份验证","count":12},{"language":"zh-Hant","tag":"身分驗證","count":12},{"language":"zh-TW","tag":"身分驗證","count":12},{"language":"ar","tag":"المطوّرون","count":11},{"language":"cs","tag":"Vývojáři","count":11},{"language":"da","tag":"Udvikler","count":11},{"language":"de","tag":"Entwickler","count":11},{"language":"es","tag":"Desarrollador","count":11},{"language":"fi","tag":"Kehittäjä","count":11},{"language":"fr","tag":"Développeur","count":11},{"language":"id","tag":"Pengembang","count":11},{"language":"it","tag":"Sviluppatore","count":11},{"language":"ja","tag":"開発者","count":11},{"language":"ko","tag":"개발자","count":11},{"language":"nl","tag":"Ontwikkelaar","count":11},{"language":"no","tag":"Utvikler","count":11},{"language":"pl","tag":"Dla deweloperów","count":11},{"language":"pt","tag":"Desenvolvedor","count":11},{"language":"ru","tag":"Разработчикам","count":11},{"language":"sv","tag":"Utvecklare","count":11},{"language":"tr","tag":"Geliştirici","count":11},{"language":"uk","tag":"Розробникам","count":11},{"language":"vi","tag":"Nhà phát triển","count":11},{"language":"zh-CN","tag":"开发者","count":11},{"language":"zh-Hans","tag":"开发者","count":11},{"language":"zh-Hant","tag":"開發者","count":11},{"language":"zh-TW","tag":"開發者","count":11},{"language":"ar","tag":"نظرة عامة","count":9},{"language":"ar","tag":"الصيانة","count":9},{"language":"cs","tag":"Přehled","count":9},{"language":"cs","tag":"Údržba","count":9},{"language":"da","tag":"Oversigt","count":9},{"language":"da","tag":"Vedligeholdelse","count":9},{"language":"de","tag":"Überblick","count":9},{"language":"de","tag":"Wartung","count":9},{"language":"es","tag":"Descripción general","count":9},{"language":"es","tag":"Mantenimiento","count":9},{"language":"fi","tag":"Yleiskatsaus","count":9},{"language":"fi","tag":"Ylläpito","count":9},{"language":"fr","tag":"Aperçu","count":9},{"language":"fr","tag":"Maintenance","count":9},{"language":"id","tag":"Ikhtisar","count":9},{"language":"id","tag":"Pemeliharaan","count":9},{"language":"it","tag":"Panoramica","count":9},{"language":"it","tag":"Manutenzione","count":9},{"language":"ja","tag":"概要","count":9},{"language":"ja","tag":"メンテナンス","count":9},{"language":"ko","tag":"개요","count":9},{"language":"ko","tag":"유지 관리","count":9},{"language":"nl","tag":"Overzicht","count":9},{"language":"nl","tag":"Onderhoud","count":9},{"language":"no","tag":"Oversikt","count":9},{"language":"no","tag":"Vedlikehold","count":9},{"language":"pl","tag":"Przegląd","count":9},{"language":"pl","tag":"Utrzymanie","count":9},{"language":"pt","tag":"Visão geral","count":9},{"language":"pt","tag":"Manutenção","count":9},{"language":"ru","tag":"Обзор","count":9},{"language":"ru","tag":"Обслуживание","count":9},{"language":"sv","tag":"Översikt","count":9},{"language":"sv","tag":"Underhåll","count":9},{"language":"tr","tag":"Genel Bakış","count":9},{"language":"tr","tag":"Bakım","count":9},{"language":"uk","tag":"Огляд","count":9},{"language":"uk","tag":"Обслуговування","count":9},{"language":"vi","tag":"Tổng quan","count":9},{"language":"vi","tag":"Bảo trì","count":9},{"language":"zh-CN","tag":"概览","count":9},{"language":"zh-CN","tag":"维护","count":9},{"language":"zh-Hans","tag":"概览","count":9},{"language":"zh-Hans","tag":"维护","count":9},{"language":"zh-Hant","tag":"概覽","count":9},{"language":"zh-Hant","tag":"維護","count":9},{"language":"zh-TW","tag":"概覽","count":9},{"language":"zh-TW","tag":"維護","count":9}],"searchSettings":{"maxResults":6}},"assistantConfig":{"enableAskAiButton":false,"enableStarterQuestions":false,"enableContextualStarterQuestions":false,"enableAskAiSearchBar":true},"basePath":"","hasChatPermissions":true,"hasWebMcpPermissions":true,"toggles":[{"name":"kill-isr","enabled":true,"variant":{"name":"disabled","enabled":false,"feature_enabled":true},"impressionData":false},{"name":"agent-mintlify-slack","enabled":true,"variant":{"name":"disabled","enabled":false,"feature_enabled":true},"impressionData":false},{"name":"agent-integrations-settings","enabled":true,"variant":{"name":"disabled","enabled":false,"feature_enabled":true},"impressionData":false},{"name":"rbac-expansion","enabled":true,"variant":{"name":"disabled","enabled":false,"feature_enabled":true},"impressionData":false},{"name":"automations-pr-grouping","enabled":true,"variant":{"name":"disabled","enabled":false,"feature_enabled":true},"impressionData":false},{"name":"custom-prefix","enabled":true,"variant":{"name":"disabled","enabled":false,"feature_enabled":true},"impressionData":false},{"name":"analytics-v7","enabled":true,"variant":{"name":"disabled","enabled":false,"feature_enabled":true},"impressionData":false},{"name":"user-flows-analytics","enabled":true,"variant":{"name":"disabled","enabled":false,"feature_enabled":true},"impressionData":false},{"name":"no-publish-flow","enabled":true,"variant":{"name":"disabled","enabled":false,"feature_enabled":true},"impressionData":false},{"name":"workos-onboarding","enabled":true,"variant":{"name":"disabled","enabled":false,"feature_enabled":true},"impressionData":false},{"name":"llms-txt-v2","enabled":true,"variant":{"name":"disabled","enabled":false,"feature_enabled":true},"impressionData":false},{"name":"snapshot-serving-live","enabled":true,"variant":{"name":"disabled","enabled":false,"feature_enabled":true},"impressionData":false},{"name":"stripTemperatureMiddleware","enabled":true,"variant":{"name":"disabled","enabled":false,"feature_enabled":true},"impressionData":false},{"name":"support-platform-pylon-zendesk","enabled":true,"variant":{"name":"disabled","enabled":false,"feature_enabled":true},"impressionData":false},{"name":"snapshot-serving","enabled":true,"variant":{"name":"disabled","enabled":false,"feature_enabled":true},"impressionData":false},{"name":"instant-rollback","enabled":true,"variant":{"name":"disabled","enabled":false,"feature_enabled":true},"impressionData":false},{"name":"granular-notifications-server","enabled":true,"variant":{"name":"disabled","enabled":false,"feature_enabled":true},"impressionData":false},{"name":"granular-notifications","enabled":true,"variant":{"name":"disabled","enabled":false,"feature_enabled":true},"impressionData":false},{"name":"automations-fable","enabled":true,"variant":{"name":"disabled","enabled":false,"feature_enabled":true},"impressionData":false},{"name":"fixed-ai-action-pricing","enabled":true,"variant":{"name":"disabled","enabled":false,"feature_enabled":true},"impressionData":false},{"name":"automation-resolve-merge-conflict","enabled":true,"variant":{"name":"disabled","enabled":false,"feature_enabled":true},"impressionData":false},{"name":"scoped-publishing","enabled":true,"variant":{"name":"disabled","enabled":false,"feature_enabled":true},"impressionData":false},{"name":"mintql","enabled":true,"variant":{"name":"disabled","enabled":false,"feature_enabled":true},"impressionData":false},{"name":"page-level-analytics","enabled":true,"variant":{"name":"disabled","enabled":false,"feature_enabled":true},"impressionData":false},{"name":"editor-version-history-v2","enabled":true,"variant":{"name":"disabled","enabled":false,"feature_enabled":true},"impressionData":false},{"name":"billing-page-v2","enabled":true,"variant":{"name":"disabled","enabled":false,"feature_enabled":true},"impressionData":false},{"name":"full-page-search","enabled":true,"variant":{"name":"disabled","enabled":false,"feature_enabled":true},"impressionData":false},{"name":"workspace-projects","enabled":true,"variant":{"name":"disabled","enabled":false,"feature_enabled":true},"impressionData":false},{"name":"assistant-v5","enabled":true,"variant":{"name":"disabled","enabled":false,"feature_enabled":true},"impressionData":false},{"name":"fork-pr-previews","enabled":true,"variant":{"name":"disabled","enabled":false,"feature_enabled":true},"impressionData":false},{"name":"revalidation-jwt","enabled":true,"variant":{"name":"disabled","enabled":false,"feature_enabled":true},"impressionData":false},{"name":"workos-sso-scim","enabled":true,"variant":{"name":"disabled","enabled":false,"feature_enabled":true},"impressionData":false},{"name":"hobby-abuse-scan","enabled":true,"variant":{"name":"disabled","enabled":false,"feature_enabled":true},"impressionData":false},{"name":"dashboard-inbox","enabled":true,"variant":{"name":"disabled","enabled":false,"feature_enabled":true},"impressionData":false},{"name":"workos-signup","enabled":true,"variant":{"name":"disabled","enabled":false,"feature_enabled":true},"impressionData":false},{"name":"turbopuffer-dual-write","enabled":true,"variant":{"name":"disabled","enabled":false,"feature_enabled":true},"impressionData":false},{"name":"workos-enabled","enabled":true,"variant":{"name":"disabled","enabled":false,"feature_enabled":true},"impressionData":false},{"name":"approve-review-flow","enabled":true,"variant":{"name":"disabled","enabled":false,"feature_enabled":true},"impressionData":false},{"name":"editor-metadata","enabled":true,"variant":{"name":"disabled","enabled":false,"feature_enabled":true},"impressionData":false},{"name":"sso-setup-deadline-banner","enabled":true,"variant":{"name":"disabled","enabled":false,"feature_enabled":true},"impressionData":false},{"name":"turbopuffer-serve","enabled":true,"variant":{"name":"disabled","enabled":false,"feature_enabled":true},"impressionData":false},{"name":"live-agents","enabled":true,"variant":{"name":"disabled","enabled":false,"feature_enabled":true},"impressionData":false},{"name":"comment-mode","enabled":true,"variant":{"name":"disabled","enabled":false,"feature_enabled":true},"impressionData":false}],"googleFontsInlined":false},"customCss":[{"filePath":"style.css","content":"@font-face{font-family:\"Site Sans\";src:url(\"/fonts/SiteSans-Text-Regular-Static.otf\") format(\"opentype\");font-weight:400;font-style:normal;font-display:swap}@font-face{font-family:\"Site Sans\";src:url(\"/fonts/SiteSans-Text-RegularItalic-Static.otf\") format(\"opentype\");font-weight:400;font-style:italic;font-display:swap}@font-face{font-family:\"Site Sans\";src:url(\"/fonts/SiteSans-Text-Medium-Static.otf\") format(\"opentype\");font-weight:500;font-style:normal;font-display:swap}@font-face{font-family:\"Site Sans\";src:url(\"/fonts/SiteSans-Text-MediumItalic-Static.otf\") format(\"opentype\");font-weight:500;font-style:italic;font-display:swap}@font-face{font-family:\"Site Sans\";src:url(\"/fonts/SiteSans-Text-Semibold-Static.otf\") format(\"opentype\");font-weight:600;font-style:normal;font-display:swap}@font-face{font-family:\"Site Sans\";src:url(\"/fonts/SiteSans-Text-SemiboldItalic-Static.otf\") format(\"opentype\");font-weight:600;font-style:italic;font-display:swap}@font-face{font-family:\"Site Sans\";src:url(\"/fonts/SiteSans-Text-Bold-Static.otf\") format(\"opentype\");font-weight:700;font-style:normal;font-display:swap}@font-face{font-family:\"Site Sans\";src:url(\"/fonts/SiteSans-Text-BoldItalic-Static.otf\") format(\"opentype\");font-weight:700;font-style:italic;font-display:swap}@font-face{font-family:\"Site Serif Display\";src:url(\"/fonts/SiteSerif-Display-Regular-Static.otf\") format(\"opentype\");font-weight:400;font-style:normal;font-display:swap}@font-face{font-family:\"Site Serif Display\";src:url(\"/fonts/SiteSerif-Display-RegularItalic-Static.otf\") format(\"opentype\");font-weight:400;font-style:italic;font-display:swap}@font-face{font-family:\"Site Serif Display\";src:url(\"/fonts/SiteSerif-Display-Medium-Static.otf\") format(\"opentype\");font-weight:500;font-style:normal;font-display:swap}@font-face{font-family:\"Site Serif Display\";src:url(\"/fonts/SiteSerif-Display-Semibold-Static.otf\") format(\"opentype\");font-weight:600;font-style:normal;font-display:swap}@font-face{font-family:\"Site Serif Display\";src:url(\"/fonts/SiteSerif-Display-Bold-Static.otf\") format(\"opentype\");font-weight:700;font-style:normal;font-display:swap}@font-face{font-family:\"Site Serif\";src:url(\"/fonts/SiteSerif-Text-Regular-Static.otf\") format(\"opentype\");font-weight:400;font-style:normal;font-display:swap}@font-face{font-family:\"Site Serif\";src:url(\"/fonts/SiteSerif-Text-RegularItalic-Static.otf\") format(\"opentype\");font-weight:400;font-style:italic;font-display:swap}@font-face{font-family:\"Site Serif\";src:url(\"/fonts/SiteSerif-Text-Medium-Static.otf\") format(\"opentype\");font-weight:500;font-style:normal;font-display:swap}@font-face{font-family:\"Site Serif\";src:url(\"/fonts/SiteSerif-Text-MediumItalic-Static.otf\") format(\"opentype\");font-weight:500;font-style:italic;font-display:swap}@font-face{font-family:\"Site Serif\";src:url(\"/fonts/SiteSerif-Text-Semibold-Static.otf\") format(\"opentype\");font-weight:600;font-style:normal;font-display:swap}@font-face{font-family:\"Site Serif\";src:url(\"/fonts/SiteSerif-Text-SemiboldItalic-Static.otf\") format(\"opentype\");font-weight:600;font-style:italic;font-display:swap}@font-face{font-family:\"Site Serif\";src:url(\"/fonts/SiteSerif-Text-Bold-Static.otf\") format(\"opentype\");font-weight:700;font-style:normal;font-display:swap}@font-face{font-family:\"Site Serif\";src:url(\"/fonts/SiteSerif-Text-BoldItalic-Static.otf\") format(\"opentype\");font-weight:700;font-style:italic;font-display:swap}:root{--always-white: 0 0% 100%;--always-black: 0 0% 0%;--constant-book-cloth: 15 55% 80%;--constant-clay: 15 60% 85%;--constant-kraft: 25 40% 83%;--constant-manilla: 40 20% 92%;--constant-slate-000: 0 0% 100%;--constant-slate-050: 48 33.3% 97.1%;--constant-slate-100: 53 28.6% 94.5%;--constant-slate-150: 48 25% 92.2%;--constant-slate-200: 50 20.7% 88.6%;--constant-slate-250: 51 16.5% 84.5%;--constant-slate-300: 50 11.5% 79.6%;--constant-slate-350: 50 9% 73.7%;--constant-slate-400: 49 6.5% 66.9%;--constant-slate-450: 48 4.8% 59.2%;--constant-slate-500: 53 3.2% 51.4%;--constant-slate-550: 51 3.1% 43.7%;--constant-slate-600: 48 2.7% 35.9%;--constant-slate-650: 48 3.4% 29.2%;--constant-slate-700: 60 2.5% 23.3%;--constant-slate-750: 60 2.1% 18.4%;--constant-slate-800: 60 2.7% 14.5%;--constant-slate-850: 30 3.3% 11.8%;--constant-slate-900: 30 4% 9.8%;--constant-slate-950: 60 2.6% 7.6%;--constant-slate-1000: 60 3.4% 5.7%}:root:not(.dark){--accent-brand: 15 63.1% 59.6%;--accent-main-000: 15 55.6% 52.4%;--accent-main-100: 15 55.6% 52.4%;--accent-main-200: 15 63.1% 59.6%;--accent-main-900: 0 0% 0%;--accent-pro-000: 251 34.2% 33.3%;--accent-pro-100: 251 40% 45.1%;--accent-pro-200: 251 61% 72.2%;--accent-pro-900: 253 33.3% 91.8%;--accent-secondary-000: 210 73.7% 40.2%;--accent-secondary-100: 210 70.9% 51.6%;--accent-secondary-200: 210 70.9% 51.6%;--accent-secondary-900: 211 72% 90%;--bg-000: 0 0% 100%;--bg-100: 48 33.3% 97.1%;--bg-200: 53 28.6% 94.5%;--bg-300: 48 25% 92.2%;--bg-400: 50 20.7% 88.6%;--bg-500: 50 20.7% 88.6%;--border-100: 30 3.3% 11.8%;--border-200: 30 3.3% 11.8%;--border-300: 30 3.3% 11.8%;--border-400: 30 3.3% 11.8%;--danger-000: 0 61.4% 22.4%;--danger-100: 0 58.6% 34.1%;--danger-200: 0 58.6% 34.1%;--danger-900: 0 50% 95%;--oncolor-100: 0 0% 100%;--oncolor-200: 60 6.7% 97.1%;--oncolor-300: 60 6.7% 97.1%;--text-000: 60 2.6% 7.6%;--text-100: 60 2.6% 7.6%;--text-200: 60 2.5% 23.3%;--text-300: 60 2.5% 23.3%;--text-400: 51 3.1% 43.7%;--text-500: 51 3.1% 43.7%}:root.dark{--accent-brand: 15 63.1% 59.6%;--accent-main-000: 15 55.6% 52.4%;--accent-main-100: 15 63.1% 59.6%;--accent-main-200: 15 63.1% 59.6%;--accent-main-900: 0 0% 0%;--accent-pro-000: 251 84.6% 74.5%;--accent-pro-100: 251 40.2% 54.1%;--accent-pro-200: 251 40% 45.1%;--accent-pro-900: 250 25.3% 19.4%;--accent-secondary-000: 210 71.1% 62%;--accent-secondary-100: 210 70.9% 51.6%;--accent-secondary-200: 210 70.9% 51.6%;--accent-secondary-900: 210 55.9% 24.6%;--bg-000: 60 2.1% 18.4%;--bg-100: 60 2.7% 14.5%;--bg-200: 30 3.3% 11.8%;--bg-300: 60 2.6% 7.6%;--bg-400: 60 3.4% 5.7%;--bg-500: 60 3.4% 5.7%;--border-100: 51 16.5% 84.5%;--border-200: 51 16.5% 84.5%;--border-300: 51 16.5% 84.5%;--border-400: 51 16.5% 84.5%;--danger-000: 0 73.1% 66.5%;--danger-100: 0 58.6% 34.1%;--danger-200: 0 58.6% 34.1%;--danger-900: 0 23% 15.6%;--oncolor-100: 0 0% 100%;--oncolor-200: 60 6.7% 97.1%;--oncolor-300: 60 6.7% 97.1%;--text-000: 48 33.3% 97.1%;--text-100: 48 33.3% 97.1%;--text-200: 50 9% 73.7%;--text-300: 50 9% 73.7%;--text-400: 48 4.8% 59.2%;--text-500: 48 4.8% 59.2%}#home-header{font-family:\"Site Sans\", system-ui, \"Segoe UI\", Roboto, Helvetica, Arial, sans-serif;font-weight:400!important;font-size:50px;line-height:1.2;margin-bottom:1rem;color:--text-000;display:flex;align-items:baseline;justify-content:center;flex-wrap:nowrap}#localization-select-trigger>:has(img[src*=\"flags\"]){display:none}div[id^=\"localization-select-item\"]>:has(img[src*=\"flags\"]){display:none}@media (min-width: 768px){#home-header{justify-content:center}}.build-with{font-family:\"Site Sans\", system-ui, \"Segoe UI\", Roboto, Helvetica, Arial, sans-serif;letter-spacing:-0.02em}.claude-wordmark-wrapper{display:inline-flex;align-items:baseline;margin-left:10px}.claude-wordmark{height:40px;width:auto;position:relative}.dark #home-header{color:white}.description-text{color:black}.dark .description-text{color:white}.dark .claude-wordmark{filter:invert(1)}:root{--bg-color: #f0efea}.dark{--bg-color: #2b2b2b}body,input,#category-select,.dropdown-item,#table-of-contents{font-family:\"Site Sans\", system-ui, \"Segoe UI\", Roboto, Helvetica, Arial, sans-serif}.eyebrow{font-family:\"Site Sans\", system-ui, \"Segoe UI\", Roboto, Helvetica, Arial, sans-serif;text-transform:uppercase;letter-spacing:0.02rem}#content-container{font-family:\"Site Sans\", system-ui, \"Segoe UI\", Roboto, Helvetica, Arial, sans-serif}#content-container h1,#content-container h2,#content-container h3,#content-container h4,#content-container h5,#content-container h6{font-family:\"Site Serif Display\", Georgia, \"Times New Roman\", Times, serif;font-weight:400;letter-spacing:0;word-spacing:0.1em}#content-container p{font-size:1rem;line-height:1.65rem}.font-extrabold{font-weight:600!important}.wide-table{width:100%;overflow-x:auto}.wide-table table{width:175%;margin-bottom:0}#prompt-library-container{margin:4rem auto;max-width:48rem;padding-left:1.25rem;padding-right:1.25rem}.prompt-library-title{font-size:24px;text-align:center;font-weight:700;color:#1f2937}.dark .prompt-library-title{color:#e5e7eb}.prompt-library-description{margin-top:1rem;text-align:center}.main-content{margin-bottom:10rem;max-width:64rem;margin-left:auto;margin-right:auto;padding-left:1.25rem;padding-right:1.25rem}.prompt-controllers{display:flex;gap:0.5rem}.prompt-search-container{position:relative;flex:1 1 0%}.prompt-search-icon-container{display:flex;position:absolute;top:0;bottom:0;left:0;align-items:center;padding-left:0.75rem}.prompt-search-icon{margin-left:0.25rem;margin-right:0.75rem;flex:none;width:1rem;height:1rem;background-color:#6b7280;mask-image:url(https://mintlify.b-cdn.net/v6.5.1/solid/magnifying-glass.svg);mask-repeat:no-repeat;mask-position:center center}input.prompt-search-bar{display:block;height:2.5rem;padding-left:2.5rem;border-radius:0.75rem;border-width:1px;background-color:#ffffff;width:100%;color:#111827;box-shadow:0 1px 2px 0 rgba(0, 0, 0, 0.05)}.dark input.prompt-search-bar{color:#ffffff;background-color:rgb(var(--background-dark));border-color:#d1d5db1a}input.prompt-search-bar:focus{outline-color:rgb(var(--primary))}.dark input.prompt-search-bar:focus{outline-color:rgb(var(--primary-light))}.dark .prompt-search-icon{background-color:#ffffff80}#category-select{padding-left:1rem;padding-right:2.5rem;height:2.5rem;display:flex;align-items:center;border-radius:0.75rem;border-width:1px;color:#111827;background-color:#ffffff;cursor:pointer;box-shadow:0 1px 2px 0 rgba(0, 0, 0, 0.05);white-space:nowrap}.dark #category-select{background-color:rgb(var(--background-dark));border-color:#d1d5db1a;color:#ffffff}#category-select:hover{background-color:#f9fafb}.dark #category-select:hover{background-color:#ffffff0d}#category-select:focus{outline-color:rgb(var(--primary))}.dark #category-select:focus{outline-color:rgb(var(--primary-light))}#categories-dropdown{top:calc(100% + 4px);padding:0.5rem 0.5rem;display:none;position:absolute;z-index:10;border-radius:0.75rem;border-width:1px;width:100%;color:#111827;background-color:#ffffff;box-shadow:0 1px 2px 0 rgba(0, 0, 0, 0.05)}.dark #categories-dropdown{background-color:rgb(var(--background-dark));border-color:#d1d5db1a;color:#ffffff}#categories-dropdown-clickout{position:fixed;top:0;right:0;bottom:0;left:0;z-index:0}.dropdown-icon-container{display:flex;position:absolute;top:0;bottom:0;right:0;align-items:center;padding-right:0.25rem}.dropdown-icon{margin-left:0.25rem;margin-right:0.75rem;flex:none;width:0.75rem;height:0.75rem;background-color:#6b7280;mask-image:url(https://mintlify.b-cdn.net/v6.5.1/solid/caret-down.svg);mask-repeat:no-repeat;mask-position:center center}.dark .dropdown-icon{background-color:#ffffff80}#prompts-container{grid-template-columns:repeat(1, minmax(0, 1fr));gap:2rem}.dropdown-item{padding:0.25rem 0.5rem;border-radius:0.375rem;display:flex;align-items:center;cursor:pointer}.dropdown-item:hover{background-color:#f9fafb}.dark .dropdown-item:hover{background-color:#ffffff0d}.check-icon{mask-image:url(https://mintlify.b-cdn.net/v6.5.1/solid/check.svg);height:0.875rem;width:1rem;background-color:rgb(var(--primary-light));mask-repeat:no-repeat;mask-position:center center}.prompt-card{margin:-0.75rem;padding:0.75rem;display:flex;border-radius:1rem}.prompt-card:hover{background-color:#03071208}.dark .prompt-card:hover{background-color:#ffffff08}.prompt-icon-container{display:flex;flex:none;align-items:center;justify-content:center;margin-right:1.5rem;border-radius:0.75rem;height:4rem;width:4rem;background-color:#cb785c1a}.prompt-icon{height:1.5rem;width:1.5rem;background-color:rgb(var(--primary-light));mask-repeat:no-repeat;mask-position:center center}.prompt-title{color:rgb(31 41 55);font-weight:600}.dark .prompt-title{color:rgb(229 231 235)}.prompt-description{margin-top:0.25rem}#prompts-container{display:grid;margin-top:2.5rem}@media (min-width: 640px){#category-select{width:16rem}}@media (min-width: 1024px){#prompts-container{grid-template-columns:repeat(2, minmax(0, 1fr))}}.home-cards-custom{display:grid;grid-template-columns:repeat(3, 1fr);grid-template-rows:repeat(2, auto);gap:1.5rem}.home-cards-custom .card{background:transparent;border:0.5px solid hsl(var(--border-300));border-radius:12px;padding:0.25rem}@media (max-width: 1024px){.home-cards-custom{grid-template-columns:repeat(2, 1fr);grid-template-rows:repeat(3, auto)}}@media (max-width: 768px){.home-cards-custom{grid-template-columns:1fr;grid-template-rows:repeat(6, auto)}}.relative{position:relative}.flex-1{flex:1 1 0%}.mermaid{position:relative;background-color:#FDFDFB;background-image:linear-gradient(rgba(235, 219, 188, .25) 1px, transparent 1px), /* Secondary color #EBDBBC with low opacity */\n linear-gradient(90deg, rgba(235, 219, 188, .25) 1px, transparent 1px),\n linear-gradient(rgba(235, 219, 188, .1) 1px, transparent 1px),\n linear-gradient(90deg, rgba(235, 219, 188, .1) 1px, transparent 1px);background-size:20px 20px,\n 20px 20px,\n 4px 4px,\n 4px 4px;background-position:-1px -1px,\n -1px -1px,\n -1px -1px,\n -1px -1px;padding:20px;border-radius:8px;border:1px solid rgba(235, 219, 188, .4);box-shadow:0 2px 4px rgba(64, 64, 62, 0.08)}.dark .mermaid{background-color:#1a1918;background-image:linear-gradient(rgba(212, 162, 127, .15) 1px, transparent 1px), /* Tertiary color #D4A27F with low opacity */\n linear-gradient(90deg, rgba(212, 162, 127, .15) 1px, transparent 1px),\n linear-gradient(rgba(212, 162, 127, .08) 1px, transparent 1px),\n linear-gradient(90deg, rgba(212, 162, 127, .08) 1px, transparent 1px);border:1px solid rgba(102, 102, 99, .5);box-shadow:0 2px 4px rgba(0, 0, 0, 0.2)}.digest-meta{display:flex;align-items:center;justify-content:space-between;flex-wrap:wrap;gap:0.5rem 1rem;padding:0.75rem 1rem;margin:1.5rem 0 2.5rem;border:1px solid hsl(var(--border-300) / 0.15);background:hsl(var(--bg-200));font-variant-numeric:tabular-nums;font-size:0.875rem;color:hsl(var(--text-400))}#content-container .digest-meta a{color:hsl(var(--accent-main-100));font-weight:500;text-decoration:none;border-bottom:none}#content-container .digest-meta a:hover{text-decoration:underline}.digest-feature{position:relative;margin:2.5rem 0;padding:1.875rem 1.875rem 1.625rem;background:radial-gradient(circle, hsl(var(--text-000) / 0.025) 1px, transparent 1px) 0 0 / 18px 18px,\n linear-gradient(180deg, hsl(var(--constant-manilla) / 0.55), hsl(var(--constant-manilla) / 0.38));border:1px solid hsl(var(--border-300) / 0.12);box-shadow:inset 0 1px 0 hsl(var(--text-000) / 0.04),\n 0 1px 2px hsl(var(--always-black) / 0.04)}.digest-feature::before{content:\"\";position:absolute;inset:0 auto 0 0;width:4px;background:hsl(var(--accent-brand))}.dark .digest-feature{background:radial-gradient(circle, hsl(var(--text-000) / 0.02) 1px, transparent 1px) 0 0 / 18px 18px,\n linear-gradient(180deg, hsl(var(--bg-000) / 0.75), hsl(var(--bg-000) / 0.5));border-color:hsl(var(--border-300) / 0.1);box-shadow:inset 0 1px 0 hsl(var(--text-000) / 0.03),\n 0 1px 2px hsl(var(--always-black) / 0.25)}.digest-feature>:first-child{margin-top:0}.digest-feature>:last-child{margin-bottom:0}.digest-feature-header{display:flex;align-items:center;flex-wrap:wrap;gap:0.625rem;margin:0 0 0.75rem}#content-container .digest-feature-title{font-family:\"Site Serif Display\", Georgia, serif;font-size:1.75rem;line-height:1.15;font-weight:500;letter-spacing:-0.015em;color:hsl(var(--text-000));margin:0}#content-container .digest-feature-pill{font-family:ui-monospace, \"SF Mono\", Menlo, Consolas, monospace;font-size:0.75rem;line-height:1;letter-spacing:0.01em;padding:0.3rem 0.6rem;border-radius:999px;background:hsl(var(--accent-brand) / 0.12);color:hsl(var(--accent-main-000));border:1px solid hsl(var(--accent-brand) / 0.25);white-space:nowrap;transform:translateY(1px)}#content-container .digest-feature-lede{font-size:1.0625rem;line-height:1.65;color:hsl(var(--text-100));margin:0 0 1.25rem;max-width:none}#content-container .digest-feature-lede code{font-size:0.875em;padding:0.1em 0.35em}#content-container .digest-feature-try{font-size:0.875rem;color:hsl(var(--text-400));margin:1.25rem 0 0.5rem}#content-container .digest-feature .frame{margin:1rem 0;border-radius:0;padding:0}#content-container .digest-feature .frame>*{border-radius:0}#content-container .digest-feature pre,#content-container .digest-feature [class*=\"CodeBlock\"]{border-radius:0}#content-container .digest-feature-link{display:inline-flex;align-items:center;gap:0.35rem;font-size:0.875rem;font-weight:500;color:hsl(var(--accent-main-100));text-decoration:none;border-bottom:none;margin-top:0.75rem}#content-container .digest-feature-link::after{content:\"→\";transition:transform 120ms ease-out}#content-container .digest-feature-link:hover::after{transform:translateX(3px)}.digest-wins{margin:2.5rem 0;padding:1.5rem 1.75rem 1.25rem;background:hsl(var(--bg-200));border:1px solid hsl(var(--border-300) / 0.1)}.dark .digest-wins{background:hsl(var(--bg-200) / 0.6)}#content-container .digest-wins-title{font-family:\"Site Serif Display\", Georgia, serif;font-size:1.25rem;font-weight:500;color:hsl(var(--text-000));margin:0 0 0.75rem}.digest-wins-grid{display:grid;grid-template-columns:repeat(auto-fit, minmax(16rem, 1fr));column-gap:2rem}#content-container .digest-wins-grid>div{position:relative;font-size:0.875rem;line-height:1.5;color:hsl(var(--text-300));padding:0.5rem 0 0.5rem 1.125rem;border-top:1px solid hsl(var(--border-300) / 0.06);margin:0}#content-container .digest-wins-grid>div::before{content:\"+\";position:absolute;left:0;top:0.5rem;font-family:ui-monospace, \"SF Mono\", Menlo, Consolas, monospace;font-size:0.8125rem;font-weight:600;color:hsl(var(--accent-brand))}#content-container .digest-wins-grid>div:first-child,#content-container .digest-wins-grid>div:nth-child(2){border-top:none;padding-top:0}#content-container .digest-wins-grid>div:first-child::before,#content-container .digest-wins-grid>div:nth-child(2)::before{top:0}#content-container .digest-wins-grid code{font-size:0.8125rem;padding:0.1em 0.3em}:root{--toc-wrapper-max: 92rem;--toc-wrapper-pad: 2rem;--toc-col: 19rem;--toc-side: 28rem;--toc-btn-size: 1.75rem}#toc-collapse-toggle{display:none;align-items:center;justify-content:center;position:fixed;top:10rem;right:calc(\n max((100% - var(--toc-wrapper-max)) / 2, 0px) + var(--toc-wrapper-pad) +\n var(--toc-col) - var(--toc-btn-size) - 0.35rem\n );transition:right 200ms ease-out;z-index:30;width:var(--toc-btn-size);height:var(--toc-btn-size);border-radius:9999px;border:1px solid hsl(var(--border-300) / 0.15);background:hsl(var(--bg-100));color:hsl(var(--text-400));cursor:pointer}#toc-collapse-toggle:hover{background:hsl(var(--bg-300));color:hsl(var(--text-100))}#toc-collapse-toggle svg{width:14px;height:14px;fill:none;stroke:currentColor;stroke-width:2.5;stroke-linecap:round;stroke-linejoin:round}#toc-collapse-toggle .toc-glyph{display:none;stroke-width:2}@media print{#toc-collapse-toggle{display:none!important}}@media (prefers-reduced-motion: reduce){#toc-collapse-toggle{transition:none}}@media (min-width: 1280px){html:has(#table-of-contents-layout) #toc-collapse-toggle{display:flex}html.toc-collapsed #toc-collapse-toggle .toc-chevron{transform:rotate(180deg)}html.toc-collapsed #toc-collapse-toggle{right:0.5rem;width:auto;padding:0 0.5rem;gap:0.25rem}html.toc-collapsed #toc-collapse-toggle .toc-glyph{display:block}html.toc-collapsed #table-of-contents-layout{display:none!important}html.toc-collapsed #content-side-layout:has(#table-of-contents-layout){display:none!important}html.toc-collapsed #content-container:has(#table-of-contents-layout) #content-area{width:100%!important}html.toc-collapsed #content-container:has(#table-of-contents-layout) #content-area>*{max-width:calc(var(--toc-wrapper-max) - var(--toc-side))}}@media (max-width: 640px){.digest-feature{padding:1.25rem 1rem 1rem;margin:1.5rem 0}#content-container .digest-feature-title{font-size:1.375rem}.digest-wins{padding:1.25rem 1rem 1rem}.digest-wins-grid{grid-template-columns:1fr}#content-container .digest-wins-grid>div:nth-child(2){border-top:1px solid hsl(var(--border-300) / 0.06);padding-top:0.5rem}#content-container .digest-wins-grid>div:nth-child(2)::before{top:0.5rem}}img[data-component-part=\"card-image\"]{aspect-ratio:16 / 9;height:auto;object-fit:cover;object-position:top center}"},{"filePath":"button.css","content":".btn{position:relative;display:inline-flex;gap:0.5rem;align-items:center;justify-content:center;flex-shrink:0;min-width:5rem;height:2.25rem;padding:0.5rem 1rem;white-space:nowrap;font-family:Styrene;font-weight:600;border-radius:0.5rem;\u0026:active{transform:scale(0.985)}\u0026.size-xs{height:1.75rem;min-width:3.5rem;padding:0 0.5rem;border-radius:0.25rem;font-size:0.75rem;gap:0.25rem}\u0026.size-sm{height:2rem;min-width:4rem;padding:0 0.75rem;border-radius:0.375rem;font-size:0.75rem}\u0026.size-lg{height:2.75rem;min-width:6rem;padding:0 1.25rem;border-radius:0.6rem}\u0026:disabled{pointer-events:none;opacity:0.5;box-shadow:none}\u0026:focus-visible{outline:none;--tw-ring-offset-shadow: var(--tw-ring-inset) 0 0 0 var(--tw-ring-offset-width) var(--tw-ring-offset-color);--tw-ring-shadow: var(--tw-ring-inset) 0 0 0 calc(1px + var(--tw-ring-offset-width)) var(--tw-ring-color);box-shadow:var(--tw-ring-offset-shadow), var(--tw-ring-shadow)}\u0026.primary{font-weight:600;color:hsl(var(--oncolor-100));background-color:hsl(var(--accent-main-100));background-image:linear-gradient(\n to right,\n hsl(var(--accent-main-100)) 0%,\n hsl(var(--accent-main-200) / 0.5) 50%,\n hsl(var(--accent-main-200)) 100%\n );background-size:200% 100%;background-position:0% 0%;border:0.5px solid hsl(var(--border-300) / 0.25);box-shadow:inset 0 0.5px 0px rgba(255, 255, 0, 0.15),\n 0 1px 1px rgba(0, 0, 0, 0.05);text-shadow:0 1px 2px rgb(0 0 0 / 10%);transition:all 150ms cubic-bezier(0.4, 0, 0.2, 1);\u0026:hover{background-position:100% 0%;background-image:linear-gradient(\n to right,\n hsl(var(--accent-main-200)) 0%,\n hsl(var(--accent-main-200)) 100%\n )}\u0026:active{background-color:hsl(var(--accent-main-000));box-shadow:inset 0 1px 6px rgba(0, 0, 0, 0.2);transform:scale(0.985)}}\u0026.flat{font-weight:500;color:hsl(var(--oncolor-100));background-color:hsl(var(--accent-main-100));transition:background-color 150ms;\u0026:hover{background-color:hsl(var(--accent-main-200))}}\u0026.secondary{font-weight:600;color:hsl(var(--text-100) / 0.9);background-image:radial-gradient(\n ellipse at center,\n hsl(var(--bg-500) / 0.1) 50%,\n hsl(var(--bg-500) / 0.3) 100%\n );border:0.5px solid hsl(var(--border-400));transition:color 150ms, background-color 150ms;\u0026:hover{color:hsl(var(--text-000));background-color:hsl(var(--bg-500) / 0.6)}\u0026:active{background-color:hsl(var(--bg-500) / 0.5)}}\u0026.outline{font-weight:600;color:hsl(var(--text-200));background-color:transparent;border:1.5px solid currentColor;transition:color 150ms, background-color 150ms;\u0026:hover{color:hsl(var(--text-100));background-color:hsl(var(--bg-400));border-color:hsl(var(--bg-400))}}\u0026.ghost{color:hsl(var(--text-200));border-color:transparent;transition:color 150ms, background-color 150ms;\u0026:hover{color:hsl(var(--text-100));background-color:hsl(var(--bg-500) / 0.4)}\u0026:active{background-color:hsl(var(--bg-400))}}\u0026.underline{opacity:0.8;text-decoration-line:none;text-underline-offset:3px;transition:all 150ms;\u0026:hover{opacity:1;text-decoration-line:underline}\u0026:active{transform:scale(0.985)}}\u0026.danger{font-weight:600;color:hsl(var(--oncolor-100));background-color:hsl(var(--danger-100));transition:background-color 150ms;\u0026:hover{background-color:hsl(var(--danger-200))}}}"}],"page":{"pagePath":"on-premises/user-guide/users/gitlab-synchronisation","slug":"/on-premises/user-guide/users/gitlab-synchronisation","pageMetadata":{"title":"GitLab Synchronisation","description":"Link your GitLab account, import or export a project, sync changes both ways and unlink.","icon":"https://d3gk2c5xim1je2.cloudfront.net/fontawesome/v7.2.0/brands/gitlab.svg","href":"/on-premises/user-guide/users/gitlab-synchronisation"},"description":{"compiledSource":"\"use strict\";\nconst {jsx: _jsx} = arguments[0];\nconst {useMDXComponents: _provideComponents} = arguments[0];\nfunction _createMdxContent(props) {\n const _components = {\n p: \"p\",\n ..._provideComponents(),\n ...props.components\n };\n return _jsx(_components.p, {\n children: \"Link your GitLab account, import or export a project, sync changes both ways and unlink.\"\n });\n}\nfunction MDXContent(props = {}) {\n const {wrapper: MDXLayout} = {\n ..._provideComponents(),\n ...props.components\n };\n return MDXLayout ? _jsx(MDXLayout, {\n ...props,\n children: _jsx(_createMdxContent, {\n ...props\n })\n }) : _createMdxContent(props);\n}\nreturn {\n default: MDXContent\n};\n","frontmatter":{},"scope":{}},"pageType":"default","mdx":{"mdxSource":{"compiledSource":"\"use strict\";const{Fragment:_Fragment,jsx:_jsx,jsxs:_jsxs}=arguments[0];const{useMDXComponents:_provideComponents}=arguments[0];function _createMdxContent(props){const _components={a:`a`,code:`code`,li:`li`,ol:`ol`,p:`p`,strong:`strong`,..._provideComponents(),...props.components},{Frame,Heading,Info,OptimizedImage,Step,Steps}=_components;if(!Frame)_missingMdxReference(`Frame`,true);if(!Heading)_missingMdxReference(`Heading`,true);if(!Info)_missingMdxReference(`Info`,true);if(!OptimizedImage)_missingMdxReference(`OptimizedImage`,true);if(!Step)_missingMdxReference(`Step`,true);if(!Steps)_missingMdxReference(`Steps`,true);return _jsxs(_Fragment,{children:[_jsxs(_components.p,{children:[`Connect a project to a GitLab repository. Changes go both ways, and only when you click `,_jsx(_components.strong,{children:`Sync`}),`: nothing syncs on its own.`]}),`\n`,_jsx(Info,{children:_jsxs(_components.p,{children:[`An administrator has to turn on `,_jsx(_components.a,{href:`/on-premises/configuration/overleaf-toolkit/integrations/gitlab-synchronisation`,children:`GitLab Synchronisation`}),` first.`]})}),`\n`,_jsx(Heading,{level:`2`,id:`link-your-gitlab-account`,children:`Link your GitLab account`}),`\n`,_jsx(_components.p,{children:`You do this once.`}),`\n`,_jsxs(Steps,{children:[_jsxs(Step,{title:`Open your account settings`,children:[_jsxs(_components.p,{children:[`Click `,_jsx(_components.strong,{children:`Account`}),`, then `,_jsx(_components.strong,{children:`Account settings`}),`. Under `,_jsx(_components.strong,{children:`Project synchronisation`}),`, find `,_jsx(_components.strong,{children:`GitLab`}),` and click `,_jsx(_components.strong,{children:`Link`}),`.`]}),_jsx(Frame,{caption:`GitLab in the account settings`,children:_jsx(OptimizedImage,{src:`https://mintcdn.com/ayakaleaf-pro/IsGnx0wnzqtV4hI8/images/on-premises/gitlab-sync-link.png?fit=max\u0026auto=format\u0026n=IsGnx0wnzqtV4hI8\u0026q=85\u0026s=cd34b300ea3566a7083df441f465a163`,alt:`The GitLab section of the account settings with a Link button`,\"data-og-width\":`1050`,width:`1050`,\"data-og-height\":`126`,height:`126`,\"data-path\":`images/on-premises/gitlab-sync-link.png`,\"data-optimize\":`true`,\"data-opv\":`3`,srcset:`https://mintcdn.com/ayakaleaf-pro/IsGnx0wnzqtV4hI8/images/on-premises/gitlab-sync-link.png?w=280\u0026fit=max\u0026auto=format\u0026n=IsGnx0wnzqtV4hI8\u0026q=85\u0026s=7e9fb067d1161aa084b9347231b30c0e 280w, https://mintcdn.com/ayakaleaf-pro/IsGnx0wnzqtV4hI8/images/on-premises/gitlab-sync-link.png?w=560\u0026fit=max\u0026auto=format\u0026n=IsGnx0wnzqtV4hI8\u0026q=85\u0026s=5e62a33ea515eab8b031e8c1e99e69a0 560w, https://mintcdn.com/ayakaleaf-pro/IsGnx0wnzqtV4hI8/images/on-premises/gitlab-sync-link.png?w=840\u0026fit=max\u0026auto=format\u0026n=IsGnx0wnzqtV4hI8\u0026q=85\u0026s=2a04aa999fc2ce4b5b3c8ed46cc6d828 840w, https://mintcdn.com/ayakaleaf-pro/IsGnx0wnzqtV4hI8/images/on-premises/gitlab-sync-link.png?w=1100\u0026fit=max\u0026auto=format\u0026n=IsGnx0wnzqtV4hI8\u0026q=85\u0026s=3fe0735151d38bd3289b0ac96e20b13b 1100w, https://mintcdn.com/ayakaleaf-pro/IsGnx0wnzqtV4hI8/images/on-premises/gitlab-sync-link.png?w=1650\u0026fit=max\u0026auto=format\u0026n=IsGnx0wnzqtV4hI8\u0026q=85\u0026s=d3649355f4f526df3640c07e1d8b6a92 1650w, https://mintcdn.com/ayakaleaf-pro/IsGnx0wnzqtV4hI8/images/on-premises/gitlab-sync-link.png?w=2500\u0026fit=max\u0026auto=format\u0026n=IsGnx0wnzqtV4hI8\u0026q=85\u0026s=204f7c7611e4ca44da586ed574254c80 2500w`})})]}),_jsx(Step,{title:`Authorize on GitLab`,children:_jsx(_components.p,{children:`GitLab opens. Sign in if you are asked to, then authorize the application.`})}),_jsxs(Step,{title:`Check the link`,children:[_jsxs(_components.p,{children:[`You are back in the account settings. A green message says your GitLab account is linked, and the button now says `,_jsx(_components.strong,{children:`Unlink`}),`.`]}),_jsx(Frame,{caption:`Your GitLab account is linked`,children:_jsx(OptimizedImage,{src:`https://mintcdn.com/ayakaleaf-pro/IsGnx0wnzqtV4hI8/images/on-premises/gitlab-sync-linked.png?fit=max\u0026auto=format\u0026n=IsGnx0wnzqtV4hI8\u0026q=85\u0026s=f187b1d6ba770789495f03ecac75c7f7`,alt:`The GitLab section of the account settings with an Unlink button`,\"data-og-width\":`1050`,width:`1050`,\"data-og-height\":`132`,height:`132`,\"data-path\":`images/on-premises/gitlab-sync-linked.png`,\"data-optimize\":`true`,\"data-opv\":`3`,srcset:`https://mintcdn.com/ayakaleaf-pro/IsGnx0wnzqtV4hI8/images/on-premises/gitlab-sync-linked.png?w=280\u0026fit=max\u0026auto=format\u0026n=IsGnx0wnzqtV4hI8\u0026q=85\u0026s=1ad1589a015b266940e864a0a748da91 280w, https://mintcdn.com/ayakaleaf-pro/IsGnx0wnzqtV4hI8/images/on-premises/gitlab-sync-linked.png?w=560\u0026fit=max\u0026auto=format\u0026n=IsGnx0wnzqtV4hI8\u0026q=85\u0026s=65e72e47d6b934696feb9ce67d5ac829 560w, https://mintcdn.com/ayakaleaf-pro/IsGnx0wnzqtV4hI8/images/on-premises/gitlab-sync-linked.png?w=840\u0026fit=max\u0026auto=format\u0026n=IsGnx0wnzqtV4hI8\u0026q=85\u0026s=55e18fc42751d9be38b758d9ed8c0c52 840w, https://mintcdn.com/ayakaleaf-pro/IsGnx0wnzqtV4hI8/images/on-premises/gitlab-sync-linked.png?w=1100\u0026fit=max\u0026auto=format\u0026n=IsGnx0wnzqtV4hI8\u0026q=85\u0026s=6bf14881141957e0b065ce38d9d86c13 1100w, https://mintcdn.com/ayakaleaf-pro/IsGnx0wnzqtV4hI8/images/on-premises/gitlab-sync-linked.png?w=1650\u0026fit=max\u0026auto=format\u0026n=IsGnx0wnzqtV4hI8\u0026q=85\u0026s=9fa0b711512ed182d406a2d44c3efa35 1650w, https://mintcdn.com/ayakaleaf-pro/IsGnx0wnzqtV4hI8/images/on-premises/gitlab-sync-linked.png?w=2500\u0026fit=max\u0026auto=format\u0026n=IsGnx0wnzqtV4hI8\u0026q=85\u0026s=ebb76a44dfec832a3d22b321dfd98e95 2500w`})})]})]}),`\n`,_jsxs(_components.p,{children:[`If your account is not linked yet, `,_jsx(_components.strong,{children:`Import from GitLab`}),` and the `,_jsx(_components.strong,{children:`GitLab`}),` card in the editor ask you to link it first. Click `,_jsx(_components.strong,{children:`Link to your GitLab account`}),`. You also end up in the account settings, in a new tab if you started in the editor. Then go back and start again.`]}),`\n`,_jsx(Frame,{caption:`The prompt when your account is not linked`,children:_jsx(OptimizedImage,{src:`https://mintcdn.com/ayakaleaf-pro/IsGnx0wnzqtV4hI8/images/on-premises/gitlab-sync-link-prompt.png?fit=max\u0026auto=format\u0026n=IsGnx0wnzqtV4hI8\u0026q=85\u0026s=50ded943f918001121d5a00ef345d008`,alt:`The Import from GitLab dialog with a Link to your GitLab account button`,\"data-og-width\":`984`,width:`984`,\"data-og-height\":`267`,height:`267`,\"data-path\":`images/on-premises/gitlab-sync-link-prompt.png`,\"data-optimize\":`true`,\"data-opv\":`3`,srcset:`https://mintcdn.com/ayakaleaf-pro/IsGnx0wnzqtV4hI8/images/on-premises/gitlab-sync-link-prompt.png?w=280\u0026fit=max\u0026auto=format\u0026n=IsGnx0wnzqtV4hI8\u0026q=85\u0026s=afe704cbebf3be6dfa19d9fec206d2e7 280w, https://mintcdn.com/ayakaleaf-pro/IsGnx0wnzqtV4hI8/images/on-premises/gitlab-sync-link-prompt.png?w=560\u0026fit=max\u0026auto=format\u0026n=IsGnx0wnzqtV4hI8\u0026q=85\u0026s=43caa10fd52c0be7851309543d047ea6 560w, https://mintcdn.com/ayakaleaf-pro/IsGnx0wnzqtV4hI8/images/on-premises/gitlab-sync-link-prompt.png?w=840\u0026fit=max\u0026auto=format\u0026n=IsGnx0wnzqtV4hI8\u0026q=85\u0026s=5fed61b869a0eeecfc2d33cc42d7e02e 840w, https://mintcdn.com/ayakaleaf-pro/IsGnx0wnzqtV4hI8/images/on-premises/gitlab-sync-link-prompt.png?w=1100\u0026fit=max\u0026auto=format\u0026n=IsGnx0wnzqtV4hI8\u0026q=85\u0026s=a1d4215f3bec15438b4d3aeb26369e21 1100w, https://mintcdn.com/ayakaleaf-pro/IsGnx0wnzqtV4hI8/images/on-premises/gitlab-sync-link-prompt.png?w=1650\u0026fit=max\u0026auto=format\u0026n=IsGnx0wnzqtV4hI8\u0026q=85\u0026s=25add7a02312857c2daceadfb99efc18 1650w, https://mintcdn.com/ayakaleaf-pro/IsGnx0wnzqtV4hI8/images/on-premises/gitlab-sync-link-prompt.png?w=2500\u0026fit=max\u0026auto=format\u0026n=IsGnx0wnzqtV4hI8\u0026q=85\u0026s=961755644d7d1c94c94397cc5c1f621f 2500w`})}),`\n`,_jsx(Heading,{level:`2`,id:`import-a-repository`,children:`Import a repository`}),`\n`,_jsx(_components.p,{children:`This creates a new project from a GitLab repository, already linked to it.`}),`\n`,_jsxs(Steps,{children:[_jsxs(Step,{title:`Open the import dialog`,children:[_jsxs(_components.p,{children:[`On the projects page, click `,_jsx(_components.strong,{children:`New project`}),`, then `,_jsx(_components.strong,{children:`Import from GitLab`}),`.`]}),_jsx(Frame,{caption:`The New project menu`,children:_jsx(OptimizedImage,{src:`https://mintcdn.com/ayakaleaf-pro/IsGnx0wnzqtV4hI8/images/on-premises/gitlab-sync-new-project-menu.png?fit=max\u0026auto=format\u0026n=IsGnx0wnzqtV4hI8\u0026q=85\u0026s=4065d1b3b3e2fc5542272e38e2d01f61`,alt:`The New project menu with Import from GitLab`,\"data-og-width\":`272`,width:`272`,\"data-og-height\":`405`,height:`405`,\"data-path\":`images/on-premises/gitlab-sync-new-project-menu.png`,\"data-optimize\":`true`,\"data-opv\":`3`,srcset:`https://mintcdn.com/ayakaleaf-pro/IsGnx0wnzqtV4hI8/images/on-premises/gitlab-sync-new-project-menu.png?w=280\u0026fit=max\u0026auto=format\u0026n=IsGnx0wnzqtV4hI8\u0026q=85\u0026s=e019b87cb377f3b54fbe96fed4895131 280w, https://mintcdn.com/ayakaleaf-pro/IsGnx0wnzqtV4hI8/images/on-premises/gitlab-sync-new-project-menu.png?w=560\u0026fit=max\u0026auto=format\u0026n=IsGnx0wnzqtV4hI8\u0026q=85\u0026s=d3e884d862863a3aa1648113170c42f3 560w, https://mintcdn.com/ayakaleaf-pro/IsGnx0wnzqtV4hI8/images/on-premises/gitlab-sync-new-project-menu.png?w=840\u0026fit=max\u0026auto=format\u0026n=IsGnx0wnzqtV4hI8\u0026q=85\u0026s=3495cd46ea1800e9c98d5eb0641b67d4 840w, https://mintcdn.com/ayakaleaf-pro/IsGnx0wnzqtV4hI8/images/on-premises/gitlab-sync-new-project-menu.png?w=1100\u0026fit=max\u0026auto=format\u0026n=IsGnx0wnzqtV4hI8\u0026q=85\u0026s=c8d080569153364cf1351b224ab2d0ab 1100w, https://mintcdn.com/ayakaleaf-pro/IsGnx0wnzqtV4hI8/images/on-premises/gitlab-sync-new-project-menu.png?w=1650\u0026fit=max\u0026auto=format\u0026n=IsGnx0wnzqtV4hI8\u0026q=85\u0026s=32f56421fcb94f0b50ecbc7ef7fc7523 1650w, https://mintcdn.com/ayakaleaf-pro/IsGnx0wnzqtV4hI8/images/on-premises/gitlab-sync-new-project-menu.png?w=2500\u0026fit=max\u0026auto=format\u0026n=IsGnx0wnzqtV4hI8\u0026q=85\u0026s=6c23f62f5f9823043e2572ee86521bc7 2500w`})})]}),_jsxs(Step,{title:`Choose the repository`,children:[_jsxs(_components.p,{children:[`Click `,_jsx(_components.strong,{children:`Import to Overleaf`}),` next to the repository. The list includes your repositories and those of your groups.`]}),_jsx(Frame,{caption:`Your GitLab repositories`,children:_jsx(OptimizedImage,{src:`https://mintcdn.com/ayakaleaf-pro/IsGnx0wnzqtV4hI8/images/on-premises/gitlab-sync-import.png?fit=max\u0026auto=format\u0026n=IsGnx0wnzqtV4hI8\u0026q=85\u0026s=cb0ba36bfa954e101ec1ccd8dac0bca3`,alt:`The Import from GitLab dialog listing four repositories`,\"data-og-width\":`984`,width:`984`,\"data-og-height\":`503`,height:`503`,\"data-path\":`images/on-premises/gitlab-sync-import.png`,\"data-optimize\":`true`,\"data-opv\":`3`,srcset:`https://mintcdn.com/ayakaleaf-pro/IsGnx0wnzqtV4hI8/images/on-premises/gitlab-sync-import.png?w=280\u0026fit=max\u0026auto=format\u0026n=IsGnx0wnzqtV4hI8\u0026q=85\u0026s=c72f71af3ff7dd603b3bc23a10dc8364 280w, https://mintcdn.com/ayakaleaf-pro/IsGnx0wnzqtV4hI8/images/on-premises/gitlab-sync-import.png?w=560\u0026fit=max\u0026auto=format\u0026n=IsGnx0wnzqtV4hI8\u0026q=85\u0026s=e4e27a554f9f2ceb5cb9171c7d7c057b 560w, https://mintcdn.com/ayakaleaf-pro/IsGnx0wnzqtV4hI8/images/on-premises/gitlab-sync-import.png?w=840\u0026fit=max\u0026auto=format\u0026n=IsGnx0wnzqtV4hI8\u0026q=85\u0026s=dab10f6374d36b008bdf9917222cb636 840w, https://mintcdn.com/ayakaleaf-pro/IsGnx0wnzqtV4hI8/images/on-premises/gitlab-sync-import.png?w=1100\u0026fit=max\u0026auto=format\u0026n=IsGnx0wnzqtV4hI8\u0026q=85\u0026s=9065c09602ab5d65d76853bb9e5ad199 1100w, https://mintcdn.com/ayakaleaf-pro/IsGnx0wnzqtV4hI8/images/on-premises/gitlab-sync-import.png?w=1650\u0026fit=max\u0026auto=format\u0026n=IsGnx0wnzqtV4hI8\u0026q=85\u0026s=0e697f5677a98e5485faa3f7d58de098 1650w, https://mintcdn.com/ayakaleaf-pro/IsGnx0wnzqtV4hI8/images/on-premises/gitlab-sync-import.png?w=2500\u0026fit=max\u0026auto=format\u0026n=IsGnx0wnzqtV4hI8\u0026q=85\u0026s=ce52abe10c30e6f347c29cdf69554de4 2500w`})})]}),_jsxs(Step,{title:`Check the project`,children:[_jsx(_components.p,{children:`The new project opens with the files of the repository.`}),_jsx(Frame,{caption:`The imported project`,children:_jsx(OptimizedImage,{src:`https://mintcdn.com/ayakaleaf-pro/IsGnx0wnzqtV4hI8/images/on-premises/gitlab-sync-imported.png?fit=max\u0026auto=format\u0026n=IsGnx0wnzqtV4hI8\u0026q=85\u0026s=a467df37fd623dffe523b5a92ebc47c1`,alt:`The editor showing the imported project with its files and compiled PDF`,\"data-og-width\":`1440`,width:`1440`,\"data-og-height\":`900`,height:`900`,\"data-path\":`images/on-premises/gitlab-sync-imported.png`,\"data-optimize\":`true`,\"data-opv\":`3`,srcset:`https://mintcdn.com/ayakaleaf-pro/IsGnx0wnzqtV4hI8/images/on-premises/gitlab-sync-imported.png?w=280\u0026fit=max\u0026auto=format\u0026n=IsGnx0wnzqtV4hI8\u0026q=85\u0026s=65950e3556994ad3bae256b7d5e0d6c0 280w, https://mintcdn.com/ayakaleaf-pro/IsGnx0wnzqtV4hI8/images/on-premises/gitlab-sync-imported.png?w=560\u0026fit=max\u0026auto=format\u0026n=IsGnx0wnzqtV4hI8\u0026q=85\u0026s=6bcf37af55466cbd72b508cbbcc5f6e1 560w, https://mintcdn.com/ayakaleaf-pro/IsGnx0wnzqtV4hI8/images/on-premises/gitlab-sync-imported.png?w=840\u0026fit=max\u0026auto=format\u0026n=IsGnx0wnzqtV4hI8\u0026q=85\u0026s=086506a55df13c9aa735bd84c855eaa4 840w, https://mintcdn.com/ayakaleaf-pro/IsGnx0wnzqtV4hI8/images/on-premises/gitlab-sync-imported.png?w=1100\u0026fit=max\u0026auto=format\u0026n=IsGnx0wnzqtV4hI8\u0026q=85\u0026s=5757657a53ea6db7760b41c6f1310fa4 1100w, https://mintcdn.com/ayakaleaf-pro/IsGnx0wnzqtV4hI8/images/on-premises/gitlab-sync-imported.png?w=1650\u0026fit=max\u0026auto=format\u0026n=IsGnx0wnzqtV4hI8\u0026q=85\u0026s=98af62a4d688ce780f2295c23e62914b 1650w, https://mintcdn.com/ayakaleaf-pro/IsGnx0wnzqtV4hI8/images/on-premises/gitlab-sync-imported.png?w=2500\u0026fit=max\u0026auto=format\u0026n=IsGnx0wnzqtV4hI8\u0026q=85\u0026s=9b797923a5e2419f6c4f87a7ecb12799 2500w`})})]})]}),`\n`,_jsx(Heading,{level:`2`,id:`export-a-project-to-a-new-repository`,children:`Export a project to a new repository`}),`\n`,_jsx(_components.p,{children:`This creates a repository from a project and links them. A project can only be linked this way or by importing: you cannot link it to a repository that already exists.`}),`\n`,_jsxs(Steps,{children:[_jsxs(Step,{title:`Open GitLab in the editor`,children:[_jsxs(_components.p,{children:[`Open the project. In the left bar, click `,_jsx(_components.strong,{children:`Integrations`}),`, then `,_jsx(_components.strong,{children:`GitLab`}),`.`]}),_jsx(Frame,{caption:`The Integrations panel`,children:_jsx(OptimizedImage,{src:`https://mintcdn.com/ayakaleaf-pro/IsGnx0wnzqtV4hI8/images/on-premises/gitlab-sync-integrations.png?fit=max\u0026auto=format\u0026n=IsGnx0wnzqtV4hI8\u0026q=85\u0026s=df24d11afeb5bbec55a8a745fd58f47a`,alt:`The Integrations panel with the GitLab card`,\"data-og-width\":`250`,width:`250`,\"data-og-height\":`315`,height:`315`,\"data-path\":`images/on-premises/gitlab-sync-integrations.png`,\"data-optimize\":`true`,\"data-opv\":`3`,srcset:`https://mintcdn.com/ayakaleaf-pro/IsGnx0wnzqtV4hI8/images/on-premises/gitlab-sync-integrations.png?w=280\u0026fit=max\u0026auto=format\u0026n=IsGnx0wnzqtV4hI8\u0026q=85\u0026s=bc3d0921a68ac601e66770dbc99730fa 280w, https://mintcdn.com/ayakaleaf-pro/IsGnx0wnzqtV4hI8/images/on-premises/gitlab-sync-integrations.png?w=560\u0026fit=max\u0026auto=format\u0026n=IsGnx0wnzqtV4hI8\u0026q=85\u0026s=567eae6a3fe1b6fdbd24fdcdb447d8a7 560w, https://mintcdn.com/ayakaleaf-pro/IsGnx0wnzqtV4hI8/images/on-premises/gitlab-sync-integrations.png?w=840\u0026fit=max\u0026auto=format\u0026n=IsGnx0wnzqtV4hI8\u0026q=85\u0026s=87971977d7fea58ddffffd23d4dc7f0a 840w, https://mintcdn.com/ayakaleaf-pro/IsGnx0wnzqtV4hI8/images/on-premises/gitlab-sync-integrations.png?w=1100\u0026fit=max\u0026auto=format\u0026n=IsGnx0wnzqtV4hI8\u0026q=85\u0026s=f2e091ccbe43f295c8c99751992d3b35 1100w, https://mintcdn.com/ayakaleaf-pro/IsGnx0wnzqtV4hI8/images/on-premises/gitlab-sync-integrations.png?w=1650\u0026fit=max\u0026auto=format\u0026n=IsGnx0wnzqtV4hI8\u0026q=85\u0026s=f21a3c6e2c46c09d10a2a935c96f65dd 1650w, https://mintcdn.com/ayakaleaf-pro/IsGnx0wnzqtV4hI8/images/on-premises/gitlab-sync-integrations.png?w=2500\u0026fit=max\u0026auto=format\u0026n=IsGnx0wnzqtV4hI8\u0026q=85\u0026s=865b35fcfe20fc27fda3661fe6291d06 2500w`})})]}),_jsxs(Step,{title:`Fill in the repository`,children:[_jsxs(_components.p,{children:[`Choose the `,_jsx(_components.strong,{children:`Owner`}),`, which can be you or one of your groups. When you pick a group, this field is called `,_jsx(_components.strong,{children:`Organization`}),`. `,_jsx(_components.strong,{children:`Repository Name`}),` starts as the project’s name. The description is optional, and `,_jsx(_components.strong,{children:`Private`}),` is selected by default. Click `,_jsx(_components.strong,{children:`Create a GitLab repository`}),`.`]}),_jsx(Frame,{caption:`Export Project to GitLab`,children:_jsx(OptimizedImage,{src:`https://mintcdn.com/ayakaleaf-pro/IsGnx0wnzqtV4hI8/images/on-premises/gitlab-sync-export.png?fit=max\u0026auto=format\u0026n=IsGnx0wnzqtV4hI8\u0026q=85\u0026s=ba5191a105be584e994ad663565ee511`,alt:`The Export Project to GitLab form filled in`,\"data-og-width\":`664`,width:`664`,\"data-og-height\":`614`,height:`614`,\"data-path\":`images/on-premises/gitlab-sync-export.png`,\"data-optimize\":`true`,\"data-opv\":`3`,srcset:`https://mintcdn.com/ayakaleaf-pro/IsGnx0wnzqtV4hI8/images/on-premises/gitlab-sync-export.png?w=280\u0026fit=max\u0026auto=format\u0026n=IsGnx0wnzqtV4hI8\u0026q=85\u0026s=2c6eb120ca7d6f54f152d558b8e6d99a 280w, https://mintcdn.com/ayakaleaf-pro/IsGnx0wnzqtV4hI8/images/on-premises/gitlab-sync-export.png?w=560\u0026fit=max\u0026auto=format\u0026n=IsGnx0wnzqtV4hI8\u0026q=85\u0026s=cf2f30b9a06ac076426ce7bd24c65f03 560w, https://mintcdn.com/ayakaleaf-pro/IsGnx0wnzqtV4hI8/images/on-premises/gitlab-sync-export.png?w=840\u0026fit=max\u0026auto=format\u0026n=IsGnx0wnzqtV4hI8\u0026q=85\u0026s=f688f7348c540bb27beaa18eb62d4ef1 840w, https://mintcdn.com/ayakaleaf-pro/IsGnx0wnzqtV4hI8/images/on-premises/gitlab-sync-export.png?w=1100\u0026fit=max\u0026auto=format\u0026n=IsGnx0wnzqtV4hI8\u0026q=85\u0026s=0d8c1d18d28396a2470ec04e1517fa60 1100w, https://mintcdn.com/ayakaleaf-pro/IsGnx0wnzqtV4hI8/images/on-premises/gitlab-sync-export.png?w=1650\u0026fit=max\u0026auto=format\u0026n=IsGnx0wnzqtV4hI8\u0026q=85\u0026s=f75c7695e60ff5f22a5ade2477c255b9 1650w, https://mintcdn.com/ayakaleaf-pro/IsGnx0wnzqtV4hI8/images/on-premises/gitlab-sync-export.png?w=2500\u0026fit=max\u0026auto=format\u0026n=IsGnx0wnzqtV4hI8\u0026q=85\u0026s=30c76c95cce698d07115f40a5aa57b01 2500w`})}),_jsxs(_components.p,{children:[`If the name is already taken, the dialog says `,_jsx(`strong`,{children:`Please check that the repository name is valid, and that you have permission to create the repository.`}),` Change the name and click the button again.`]})]}),_jsxs(Step,{title:`Check the link`,children:[_jsxs(_components.p,{children:[`The dialog now says `,_jsx(_components.strong,{children:`This project is linked to`}),` and names the repository.`]}),_jsx(Frame,{caption:`The project is linked`,children:_jsx(OptimizedImage,{src:`https://mintcdn.com/ayakaleaf-pro/IsGnx0wnzqtV4hI8/images/on-premises/gitlab-sync-exported.png?fit=max\u0026auto=format\u0026n=IsGnx0wnzqtV4hI8\u0026q=85\u0026s=6e18dc3c00fb9a29b3bb2f1a76cec08e`,alt:`The Sync with GitLab dialog after the export`,\"data-og-width\":`664`,width:`664`,\"data-og-height\":`334`,height:`334`,\"data-path\":`images/on-premises/gitlab-sync-exported.png`,\"data-optimize\":`true`,\"data-opv\":`3`,srcset:`https://mintcdn.com/ayakaleaf-pro/IsGnx0wnzqtV4hI8/images/on-premises/gitlab-sync-exported.png?w=280\u0026fit=max\u0026auto=format\u0026n=IsGnx0wnzqtV4hI8\u0026q=85\u0026s=59e44c395d53b61b1db15d1e53711df1 280w, https://mintcdn.com/ayakaleaf-pro/IsGnx0wnzqtV4hI8/images/on-premises/gitlab-sync-exported.png?w=560\u0026fit=max\u0026auto=format\u0026n=IsGnx0wnzqtV4hI8\u0026q=85\u0026s=a017c7f83ae55c3e74298edde15ea6b2 560w, https://mintcdn.com/ayakaleaf-pro/IsGnx0wnzqtV4hI8/images/on-premises/gitlab-sync-exported.png?w=840\u0026fit=max\u0026auto=format\u0026n=IsGnx0wnzqtV4hI8\u0026q=85\u0026s=3b40397054bfe540f1d8df217c339c99 840w, https://mintcdn.com/ayakaleaf-pro/IsGnx0wnzqtV4hI8/images/on-premises/gitlab-sync-exported.png?w=1100\u0026fit=max\u0026auto=format\u0026n=IsGnx0wnzqtV4hI8\u0026q=85\u0026s=90eb03c1b1245dd8fc9157307a79136b 1100w, https://mintcdn.com/ayakaleaf-pro/IsGnx0wnzqtV4hI8/images/on-premises/gitlab-sync-exported.png?w=1650\u0026fit=max\u0026auto=format\u0026n=IsGnx0wnzqtV4hI8\u0026q=85\u0026s=c3bf2754561f2d820b8cb839cd686d72 1650w, https://mintcdn.com/ayakaleaf-pro/IsGnx0wnzqtV4hI8/images/on-premises/gitlab-sync-exported.png?w=2500\u0026fit=max\u0026auto=format\u0026n=IsGnx0wnzqtV4hI8\u0026q=85\u0026s=fb60b748480683cea418d8959f56edc3 2500w`})})]})]}),`\n`,_jsx(Heading,{level:`2`,id:`sync`,children:`Sync`}),`\n`,_jsxs(Steps,{children:[_jsxs(Step,{title:`Open the sync dialog`,children:[_jsxs(_components.p,{children:[`Open a linked project. In the left bar, click `,_jsx(_components.strong,{children:`Integrations`}),`, then `,_jsx(_components.strong,{children:`GitLab`}),`.`]}),_jsxs(_components.p,{children:[_jsx(_components.strong,{children:`Recent commits in GitLab`}),` lists what will come into the project.`]}),_jsx(Frame,{caption:`A new commit waiting in GitLab`,children:_jsx(OptimizedImage,{src:`https://mintcdn.com/ayakaleaf-pro/IsGnx0wnzqtV4hI8/images/on-premises/gitlab-sync-new-commits.png?fit=max\u0026auto=format\u0026n=IsGnx0wnzqtV4hI8\u0026q=85\u0026s=e67529c0cad7a0cb7eafaa5f8d134b0a`,alt:`The Sync with GitLab dialog listing one new commit`,\"data-og-width\":`664`,width:`664`,\"data-og-height\":`342`,height:`342`,\"data-path\":`images/on-premises/gitlab-sync-new-commits.png`,\"data-optimize\":`true`,\"data-opv\":`3`,srcset:`https://mintcdn.com/ayakaleaf-pro/IsGnx0wnzqtV4hI8/images/on-premises/gitlab-sync-new-commits.png?w=280\u0026fit=max\u0026auto=format\u0026n=IsGnx0wnzqtV4hI8\u0026q=85\u0026s=78e10ced075ef97f8c29d59f3714e0ac 280w, https://mintcdn.com/ayakaleaf-pro/IsGnx0wnzqtV4hI8/images/on-premises/gitlab-sync-new-commits.png?w=560\u0026fit=max\u0026auto=format\u0026n=IsGnx0wnzqtV4hI8\u0026q=85\u0026s=928006c30600ca8c1e842e03cd036436 560w, https://mintcdn.com/ayakaleaf-pro/IsGnx0wnzqtV4hI8/images/on-premises/gitlab-sync-new-commits.png?w=840\u0026fit=max\u0026auto=format\u0026n=IsGnx0wnzqtV4hI8\u0026q=85\u0026s=5caa88bc197850c3985a36483f0250aa 840w, https://mintcdn.com/ayakaleaf-pro/IsGnx0wnzqtV4hI8/images/on-premises/gitlab-sync-new-commits.png?w=1100\u0026fit=max\u0026auto=format\u0026n=IsGnx0wnzqtV4hI8\u0026q=85\u0026s=cea782170c88a1b2e93cc9d569c20067 1100w, https://mintcdn.com/ayakaleaf-pro/IsGnx0wnzqtV4hI8/images/on-premises/gitlab-sync-new-commits.png?w=1650\u0026fit=max\u0026auto=format\u0026n=IsGnx0wnzqtV4hI8\u0026q=85\u0026s=2450a2ad0ff935755e5a696624d51365 1650w, https://mintcdn.com/ayakaleaf-pro/IsGnx0wnzqtV4hI8/images/on-premises/gitlab-sync-new-commits.png?w=2500\u0026fit=max\u0026auto=format\u0026n=IsGnx0wnzqtV4hI8\u0026q=85\u0026s=52fae46b72c0f2d3bef756bc4ca6541c 2500w`})})]}),_jsxs(Step,{title:`Describe your changes`,children:[_jsxs(_components.p,{children:[`If you changed something in the project, a commit message box appears. It is optional: when you leave it empty, the commit is called `,_jsx(_components.code,{children:`Updates from Overleaf`}),`.`]}),_jsx(Frame,{caption:`The commit message for your changes`,children:_jsx(OptimizedImage,{src:`https://mintcdn.com/ayakaleaf-pro/IsGnx0wnzqtV4hI8/images/on-premises/gitlab-sync-commit-message.png?fit=max\u0026auto=format\u0026n=IsGnx0wnzqtV4hI8\u0026q=85\u0026s=45677a6ea3a96235bcde72e1cdaa436a`,alt:`The Sync with GitLab dialog with a commit message filled in`,\"data-og-width\":`664`,width:`664`,\"data-og-height\":`485`,height:`485`,\"data-path\":`images/on-premises/gitlab-sync-commit-message.png`,\"data-optimize\":`true`,\"data-opv\":`3`,srcset:`https://mintcdn.com/ayakaleaf-pro/IsGnx0wnzqtV4hI8/images/on-premises/gitlab-sync-commit-message.png?w=280\u0026fit=max\u0026auto=format\u0026n=IsGnx0wnzqtV4hI8\u0026q=85\u0026s=c2ba6528ae6d0c7a69c60b93c533dc1e 280w, https://mintcdn.com/ayakaleaf-pro/IsGnx0wnzqtV4hI8/images/on-premises/gitlab-sync-commit-message.png?w=560\u0026fit=max\u0026auto=format\u0026n=IsGnx0wnzqtV4hI8\u0026q=85\u0026s=258379664833a4df843960f6b549a7ab 560w, https://mintcdn.com/ayakaleaf-pro/IsGnx0wnzqtV4hI8/images/on-premises/gitlab-sync-commit-message.png?w=840\u0026fit=max\u0026auto=format\u0026n=IsGnx0wnzqtV4hI8\u0026q=85\u0026s=78741526ad40ba03ab7ed3a493fe11da 840w, https://mintcdn.com/ayakaleaf-pro/IsGnx0wnzqtV4hI8/images/on-premises/gitlab-sync-commit-message.png?w=1100\u0026fit=max\u0026auto=format\u0026n=IsGnx0wnzqtV4hI8\u0026q=85\u0026s=20e6b8e41f85f975f10b269353106fe5 1100w, https://mintcdn.com/ayakaleaf-pro/IsGnx0wnzqtV4hI8/images/on-premises/gitlab-sync-commit-message.png?w=1650\u0026fit=max\u0026auto=format\u0026n=IsGnx0wnzqtV4hI8\u0026q=85\u0026s=53257959926f3d0b80312ce0d29c7d52 1650w, https://mintcdn.com/ayakaleaf-pro/IsGnx0wnzqtV4hI8/images/on-premises/gitlab-sync-commit-message.png?w=2500\u0026fit=max\u0026auto=format\u0026n=IsGnx0wnzqtV4hI8\u0026q=85\u0026s=938f8160b1bf8c0f4d06a8070def7fcc 2500w`})})]}),_jsx(Step,{title:`Click Sync`,children:_jsxs(_components.p,{children:[`Click `,_jsx(_components.strong,{children:`Sync`}),`. New commits from GitLab come into the project, and your changes go to the default branch of the repository. If both sides changed different things, they are merged for you.`]})}),_jsxs(Step,{title:`Check the result`,children:[_jsxs(_components.p,{children:[`The dialog shows `,_jsx(`strong`,{children:`No new commits in GitLab since last merge.`}),` and the commit message box is gone. The files in the editor and the commits on GitLab are up to date.`]}),_jsx(Frame,{caption:`Everything is in sync`,children:_jsx(OptimizedImage,{src:`https://mintcdn.com/ayakaleaf-pro/IsGnx0wnzqtV4hI8/images/on-premises/gitlab-sync-done.png?fit=max\u0026auto=format\u0026n=IsGnx0wnzqtV4hI8\u0026q=85\u0026s=74dd7ceacb36ac0289d76504e95e7ba7`,alt:`The Sync with GitLab dialog after syncing, with no new commits`,\"data-og-width\":`664`,width:`664`,\"data-og-height\":`334`,height:`334`,\"data-path\":`images/on-premises/gitlab-sync-done.png`,\"data-optimize\":`true`,\"data-opv\":`3`,srcset:`https://mintcdn.com/ayakaleaf-pro/IsGnx0wnzqtV4hI8/images/on-premises/gitlab-sync-done.png?w=280\u0026fit=max\u0026auto=format\u0026n=IsGnx0wnzqtV4hI8\u0026q=85\u0026s=86054e7d86ae1c93e5975b5553db858d 280w, https://mintcdn.com/ayakaleaf-pro/IsGnx0wnzqtV4hI8/images/on-premises/gitlab-sync-done.png?w=560\u0026fit=max\u0026auto=format\u0026n=IsGnx0wnzqtV4hI8\u0026q=85\u0026s=c9fbd3f13a0420ce9a7c17c44be9a661 560w, https://mintcdn.com/ayakaleaf-pro/IsGnx0wnzqtV4hI8/images/on-premises/gitlab-sync-done.png?w=840\u0026fit=max\u0026auto=format\u0026n=IsGnx0wnzqtV4hI8\u0026q=85\u0026s=f13f90e6f71539297788b7a5f93e0255 840w, https://mintcdn.com/ayakaleaf-pro/IsGnx0wnzqtV4hI8/images/on-premises/gitlab-sync-done.png?w=1100\u0026fit=max\u0026auto=format\u0026n=IsGnx0wnzqtV4hI8\u0026q=85\u0026s=2d46b2fa6b479ffbe4068eddfea05cb8 1100w, https://mintcdn.com/ayakaleaf-pro/IsGnx0wnzqtV4hI8/images/on-premises/gitlab-sync-done.png?w=1650\u0026fit=max\u0026auto=format\u0026n=IsGnx0wnzqtV4hI8\u0026q=85\u0026s=ba119572595588447e7caa214243a492 1650w, https://mintcdn.com/ayakaleaf-pro/IsGnx0wnzqtV4hI8/images/on-premises/gitlab-sync-done.png?w=2500\u0026fit=max\u0026auto=format\u0026n=IsGnx0wnzqtV4hI8\u0026q=85\u0026s=3f36b8e65e0bd25c102912b14f131b5a 2500w`})})]})]}),`\n`,_jsx(Heading,{level:`3`,id:`if-the-same-lines-changed-on-both-sides`,children:`If the same lines changed on both sides`}),`\n`,_jsxs(_components.p,{children:[`The dialog says the changes could not be merged and names a new branch, `,_jsx(_components.code,{children:`overleaf-YYYY-MM-DD-HHMMSS`}),`, which holds your changes. Overleaf also opens a merge request from that branch on GitLab.`]}),`\n`,_jsx(Frame,{caption:`A conflict`,children:_jsx(OptimizedImage,{src:`https://mintcdn.com/ayakaleaf-pro/IsGnx0wnzqtV4hI8/images/on-premises/gitlab-sync-conflict.png?fit=max\u0026auto=format\u0026n=IsGnx0wnzqtV4hI8\u0026q=85\u0026s=da33555666132affd667ce24b61221c9`,alt:`The Sync with GitLab dialog with a merge conflict warning`,\"data-og-width\":`664`,width:`664`,\"data-og-height\":`355`,height:`355`,\"data-path\":`images/on-premises/gitlab-sync-conflict.png`,\"data-optimize\":`true`,\"data-opv\":`3`,srcset:`https://mintcdn.com/ayakaleaf-pro/IsGnx0wnzqtV4hI8/images/on-premises/gitlab-sync-conflict.png?w=280\u0026fit=max\u0026auto=format\u0026n=IsGnx0wnzqtV4hI8\u0026q=85\u0026s=33ed17dadc05b548da78c0c1a1320c19 280w, https://mintcdn.com/ayakaleaf-pro/IsGnx0wnzqtV4hI8/images/on-premises/gitlab-sync-conflict.png?w=560\u0026fit=max\u0026auto=format\u0026n=IsGnx0wnzqtV4hI8\u0026q=85\u0026s=9be4109e5757ee7f13b990452c85f117 560w, https://mintcdn.com/ayakaleaf-pro/IsGnx0wnzqtV4hI8/images/on-premises/gitlab-sync-conflict.png?w=840\u0026fit=max\u0026auto=format\u0026n=IsGnx0wnzqtV4hI8\u0026q=85\u0026s=4678ba04ebd3516223662076eed5e2c2 840w, https://mintcdn.com/ayakaleaf-pro/IsGnx0wnzqtV4hI8/images/on-premises/gitlab-sync-conflict.png?w=1100\u0026fit=max\u0026auto=format\u0026n=IsGnx0wnzqtV4hI8\u0026q=85\u0026s=3b1356a435154adf25d761695a2936a1 1100w, https://mintcdn.com/ayakaleaf-pro/IsGnx0wnzqtV4hI8/images/on-premises/gitlab-sync-conflict.png?w=1650\u0026fit=max\u0026auto=format\u0026n=IsGnx0wnzqtV4hI8\u0026q=85\u0026s=b54460c4f70a3909e677a588e08bfbca 1650w, https://mintcdn.com/ayakaleaf-pro/IsGnx0wnzqtV4hI8/images/on-premises/gitlab-sync-conflict.png?w=2500\u0026fit=max\u0026auto=format\u0026n=IsGnx0wnzqtV4hI8\u0026q=85\u0026s=d7a56531e2338242b2b4b4e82508c03c 2500w`})}),`\n`,_jsxs(_components.ol,{children:[`\n`,_jsx(_components.li,{children:`Merge that branch into the default branch on GitLab or with Git. You can close the dialog in the meantime: it shows the same message when you open it again.`}),`\n`,_jsxs(_components.li,{children:[`Click `,_jsx(_components.strong,{children:`I have manually merged. Continue`}),`. The merged result comes into the project. If you click it before the branch is merged, the dialog stays as it is.`]}),`\n`,_jsx(_components.li,{children:`The branch stays on GitLab, unless you deleted it when merging. Delete it when you no longer need it.`}),`\n`]}),`\n`,_jsxs(_components.p,{children:[`The same dialog appears when the repository’s merge rules hold the merge request back, for example when it needs an approval, even if no lines conflict. Once the rule allows it, merge the merge request on GitLab and click `,_jsx(_components.strong,{children:`I have manually merged. Continue`}),`. See `,_jsx(_components.a,{href:`/on-premises/configuration/overleaf-toolkit/integrations/gitlab-synchronisation#how-syncing-works-with-gitlab`,children:`How syncing works with GitLab`}),`.`]}),`\n`,_jsx(Heading,{level:`2`,id:`unlink-a-project`,children:`Unlink a project`}),`\n`,_jsx(_components.p,{children:`Do this when you no longer want the project to sync.`}),`\n`,_jsxs(Steps,{children:[_jsx(Step,{title:`Click Unlink`,children:_jsxs(_components.p,{children:[`In the sync dialog, click `,_jsx(_components.strong,{children:`Unlink`}),`.`]})}),_jsxs(Step,{title:`Confirm`,children:[_jsxs(_components.p,{children:[`Click `,_jsx(_components.strong,{children:`Confirm`}),`. This only removes the link: the connection to a repository you own, which the warning mentions, is an option you have afterwards, not something that happens now.`]}),_jsx(Frame,{caption:`Confirm the unlink`,children:_jsx(OptimizedImage,{src:`https://mintcdn.com/ayakaleaf-pro/IsGnx0wnzqtV4hI8/images/on-premises/gitlab-sync-unlink-project.png?fit=max\u0026auto=format\u0026n=IsGnx0wnzqtV4hI8\u0026q=85\u0026s=8d7469fda58abd012ed1364f9f54005d`,alt:`The Sync with GitLab dialog asking to confirm the unlink`,\"data-og-width\":`664`,width:`664`,\"data-og-height\":`364`,height:`364`,\"data-path\":`images/on-premises/gitlab-sync-unlink-project.png`,\"data-optimize\":`true`,\"data-opv\":`3`,srcset:`https://mintcdn.com/ayakaleaf-pro/IsGnx0wnzqtV4hI8/images/on-premises/gitlab-sync-unlink-project.png?w=280\u0026fit=max\u0026auto=format\u0026n=IsGnx0wnzqtV4hI8\u0026q=85\u0026s=9b31961b26d004083e05eaa2473be0d0 280w, https://mintcdn.com/ayakaleaf-pro/IsGnx0wnzqtV4hI8/images/on-premises/gitlab-sync-unlink-project.png?w=560\u0026fit=max\u0026auto=format\u0026n=IsGnx0wnzqtV4hI8\u0026q=85\u0026s=e7702968356df4e8179328102d6411a4 560w, https://mintcdn.com/ayakaleaf-pro/IsGnx0wnzqtV4hI8/images/on-premises/gitlab-sync-unlink-project.png?w=840\u0026fit=max\u0026auto=format\u0026n=IsGnx0wnzqtV4hI8\u0026q=85\u0026s=7afd426cd972a1fdd10633b929858c60 840w, https://mintcdn.com/ayakaleaf-pro/IsGnx0wnzqtV4hI8/images/on-premises/gitlab-sync-unlink-project.png?w=1100\u0026fit=max\u0026auto=format\u0026n=IsGnx0wnzqtV4hI8\u0026q=85\u0026s=b043cb3cedc2723556024dec20556de2 1100w, https://mintcdn.com/ayakaleaf-pro/IsGnx0wnzqtV4hI8/images/on-premises/gitlab-sync-unlink-project.png?w=1650\u0026fit=max\u0026auto=format\u0026n=IsGnx0wnzqtV4hI8\u0026q=85\u0026s=1dc8e6df9da3bcf2a55d9ab01e2e0848 1650w, https://mintcdn.com/ayakaleaf-pro/IsGnx0wnzqtV4hI8/images/on-premises/gitlab-sync-unlink-project.png?w=2500\u0026fit=max\u0026auto=format\u0026n=IsGnx0wnzqtV4hI8\u0026q=85\u0026s=8bb7b086c5a47d559d01455e8bba0dc7 2500w`})})]}),_jsx(Step,{title:`Check the result`,children:_jsxs(_components.p,{children:[`The dialog now shows `,_jsx(_components.strong,{children:`Export Project to GitLab`}),`. The project and the repository both keep their content. To sync again, export the project to a new repository, or import the repository into a new project.`]})})]}),`\n`,_jsx(Heading,{level:`2`,id:`unlink-your-gitlab-account`,children:`Unlink your GitLab account`}),`\n`,_jsxs(_components.p,{children:[`In `,_jsx(_components.strong,{children:`Account settings`}),`, under `,_jsx(_components.strong,{children:`GitLab`}),`, click `,_jsx(_components.strong,{children:`Unlink`}),`, then `,_jsx(_components.strong,{children:`Unlink`}),` again in the dialog.`]}),`\n`,_jsx(Frame,{caption:`Unlink your account`,children:_jsx(OptimizedImage,{src:`https://mintcdn.com/ayakaleaf-pro/IsGnx0wnzqtV4hI8/images/on-premises/gitlab-sync-unlink-account.png?fit=max\u0026auto=format\u0026n=IsGnx0wnzqtV4hI8\u0026q=85\u0026s=478ab26a1f13d3a9cb08ffc15ad64bc1`,alt:`The Unlink GitLab Account dialog`,\"data-og-width\":`664`,width:`664`,\"data-og-height\":`277`,height:`277`,\"data-path\":`images/on-premises/gitlab-sync-unlink-account.png`,\"data-optimize\":`true`,\"data-opv\":`3`,srcset:`https://mintcdn.com/ayakaleaf-pro/IsGnx0wnzqtV4hI8/images/on-premises/gitlab-sync-unlink-account.png?w=280\u0026fit=max\u0026auto=format\u0026n=IsGnx0wnzqtV4hI8\u0026q=85\u0026s=2fefe83f111bacc42b117937b5c52873 280w, https://mintcdn.com/ayakaleaf-pro/IsGnx0wnzqtV4hI8/images/on-premises/gitlab-sync-unlink-account.png?w=560\u0026fit=max\u0026auto=format\u0026n=IsGnx0wnzqtV4hI8\u0026q=85\u0026s=6a01a924168373bc84bad9e781c1a7ee 560w, https://mintcdn.com/ayakaleaf-pro/IsGnx0wnzqtV4hI8/images/on-premises/gitlab-sync-unlink-account.png?w=840\u0026fit=max\u0026auto=format\u0026n=IsGnx0wnzqtV4hI8\u0026q=85\u0026s=74a0f22e044e6098952f993e02743fcd 840w, https://mintcdn.com/ayakaleaf-pro/IsGnx0wnzqtV4hI8/images/on-premises/gitlab-sync-unlink-account.png?w=1100\u0026fit=max\u0026auto=format\u0026n=IsGnx0wnzqtV4hI8\u0026q=85\u0026s=c1bc1022f5cb4ada5451b52c9606a48c 1100w, https://mintcdn.com/ayakaleaf-pro/IsGnx0wnzqtV4hI8/images/on-premises/gitlab-sync-unlink-account.png?w=1650\u0026fit=max\u0026auto=format\u0026n=IsGnx0wnzqtV4hI8\u0026q=85\u0026s=45da614e22cc927ea9a12f1c7a20f9a0 1650w, https://mintcdn.com/ayakaleaf-pro/IsGnx0wnzqtV4hI8/images/on-premises/gitlab-sync-unlink-account.png?w=2500\u0026fit=max\u0026auto=format\u0026n=IsGnx0wnzqtV4hI8\u0026q=85\u0026s=a9ed914e86ad53eb88993fafc00e8ecb 2500w`})}),`\n`,_jsx(_components.p,{children:`Your projects stay linked to their repositories. You cannot sync them until you link your account again.`}),`\n`,_jsx(Info,{children:_jsxs(_components.p,{children:[`For who can do what in a shared project, see `,_jsx(_components.a,{href:`/on-premises/configuration/overleaf-toolkit/integrations/gitlab-synchronisation#who-can-link-and-sync`,children:`Who can link and sync`}),`.`]})})]})}function MDXContent(props={}){const{wrapper:MDXLayout}={..._provideComponents(),...props.components};return MDXLayout?_jsx(MDXLayout,{...props,children:_jsx(_createMdxContent,{...props})}):_createMdxContent(props)}return{default:MDXContent};function _missingMdxReference(id,component){throw new Error(`Expected `+(component?`component`:`object`)+\" `\"+id+\"` to be defined: you likely forgot to import, pass, or provide it.\")}","frontmatter":{},"scope":{"config":{},"pageMetadata":{"title":"GitLab Synchronisation","description":"Link your GitLab account, import or export a project, sync changes both ways and unlink.","icon":"https://d3gk2c5xim1je2.cloudfront.net/fontawesome/v7.2.0/brands/gitlab.svg","href":"/on-premises/user-guide/users/gitlab-synchronisation"}}},"mdxSourceWithNoJs":null},"mdxExtracts":{"tableOfContents":[{"title":"Link your GitLab account","slug":"link-your-gitlab-account","depth":2,"children":[]},{"title":"Import a repository","slug":"import-a-repository","depth":2,"children":[]},{"title":"Export a project to a new repository","slug":"export-a-project-to-a-new-repository","depth":2,"children":[]},{"title":"Sync","slug":"sync","depth":2,"children":[{"title":"If the same lines changed on both sides","slug":"if-the-same-lines-changed-on-both-sides","depth":3,"children":[]}]},{"title":"Unlink a project","slug":"unlink-a-project","depth":2,"children":[]},{"title":"Unlink your GitLab account","slug":"unlink-your-gitlab-account","depth":2,"children":[]}],"codeExamples":{}},"jsLinks":[],"subdomain":"ayakaleaf-pro","siteName":"Ayakaleaf Pro","title":"GitLab Synchronisation - Ayakaleaf Pro","navMaps":{"firstHrefInVersion":{},"firstHrefInLanguage":{"en":{"href":"/on-premises/user-guide/users/gitlab-synchronisation","matchLevel":0},"zh-CN":{"href":"/zh-CN","matchLevel":4},"zh-TW":{"href":"/zh-TW","matchLevel":4},"ja":{"href":"/ja","matchLevel":4},"de":{"href":"/de","matchLevel":4},"fr":{"href":"/fr","matchLevel":4},"es":{"href":"/es","matchLevel":4},"it":{"href":"/it","matchLevel":4},"ko":{"href":"/ko","matchLevel":4},"ru":{"href":"/ru","matchLevel":4},"nl":{"href":"/nl","matchLevel":4},"pt":{"href":"/pt","matchLevel":4},"tr":{"href":"/tr","matchLevel":4},"uk":{"href":"/uk","matchLevel":4},"pl":{"href":"/pl","matchLevel":4},"cs":{"href":"/cs","matchLevel":4},"sv":{"href":"/sv","matchLevel":4},"fi":{"href":"/fi","matchLevel":4},"ar":{"href":"/ar","matchLevel":4},"vi":{"href":"/vi","matchLevel":4},"no":{"href":"/no","matchLevel":4},"da":{"href":"/da","matchLevel":4},"id":{"href":"/id","matchLevel":4},"zh-Hans":{"href":"/zh-Hans","matchLevel":4},"zh-Hant":{"href":"/zh-Hant","matchLevel":4}}},"lastModified":"2026-11-07T03:05:41.657Z","gitLastModified":"2026-11-07T03:05:24.000Z","originalFileLocation":"on-premises/user-guide/users/gitlab-synchronisation.mdx","locale":"en"},"headHtml":"\u003cscript data-mint-head>(function(){var d=document.documentElement,p=null;if(!p){try{p=localStorage.getItem(\"isDarkMode\")}catch(e){}if(p==='true')p='dark';else if(p==='false')p='light';if(p!=='light'\u0026\u0026p!=='dark'\u0026\u0026p!=='system')p=\"system\"}var r=p==='system'?(matchMedia(\"(prefers-color-scheme: dark)\").matches?'dark':'light'):p;d.classList.remove(r==='dark'?'light':'dark');d.classList.add(r);d.setAttribute(\"data-theme-preference\",p)})();\u003c/script>\u003cmeta data-mint-head name=\"description\" content=\"Link your GitLab account, import or export a project, sync changes both ways and unlink.\">\u003cmeta data-mint-head name=\"application-name\" content=\"Ayakaleaf Pro\">\u003cmeta data-mint-head name=\"generator\" content=\"Mintlify\">\u003clink data-mint-head rel=\"icon\" type=\"image/png\" sizes=\"192x192\" href=\"/mintlify-assets/_mintlify/favicons/ayakaleaf-pro/o_LAbiVNKQm96Y75/_generated/favicon/android-chrome-192x192.png\" media=\"(prefers-color-scheme: light)\">\u003clink data-mint-head rel=\"apple-touch-icon\" type=\"image/png\" sizes=\"180x180\" href=\"/mintlify-assets/_mintlify/favicons/ayakaleaf-pro/o_LAbiVNKQm96Y75/_generated/favicon/apple-touch-icon.png\">\u003clink data-mint-head rel=\"icon\" type=\"image/png\" sizes=\"16x16\" href=\"/mintlify-assets/_mintlify/favicons/ayakaleaf-pro/o_LAbiVNKQm96Y75/_generated/favicon/favicon-16x16.png\" media=\"(prefers-color-scheme: light)\">\u003clink data-mint-head rel=\"icon\" type=\"image/png\" sizes=\"32x32\" href=\"/mintlify-assets/_mintlify/favicons/ayakaleaf-pro/o_LAbiVNKQm96Y75/_generated/favicon/favicon-32x32.png\" media=\"(prefers-color-scheme: light)\">\u003clink data-mint-head rel=\"shortcut icon\" type=\"image/x-icon\" href=\"/mintlify-assets/_mintlify/favicons/ayakaleaf-pro/o_LAbiVNKQm96Y75/_generated/favicon/favicon.ico\" media=\"(prefers-color-scheme: light)\">\u003clink data-mint-head rel=\"icon\" type=\"image/png\" sizes=\"192x192\" href=\"/mintlify-assets/_mintlify/favicons/ayakaleaf-pro/o_LAbiVNKQm96Y75/_generated/favicon-dark/android-chrome-192x192.png\" media=\"(prefers-color-scheme: dark)\">\u003clink data-mint-head rel=\"icon\" type=\"image/png\" sizes=\"16x16\" href=\"/mintlify-assets/_mintlify/favicons/ayakaleaf-pro/o_LAbiVNKQm96Y75/_generated/favicon-dark/favicon-16x16.png\" media=\"(prefers-color-scheme: dark)\">\u003clink data-mint-head rel=\"icon\" type=\"image/png\" sizes=\"32x32\" href=\"/mintlify-assets/_mintlify/favicons/ayakaleaf-pro/o_LAbiVNKQm96Y75/_generated/favicon-dark/favicon-32x32.png\" media=\"(prefers-color-scheme: dark)\">\u003clink data-mint-head rel=\"shortcut icon\" type=\"image/x-icon\" href=\"/mintlify-assets/_mintlify/favicons/ayakaleaf-pro/o_LAbiVNKQm96Y75/_generated/favicon-dark/favicon.ico\" media=\"(prefers-color-scheme: dark)\">\u003cmeta data-mint-head property=\"og:title\" content=\"GitLab Synchronisation - Ayakaleaf Pro\">\u003cmeta data-mint-head property=\"og:description\" content=\"Link your GitLab account, import or export a project, sync changes both ways and unlink.\">\u003cmeta data-mint-head property=\"og:site_name\" content=\"Ayakaleaf Pro\">\u003cmeta data-mint-head property=\"og:url\" content=\"https://ayakaleaf-pro.mintlify.app/on-premises/user-guide/users/gitlab-synchronisation\">\u003cmeta data-mint-head property=\"og:type\" content=\"website\">\u003cmeta data-mint-head property=\"og:image\" content=\"https://ayakaleaf-pro.mintlify.site/_mintlify/api/og/v2?division=For+users\u0026amp;title=GitLab+Synchronisation\u0026amp;description=Link+your+GitLab+account%2C+import+or+export+a+project%2C+sync+changes+both+ways+and+unlink.\u0026amp;theme=a852d976fde0e13c2ab73efd\u0026amp;signature=e0018de82ee512579d668db5646325bbdf37a72d3295abbb93d98b5c4c7cba21\">\u003cmeta data-mint-head property=\"og:image:width\" content=\"1200\">\u003cmeta data-mint-head property=\"og:image:height\" content=\"630\">\u003cmeta data-mint-head name=\"twitter:card\" content=\"summary_large_image\">\u003cmeta data-mint-head name=\"twitter:title\" content=\"GitLab Synchronisation - Ayakaleaf Pro\">\u003cmeta data-mint-head name=\"twitter:description\" content=\"Link your GitLab account, import or export a project, sync changes both ways and unlink.\">\u003cmeta data-mint-head name=\"twitter:image\" content=\"https://ayakaleaf-pro.mintlify.site/_mintlify/api/og/v2?division=For+users\u0026amp;title=GitLab+Synchronisation\u0026amp;description=Link+your+GitLab+account%2C+import+or+export+a+project%2C+sync+changes+both+ways+and+unlink.\u0026amp;theme=a852d976fde0e13c2ab73efd\u0026amp;signature=e0018de82ee512579d668db5646325bbdf37a72d3295abbb93d98b5c4c7cba21\">\u003cmeta data-mint-head name=\"twitter:image:width\" content=\"1200\">\u003cmeta data-mint-head name=\"twitter:image:height\" content=\"630\">\u003cmeta data-mint-head name=\"msapplication-config\" content=\"/mintlify-assets/_mintlify/favicons/ayakaleaf-pro/o_LAbiVNKQm96Y75/_generated/favicon/browserconfig.xml\">\u003cmeta data-mint-head name=\"apple-mobile-web-app-title\" content=\"Ayakaleaf Pro\">\u003cmeta data-mint-head name=\"msapplication-TileColor\" content=\"#0E0E0E\">\u003clink data-mint-head rel=\"canonical\" href=\"https://ayakaleaf-pro.mintlify.app/on-premises/user-guide/users/gitlab-synchronisation\">\u003clink data-mint-head rel=\"alternate\" type=\"application/xml\" href=\"/sitemap.xml\">\u003clink data-mint-head rel=\"alternate\" type=\"text/markdown\" href=\"/on-premises/user-guide/users/gitlab-synchronisation.md\">\u003cscript data-mint-head type=\"application/ld+json\">{\"@context\":\"https://schema.org\",\"@graph\":[{\"@type\":\"Organization\",\"@id\":\"https://ayakaleaf-pro.mintlify.app/#organization\",\"name\":\"Ayakaleaf Pro\",\"url\":\"https://ayakaleaf-pro.mintlify.app\",\"logo\":{\"@type\":\"ImageObject\",\"url\":\"https://mintcdn.com/ayakaleaf-pro/JetHeEeglWIIXNds/logo/light.png?fit=max\u0026auto=format\u0026n=JetHeEeglWIIXNds\u0026q=85\u0026s=7f1abd8dcc74dd3b7cdafac9e6e82092\"}},{\"@type\":\"WebSite\",\"@id\":\"https://ayakaleaf-pro.mintlify.app#website\",\"name\":\"Ayakaleaf Pro\",\"url\":\"https://ayakaleaf-pro.mintlify.app\",\"publisher\":{\"@id\":\"https://ayakaleaf-pro.mintlify.app/#organization\"}},{\"@type\":\"WebPage\",\"@id\":\"https://ayakaleaf-pro.mintlify.app/on-premises/user-guide/users/gitlab-synchronisation#webpage\",\"url\":\"https://ayakaleaf-pro.mintlify.app/on-premises/user-guide/users/gitlab-synchronisation\",\"name\":\"GitLab Synchronisation\",\"description\":\"Link your GitLab account, import or export a project, sync changes both ways and unlink.\",\"dateModified\":\"2026-11-07T03:05:24.000Z\",\"isPartOf\":{\"@id\":\"https://ayakaleaf-pro.mintlify.app#website\"},\"breadcrumb\":{\"@id\":\"https://ayakaleaf-pro.mintlify.app/on-premises/user-guide/users/gitlab-synchronisation#breadcrumb\"}},{\"@type\":\"BreadcrumbList\",\"@id\":\"https://ayakaleaf-pro.mintlify.app/on-premises/user-guide/users/gitlab-synchronisation#breadcrumb\",\"itemListElement\":[{\"@type\":\"ListItem\",\"position\":1,\"name\":\"User guide\",\"item\":\"https://ayakaleaf-pro.mintlify.app/on-premises/user-guide/administrators/onboarding\"},{\"@type\":\"ListItem\",\"position\":2,\"name\":\"For users\",\"item\":\"https://ayakaleaf-pro.mintlify.app/on-premises/user-guide/users/index\"},{\"@type\":\"ListItem\",\"position\":3,\"name\":\"GitLab Synchronisation\",\"item\":\"https://ayakaleaf-pro.mintlify.app/on-premises/user-guide/users/gitlab-synchronisation\"}]},{\"@type\":[\"Article\",\"TechArticle\"],\"@id\":\"https://ayakaleaf-pro.mintlify.app/on-premises/user-guide/users/gitlab-synchronisation#article\",\"headline\":\"GitLab Synchronisation\",\"name\":\"GitLab Synchronisation\",\"description\":\"Link your GitLab account, import or export a project, sync changes both ways and unlink.\",\"url\":\"https://ayakaleaf-pro.mintlify.app/on-premises/user-guide/users/gitlab-synchronisation\",\"mainEntityOfPage\":{\"@id\":\"https://ayakaleaf-pro.mintlify.app/on-premises/user-guide/users/gitlab-synchronisation#webpage\"},\"dateModified\":\"2026-11-07T03:05:24.000Z\",\"publisher\":{\"@id\":\"https://ayakaleaf-pro.mintlify.app/#organization\"},\"isPartOf\":{\"@id\":\"https://ayakaleaf-pro.mintlify.app#website\"}}]}\u003c/script>\u003cscript data-mint-head type=\"application/ld+json\">{\"@context\":\"https://schema.org\",\"@type\":\"WebSite\",\"name\":\"Ayakaleaf Pro\",\"creator\":{\"@type\":\"Organization\",\"name\":\"Mintlify\",\"url\":\"https://mintlify.com\"}}\u003c/script>","siteName":"Ayakaleaf Pro","nav":{"global":null,"languages":[{"language":"en","default":true,"tabs":[{"tab":"Home","icon":"house-chimney","pages":[{"title":"Home","href":""}]},{"tab":"On-Premises","icon":"server","groups":[{"group":"Overview","pages":[{"group":"Welcome","icon":"hand-wave","root":{"title":"Welcome","icon":"hand-wave","href":"/on-premises"},"pages":[{"title":"Features and Copyright","icon":"layer-plus","href":"/on-premises/readme/features-and-copyright"},{"title":"Trust and Security","icon":"https://d3gk2c5xim1je2.cloudfront.net/fontawesome/v7.2.0/brands/expeditedssl.svg","href":"/on-premises/readme/trust-and-security"},{"title":"Overleaf Server Pro vs. Ayakaleaf Pro","icon":"scale-balanced","href":"/on-premises/readme/ayakaleaf-pro-vs-server-pro"},{"title":"Question and Answer","icon":"comment-question","href":"/on-premises/readme/question-and-answer"}]},{"group":"Release notes","icon":"code-branch","root":{"title":"Release notes","icon":"code-branch","href":"/on-premises/release-notes/index"},"pages":[{"title":"Release notes 6.x.x","href":"/on-premises/release-notes/release-notes-6.x.x"}]}]},{"group":"Installation","pages":[{"title":"Introduction","icon":"map-location","href":"/on-premises/installation/introduction"},{"group":"Using Docker Compose","icon":"https://d3gk2c5xim1je2.cloudfront.net/fontawesome/v7.2.0/brands/docker.svg","root":{"title":"Using Docker Compose","icon":"https://d3gk2c5xim1je2.cloudfront.net/fontawesome/v7.2.0/brands/docker.svg","href":"/on-premises/installation/using-docker-compose/index"},"pages":[{"group":"Linux","icon":"https://d3gk2c5xim1je2.cloudfront.net/fontawesome/v7.2.0/brands/linux.svg","root":{"title":"Linux","icon":"https://d3gk2c5xim1je2.cloudfront.net/fontawesome/v7.2.0/brands/linux.svg","href":"/on-premises/installation/using-docker-compose/linux/index"},"pages":[{"title":"0. Setup Docker","icon":"https://d3gk2c5xim1je2.cloudfront.net/fontawesome/v7.2.0/brands/docker.svg","href":"/on-premises/installation/using-docker-compose/linux/0.-setup-docker"},{"title":"1. Download the Toolkit","icon":"arrow-down-to-bracket","href":"/on-premises/installation/using-docker-compose/linux/1.-download-the-toolkit"},{"title":"2. Familiarize yourself with the Toolkit","icon":"magnifying-glass","href":"/on-premises/installation/using-docker-compose/linux/2.-familiarize-yourself-with-the-toolkit"},{"title":"3. Initialize the configuration","icon":"circle-play","href":"/on-premises/installation/using-docker-compose/linux/3.-initialize-the-configuration"},{"title":"4. Get Ayakaleaf Pro Images","icon":"split","href":"/on-premises/installation/using-docker-compose/linux/4.-get-overleaf-pro-images"},{"title":"5. Personalizing your instance","icon":"square-sliders","href":"/on-premises/installation/using-docker-compose/linux/5.-personalizing-your-instance"},{"title":"6. Post-installation tasks","icon":"ballot-check","href":"/on-premises/installation/using-docker-compose/linux/6.-post-installation-tasks"}]},{"group":"macOS","icon":"https://d3gk2c5xim1je2.cloudfront.net/fontawesome/v7.2.0/brands/apple.svg","root":{"title":"macOS","icon":"https://d3gk2c5xim1je2.cloudfront.net/fontawesome/v7.2.0/brands/apple.svg","href":"/on-premises/installation/using-docker-compose/macos/index"},"pages":[{"title":"0. Setup Docker Desktop","icon":"https://d3gk2c5xim1je2.cloudfront.net/fontawesome/v7.2.0/brands/docker.svg","href":"/on-premises/installation/using-docker-compose/macos/0.-setup-docker-desktop"},{"title":"1. Download the Toolkit","icon":"arrow-down-to-bracket","href":"/on-premises/installation/using-docker-compose/macos/1.-download-the-toolkit"},{"title":"2. Familiarize yourself with the Toolkit","icon":"magnifying-glass","href":"/on-premises/installation/using-docker-compose/macos/2.-familiarize-yourself-with-the-toolkit"},{"title":"3. Initialize the configuration","icon":"circle-play","href":"/on-premises/installation/using-docker-compose/macos/3.-initialize-the-configuration"},{"title":"4. Get Ayakaleaf Pro Images","icon":"split","href":"/on-premises/installation/using-docker-compose/macos/4.-get-ayakaleaf-pro-images"},{"title":"5. Personalizing your instance","icon":"square-sliders","href":"/on-premises/installation/using-docker-compose/macos/5.-personalizing-your-instance"},{"title":"6. Post-installation tasks","icon":"ballot-check","href":"/on-premises/installation/using-docker-compose/macos/6.-post-installation-tasks"},{"title":"Troubleshooting","icon":"screwdriver-wrench","href":"/on-premises/installation/using-docker-compose/macos/troubleshooting"}]},{"group":"Windows","icon":"https://d3gk2c5xim1je2.cloudfront.net/fontawesome/v7.2.0/brands/windows.svg","root":{"title":"Windows","icon":"https://d3gk2c5xim1je2.cloudfront.net/fontawesome/v7.2.0/brands/windows.svg","href":"/on-premises/installation/using-docker-compose/windows/index"},"pages":[{"title":"0. Setup WSL 2 and Docker Desktop","icon":"https://d3gk2c5xim1je2.cloudfront.net/fontawesome/v7.2.0/brands/docker.svg","href":"/on-premises/installation/using-docker-compose/windows/0.-setup-wsl-and-docker-desktop"},{"title":"1. Download the Toolkit","icon":"arrow-down-to-bracket","href":"/on-premises/installation/using-docker-compose/windows/1.-download-the-toolkit"},{"title":"2. Familiarize yourself with the Toolkit","icon":"magnifying-glass","href":"/on-premises/installation/using-docker-compose/windows/2.-familiarize-yourself-with-the-toolkit"},{"title":"3. Initialize the configuration","icon":"circle-play","href":"/on-premises/installation/using-docker-compose/windows/3.-initialize-the-configuration"},{"title":"4. Get Ayakaleaf Pro Images","icon":"split","href":"/on-premises/installation/using-docker-compose/windows/4.-get-ayakaleaf-pro-images"},{"title":"5. Personalizing your instance","icon":"square-sliders","href":"/on-premises/installation/using-docker-compose/windows/5.-personalizing-your-instance"},{"title":"6. Post-installation tasks","icon":"ballot-check","href":"/on-premises/installation/using-docker-compose/windows/6.-post-installation-tasks"},{"title":"Troubleshooting","icon":"wrench","href":"/on-premises/installation/using-docker-compose/windows/troubleshooting"}]}]},{"group":"Using Kubernetes","icon":"dharmachakra","root":{"title":"Using Kubernetes","icon":"dharmachakra","href":"/on-premises/installation/using-kubernetes/index"},"pages":[{"title":"0. Prepare the nodes","icon":"server","href":"/on-premises/installation/using-kubernetes/0.-prepare-the-nodes"},{"title":"1. Get Ayakaleaf Pro Images","icon":"split","href":"/on-premises/installation/using-kubernetes/1.-get-ayakaleaf-pro-images"},{"title":"2. Create the namespace and secrets","icon":"key","href":"/on-premises/installation/using-kubernetes/2.-create-the-namespace-and-secrets"},{"title":"3. Deploy MongoDB and Redis","icon":"database","href":"/on-premises/installation/using-kubernetes/3.-deploy-mongodb-and-redis"},{"title":"4. Personalizing your instance","icon":"square-sliders","href":"/on-premises/installation/using-kubernetes/4.-personalizing-your-instance"},{"title":"5. Deploy Ayakaleaf Pro","icon":"rocket-launch","href":"/on-premises/installation/using-kubernetes/5.-deploy-ayakaleaf-pro"},{"title":"6. Post-installation tasks","icon":"ballot-check","href":"/on-premises/installation/using-kubernetes/6.-post-installation-tasks"}]},{"title":"Using Claude or Codex","icon":"https://d3gk2c5xim1je2.cloudfront.net/fontawesome/v7.2.0/brands/claude.svg","href":"/on-premises/installation/using-claude-or-codex"},{"title":"Using GitHub Codespace","icon":"https://d3gk2c5xim1je2.cloudfront.net/fontawesome/v7.2.0/brands/github.svg","href":"/on-premises/installation/using-the-github-codespace"},{"title":"Air-gapped/offline deployments","icon":"block-brick","href":"/on-premises/installation/air-gapped-offline-deployments"},{"title":"Migrate from Existing","icon":"u-turn-up-right","href":"/on-premises/installation/migrate-from-existing"}]},{"group":"Configuration","pages":[{"group":"Docker Compose","icon":"https://d3gk2c5xim1je2.cloudfront.net/fontawesome/v7.2.0/brands/docker.svg","root":{"title":"Docker Compose","icon":"https://d3gk2c5xim1je2.cloudfront.net/fontawesome/v7.2.0/brands/docker.svg","href":"/on-premises/configuration/overleaf-toolkit/index"},"pages":[{"title":"Files and locations","icon":"folder-open","href":"/on-premises/configuration/overleaf-toolkit/files-and-locations"},{"title":"Toolkit settings","icon":"gear-complex","href":"/on-premises/configuration/overleaf-toolkit/toolkit-settings"},{"title":"Environment variables","icon":"seedling","href":"/on-premises/configuration/overleaf-toolkit/environment-variables"},{"group":"Authentication","icon":"address-card","root":{"title":"Authentication","icon":"address-card","href":"/on-premises/configuration/overleaf-toolkit/authentication/index"},"pages":[{"title":"OIDC Authentication","icon":"id-card-clip","href":"/on-premises/configuration/overleaf-toolkit/authentication/oidc-authentication"},{"title":"SAML Authentication","icon":"key","href":"/on-premises/configuration/overleaf-toolkit/authentication/saml-authentication"},{"title":"LDAP Authentication","icon":"lock","href":"/on-premises/configuration/overleaf-toolkit/authentication/ldap-authentication"},{"title":"Public Access","icon":"lock-open","href":"/on-premises/configuration/overleaf-toolkit/authentication/public-access"},{"title":"reCAPTCHA","icon":"robot","href":"/on-premises/configuration/overleaf-toolkit/authentication/recaptcha"},{"title":"Password restrictions","icon":"key","href":"/on-premises/configuration/overleaf-toolkit/authentication/password-restrictions"}]},{"title":"Sandboxed Compiles","icon":"gear-code","href":"/on-premises/configuration/overleaf-toolkit/sandboxed-compiles"},{"title":"Pandoc Import and Export","icon":"file-lines","href":"/on-premises/configuration/overleaf-toolkit/pandoc-import-and-export"},{"group":"Integrations","icon":"puzzle-piece","root":{"title":"Integrations","icon":"puzzle-piece","href":"/on-premises/configuration/overleaf-toolkit/integrations/index"},"pages":[{"title":"Git integration","icon":"https://d3gk2c5xim1je2.cloudfront.net/fontawesome/v7.2.0/brands/git-alt.svg","href":"/on-premises/configuration/overleaf-toolkit/integrations/git-integration"},{"title":"GitHub Synchronisation","icon":"https://d3gk2c5xim1je2.cloudfront.net/fontawesome/v7.2.0/brands/github.svg","href":"/on-premises/configuration/overleaf-toolkit/integrations/github-synchronisation"},{"title":"GitLab Synchronisation","icon":"https://d3gk2c5xim1je2.cloudfront.net/fontawesome/v7.2.0/brands/gitlab.svg","href":"/on-premises/configuration/overleaf-toolkit/integrations/gitlab-synchronisation"},{"title":"Gitea Synchronisation","icon":"mug-hot","href":"/on-premises/configuration/overleaf-toolkit/integrations/gitea-synchronisation"},{"title":"Dropbox Synchronisation","icon":"https://d3gk2c5xim1je2.cloudfront.net/fontawesome/v7.2.0/brands/dropbox.svg","href":"/on-premises/configuration/overleaf-toolkit/integrations/dropbox-synchronisation"},{"title":"Zotero Integration","icon":"z","href":"/on-premises/configuration/overleaf-toolkit/integrations/zotero-integration"},{"title":"Mendeley Integration","icon":"https://d3gk2c5xim1je2.cloudfront.net/fontawesome/v7.2.0/brands/mendeley.svg","href":"/on-premises/configuration/overleaf-toolkit/integrations/mendeley-integration"},{"title":"MCP Server","icon":"plug","href":"/on-premises/configuration/overleaf-toolkit/integrations/mcp-server"},{"title":"AI Integration","icon":"https://d3gk2c5xim1je2.cloudfront.net/fontawesome/v7.2.0/brands/openai.svg","href":"/on-premises/configuration/overleaf-toolkit/integrations/ai-integration"},{"title":"Overleaf Import API","icon":"rectangle-api","href":"/on-premises/configuration/overleaf-toolkit/integrations/overleaf-import-api"}]},{"title":"Templates","icon":"paste","href":"/on-premises/configuration/overleaf-toolkit/templates"},{"title":"External URL","icon":"link","href":"/on-premises/configuration/overleaf-toolkit/external-url"},{"title":"Logging","icon":"memo-circle-info","href":"/on-premises/configuration/overleaf-toolkit/logging"},{"title":"TLS proxy","icon":"lock","href":"/on-premises/configuration/overleaf-toolkit/tls-proxy"},{"title":"Branding","icon":"copyright","href":"/on-premises/configuration/overleaf-toolkit/branding"},{"title":"Localization","icon":"globe-pointer","href":"/on-premises/configuration/overleaf-toolkit/localization"},{"title":"Email delivery","icon":"paper-plane-top","href":"/on-premises/configuration/overleaf-toolkit/email-delivery"},{"title":"Redis","icon":"memory","href":"/on-premises/configuration/overleaf-toolkit/redis"},{"title":"S3","icon":"https://d3gk2c5xim1je2.cloudfront.net/fontawesome/v7.2.0/brands/aws.svg","href":"/on-premises/configuration/overleaf-toolkit/s3"},{"title":"Adding LaTeX user help","icon":"graduation-cap","href":"/on-premises/configuration/overleaf-toolkit/adding-latex-user-help"}]},{"group":"Kubernetes","icon":"dharmachakra","root":{"title":"Kubernetes","icon":"dharmachakra","href":"/on-premises/configuration/kubernetes/index"},"pages":[{"group":"Authentication","icon":"address-card","root":{"title":"Authentication","icon":"address-card","href":"/on-premises/configuration/kubernetes/authentication/index"},"pages":[{"title":"OIDC Authentication","icon":"id-card-clip","href":"/on-premises/configuration/kubernetes/authentication/oidc-authentication"},{"title":"SAML Authentication","icon":"building-columns","href":"/on-premises/configuration/kubernetes/authentication/saml-authentication"},{"title":"LDAP Authentication","icon":"address-book","href":"/on-premises/configuration/kubernetes/authentication/ldap-authentication"},{"title":"Public Access","icon":"lock-open","href":"/on-premises/configuration/kubernetes/authentication/public-access"},{"title":"reCAPTCHA","icon":"robot","href":"/on-premises/configuration/kubernetes/authentication/recaptcha"},{"title":"Password restrictions","icon":"key","href":"/on-premises/configuration/kubernetes/authentication/password-restrictions"}]},{"title":"Sandboxed Compiles","icon":"gear-code","href":"/on-premises/configuration/kubernetes/sandboxed-compiles"},{"title":"Pandoc Import and Export","icon":"file-lines","href":"/on-premises/configuration/kubernetes/pandoc-import-and-export"},{"group":"Integrations","icon":"puzzle-piece","root":{"title":"Integrations","icon":"puzzle-piece","href":"/on-premises/configuration/kubernetes/integrations/index"},"pages":[{"title":"Git integration","icon":"code-branch","href":"/on-premises/configuration/kubernetes/integrations/git-integration"},{"title":"GitHub Synchronisation","icon":"https://d3gk2c5xim1je2.cloudfront.net/fontawesome/v7.2.0/brands/github.svg","href":"/on-premises/configuration/kubernetes/integrations/github-synchronisation"},{"title":"GitLab Synchronisation","icon":"https://d3gk2c5xim1je2.cloudfront.net/fontawesome/v7.2.0/brands/gitlab.svg","href":"/on-premises/configuration/kubernetes/integrations/gitlab-synchronisation"},{"title":"Gitea Synchronisation","icon":"mug-hot","href":"/on-premises/configuration/kubernetes/integrations/gitea-synchronisation"},{"title":"Dropbox Synchronisation","icon":"https://d3gk2c5xim1je2.cloudfront.net/fontawesome/v7.2.0/brands/dropbox.svg","href":"/on-premises/configuration/kubernetes/integrations/dropbox-synchronisation"},{"title":"Zotero Integration","icon":"z","href":"/on-premises/configuration/kubernetes/integrations/zotero-integration"},{"title":"Mendeley Integration","icon":"https://d3gk2c5xim1je2.cloudfront.net/fontawesome/v7.2.0/brands/mendeley.svg","href":"/on-premises/configuration/kubernetes/integrations/mendeley-integration"},{"title":"MCP Server","icon":"plug","href":"/on-premises/configuration/kubernetes/integrations/mcp-server"},{"title":"AI Integration","icon":"https://d3gk2c5xim1je2.cloudfront.net/fontawesome/v7.2.0/brands/openai.svg","href":"/on-premises/configuration/kubernetes/integrations/ai-integration"},{"title":"Overleaf Import API","icon":"rectangle-api","href":"/on-premises/configuration/kubernetes/integrations/overleaf-import-api"}]},{"title":"Templates","icon":"paste","href":"/on-premises/configuration/kubernetes/templates"},{"title":"External URL","icon":"link","href":"/on-premises/configuration/kubernetes/external-url"},{"title":"Logging","icon":"memo-circle-info","href":"/on-premises/configuration/kubernetes/logging"},{"title":"TLS proxy","icon":"lock","href":"/on-premises/configuration/kubernetes/tls-proxy"},{"title":"Branding","icon":"copyright","href":"/on-premises/configuration/kubernetes/branding"},{"title":"Localization","icon":"globe-pointer","href":"/on-premises/configuration/kubernetes/localization"},{"title":"Email delivery","icon":"paper-plane-top","href":"/on-premises/configuration/kubernetes/email-delivery"},{"title":"Redis","icon":"memory","href":"/on-premises/configuration/kubernetes/redis"},{"title":"S3","icon":"https://d3gk2c5xim1je2.cloudfront.net/fontawesome/v7.2.0/brands/aws.svg","href":"/on-premises/configuration/kubernetes/s3"},{"title":"Adding LaTeX user help","icon":"graduation-cap","href":"/on-premises/configuration/kubernetes/adding-latex-user-help"},{"title":"Horizontal scaling","icon":"layer-group","href":"/on-premises/configuration/kubernetes/horizontal-scaling"}]}]},{"group":"User guide","pages":[{"group":"For administrators","icon":"user-gear","root":{"title":"For administrators","icon":"user-gear","href":"/on-premises/user-guide/administrators/index"},"pages":[{"title":"Onboarding","icon":"user-plus","href":"/on-premises/user-guide/administrators/onboarding"},{"title":"Basic management","icon":"sliders","href":"/on-premises/user-guide/administrators/basic-management"},{"title":"User management","icon":"users-gear","href":"/on-premises/user-guide/administrators/user-management"},{"title":"Project management","icon":"folder-gear","href":"/on-premises/user-guide/administrators/project-management"},{"title":"Template management","icon":"paste","href":"/on-premises/user-guide/administrators/template-management"}]},{"group":"For users","icon":"users","root":{"title":"For users","icon":"users","href":"/on-premises/user-guide/users/index"},"pages":[{"title":"Git integration","icon":"https://d3gk2c5xim1je2.cloudfront.net/fontawesome/v7.2.0/brands/git-alt.svg","href":"/on-premises/user-guide/users/git-integration"},{"title":"GitHub Synchronisation","description":"Link your GitHub account, import or export a project, sync changes both ways and unlink.","icon":"https://d3gk2c5xim1je2.cloudfront.net/fontawesome/v7.2.0/brands/github.svg","href":"/on-premises/user-guide/users/github-synchronisation"},{"title":"GitLab Synchronisation","icon":"https://d3gk2c5xim1je2.cloudfront.net/fontawesome/v7.2.0/brands/gitlab.svg","href":"/on-premises/user-guide/users/gitlab-synchronisation"},{"title":"Gitea Synchronisation","description":"Link your Gitea account, import or export a project, sync changes both ways and unlink.","icon":"mug-hot","href":"/on-premises/user-guide/users/gitea-synchronisation"},{"title":"Dropbox Synchronisation","icon":"https://d3gk2c5xim1je2.cloudfront.net/fontawesome/v7.2.0/brands/dropbox.svg","href":"/on-premises/user-guide/users/dropbox-synchronisation"},{"title":"Zotero Integration","icon":"z","href":"/on-premises/user-guide/users/zotero-integration"},{"title":"Mendeley Integration","icon":"https://d3gk2c5xim1je2.cloudfront.net/fontawesome/v7.2.0/brands/mendeley.svg","href":"/on-premises/user-guide/users/mendeley-integration"},{"title":"Templates","icon":"paste","href":"/on-premises/user-guide/users/templates"},{"title":"Symbol Palette","icon":"omega","href":"/on-premises/user-guide/users/symbol-palette"},{"title":"Advanced Reference Search","icon":"magnifying-glass","href":"/on-premises/user-guide/users/advanced-reference-search"},{"title":"AI Assistant","icon":"sparkles","href":"/on-premises/user-guide/users/ai-assistant"},{"title":"Error Assistant","icon":"wand-magic-sparkles","href":"/on-premises/user-guide/users/error-assistant"},{"title":"MCP Server","icon":"plug","href":"/on-premises/user-guide/users/mcp-server"},{"title":"Python Runner","icon":"https://d3gk2c5xim1je2.cloudfront.net/fontawesome/v7.2.0/brands/python.svg","href":"/on-premises/user-guide/users/python-runner"},{"title":"Word import and export","icon":"file-word","href":"/on-premises/user-guide/users/word-import-export"},{"title":"Open in Overleaf","icon":"arrow-up-right-from-square","href":"/on-premises/user-guide/users/open-in-overleaf"}]}]},{"group":"Maintenance","pages":[{"title":"docker-compose.yml to Toolkit migration","icon":"right-left","href":"/on-premises/maintenance/docker-compose.yml-to-toolkit-migration"},{"title":"Upgrading your deployment","icon":"arrow-up-from-square","href":"/on-premises/maintenance/upgrading-your-deployment"},{"title":"Upgrading on Kubernetes","icon":"arrow-up-from-square","href":"/on-premises/maintenance/upgrading-on-kubernetes"},{"group":"Data and backups","icon":"database","root":{"title":"Data and backups","icon":"database","href":"/on-premises/maintenance/data-and-backups/index"},"pages":[{"title":"Exporting projects","icon":"file-export","href":"/on-premises/maintenance/data-and-backups/exporting-projects"}]},{"title":"Extending TeX Live","icon":"rectangle-pro","href":"/on-premises/maintenance/extending-tex-live"},{"title":"Updating TeX Live Full Images Automatically","icon":"arrows-rotate","href":"/on-premises/maintenance/updating-tex-live-full-images-automatically"},{"title":"Horizontal scaling","icon":"distribute-spacing-horizontal","href":"/on-premises/maintenance/horizontal-scaling"},{"title":"S3 migration","icon":"https://d3gk2c5xim1je2.cloudfront.net/fontawesome/v7.2.0/brands/aws.svg","href":"/on-premises/maintenance/s3-migration"},{"title":"Updating MongoDB","icon":"database","href":"/on-premises/maintenance/updating-mongodb"}]},{"group":"User and project management","pages":[{"title":"Roles and permissions","icon":"list-check","href":"/on-premises/user-and-project-management/roles-and-permissions"},{"group":"User management","icon":"users-between-lines","root":{"title":"User management","icon":"users-between-lines","href":"/on-premises/user-and-project-management/user-management/index"},"pages":[{"title":"Username migration","icon":"lock","href":"/on-premises/user-and-project-management/user-management/username-migration"},{"title":"Migrating to LDAP or SAML","icon":"rectangle-pro","href":"/on-premises/user-and-project-management/user-management/migrating-to-ldap-or-saml"}]},{"group":"Project management","icon":"rectangle-history","root":{"title":"Project management","icon":"rectangle-history","href":"/on-premises/user-and-project-management/project-management/index"},"pages":[{"title":"Bulk transfer of project ownership","icon":"lock","href":"/on-premises/user-and-project-management/project-management/bulk-transfer-of-project-ownership"}]}]},{"group":"Support","pages":[{"title":"Project limits","icon":"list-check","href":"/on-premises/support/project-limits"},{"title":"Troubleshooting","icon":"comments-question-check","href":"/on-premises/support/troubleshooting"},{"title":"Getting help","icon":"truck-medical","href":"/on-premises/support/getting-help"},{"group":"Support guides","icon":"message-question","root":{"title":"Support guides","icon":"message-question","href":"/on-premises/support/support-guides/index"},"pages":[{"title":"Using templates as an individual","icon":"rectangle-vertical-history","href":"/on-premises/support/support-guides/using-templates-as-an-individual"}]}]}]},{"tab":"Blog","icon":"rss","pages":[{"title":"Blog","href":"/blog"}]},{"tab":"TeXLive","icon":"compact-disc","pages":[{"title":"TeXLive","href":"/texlive"}]},{"tab":"Developer","icon":"rectangle-terminal","pages":[{"title":"Developer","href":"/dev"}]}]},{"language":"zh-CN","pages":[{"title":"zh-CN","href":"/zh-CN"}]},{"language":"zh-TW","pages":[{"title":"zh-TW","href":"/zh-TW"}]},{"language":"ja","pages":[{"title":"ja","href":"/ja"}]},{"language":"de","pages":[{"title":"de","href":"/de"}]},{"language":"fr","pages":[{"title":"fr","href":"/fr"}]},{"language":"es","pages":[{"title":"es","href":"/es"}]},{"language":"it","pages":[{"title":"it","href":"/it"}]},{"language":"ko","pages":[{"title":"ko","href":"/ko"}]},{"language":"ru","pages":[{"title":"ru","href":"/ru"}]},{"language":"nl","pages":[{"title":"nl","href":"/nl"}]},{"language":"pt","pages":[{"title":"pt","href":"/pt"}]},{"language":"tr","pages":[{"title":"tr","href":"/tr"}]},{"language":"uk","pages":[{"title":"uk","href":"/uk"}]},{"language":"pl","pages":[{"title":"pl","href":"/pl"}]},{"language":"cs","pages":[{"title":"cs","href":"/cs"}]},{"language":"sv","pages":[{"title":"sv","href":"/sv"}]},{"language":"fi","pages":[{"title":"fi","href":"/fi"}]},{"language":"ar","pages":[{"title":"ar","href":"/ar"}]},{"language":"vi","pages":[{"title":"vi","href":"/vi"}]},{"language":"no","pages":[{"title":"no","href":"/no"}]},{"language":"da","pages":[{"title":"da","href":"/da"}]},{"language":"id","pages":[{"title":"id","href":"/id"}]},{"language":"zh-Hans","pages":[{"title":"zh-Hans","href":"/zh-Hans"}]},{"language":"zh-Hant","pages":[{"title":"zh-Hant","href":"/zh-Hant"}]}]},"basePath":"","title":"GitLab Synchronisation - Ayakaleaf Pro","buildId":"dpl_8LJbrAiZvr1K98WQNZXCyY5AvT34","deploymentId":"dpl_8LJbrAiZvr1K98WQNZXCyY5AvT34","dynamics":["07c022d89b","a74be98ba7"],"chunks":["Frame-NdetNziF.js","DynamicMarkdown-CD8713Yy.js","zoom-image-lightbox-DMoL6lHz.js","lightbox-handle-r17bVUz3.js"]}