Create the first administrator, check your instance and add the first user.
Do this once, right after the installation. This page uses the default password login.
1
Open the launchpad
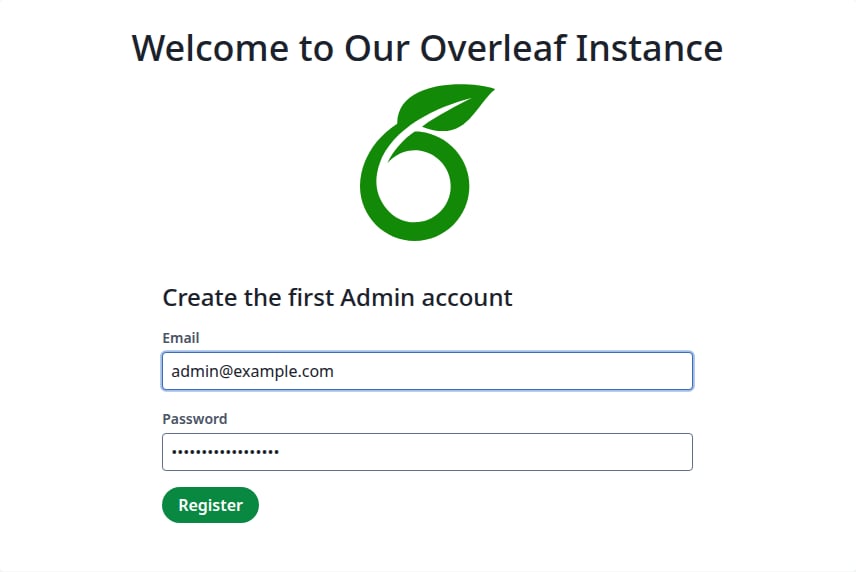
Open /launchpad on your instance, for example http://localhost/launchpad. You see Create the first Admin account.The form is there only until the first administrator exists. After that, signed-out visitors are sent to the login page.
2
Create the administrator account
Enter an email and a password, then click Register.
The first administrator account
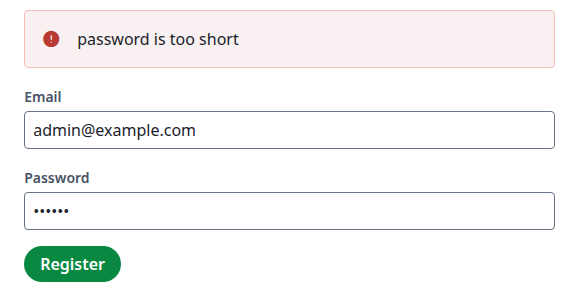
If the password is refused, a message appears above the form and no account is created.
A refused password
Message
Meaning
password is too short
Fewer than 8 characters.
password is too long
More than 72 characters.
password contains an invalid character
Allowed are letters a-z and A-Z, digits and @#$%^&*()-_=+[]{};:<>/?!£€.,. Spaces and accented or non-Latin letters are not.
password contains part of email address
It contains the email or the part before @, or it is part of the email. For admin@example.com, both admin-7Tq9-demo and example.com are refused.
password is too similar to email address
It is close to the email, for example adm1n@example.c0m.
Capital letters, digits and symbols are not required by default. To change the length limits, see Password restrictions.
3
Log in
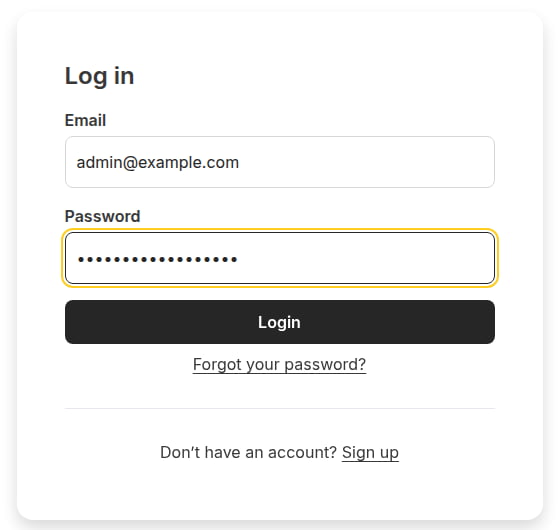
After Register you are on the login page. Enter the same email and password, then click Login.
Log in with the new account
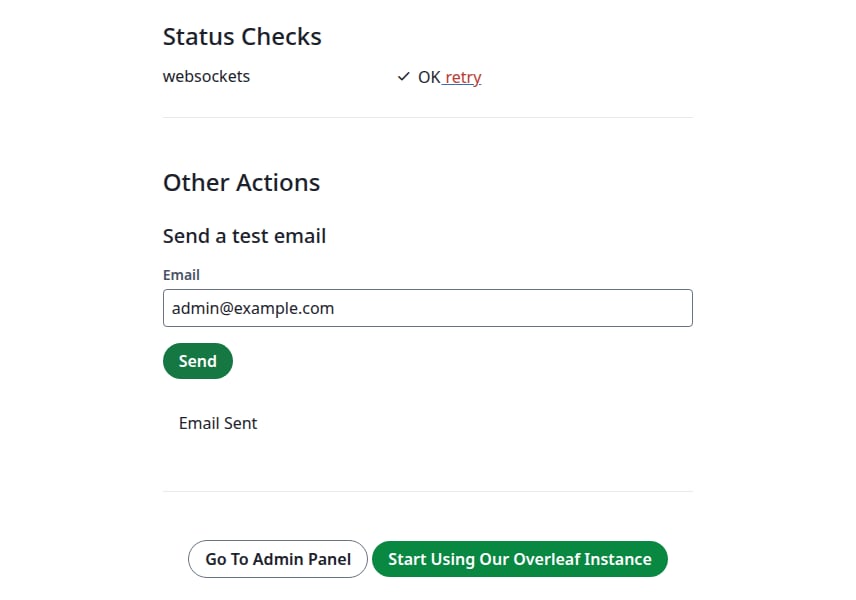
You are back on the launchpad, now with Status Checks.
4
Check the instance
websockets should show OK.To test email, enter your address under Send a test email, click Send, then check your inbox.
Status checks and the test email
Email Sent does not prove that a message left the server. Without email delivery, the page shows the same text and nothing arrives.
Start Usingyour site name opens your projects. Go To Admin Panel opens the site tools, see Basic management.
5
Create the first user
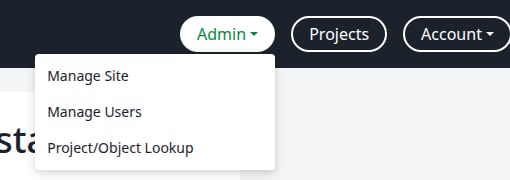
In the top menu, click Admin, then Manage Users.
The Admin menu
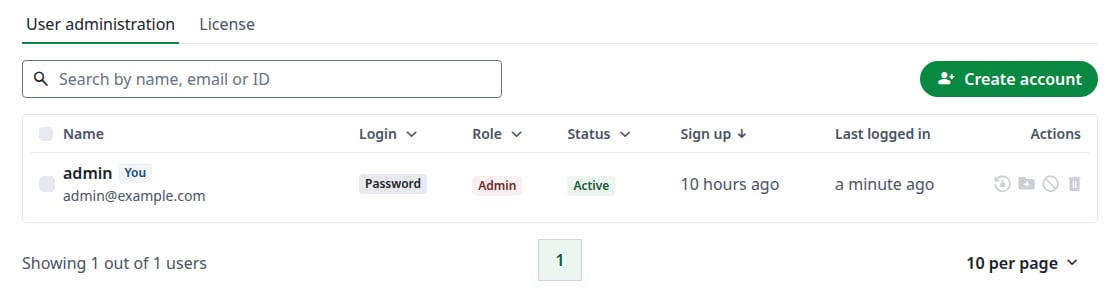
Click Create account.
The user list
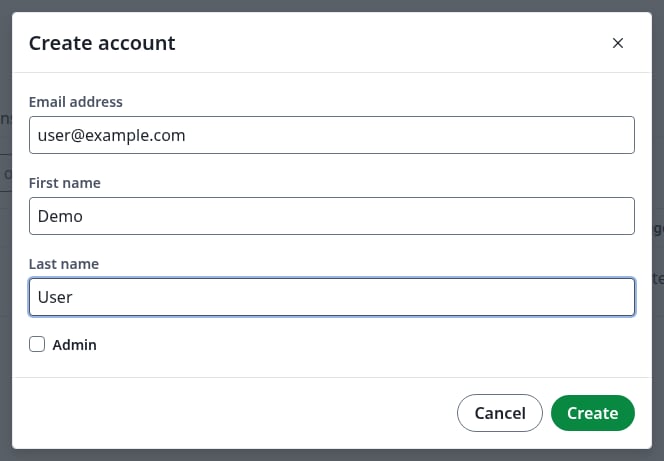
Enter the user’s email. First name and Last name are optional. Tick Admin only for another administrator. Click Create.
The Create account dialog
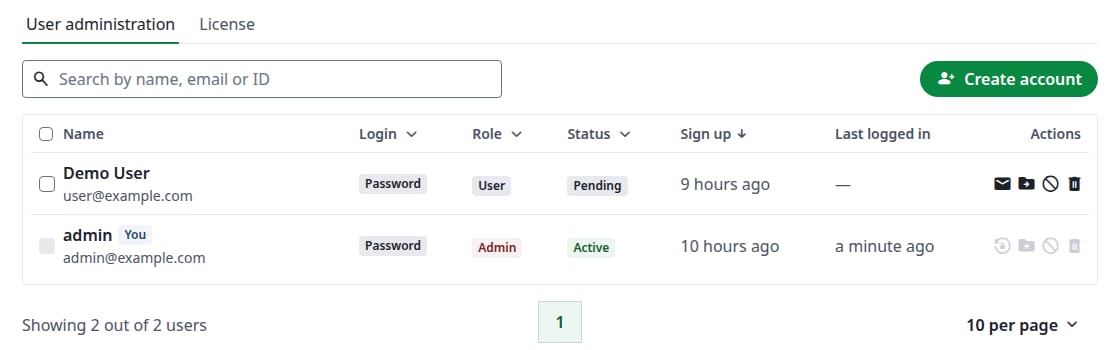
The account appears in the list with the status Pending.
A new account stays Pending until its first login
6
Give the user access
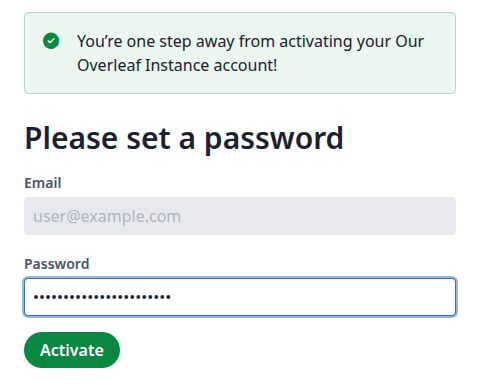
With email delivery configured, the user receives an activation email with a Set password link. The link opens this page. The user enters a password and clicks Activate, and then lands on the projects page. The password rules above apply.
What the user sees after opening the link
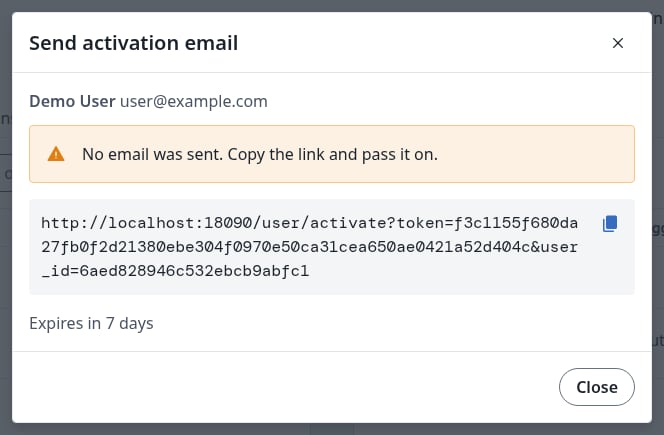
Without email delivery, pass the link on yourself. In Manage Users, click the envelope icon on the user’s row, then Send activation email. The dialog says No email was sent and shows the link, which expires in 7 days. Click the copy icon and send the link to the user, who sets a password as above.
The activation link to pass on
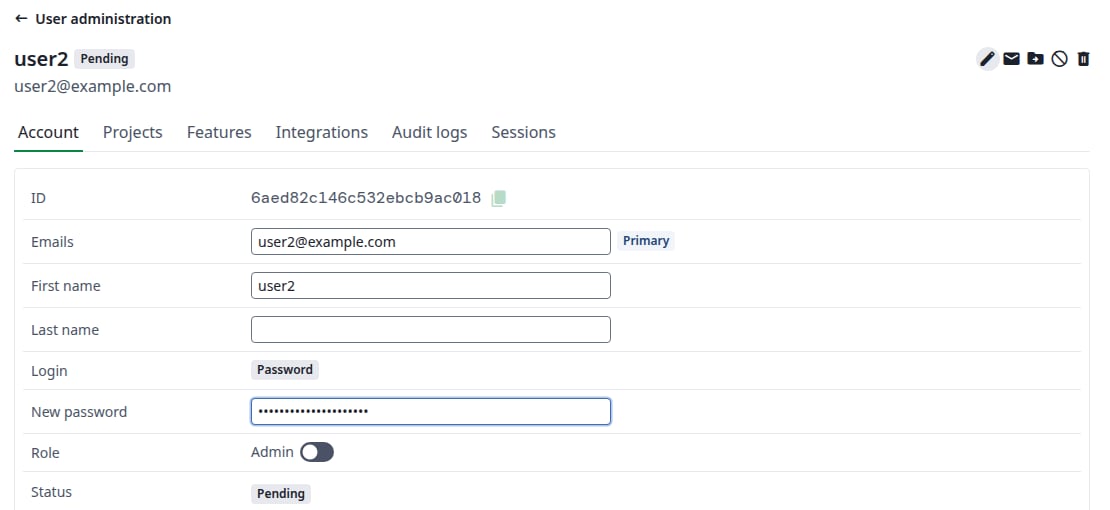
You can also set a password yourself. In Manage Users, click the user’s name, then the pencil icon. Enter New password and click Save. Pass the password on to the user, who logs in at /login.
Setting a password on the Account tab
7
Confirm it worked
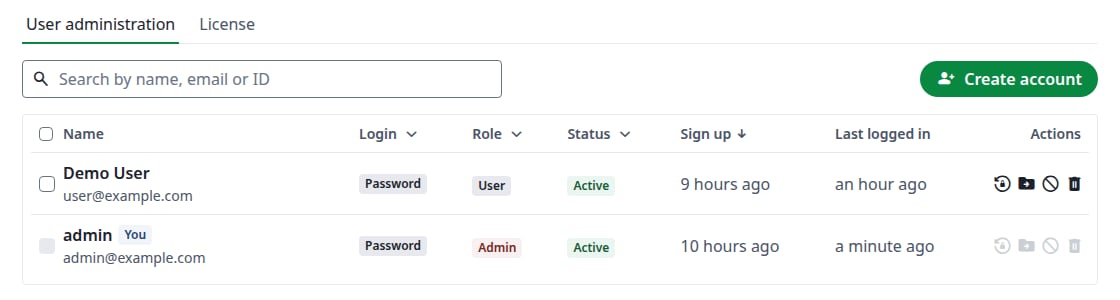
After the user’s first login, the status in Manage Users changes to Active.
The user has logged in
Sign up does not create accounts by default: the page asks visitors to contact the address in OVERLEAF_ADMIN_EMAIL. To let people register themselves, see Public Access.
Last modified on November 7, 2026
Was this page helpful?
{"docsConfig":{"theme":"mint","$schema":"https://mintlify.com/docs.json","name":"Ayakaleaf Pro","description":"Overleaf Community Edition enhanced with all Pro features: open source, free to use, self-hostable.","colors":{"primary":"#0E0E0E","light":"#D4A27F","dark":"#0E0E0E"},"logo":{"light":"https://mintcdn.com/ayakaleaf-pro/JetHeEeglWIIXNds/logo/light.png?fit=max\u0026auto=format\u0026n=JetHeEeglWIIXNds\u0026q=85\u0026s=7f1abd8dcc74dd3b7cdafac9e6e82092","dark":"https://mintcdn.com/ayakaleaf-pro/JetHeEeglWIIXNds/logo/dark.png?fit=max\u0026auto=format\u0026n=JetHeEeglWIIXNds\u0026q=85\u0026s=4e369d29a8c5a6cd8b4b7697ddb1f7e2","href":"/"},"favicon":"https://mintcdn.com/ayakaleaf-pro/x9kfDjtWlyyhG_mR/favicon.png?fit=max\u0026auto=format\u0026n=x9kfDjtWlyyhG_mR\u0026q=85\u0026s=832c6bfafce5eb69ebc83783083a4a85","background":{"color":{"light":"#FDFDF7","dark":"#09090B"}},"navbar":{"links":[{"href":"https://github.com/ayaka-notes/ayakaleaf-pro-playground","label":"Playground"},{"href":"https://github.com/orgs/ayaka-notes/packages/container/package/overleaf-pro","label":"Docker Image"},{"href":"https://github.com/ayaka-notes/texlive-full","label":"TeXLive Full"}],"primary":{"type":"button","label":"Open GitHub","href":"https://github.com/ayaka-notes/ayakaleaf-pro"}},"footer":{"socials":{"github":"https://github.com/ayaka-notes"}},"styling":{"latex":true},"contextual":{"options":["copy","view","chatgpt","claude","perplexity","mcp","cursor","vscode","assistant","download-pdf","download-spec"],"display":"header"},"metadata":{"timestamp":true},"navigation":{"languages":[{"language":"en","default":true,"href":""},{"language":"zh-CN","href":"zh-CN"},{"language":"zh-TW","href":"zh-TW"},{"language":"ja","href":"ja"},{"language":"de","href":"de"},{"language":"fr","href":"fr"},{"language":"es","href":"es"},{"language":"it","href":"it"},{"language":"ko","href":"ko"},{"language":"ru","href":"ru"},{"language":"nl","href":"nl"},{"language":"pt","href":"pt"},{"language":"tr","href":"tr"},{"language":"uk","href":"uk"},{"language":"pl","href":"pl"},{"language":"cs","href":"cs"},{"language":"sv","href":"sv"},{"language":"fi","href":"fi"},{"language":"ar","href":"ar"},{"language":"vi","href":"vi"},{"language":"no","href":"no"},{"language":"da","href":"da"},{"language":"id","href":"id"},{"language":"zh-Hans","href":"zh-Hans"},{"language":"zh-Hant","href":"zh-Hant"}]}},"deployment":{"deploymentMetadataValue":{"subdomain":"ayakaleaf-pro","hasAudioNarration":false,"actualSubdomain":"ayakaleaf-pro","customDomains":[],"gitSource":{"type":"github","owner":"ayaka-notes","repo":"docs","deployBranch":"main","contentDirectory":"","isPrivate":false,"mountPath":"","label":""},"feedback":{"thumbs":true},"entitlements":{"AI_CHAT":{"status":"ENABLED"},"WEB_MCP":{"status":"ENABLED"},"NARRATION":{"status":"ENABLED"}},"buildId":"6aee957818cb0ff786610e20","clientVersion":"0.0.4076","searchFilterCounts":[{"language":"en","tag":"On-Premises","count":138},{"language":"ar","tag":"الاستضافة المحلية","count":101},{"language":"cs","tag":"On-Premises","count":101},{"language":"da","tag":"On-premises","count":101},{"language":"de","tag":"On-Premises","count":101},{"language":"es","tag":"Local","count":101},{"language":"fi","tag":"Paikallinen asennus","count":101},{"language":"fr","tag":"Sur site","count":101},{"language":"id","tag":"On-Premises","count":101},{"language":"it","tag":"On-premise","count":101},{"language":"ja","tag":"オンプレミス","count":101},{"language":"ko","tag":"온프레미스","count":101},{"language":"nl","tag":"On-premises","count":101},{"language":"no","tag":"Lokal drift","count":101},{"language":"pl","tag":"On-Premises","count":101},{"language":"pt","tag":"On-Premises","count":101},{"language":"ru","tag":"Локальное развертывание","count":101},{"language":"sv","tag":"On-Premises","count":101},{"language":"tr","tag":"Şirket İçi Kurulum","count":101},{"language":"uk","tag":"Локальне розгортання","count":101},{"language":"vi","tag":"Tự triển khai (On-Premises)","count":101},{"language":"zh-CN","tag":"本地部署","count":101},{"language":"zh-Hans","tag":"本地部署","count":101},{"language":"zh-Hant","tag":"本地部署","count":101},{"language":"zh-TW","tag":"本地部署","count":101},{"language":"ar","tag":"الإعداد","count":60},{"language":"en","tag":"Configuration","count":60},{"language":"cs","tag":"Konfigurace","count":60},{"language":"da","tag":"Konfiguration","count":60},{"language":"de","tag":"Konfiguration","count":60},{"language":"es","tag":"Configuración","count":60},{"language":"fi","tag":"Määritys","count":60},{"language":"fr","tag":"Configuration","count":60},{"language":"id","tag":"Konfigurasi","count":60},{"language":"it","tag":"Configurazione","count":60},{"language":"ja","tag":"設定","count":60},{"language":"ko","tag":"구성","count":60},{"language":"nl","tag":"Configuratie","count":60},{"language":"no","tag":"Konfigurasjon","count":60},{"language":"pl","tag":"Konfiguracja","count":60},{"language":"pt","tag":"Configuração","count":60},{"language":"ru","tag":"Настройка","count":60},{"language":"sv","tag":"Konfiguration","count":60},{"language":"tr","tag":"Yapılandırma","count":60},{"language":"uk","tag":"Конфігурація","count":60},{"language":"vi","tag":"Cấu hình","count":60},{"language":"zh-CN","tag":"配置","count":60},{"language":"zh-Hans","tag":"配置","count":60},{"language":"zh-Hant","tag":"設定","count":60},{"language":"zh-TW","tag":"設定","count":60},{"language":"en","tag":"Installation","count":35},{"language":"ar","tag":"Ayakaleaf Toolkit","count":31},{"language":"en","tag":"Docker Compose","count":31},{"language":"cs","tag":"Ayakaleaf Toolkit","count":31},{"language":"da","tag":"Ayakaleaf Toolkit","count":31},{"language":"de","tag":"Ayakaleaf Toolkit","count":31},{"language":"es","tag":"Ayakaleaf Toolkit","count":31},{"language":"fi","tag":"Ayakaleaf Toolkit","count":31},{"language":"fr","tag":"Ayakaleaf Toolkit","count":31},{"language":"id","tag":"Ayakaleaf Toolkit","count":31},{"language":"it","tag":"Ayakaleaf Toolkit","count":31},{"language":"ja","tag":"Ayakaleaf Toolkit","count":31},{"language":"ko","tag":"Ayakaleaf Toolkit","count":31},{"language":"nl","tag":"Ayakaleaf Toolkit","count":31},{"language":"no","tag":"Ayakaleaf Toolkit","count":31},{"language":"pl","tag":"Ayakaleaf Toolkit","count":31},{"language":"pt","tag":"Ayakaleaf Toolkit","count":31},{"language":"ru","tag":"Ayakaleaf Toolkit","count":31},{"language":"sv","tag":"Ayakaleaf Toolkit","count":31},{"language":"tr","tag":"Ayakaleaf Toolkit","count":31},{"language":"uk","tag":"Ayakaleaf Toolkit","count":31},{"language":"vi","tag":"Ayakaleaf Toolkit","count":31},{"language":"zh-CN","tag":"Ayakaleaf Toolkit","count":31},{"language":"zh-Hans","tag":"Ayakaleaf Toolkit","count":31},{"language":"zh-Hant","tag":"Ayakaleaf Toolkit","count":31},{"language":"zh-TW","tag":"Ayakaleaf Toolkit","count":31},{"language":"ar","tag":"Kubernetes","count":29},{"language":"en","tag":"Kubernetes","count":29},{"language":"cs","tag":"Kubernetes","count":29},{"language":"da","tag":"Kubernetes","count":29},{"language":"de","tag":"Kubernetes","count":29},{"language":"es","tag":"Kubernetes","count":29},{"language":"fi","tag":"Kubernetes","count":29},{"language":"fr","tag":"Kubernetes","count":29},{"language":"id","tag":"Kubernetes","count":29},{"language":"it","tag":"Kubernetes","count":29},{"language":"ja","tag":"Kubernetes","count":29},{"language":"ko","tag":"Kubernetes","count":29},{"language":"nl","tag":"Kubernetes","count":29},{"language":"no","tag":"Kubernetes","count":29},{"language":"pl","tag":"Kubernetes","count":29},{"language":"pt","tag":"Kubernetes","count":29},{"language":"ru","tag":"Kubernetes","count":29},{"language":"sv","tag":"Kubernetes","count":29},{"language":"tr","tag":"Kubernetes","count":29},{"language":"uk","tag":"Kubernetes","count":29},{"language":"vi","tag":"Kubernetes","count":29},{"language":"zh-CN","tag":"Kubernetes","count":29},{"language":"zh-Hans","tag":"Kubernetes","count":29},{"language":"zh-Hant","tag":"Kubernetes","count":29},{"language":"zh-TW","tag":"Kubernetes","count":29},{"language":"en","tag":"Using Docker Compose","count":23},{"language":"en","tag":"User guide","count":21},{"language":"ar","tag":"التكاملات","count":20},{"language":"en","tag":"Integrations","count":20},{"language":"cs","tag":"Integrace","count":20},{"language":"da","tag":"Integrationer","count":20},{"language":"de","tag":"Integrationen","count":20},{"language":"es","tag":"Integraciones","count":20},{"language":"fi","tag":"Integraatiot","count":20},{"language":"fr","tag":"Intégrations","count":20},{"language":"id","tag":"Integrasi","count":20},{"language":"it","tag":"Integrazioni","count":20},{"language":"ja","tag":"連携","count":20},{"language":"ko","tag":"통합","count":20},{"language":"nl","tag":"Integraties","count":20},{"language":"no","tag":"Integrasjoner","count":20},{"language":"pl","tag":"Integracje","count":20},{"language":"pt","tag":"Integrações","count":20},{"language":"ru","tag":"Интеграции","count":20},{"language":"sv","tag":"Integrationer","count":20},{"language":"tr","tag":"Entegrasyonlar","count":20},{"language":"uk","tag":"Інтеграції","count":20},{"language":"vi","tag":"Tích hợp","count":20},{"language":"zh-CN","tag":"集成","count":20},{"language":"zh-Hans","tag":"集成","count":20},{"language":"zh-Hant","tag":"整合","count":20},{"language":"zh-TW","tag":"整合","count":20},{"language":"ar","tag":"التثبيت","count":19},{"language":"cs","tag":"Instalace","count":19},{"language":"da","tag":"Installation","count":19},{"language":"de","tag":"Installation","count":19},{"language":"es","tag":"Instalación","count":19},{"language":"fi","tag":"Asennus","count":19},{"language":"fr","tag":"Installation","count":19},{"language":"id","tag":"Instalasi","count":19},{"language":"it","tag":"Installazione","count":19},{"language":"ja","tag":"インストール","count":19},{"language":"ko","tag":"설치","count":19},{"language":"nl","tag":"Installatie","count":19},{"language":"no","tag":"Installasjon","count":19},{"language":"pl","tag":"Instalacja","count":19},{"language":"pt","tag":"Instalação","count":19},{"language":"ru","tag":"Установка","count":19},{"language":"sv","tag":"Installation","count":19},{"language":"tr","tag":"Kurulum","count":19},{"language":"uk","tag":"Встановлення","count":19},{"language":"vi","tag":"Cài đặt","count":19},{"language":"zh-CN","tag":"安装","count":19},{"language":"zh-Hans","tag":"安装","count":19},{"language":"zh-Hant","tag":"安裝","count":19},{"language":"zh-TW","tag":"安裝","count":19},{"language":"en","tag":"For users","count":16},{"language":"ar","tag":"المصادقة","count":12},{"language":"en","tag":"Authentication","count":12},{"language":"cs","tag":"Ověřování","count":12},{"language":"da","tag":"Godkendelse","count":12},{"language":"de","tag":"Authentifizierung","count":12},{"language":"es","tag":"Autenticación","count":12},{"language":"fi","tag":"Todennus","count":12},{"language":"fr","tag":"Authentification","count":12},{"language":"id","tag":"Autentikasi","count":12},{"language":"it","tag":"Autenticazione","count":12},{"language":"ja","tag":"認証","count":12},{"language":"ko","tag":"인증","count":12},{"language":"nl","tag":"Authenticatie","count":12},{"language":"no","tag":"Autentisering","count":12},{"language":"pl","tag":"Uwierzytelnianie","count":12},{"language":"pt","tag":"Autenticação","count":12},{"language":"ru","tag":"Аутентификация","count":12},{"language":"sv","tag":"Autentisering","count":12},{"language":"tr","tag":"Kimlik Doğrulama","count":12},{"language":"uk","tag":"Автентифікація","count":12},{"language":"vi","tag":"Xác thực","count":12},{"language":"zh-CN","tag":"身份验证","count":12},{"language":"zh-Hans","tag":"身份验证","count":12},{"language":"zh-Hant","tag":"身分驗證","count":12},{"language":"zh-TW","tag":"身分驗證","count":12},{"language":"ar","tag":"المطوّرون","count":11},{"language":"cs","tag":"Vývojáři","count":11},{"language":"da","tag":"Udvikler","count":11},{"language":"de","tag":"Entwickler","count":11},{"language":"es","tag":"Desarrollador","count":11},{"language":"fi","tag":"Kehittäjä","count":11},{"language":"fr","tag":"Développeur","count":11},{"language":"id","tag":"Pengembang","count":11},{"language":"it","tag":"Sviluppatore","count":11},{"language":"ja","tag":"開発者","count":11},{"language":"ko","tag":"개발자","count":11},{"language":"nl","tag":"Ontwikkelaar","count":11},{"language":"no","tag":"Utvikler","count":11},{"language":"pl","tag":"Dla deweloperów","count":11},{"language":"pt","tag":"Desenvolvedor","count":11},{"language":"ru","tag":"Разработчикам","count":11},{"language":"sv","tag":"Utvecklare","count":11},{"language":"tr","tag":"Geliştirici","count":11},{"language":"uk","tag":"Розробникам","count":11},{"language":"vi","tag":"Nhà phát triển","count":11},{"language":"zh-CN","tag":"开发者","count":11},{"language":"zh-Hans","tag":"开发者","count":11},{"language":"zh-Hant","tag":"開發者","count":11},{"language":"zh-TW","tag":"開發者","count":11},{"language":"ar","tag":"نظرة عامة","count":9},{"language":"ar","tag":"الصيانة","count":9},{"language":"cs","tag":"Přehled","count":9},{"language":"cs","tag":"Údržba","count":9},{"language":"da","tag":"Oversigt","count":9},{"language":"da","tag":"Vedligeholdelse","count":9},{"language":"de","tag":"Überblick","count":9},{"language":"de","tag":"Wartung","count":9},{"language":"es","tag":"Descripción general","count":9},{"language":"es","tag":"Mantenimiento","count":9},{"language":"fi","tag":"Yleiskatsaus","count":9},{"language":"fi","tag":"Ylläpito","count":9},{"language":"fr","tag":"Aperçu","count":9},{"language":"fr","tag":"Maintenance","count":9},{"language":"id","tag":"Ikhtisar","count":9},{"language":"id","tag":"Pemeliharaan","count":9},{"language":"it","tag":"Panoramica","count":9},{"language":"it","tag":"Manutenzione","count":9},{"language":"ja","tag":"概要","count":9},{"language":"ja","tag":"メンテナンス","count":9},{"language":"ko","tag":"개요","count":9},{"language":"ko","tag":"유지 관리","count":9},{"language":"nl","tag":"Overzicht","count":9},{"language":"nl","tag":"Onderhoud","count":9},{"language":"no","tag":"Oversikt","count":9},{"language":"no","tag":"Vedlikehold","count":9},{"language":"pl","tag":"Przegląd","count":9},{"language":"pl","tag":"Utrzymanie","count":9},{"language":"pt","tag":"Visão geral","count":9},{"language":"pt","tag":"Manutenção","count":9},{"language":"ru","tag":"Обзор","count":9},{"language":"ru","tag":"Обслуживание","count":9},{"language":"sv","tag":"Översikt","count":9},{"language":"sv","tag":"Underhåll","count":9},{"language":"tr","tag":"Genel Bakış","count":9},{"language":"tr","tag":"Bakım","count":9},{"language":"uk","tag":"Огляд","count":9},{"language":"uk","tag":"Обслуговування","count":9},{"language":"vi","tag":"Tổng quan","count":9},{"language":"vi","tag":"Bảo trì","count":9},{"language":"zh-CN","tag":"概览","count":9},{"language":"zh-CN","tag":"维护","count":9},{"language":"zh-Hans","tag":"概览","count":9},{"language":"zh-Hans","tag":"维护","count":9},{"language":"zh-Hant","tag":"概覽","count":9},{"language":"zh-Hant","tag":"維護","count":9},{"language":"zh-TW","tag":"概覽","count":9},{"language":"zh-TW","tag":"維護","count":9}],"searchSettings":{"maxResults":6}},"assistantConfig":{"enableAskAiButton":false,"enableStarterQuestions":false,"enableContextualStarterQuestions":false,"enableAskAiSearchBar":true},"basePath":"","hasChatPermissions":true,"hasWebMcpPermissions":true,"toggles":[{"name":"kill-isr","enabled":true,"variant":{"name":"disabled","enabled":false,"feature_enabled":true},"impressionData":false},{"name":"agent-mintlify-slack","enabled":true,"variant":{"name":"disabled","enabled":false,"feature_enabled":true},"impressionData":false},{"name":"agent-integrations-settings","enabled":true,"variant":{"name":"disabled","enabled":false,"feature_enabled":true},"impressionData":false},{"name":"rbac-expansion","enabled":true,"variant":{"name":"disabled","enabled":false,"feature_enabled":true},"impressionData":false},{"name":"automations-pr-grouping","enabled":true,"variant":{"name":"disabled","enabled":false,"feature_enabled":true},"impressionData":false},{"name":"custom-prefix","enabled":true,"variant":{"name":"disabled","enabled":false,"feature_enabled":true},"impressionData":false},{"name":"analytics-v7","enabled":true,"variant":{"name":"disabled","enabled":false,"feature_enabled":true},"impressionData":false},{"name":"user-flows-analytics","enabled":true,"variant":{"name":"disabled","enabled":false,"feature_enabled":true},"impressionData":false},{"name":"no-publish-flow","enabled":true,"variant":{"name":"disabled","enabled":false,"feature_enabled":true},"impressionData":false},{"name":"workos-onboarding","enabled":true,"variant":{"name":"disabled","enabled":false,"feature_enabled":true},"impressionData":false},{"name":"llms-txt-v2","enabled":true,"variant":{"name":"disabled","enabled":false,"feature_enabled":true},"impressionData":false},{"name":"snapshot-serving-live","enabled":true,"variant":{"name":"disabled","enabled":false,"feature_enabled":true},"impressionData":false},{"name":"stripTemperatureMiddleware","enabled":true,"variant":{"name":"disabled","enabled":false,"feature_enabled":true},"impressionData":false},{"name":"support-platform-pylon-zendesk","enabled":true,"variant":{"name":"disabled","enabled":false,"feature_enabled":true},"impressionData":false},{"name":"snapshot-serving","enabled":true,"variant":{"name":"disabled","enabled":false,"feature_enabled":true},"impressionData":false},{"name":"instant-rollback","enabled":true,"variant":{"name":"disabled","enabled":false,"feature_enabled":true},"impressionData":false},{"name":"granular-notifications-server","enabled":true,"variant":{"name":"disabled","enabled":false,"feature_enabled":true},"impressionData":false},{"name":"granular-notifications","enabled":true,"variant":{"name":"disabled","enabled":false,"feature_enabled":true},"impressionData":false},{"name":"automations-fable","enabled":true,"variant":{"name":"disabled","enabled":false,"feature_enabled":true},"impressionData":false},{"name":"fixed-ai-action-pricing","enabled":true,"variant":{"name":"disabled","enabled":false,"feature_enabled":true},"impressionData":false},{"name":"automation-resolve-merge-conflict","enabled":true,"variant":{"name":"disabled","enabled":false,"feature_enabled":true},"impressionData":false},{"name":"scoped-publishing","enabled":true,"variant":{"name":"disabled","enabled":false,"feature_enabled":true},"impressionData":false},{"name":"mintql","enabled":true,"variant":{"name":"disabled","enabled":false,"feature_enabled":true},"impressionData":false},{"name":"page-level-analytics","enabled":true,"variant":{"name":"disabled","enabled":false,"feature_enabled":true},"impressionData":false},{"name":"editor-version-history-v2","enabled":true,"variant":{"name":"disabled","enabled":false,"feature_enabled":true},"impressionData":false},{"name":"billing-page-v2","enabled":true,"variant":{"name":"disabled","enabled":false,"feature_enabled":true},"impressionData":false},{"name":"full-page-search","enabled":true,"variant":{"name":"disabled","enabled":false,"feature_enabled":true},"impressionData":false},{"name":"workspace-projects","enabled":true,"variant":{"name":"disabled","enabled":false,"feature_enabled":true},"impressionData":false},{"name":"assistant-v5","enabled":true,"variant":{"name":"disabled","enabled":false,"feature_enabled":true},"impressionData":false},{"name":"fork-pr-previews","enabled":true,"variant":{"name":"disabled","enabled":false,"feature_enabled":true},"impressionData":false},{"name":"revalidation-jwt","enabled":true,"variant":{"name":"disabled","enabled":false,"feature_enabled":true},"impressionData":false},{"name":"workos-sso-scim","enabled":true,"variant":{"name":"disabled","enabled":false,"feature_enabled":true},"impressionData":false},{"name":"hobby-abuse-scan","enabled":true,"variant":{"name":"disabled","enabled":false,"feature_enabled":true},"impressionData":false},{"name":"dashboard-inbox","enabled":true,"variant":{"name":"disabled","enabled":false,"feature_enabled":true},"impressionData":false},{"name":"workos-signup","enabled":true,"variant":{"name":"disabled","enabled":false,"feature_enabled":true},"impressionData":false},{"name":"turbopuffer-dual-write","enabled":true,"variant":{"name":"disabled","enabled":false,"feature_enabled":true},"impressionData":false},{"name":"workos-enabled","enabled":true,"variant":{"name":"disabled","enabled":false,"feature_enabled":true},"impressionData":false},{"name":"approve-review-flow","enabled":true,"variant":{"name":"disabled","enabled":false,"feature_enabled":true},"impressionData":false},{"name":"editor-metadata","enabled":true,"variant":{"name":"disabled","enabled":false,"feature_enabled":true},"impressionData":false},{"name":"sso-setup-deadline-banner","enabled":true,"variant":{"name":"disabled","enabled":false,"feature_enabled":true},"impressionData":false},{"name":"turbopuffer-serve","enabled":true,"variant":{"name":"disabled","enabled":false,"feature_enabled":true},"impressionData":false},{"name":"live-agents","enabled":true,"variant":{"name":"disabled","enabled":false,"feature_enabled":true},"impressionData":false},{"name":"comment-mode","enabled":true,"variant":{"name":"disabled","enabled":false,"feature_enabled":true},"impressionData":false}],"googleFontsInlined":false},"customCss":[{"filePath":"style.css","content":"@font-face{font-family:\"Site Sans\";src:url(\"/fonts/SiteSans-Text-Regular-Static.otf\") format(\"opentype\");font-weight:400;font-style:normal;font-display:swap}@font-face{font-family:\"Site Sans\";src:url(\"/fonts/SiteSans-Text-RegularItalic-Static.otf\") format(\"opentype\");font-weight:400;font-style:italic;font-display:swap}@font-face{font-family:\"Site Sans\";src:url(\"/fonts/SiteSans-Text-Medium-Static.otf\") format(\"opentype\");font-weight:500;font-style:normal;font-display:swap}@font-face{font-family:\"Site Sans\";src:url(\"/fonts/SiteSans-Text-MediumItalic-Static.otf\") format(\"opentype\");font-weight:500;font-style:italic;font-display:swap}@font-face{font-family:\"Site Sans\";src:url(\"/fonts/SiteSans-Text-Semibold-Static.otf\") format(\"opentype\");font-weight:600;font-style:normal;font-display:swap}@font-face{font-family:\"Site Sans\";src:url(\"/fonts/SiteSans-Text-SemiboldItalic-Static.otf\") format(\"opentype\");font-weight:600;font-style:italic;font-display:swap}@font-face{font-family:\"Site Sans\";src:url(\"/fonts/SiteSans-Text-Bold-Static.otf\") format(\"opentype\");font-weight:700;font-style:normal;font-display:swap}@font-face{font-family:\"Site Sans\";src:url(\"/fonts/SiteSans-Text-BoldItalic-Static.otf\") format(\"opentype\");font-weight:700;font-style:italic;font-display:swap}@font-face{font-family:\"Site Serif Display\";src:url(\"/fonts/SiteSerif-Display-Regular-Static.otf\") format(\"opentype\");font-weight:400;font-style:normal;font-display:swap}@font-face{font-family:\"Site Serif Display\";src:url(\"/fonts/SiteSerif-Display-RegularItalic-Static.otf\") format(\"opentype\");font-weight:400;font-style:italic;font-display:swap}@font-face{font-family:\"Site Serif Display\";src:url(\"/fonts/SiteSerif-Display-Medium-Static.otf\") format(\"opentype\");font-weight:500;font-style:normal;font-display:swap}@font-face{font-family:\"Site Serif Display\";src:url(\"/fonts/SiteSerif-Display-Semibold-Static.otf\") format(\"opentype\");font-weight:600;font-style:normal;font-display:swap}@font-face{font-family:\"Site Serif Display\";src:url(\"/fonts/SiteSerif-Display-Bold-Static.otf\") format(\"opentype\");font-weight:700;font-style:normal;font-display:swap}@font-face{font-family:\"Site Serif\";src:url(\"/fonts/SiteSerif-Text-Regular-Static.otf\") format(\"opentype\");font-weight:400;font-style:normal;font-display:swap}@font-face{font-family:\"Site Serif\";src:url(\"/fonts/SiteSerif-Text-RegularItalic-Static.otf\") format(\"opentype\");font-weight:400;font-style:italic;font-display:swap}@font-face{font-family:\"Site Serif\";src:url(\"/fonts/SiteSerif-Text-Medium-Static.otf\") format(\"opentype\");font-weight:500;font-style:normal;font-display:swap}@font-face{font-family:\"Site Serif\";src:url(\"/fonts/SiteSerif-Text-MediumItalic-Static.otf\") format(\"opentype\");font-weight:500;font-style:italic;font-display:swap}@font-face{font-family:\"Site Serif\";src:url(\"/fonts/SiteSerif-Text-Semibold-Static.otf\") format(\"opentype\");font-weight:600;font-style:normal;font-display:swap}@font-face{font-family:\"Site Serif\";src:url(\"/fonts/SiteSerif-Text-SemiboldItalic-Static.otf\") format(\"opentype\");font-weight:600;font-style:italic;font-display:swap}@font-face{font-family:\"Site Serif\";src:url(\"/fonts/SiteSerif-Text-Bold-Static.otf\") format(\"opentype\");font-weight:700;font-style:normal;font-display:swap}@font-face{font-family:\"Site Serif\";src:url(\"/fonts/SiteSerif-Text-BoldItalic-Static.otf\") format(\"opentype\");font-weight:700;font-style:italic;font-display:swap}:root{--always-white: 0 0% 100%;--always-black: 0 0% 0%;--constant-book-cloth: 15 55% 80%;--constant-clay: 15 60% 85%;--constant-kraft: 25 40% 83%;--constant-manilla: 40 20% 92%;--constant-slate-000: 0 0% 100%;--constant-slate-050: 48 33.3% 97.1%;--constant-slate-100: 53 28.6% 94.5%;--constant-slate-150: 48 25% 92.2%;--constant-slate-200: 50 20.7% 88.6%;--constant-slate-250: 51 16.5% 84.5%;--constant-slate-300: 50 11.5% 79.6%;--constant-slate-350: 50 9% 73.7%;--constant-slate-400: 49 6.5% 66.9%;--constant-slate-450: 48 4.8% 59.2%;--constant-slate-500: 53 3.2% 51.4%;--constant-slate-550: 51 3.1% 43.7%;--constant-slate-600: 48 2.7% 35.9%;--constant-slate-650: 48 3.4% 29.2%;--constant-slate-700: 60 2.5% 23.3%;--constant-slate-750: 60 2.1% 18.4%;--constant-slate-800: 60 2.7% 14.5%;--constant-slate-850: 30 3.3% 11.8%;--constant-slate-900: 30 4% 9.8%;--constant-slate-950: 60 2.6% 7.6%;--constant-slate-1000: 60 3.4% 5.7%}:root:not(.dark){--accent-brand: 15 63.1% 59.6%;--accent-main-000: 15 55.6% 52.4%;--accent-main-100: 15 55.6% 52.4%;--accent-main-200: 15 63.1% 59.6%;--accent-main-900: 0 0% 0%;--accent-pro-000: 251 34.2% 33.3%;--accent-pro-100: 251 40% 45.1%;--accent-pro-200: 251 61% 72.2%;--accent-pro-900: 253 33.3% 91.8%;--accent-secondary-000: 210 73.7% 40.2%;--accent-secondary-100: 210 70.9% 51.6%;--accent-secondary-200: 210 70.9% 51.6%;--accent-secondary-900: 211 72% 90%;--bg-000: 0 0% 100%;--bg-100: 48 33.3% 97.1%;--bg-200: 53 28.6% 94.5%;--bg-300: 48 25% 92.2%;--bg-400: 50 20.7% 88.6%;--bg-500: 50 20.7% 88.6%;--border-100: 30 3.3% 11.8%;--border-200: 30 3.3% 11.8%;--border-300: 30 3.3% 11.8%;--border-400: 30 3.3% 11.8%;--danger-000: 0 61.4% 22.4%;--danger-100: 0 58.6% 34.1%;--danger-200: 0 58.6% 34.1%;--danger-900: 0 50% 95%;--oncolor-100: 0 0% 100%;--oncolor-200: 60 6.7% 97.1%;--oncolor-300: 60 6.7% 97.1%;--text-000: 60 2.6% 7.6%;--text-100: 60 2.6% 7.6%;--text-200: 60 2.5% 23.3%;--text-300: 60 2.5% 23.3%;--text-400: 51 3.1% 43.7%;--text-500: 51 3.1% 43.7%}:root.dark{--accent-brand: 15 63.1% 59.6%;--accent-main-000: 15 55.6% 52.4%;--accent-main-100: 15 63.1% 59.6%;--accent-main-200: 15 63.1% 59.6%;--accent-main-900: 0 0% 0%;--accent-pro-000: 251 84.6% 74.5%;--accent-pro-100: 251 40.2% 54.1%;--accent-pro-200: 251 40% 45.1%;--accent-pro-900: 250 25.3% 19.4%;--accent-secondary-000: 210 71.1% 62%;--accent-secondary-100: 210 70.9% 51.6%;--accent-secondary-200: 210 70.9% 51.6%;--accent-secondary-900: 210 55.9% 24.6%;--bg-000: 60 2.1% 18.4%;--bg-100: 60 2.7% 14.5%;--bg-200: 30 3.3% 11.8%;--bg-300: 60 2.6% 7.6%;--bg-400: 60 3.4% 5.7%;--bg-500: 60 3.4% 5.7%;--border-100: 51 16.5% 84.5%;--border-200: 51 16.5% 84.5%;--border-300: 51 16.5% 84.5%;--border-400: 51 16.5% 84.5%;--danger-000: 0 73.1% 66.5%;--danger-100: 0 58.6% 34.1%;--danger-200: 0 58.6% 34.1%;--danger-900: 0 23% 15.6%;--oncolor-100: 0 0% 100%;--oncolor-200: 60 6.7% 97.1%;--oncolor-300: 60 6.7% 97.1%;--text-000: 48 33.3% 97.1%;--text-100: 48 33.3% 97.1%;--text-200: 50 9% 73.7%;--text-300: 50 9% 73.7%;--text-400: 48 4.8% 59.2%;--text-500: 48 4.8% 59.2%}#home-header{font-family:\"Site Sans\", system-ui, \"Segoe UI\", Roboto, Helvetica, Arial, sans-serif;font-weight:400!important;font-size:50px;line-height:1.2;margin-bottom:1rem;color:--text-000;display:flex;align-items:baseline;justify-content:center;flex-wrap:nowrap}#localization-select-trigger>:has(img[src*=\"flags\"]){display:none}div[id^=\"localization-select-item\"]>:has(img[src*=\"flags\"]){display:none}@media (min-width: 768px){#home-header{justify-content:center}}.build-with{font-family:\"Site Sans\", system-ui, \"Segoe UI\", Roboto, Helvetica, Arial, sans-serif;letter-spacing:-0.02em}.claude-wordmark-wrapper{display:inline-flex;align-items:baseline;margin-left:10px}.claude-wordmark{height:40px;width:auto;position:relative}.dark #home-header{color:white}.description-text{color:black}.dark .description-text{color:white}.dark .claude-wordmark{filter:invert(1)}:root{--bg-color: #f0efea}.dark{--bg-color: #2b2b2b}body,input,#category-select,.dropdown-item,#table-of-contents{font-family:\"Site Sans\", system-ui, \"Segoe UI\", Roboto, Helvetica, Arial, sans-serif}.eyebrow{font-family:\"Site Sans\", system-ui, \"Segoe UI\", Roboto, Helvetica, Arial, sans-serif;text-transform:uppercase;letter-spacing:0.02rem}#content-container{font-family:\"Site Sans\", system-ui, \"Segoe UI\", Roboto, Helvetica, Arial, sans-serif}#content-container h1,#content-container h2,#content-container h3,#content-container h4,#content-container h5,#content-container h6{font-family:\"Site Serif Display\", Georgia, \"Times New Roman\", Times, serif;font-weight:400;letter-spacing:0;word-spacing:0.1em}#content-container p{font-size:1rem;line-height:1.65rem}.font-extrabold{font-weight:600!important}.wide-table{width:100%;overflow-x:auto}.wide-table table{width:175%;margin-bottom:0}#prompt-library-container{margin:4rem auto;max-width:48rem;padding-left:1.25rem;padding-right:1.25rem}.prompt-library-title{font-size:24px;text-align:center;font-weight:700;color:#1f2937}.dark .prompt-library-title{color:#e5e7eb}.prompt-library-description{margin-top:1rem;text-align:center}.main-content{margin-bottom:10rem;max-width:64rem;margin-left:auto;margin-right:auto;padding-left:1.25rem;padding-right:1.25rem}.prompt-controllers{display:flex;gap:0.5rem}.prompt-search-container{position:relative;flex:1 1 0%}.prompt-search-icon-container{display:flex;position:absolute;top:0;bottom:0;left:0;align-items:center;padding-left:0.75rem}.prompt-search-icon{margin-left:0.25rem;margin-right:0.75rem;flex:none;width:1rem;height:1rem;background-color:#6b7280;mask-image:url(https://mintlify.b-cdn.net/v6.5.1/solid/magnifying-glass.svg);mask-repeat:no-repeat;mask-position:center center}input.prompt-search-bar{display:block;height:2.5rem;padding-left:2.5rem;border-radius:0.75rem;border-width:1px;background-color:#ffffff;width:100%;color:#111827;box-shadow:0 1px 2px 0 rgba(0, 0, 0, 0.05)}.dark input.prompt-search-bar{color:#ffffff;background-color:rgb(var(--background-dark));border-color:#d1d5db1a}input.prompt-search-bar:focus{outline-color:rgb(var(--primary))}.dark input.prompt-search-bar:focus{outline-color:rgb(var(--primary-light))}.dark .prompt-search-icon{background-color:#ffffff80}#category-select{padding-left:1rem;padding-right:2.5rem;height:2.5rem;display:flex;align-items:center;border-radius:0.75rem;border-width:1px;color:#111827;background-color:#ffffff;cursor:pointer;box-shadow:0 1px 2px 0 rgba(0, 0, 0, 0.05);white-space:nowrap}.dark #category-select{background-color:rgb(var(--background-dark));border-color:#d1d5db1a;color:#ffffff}#category-select:hover{background-color:#f9fafb}.dark #category-select:hover{background-color:#ffffff0d}#category-select:focus{outline-color:rgb(var(--primary))}.dark #category-select:focus{outline-color:rgb(var(--primary-light))}#categories-dropdown{top:calc(100% + 4px);padding:0.5rem 0.5rem;display:none;position:absolute;z-index:10;border-radius:0.75rem;border-width:1px;width:100%;color:#111827;background-color:#ffffff;box-shadow:0 1px 2px 0 rgba(0, 0, 0, 0.05)}.dark #categories-dropdown{background-color:rgb(var(--background-dark));border-color:#d1d5db1a;color:#ffffff}#categories-dropdown-clickout{position:fixed;top:0;right:0;bottom:0;left:0;z-index:0}.dropdown-icon-container{display:flex;position:absolute;top:0;bottom:0;right:0;align-items:center;padding-right:0.25rem}.dropdown-icon{margin-left:0.25rem;margin-right:0.75rem;flex:none;width:0.75rem;height:0.75rem;background-color:#6b7280;mask-image:url(https://mintlify.b-cdn.net/v6.5.1/solid/caret-down.svg);mask-repeat:no-repeat;mask-position:center center}.dark .dropdown-icon{background-color:#ffffff80}#prompts-container{grid-template-columns:repeat(1, minmax(0, 1fr));gap:2rem}.dropdown-item{padding:0.25rem 0.5rem;border-radius:0.375rem;display:flex;align-items:center;cursor:pointer}.dropdown-item:hover{background-color:#f9fafb}.dark .dropdown-item:hover{background-color:#ffffff0d}.check-icon{mask-image:url(https://mintlify.b-cdn.net/v6.5.1/solid/check.svg);height:0.875rem;width:1rem;background-color:rgb(var(--primary-light));mask-repeat:no-repeat;mask-position:center center}.prompt-card{margin:-0.75rem;padding:0.75rem;display:flex;border-radius:1rem}.prompt-card:hover{background-color:#03071208}.dark .prompt-card:hover{background-color:#ffffff08}.prompt-icon-container{display:flex;flex:none;align-items:center;justify-content:center;margin-right:1.5rem;border-radius:0.75rem;height:4rem;width:4rem;background-color:#cb785c1a}.prompt-icon{height:1.5rem;width:1.5rem;background-color:rgb(var(--primary-light));mask-repeat:no-repeat;mask-position:center center}.prompt-title{color:rgb(31 41 55);font-weight:600}.dark .prompt-title{color:rgb(229 231 235)}.prompt-description{margin-top:0.25rem}#prompts-container{display:grid;margin-top:2.5rem}@media (min-width: 640px){#category-select{width:16rem}}@media (min-width: 1024px){#prompts-container{grid-template-columns:repeat(2, minmax(0, 1fr))}}.home-cards-custom{display:grid;grid-template-columns:repeat(3, 1fr);grid-template-rows:repeat(2, auto);gap:1.5rem}.home-cards-custom .card{background:transparent;border:0.5px solid hsl(var(--border-300));border-radius:12px;padding:0.25rem}@media (max-width: 1024px){.home-cards-custom{grid-template-columns:repeat(2, 1fr);grid-template-rows:repeat(3, auto)}}@media (max-width: 768px){.home-cards-custom{grid-template-columns:1fr;grid-template-rows:repeat(6, auto)}}.relative{position:relative}.flex-1{flex:1 1 0%}.mermaid{position:relative;background-color:#FDFDFB;background-image:linear-gradient(rgba(235, 219, 188, .25) 1px, transparent 1px), /* Secondary color #EBDBBC with low opacity */\n linear-gradient(90deg, rgba(235, 219, 188, .25) 1px, transparent 1px),\n linear-gradient(rgba(235, 219, 188, .1) 1px, transparent 1px),\n linear-gradient(90deg, rgba(235, 219, 188, .1) 1px, transparent 1px);background-size:20px 20px,\n 20px 20px,\n 4px 4px,\n 4px 4px;background-position:-1px -1px,\n -1px -1px,\n -1px -1px,\n -1px -1px;padding:20px;border-radius:8px;border:1px solid rgba(235, 219, 188, .4);box-shadow:0 2px 4px rgba(64, 64, 62, 0.08)}.dark .mermaid{background-color:#1a1918;background-image:linear-gradient(rgba(212, 162, 127, .15) 1px, transparent 1px), /* Tertiary color #D4A27F with low opacity */\n linear-gradient(90deg, rgba(212, 162, 127, .15) 1px, transparent 1px),\n linear-gradient(rgba(212, 162, 127, .08) 1px, transparent 1px),\n linear-gradient(90deg, rgba(212, 162, 127, .08) 1px, transparent 1px);border:1px solid rgba(102, 102, 99, .5);box-shadow:0 2px 4px rgba(0, 0, 0, 0.2)}.digest-meta{display:flex;align-items:center;justify-content:space-between;flex-wrap:wrap;gap:0.5rem 1rem;padding:0.75rem 1rem;margin:1.5rem 0 2.5rem;border:1px solid hsl(var(--border-300) / 0.15);background:hsl(var(--bg-200));font-variant-numeric:tabular-nums;font-size:0.875rem;color:hsl(var(--text-400))}#content-container .digest-meta a{color:hsl(var(--accent-main-100));font-weight:500;text-decoration:none;border-bottom:none}#content-container .digest-meta a:hover{text-decoration:underline}.digest-feature{position:relative;margin:2.5rem 0;padding:1.875rem 1.875rem 1.625rem;background:radial-gradient(circle, hsl(var(--text-000) / 0.025) 1px, transparent 1px) 0 0 / 18px 18px,\n linear-gradient(180deg, hsl(var(--constant-manilla) / 0.55), hsl(var(--constant-manilla) / 0.38));border:1px solid hsl(var(--border-300) / 0.12);box-shadow:inset 0 1px 0 hsl(var(--text-000) / 0.04),\n 0 1px 2px hsl(var(--always-black) / 0.04)}.digest-feature::before{content:\"\";position:absolute;inset:0 auto 0 0;width:4px;background:hsl(var(--accent-brand))}.dark .digest-feature{background:radial-gradient(circle, hsl(var(--text-000) / 0.02) 1px, transparent 1px) 0 0 / 18px 18px,\n linear-gradient(180deg, hsl(var(--bg-000) / 0.75), hsl(var(--bg-000) / 0.5));border-color:hsl(var(--border-300) / 0.1);box-shadow:inset 0 1px 0 hsl(var(--text-000) / 0.03),\n 0 1px 2px hsl(var(--always-black) / 0.25)}.digest-feature>:first-child{margin-top:0}.digest-feature>:last-child{margin-bottom:0}.digest-feature-header{display:flex;align-items:center;flex-wrap:wrap;gap:0.625rem;margin:0 0 0.75rem}#content-container .digest-feature-title{font-family:\"Site Serif Display\", Georgia, serif;font-size:1.75rem;line-height:1.15;font-weight:500;letter-spacing:-0.015em;color:hsl(var(--text-000));margin:0}#content-container .digest-feature-pill{font-family:ui-monospace, \"SF Mono\", Menlo, Consolas, monospace;font-size:0.75rem;line-height:1;letter-spacing:0.01em;padding:0.3rem 0.6rem;border-radius:999px;background:hsl(var(--accent-brand) / 0.12);color:hsl(var(--accent-main-000));border:1px solid hsl(var(--accent-brand) / 0.25);white-space:nowrap;transform:translateY(1px)}#content-container .digest-feature-lede{font-size:1.0625rem;line-height:1.65;color:hsl(var(--text-100));margin:0 0 1.25rem;max-width:none}#content-container .digest-feature-lede code{font-size:0.875em;padding:0.1em 0.35em}#content-container .digest-feature-try{font-size:0.875rem;color:hsl(var(--text-400));margin:1.25rem 0 0.5rem}#content-container .digest-feature .frame{margin:1rem 0;border-radius:0;padding:0}#content-container .digest-feature .frame>*{border-radius:0}#content-container .digest-feature pre,#content-container .digest-feature [class*=\"CodeBlock\"]{border-radius:0}#content-container .digest-feature-link{display:inline-flex;align-items:center;gap:0.35rem;font-size:0.875rem;font-weight:500;color:hsl(var(--accent-main-100));text-decoration:none;border-bottom:none;margin-top:0.75rem}#content-container .digest-feature-link::after{content:\"→\";transition:transform 120ms ease-out}#content-container .digest-feature-link:hover::after{transform:translateX(3px)}.digest-wins{margin:2.5rem 0;padding:1.5rem 1.75rem 1.25rem;background:hsl(var(--bg-200));border:1px solid hsl(var(--border-300) / 0.1)}.dark .digest-wins{background:hsl(var(--bg-200) / 0.6)}#content-container .digest-wins-title{font-family:\"Site Serif Display\", Georgia, serif;font-size:1.25rem;font-weight:500;color:hsl(var(--text-000));margin:0 0 0.75rem}.digest-wins-grid{display:grid;grid-template-columns:repeat(auto-fit, minmax(16rem, 1fr));column-gap:2rem}#content-container .digest-wins-grid>div{position:relative;font-size:0.875rem;line-height:1.5;color:hsl(var(--text-300));padding:0.5rem 0 0.5rem 1.125rem;border-top:1px solid hsl(var(--border-300) / 0.06);margin:0}#content-container .digest-wins-grid>div::before{content:\"+\";position:absolute;left:0;top:0.5rem;font-family:ui-monospace, \"SF Mono\", Menlo, Consolas, monospace;font-size:0.8125rem;font-weight:600;color:hsl(var(--accent-brand))}#content-container .digest-wins-grid>div:first-child,#content-container .digest-wins-grid>div:nth-child(2){border-top:none;padding-top:0}#content-container .digest-wins-grid>div:first-child::before,#content-container .digest-wins-grid>div:nth-child(2)::before{top:0}#content-container .digest-wins-grid code{font-size:0.8125rem;padding:0.1em 0.3em}:root{--toc-wrapper-max: 92rem;--toc-wrapper-pad: 2rem;--toc-col: 19rem;--toc-side: 28rem;--toc-btn-size: 1.75rem}#toc-collapse-toggle{display:none;align-items:center;justify-content:center;position:fixed;top:10rem;right:calc(\n max((100% - var(--toc-wrapper-max)) / 2, 0px) + var(--toc-wrapper-pad) +\n var(--toc-col) - var(--toc-btn-size) - 0.35rem\n );transition:right 200ms ease-out;z-index:30;width:var(--toc-btn-size);height:var(--toc-btn-size);border-radius:9999px;border:1px solid hsl(var(--border-300) / 0.15);background:hsl(var(--bg-100));color:hsl(var(--text-400));cursor:pointer}#toc-collapse-toggle:hover{background:hsl(var(--bg-300));color:hsl(var(--text-100))}#toc-collapse-toggle svg{width:14px;height:14px;fill:none;stroke:currentColor;stroke-width:2.5;stroke-linecap:round;stroke-linejoin:round}#toc-collapse-toggle .toc-glyph{display:none;stroke-width:2}@media print{#toc-collapse-toggle{display:none!important}}@media (prefers-reduced-motion: reduce){#toc-collapse-toggle{transition:none}}@media (min-width: 1280px){html:has(#table-of-contents-layout) #toc-collapse-toggle{display:flex}html.toc-collapsed #toc-collapse-toggle .toc-chevron{transform:rotate(180deg)}html.toc-collapsed #toc-collapse-toggle{right:0.5rem;width:auto;padding:0 0.5rem;gap:0.25rem}html.toc-collapsed #toc-collapse-toggle .toc-glyph{display:block}html.toc-collapsed #table-of-contents-layout{display:none!important}html.toc-collapsed #content-side-layout:has(#table-of-contents-layout){display:none!important}html.toc-collapsed #content-container:has(#table-of-contents-layout) #content-area{width:100%!important}html.toc-collapsed #content-container:has(#table-of-contents-layout) #content-area>*{max-width:calc(var(--toc-wrapper-max) - var(--toc-side))}}@media (max-width: 640px){.digest-feature{padding:1.25rem 1rem 1rem;margin:1.5rem 0}#content-container .digest-feature-title{font-size:1.375rem}.digest-wins{padding:1.25rem 1rem 1rem}.digest-wins-grid{grid-template-columns:1fr}#content-container .digest-wins-grid>div:nth-child(2){border-top:1px solid hsl(var(--border-300) / 0.06);padding-top:0.5rem}#content-container .digest-wins-grid>div:nth-child(2)::before{top:0.5rem}}img[data-component-part=\"card-image\"]{aspect-ratio:16 / 9;height:auto;object-fit:cover;object-position:top center}"},{"filePath":"button.css","content":".btn{position:relative;display:inline-flex;gap:0.5rem;align-items:center;justify-content:center;flex-shrink:0;min-width:5rem;height:2.25rem;padding:0.5rem 1rem;white-space:nowrap;font-family:Styrene;font-weight:600;border-radius:0.5rem;\u0026:active{transform:scale(0.985)}\u0026.size-xs{height:1.75rem;min-width:3.5rem;padding:0 0.5rem;border-radius:0.25rem;font-size:0.75rem;gap:0.25rem}\u0026.size-sm{height:2rem;min-width:4rem;padding:0 0.75rem;border-radius:0.375rem;font-size:0.75rem}\u0026.size-lg{height:2.75rem;min-width:6rem;padding:0 1.25rem;border-radius:0.6rem}\u0026:disabled{pointer-events:none;opacity:0.5;box-shadow:none}\u0026:focus-visible{outline:none;--tw-ring-offset-shadow: var(--tw-ring-inset) 0 0 0 var(--tw-ring-offset-width) var(--tw-ring-offset-color);--tw-ring-shadow: var(--tw-ring-inset) 0 0 0 calc(1px + var(--tw-ring-offset-width)) var(--tw-ring-color);box-shadow:var(--tw-ring-offset-shadow), var(--tw-ring-shadow)}\u0026.primary{font-weight:600;color:hsl(var(--oncolor-100));background-color:hsl(var(--accent-main-100));background-image:linear-gradient(\n to right,\n hsl(var(--accent-main-100)) 0%,\n hsl(var(--accent-main-200) / 0.5) 50%,\n hsl(var(--accent-main-200)) 100%\n );background-size:200% 100%;background-position:0% 0%;border:0.5px solid hsl(var(--border-300) / 0.25);box-shadow:inset 0 0.5px 0px rgba(255, 255, 0, 0.15),\n 0 1px 1px rgba(0, 0, 0, 0.05);text-shadow:0 1px 2px rgb(0 0 0 / 10%);transition:all 150ms cubic-bezier(0.4, 0, 0.2, 1);\u0026:hover{background-position:100% 0%;background-image:linear-gradient(\n to right,\n hsl(var(--accent-main-200)) 0%,\n hsl(var(--accent-main-200)) 100%\n )}\u0026:active{background-color:hsl(var(--accent-main-000));box-shadow:inset 0 1px 6px rgba(0, 0, 0, 0.2);transform:scale(0.985)}}\u0026.flat{font-weight:500;color:hsl(var(--oncolor-100));background-color:hsl(var(--accent-main-100));transition:background-color 150ms;\u0026:hover{background-color:hsl(var(--accent-main-200))}}\u0026.secondary{font-weight:600;color:hsl(var(--text-100) / 0.9);background-image:radial-gradient(\n ellipse at center,\n hsl(var(--bg-500) / 0.1) 50%,\n hsl(var(--bg-500) / 0.3) 100%\n );border:0.5px solid hsl(var(--border-400));transition:color 150ms, background-color 150ms;\u0026:hover{color:hsl(var(--text-000));background-color:hsl(var(--bg-500) / 0.6)}\u0026:active{background-color:hsl(var(--bg-500) / 0.5)}}\u0026.outline{font-weight:600;color:hsl(var(--text-200));background-color:transparent;border:1.5px solid currentColor;transition:color 150ms, background-color 150ms;\u0026:hover{color:hsl(var(--text-100));background-color:hsl(var(--bg-400));border-color:hsl(var(--bg-400))}}\u0026.ghost{color:hsl(var(--text-200));border-color:transparent;transition:color 150ms, background-color 150ms;\u0026:hover{color:hsl(var(--text-100));background-color:hsl(var(--bg-500) / 0.4)}\u0026:active{background-color:hsl(var(--bg-400))}}\u0026.underline{opacity:0.8;text-decoration-line:none;text-underline-offset:3px;transition:all 150ms;\u0026:hover{opacity:1;text-decoration-line:underline}\u0026:active{transform:scale(0.985)}}\u0026.danger{font-weight:600;color:hsl(var(--oncolor-100));background-color:hsl(var(--danger-100));transition:background-color 150ms;\u0026:hover{background-color:hsl(var(--danger-200))}}}"}],"page":{"pagePath":"on-premises/user-guide/administrators/onboarding","slug":"/on-premises/user-guide/administrators/onboarding","pageMetadata":{"title":"Onboarding","description":"Create the first administrator, check your instance and add the first user.","icon":"user-plus","href":"/on-premises/user-guide/administrators/onboarding"},"description":{"compiledSource":"\"use strict\";\nconst {jsx: _jsx} = arguments[0];\nconst {useMDXComponents: _provideComponents} = arguments[0];\nfunction _createMdxContent(props) {\n const _components = {\n p: \"p\",\n ..._provideComponents(),\n ...props.components\n };\n return _jsx(_components.p, {\n children: \"Create the first administrator, check your instance and add the first user.\"\n });\n}\nfunction MDXContent(props = {}) {\n const {wrapper: MDXLayout} = {\n ..._provideComponents(),\n ...props.components\n };\n return MDXLayout ? _jsx(MDXLayout, {\n ...props,\n children: _jsx(_createMdxContent, {\n ...props\n })\n }) : _createMdxContent(props);\n}\nreturn {\n default: MDXContent\n};\n","frontmatter":{},"scope":{}},"pageType":"default","mdx":{"mdxSource":{"compiledSource":"\"use strict\";const{Fragment:_Fragment,jsx:_jsx,jsxs:_jsxs}=arguments[0];const{useMDXComponents:_provideComponents}=arguments[0];function _createMdxContent(props){const _components={a:`a`,code:`code`,em:`em`,p:`p`,strong:`strong`,tbody:`tbody`,td:`td`,th:`th`,thead:`thead`,tr:`tr`,..._provideComponents(),...props.components},{Frame,Info,OptimizedImage,Step,Steps,Table,Warning}=_components;if(!Frame)_missingMdxReference(`Frame`,true);if(!Info)_missingMdxReference(`Info`,true);if(!OptimizedImage)_missingMdxReference(`OptimizedImage`,true);if(!Step)_missingMdxReference(`Step`,true);if(!Steps)_missingMdxReference(`Steps`,true);if(!Table)_missingMdxReference(`Table`,true);if(!Warning)_missingMdxReference(`Warning`,true);return _jsxs(_Fragment,{children:[_jsxs(_components.p,{children:[`Do this once, right after the `,_jsx(_components.a,{href:`/on-premises/installation/introduction`,children:`installation`}),`. This page uses the default password login.`]}),`\n`,_jsxs(Steps,{children:[_jsxs(Step,{title:`Open the launchpad`,children:[_jsxs(_components.p,{children:[`Open `,_jsx(_components.code,{children:`/launchpad`}),` on your instance, for example `,_jsx(_components.code,{children:`http://localhost/launchpad`}),`. You see `,_jsx(_components.strong,{children:`Create the first Admin account`}),`.`]}),_jsx(_components.p,{children:`The form is there only until the first administrator exists. After that, signed-out visitors are sent to the login page.`})]}),_jsxs(Step,{title:`Create the administrator account`,children:[_jsxs(_components.p,{children:[`Enter an email and a password, then click `,_jsx(_components.strong,{children:`Register`}),`.`]}),_jsx(Frame,{caption:`The first administrator account`,children:_jsx(OptimizedImage,{src:`https://mintcdn.com/ayakaleaf-pro/PeD9iteXIf8j4GXw/images/on-premises/onboarding-launchpad-filled.png?fit=max\u0026auto=format\u0026n=PeD9iteXIf8j4GXw\u0026q=85\u0026s=44fc484a4761ab3d6290d0555d01cc5f`,alt:`The launchpad form filled in with admin@example.com`,\"data-og-width\":`856`,width:`856`,\"data-og-height\":`572`,height:`572`,\"data-path\":`images/on-premises/onboarding-launchpad-filled.png`,\"data-optimize\":`true`,\"data-opv\":`3`,srcset:`https://mintcdn.com/ayakaleaf-pro/PeD9iteXIf8j4GXw/images/on-premises/onboarding-launchpad-filled.png?w=280\u0026fit=max\u0026auto=format\u0026n=PeD9iteXIf8j4GXw\u0026q=85\u0026s=c19461f623c5c26fa2e422770b68af19 280w, https://mintcdn.com/ayakaleaf-pro/PeD9iteXIf8j4GXw/images/on-premises/onboarding-launchpad-filled.png?w=560\u0026fit=max\u0026auto=format\u0026n=PeD9iteXIf8j4GXw\u0026q=85\u0026s=a31f5a223e2569dbbab68152490d6c1a 560w, https://mintcdn.com/ayakaleaf-pro/PeD9iteXIf8j4GXw/images/on-premises/onboarding-launchpad-filled.png?w=840\u0026fit=max\u0026auto=format\u0026n=PeD9iteXIf8j4GXw\u0026q=85\u0026s=5608b97e9f486481a4bed7c6ab490405 840w, https://mintcdn.com/ayakaleaf-pro/PeD9iteXIf8j4GXw/images/on-premises/onboarding-launchpad-filled.png?w=1100\u0026fit=max\u0026auto=format\u0026n=PeD9iteXIf8j4GXw\u0026q=85\u0026s=95bfd5124f93af00c69cf950fe9c5968 1100w, https://mintcdn.com/ayakaleaf-pro/PeD9iteXIf8j4GXw/images/on-premises/onboarding-launchpad-filled.png?w=1650\u0026fit=max\u0026auto=format\u0026n=PeD9iteXIf8j4GXw\u0026q=85\u0026s=38f9d59f40579759992cb7332730765e 1650w, https://mintcdn.com/ayakaleaf-pro/PeD9iteXIf8j4GXw/images/on-premises/onboarding-launchpad-filled.png?w=2500\u0026fit=max\u0026auto=format\u0026n=PeD9iteXIf8j4GXw\u0026q=85\u0026s=40e8e51953b6d88f2ed877003672daa5 2500w`})}),_jsx(_components.p,{children:`If the password is refused, a message appears above the form and no account is created.`}),_jsx(Frame,{caption:`A refused password`,children:_jsx(OptimizedImage,{src:`https://mintcdn.com/ayakaleaf-pro/PeD9iteXIf8j4GXw/images/on-premises/onboarding-password-error.png?fit=max\u0026auto=format\u0026n=PeD9iteXIf8j4GXw\u0026q=85\u0026s=5808d2137a1291f81ab19c4a1b2fc7aa`,alt:`The message password is too short above the launchpad form`,\"data-og-width\":`578`,width:`578`,\"data-og-height\":`306`,height:`306`,\"data-path\":`images/on-premises/onboarding-password-error.png`,\"data-optimize\":`true`,\"data-opv\":`3`,srcset:`https://mintcdn.com/ayakaleaf-pro/PeD9iteXIf8j4GXw/images/on-premises/onboarding-password-error.png?w=280\u0026fit=max\u0026auto=format\u0026n=PeD9iteXIf8j4GXw\u0026q=85\u0026s=f6e9cae73f5bb293531edfef7087aaaf 280w, https://mintcdn.com/ayakaleaf-pro/PeD9iteXIf8j4GXw/images/on-premises/onboarding-password-error.png?w=560\u0026fit=max\u0026auto=format\u0026n=PeD9iteXIf8j4GXw\u0026q=85\u0026s=cdbb8a386bcb07e182adc1b866a2f34c 560w, https://mintcdn.com/ayakaleaf-pro/PeD9iteXIf8j4GXw/images/on-premises/onboarding-password-error.png?w=840\u0026fit=max\u0026auto=format\u0026n=PeD9iteXIf8j4GXw\u0026q=85\u0026s=cbb42306ded879296ad4b9dcf4b58e79 840w, https://mintcdn.com/ayakaleaf-pro/PeD9iteXIf8j4GXw/images/on-premises/onboarding-password-error.png?w=1100\u0026fit=max\u0026auto=format\u0026n=PeD9iteXIf8j4GXw\u0026q=85\u0026s=047b2c42f710a31d5d2f4d03c440d771 1100w, https://mintcdn.com/ayakaleaf-pro/PeD9iteXIf8j4GXw/images/on-premises/onboarding-password-error.png?w=1650\u0026fit=max\u0026auto=format\u0026n=PeD9iteXIf8j4GXw\u0026q=85\u0026s=b6c42a3e595d4e0eff14c0606c37d403 1650w, https://mintcdn.com/ayakaleaf-pro/PeD9iteXIf8j4GXw/images/on-premises/onboarding-password-error.png?w=2500\u0026fit=max\u0026auto=format\u0026n=PeD9iteXIf8j4GXw\u0026q=85\u0026s=30fae62a15f53b9eeffb127ddf6e412a 2500w`})}),_jsxs(Table,{children:[_jsx(_components.thead,{children:_jsxs(_components.tr,{children:[_jsx(_components.th,{children:`Message`}),_jsx(_components.th,{children:`Meaning`})]})}),_jsxs(_components.tbody,{children:[_jsxs(_components.tr,{children:[_jsx(_components.td,{children:_jsx(_components.code,{children:`password is too short`})}),_jsx(_components.td,{children:`Fewer than 8 characters.`})]}),_jsxs(_components.tr,{children:[_jsx(_components.td,{children:_jsx(_components.code,{children:`password is too long`})}),_jsx(_components.td,{children:`More than 72 characters.`})]}),_jsxs(_components.tr,{children:[_jsx(_components.td,{children:_jsx(_components.code,{children:`password contains an invalid character`})}),_jsxs(_components.td,{children:[`Allowed are letters `,_jsx(_components.code,{children:`a-z`}),` and `,_jsx(_components.code,{children:`A-Z`}),`, digits and `,_jsx(_components.code,{children:`@#$%^\u0026*()-_=+[]{};:\u003c>/?!£€.,`}),`. Spaces and accented or non-Latin letters are not.`]})]}),_jsxs(_components.tr,{children:[_jsx(_components.td,{children:_jsx(_components.code,{children:`password contains part of email address`})}),_jsxs(_components.td,{children:[`It contains the email or the part before `,_jsx(_components.code,{children:`@`}),`, or it is part of the email. For `,_jsx(_components.code,{children:`admin@example.com`}),`, both `,_jsx(_components.code,{children:`admin-7Tq9-demo`}),` and `,_jsx(_components.code,{children:`example.com`}),` are refused.`]})]}),_jsxs(_components.tr,{children:[_jsx(_components.td,{children:_jsx(_components.code,{children:`password is too similar to email address`})}),_jsxs(_components.td,{children:[`It is close to the email, for example `,_jsx(_components.code,{children:`adm1n@example.c0m`}),`.`]})]})]})]}),_jsxs(_components.p,{children:[`Capital letters, digits and symbols are not required by default. To change the length limits, see `,_jsx(_components.a,{href:`/on-premises/configuration/overleaf-toolkit/authentication/password-restrictions`,children:`Password restrictions`}),`.`]})]}),_jsxs(Step,{title:`Log in`,children:[_jsxs(_components.p,{children:[`After `,_jsx(_components.strong,{children:`Register`}),` you are on the login page. Enter the same email and password, then click `,_jsx(_components.strong,{children:`Login`}),`.`]}),_jsx(Frame,{caption:`Log in with the new account`,children:_jsx(OptimizedImage,{src:`https://mintcdn.com/ayakaleaf-pro/PeD9iteXIf8j4GXw/images/on-premises/onboarding-login.png?fit=max\u0026auto=format\u0026n=PeD9iteXIf8j4GXw\u0026q=85\u0026s=98d690d531f3c9ae4c2d4fb30e6f485c`,alt:`The login page filled in with admin@example.com`,\"data-og-width\":`560`,width:`560`,\"data-og-height\":`530`,height:`530`,\"data-path\":`images/on-premises/onboarding-login.png`,\"data-optimize\":`true`,\"data-opv\":`3`,srcset:`https://mintcdn.com/ayakaleaf-pro/PeD9iteXIf8j4GXw/images/on-premises/onboarding-login.png?w=280\u0026fit=max\u0026auto=format\u0026n=PeD9iteXIf8j4GXw\u0026q=85\u0026s=099767575f8e6d954390c698e92b2eaa 280w, https://mintcdn.com/ayakaleaf-pro/PeD9iteXIf8j4GXw/images/on-premises/onboarding-login.png?w=560\u0026fit=max\u0026auto=format\u0026n=PeD9iteXIf8j4GXw\u0026q=85\u0026s=5985bef282b239d3452193ec0ecbad6c 560w, https://mintcdn.com/ayakaleaf-pro/PeD9iteXIf8j4GXw/images/on-premises/onboarding-login.png?w=840\u0026fit=max\u0026auto=format\u0026n=PeD9iteXIf8j4GXw\u0026q=85\u0026s=cefc6f979aea5eaf2f87124937961f1e 840w, https://mintcdn.com/ayakaleaf-pro/PeD9iteXIf8j4GXw/images/on-premises/onboarding-login.png?w=1100\u0026fit=max\u0026auto=format\u0026n=PeD9iteXIf8j4GXw\u0026q=85\u0026s=f7f57139e02c6ae719d79fdc46b07846 1100w, https://mintcdn.com/ayakaleaf-pro/PeD9iteXIf8j4GXw/images/on-premises/onboarding-login.png?w=1650\u0026fit=max\u0026auto=format\u0026n=PeD9iteXIf8j4GXw\u0026q=85\u0026s=4b1876a2f2547a3260d362164971aba7 1650w, https://mintcdn.com/ayakaleaf-pro/PeD9iteXIf8j4GXw/images/on-premises/onboarding-login.png?w=2500\u0026fit=max\u0026auto=format\u0026n=PeD9iteXIf8j4GXw\u0026q=85\u0026s=8fc2c64cd50323962537c062bd2150eb 2500w`})}),_jsxs(_components.p,{children:[`You are back on the launchpad, now with `,_jsx(_components.strong,{children:`Status Checks`}),`.`]})]}),_jsxs(Step,{title:`Check the instance`,children:[_jsxs(_components.p,{children:[_jsx(_components.code,{children:`websockets`}),` should show `,_jsx(_components.strong,{children:`OK`}),`.`]}),_jsxs(_components.p,{children:[`To test email, enter your address under `,_jsx(_components.strong,{children:`Send a test email`}),`, click `,_jsx(_components.strong,{children:`Send`}),`, then check your inbox.`]}),_jsx(Frame,{caption:`Status checks and the test email`,children:_jsx(OptimizedImage,{src:`https://mintcdn.com/ayakaleaf-pro/PeD9iteXIf8j4GXw/images/on-premises/onboarding-launchpad-checks.png?fit=max\u0026auto=format\u0026n=PeD9iteXIf8j4GXw\u0026q=85\u0026s=2a82fa143112596c74c478ad3169366f`,alt:`The launchpad with websockets OK, the test email form showing Email Sent, and the two buttons at the bottom`,\"data-og-width\":`856`,width:`856`,\"data-og-height\":`600`,height:`600`,\"data-path\":`images/on-premises/onboarding-launchpad-checks.png`,\"data-optimize\":`true`,\"data-opv\":`3`,srcset:`https://mintcdn.com/ayakaleaf-pro/PeD9iteXIf8j4GXw/images/on-premises/onboarding-launchpad-checks.png?w=280\u0026fit=max\u0026auto=format\u0026n=PeD9iteXIf8j4GXw\u0026q=85\u0026s=ff7710732c59e85403d772320907e19e 280w, https://mintcdn.com/ayakaleaf-pro/PeD9iteXIf8j4GXw/images/on-premises/onboarding-launchpad-checks.png?w=560\u0026fit=max\u0026auto=format\u0026n=PeD9iteXIf8j4GXw\u0026q=85\u0026s=93ab5d8b12e3b4e1617684f72737bd99 560w, https://mintcdn.com/ayakaleaf-pro/PeD9iteXIf8j4GXw/images/on-premises/onboarding-launchpad-checks.png?w=840\u0026fit=max\u0026auto=format\u0026n=PeD9iteXIf8j4GXw\u0026q=85\u0026s=8f292e60e57b5299ac4da24ac2509853 840w, https://mintcdn.com/ayakaleaf-pro/PeD9iteXIf8j4GXw/images/on-premises/onboarding-launchpad-checks.png?w=1100\u0026fit=max\u0026auto=format\u0026n=PeD9iteXIf8j4GXw\u0026q=85\u0026s=89e0a045cae6b6c0cf0de95f8f6a206e 1100w, https://mintcdn.com/ayakaleaf-pro/PeD9iteXIf8j4GXw/images/on-premises/onboarding-launchpad-checks.png?w=1650\u0026fit=max\u0026auto=format\u0026n=PeD9iteXIf8j4GXw\u0026q=85\u0026s=0e4fe26210461c6b59c6ad05d53f042e 1650w, https://mintcdn.com/ayakaleaf-pro/PeD9iteXIf8j4GXw/images/on-premises/onboarding-launchpad-checks.png?w=2500\u0026fit=max\u0026auto=format\u0026n=PeD9iteXIf8j4GXw\u0026q=85\u0026s=c3c12e85b810c390b27504f94efb1a6a 2500w`})}),_jsx(Warning,{children:_jsxs(_components.p,{children:[_jsx(_components.strong,{children:`Email Sent`}),` does not prove that a message left the server. Without `,_jsx(_components.a,{href:`/on-premises/configuration/overleaf-toolkit/email-delivery`,children:`email delivery`}),`, the page shows the same text and nothing arrives.`]})}),_jsxs(_components.p,{children:[_jsx(_components.strong,{children:`Start Using`}),` `,_jsx(_components.em,{children:`your site name`}),` opens your projects. `,_jsx(_components.strong,{children:`Go To Admin Panel`}),` opens the site tools, see `,_jsx(_components.a,{href:`/on-premises/user-guide/administrators/basic-management`,children:`Basic management`}),`.`]})]}),_jsxs(Step,{title:`Create the first user`,children:[_jsxs(_components.p,{children:[`In the top menu, click `,_jsx(_components.strong,{children:`Admin`}),`, then `,_jsx(_components.strong,{children:`Manage Users`}),`.`]}),_jsx(Frame,{caption:`The Admin menu`,children:_jsx(OptimizedImage,{src:`https://mintcdn.com/ayakaleaf-pro/PeD9iteXIf8j4GXw/images/on-premises/onboarding-admin-menu.png?fit=max\u0026auto=format\u0026n=PeD9iteXIf8j4GXw\u0026q=85\u0026s=56643626dfb1dfa5034462cff38e5970`,alt:`The Admin menu with Manage Site, Manage Users and Project/Object Lookup`,\"data-og-width\":`510`,width:`510`,\"data-og-height\":`180`,height:`180`,\"data-path\":`images/on-premises/onboarding-admin-menu.png`,\"data-optimize\":`true`,\"data-opv\":`3`,srcset:`https://mintcdn.com/ayakaleaf-pro/PeD9iteXIf8j4GXw/images/on-premises/onboarding-admin-menu.png?w=280\u0026fit=max\u0026auto=format\u0026n=PeD9iteXIf8j4GXw\u0026q=85\u0026s=be2e11375d3bae24f9d1684085cebbb7 280w, https://mintcdn.com/ayakaleaf-pro/PeD9iteXIf8j4GXw/images/on-premises/onboarding-admin-menu.png?w=560\u0026fit=max\u0026auto=format\u0026n=PeD9iteXIf8j4GXw\u0026q=85\u0026s=ec301bdd67cf7679c86227b1c53afe16 560w, https://mintcdn.com/ayakaleaf-pro/PeD9iteXIf8j4GXw/images/on-premises/onboarding-admin-menu.png?w=840\u0026fit=max\u0026auto=format\u0026n=PeD9iteXIf8j4GXw\u0026q=85\u0026s=aa87cd4f4b680c48c27783e3ba9b8c8d 840w, https://mintcdn.com/ayakaleaf-pro/PeD9iteXIf8j4GXw/images/on-premises/onboarding-admin-menu.png?w=1100\u0026fit=max\u0026auto=format\u0026n=PeD9iteXIf8j4GXw\u0026q=85\u0026s=fe644dc091114f23256d405e966bf25e 1100w, https://mintcdn.com/ayakaleaf-pro/PeD9iteXIf8j4GXw/images/on-premises/onboarding-admin-menu.png?w=1650\u0026fit=max\u0026auto=format\u0026n=PeD9iteXIf8j4GXw\u0026q=85\u0026s=ced074eedd53fc65f8f72499d03ade2c 1650w, https://mintcdn.com/ayakaleaf-pro/PeD9iteXIf8j4GXw/images/on-premises/onboarding-admin-menu.png?w=2500\u0026fit=max\u0026auto=format\u0026n=PeD9iteXIf8j4GXw\u0026q=85\u0026s=c84ac687e121cf66f59d87a0e91099ec 2500w`})}),_jsxs(_components.p,{children:[`Click `,_jsx(_components.strong,{children:`Create account`}),`.`]}),_jsx(Frame,{caption:`The user list`,children:_jsx(OptimizedImage,{src:`https://mintcdn.com/ayakaleaf-pro/PeD9iteXIf8j4GXw/images/on-premises/onboarding-user-list.png?fit=max\u0026auto=format\u0026n=PeD9iteXIf8j4GXw\u0026q=85\u0026s=fa3a7b2ecfc0e436e1cd0e825054eaa9`,alt:`The user list with the administrator and the Create account button`,\"data-og-width\":`1120`,width:`1120`,\"data-og-height\":`290`,height:`290`,\"data-path\":`images/on-premises/onboarding-user-list.png`,\"data-optimize\":`true`,\"data-opv\":`3`,srcset:`https://mintcdn.com/ayakaleaf-pro/PeD9iteXIf8j4GXw/images/on-premises/onboarding-user-list.png?w=280\u0026fit=max\u0026auto=format\u0026n=PeD9iteXIf8j4GXw\u0026q=85\u0026s=416f43a6a17c2c0bf11825766ab401b7 280w, https://mintcdn.com/ayakaleaf-pro/PeD9iteXIf8j4GXw/images/on-premises/onboarding-user-list.png?w=560\u0026fit=max\u0026auto=format\u0026n=PeD9iteXIf8j4GXw\u0026q=85\u0026s=9cce91689c13dcae16cb2b95e0736a0a 560w, https://mintcdn.com/ayakaleaf-pro/PeD9iteXIf8j4GXw/images/on-premises/onboarding-user-list.png?w=840\u0026fit=max\u0026auto=format\u0026n=PeD9iteXIf8j4GXw\u0026q=85\u0026s=46f98f1307a6eb61dcf60ae649de66d6 840w, https://mintcdn.com/ayakaleaf-pro/PeD9iteXIf8j4GXw/images/on-premises/onboarding-user-list.png?w=1100\u0026fit=max\u0026auto=format\u0026n=PeD9iteXIf8j4GXw\u0026q=85\u0026s=a04d950dfda46195c120ec0c7974df5e 1100w, https://mintcdn.com/ayakaleaf-pro/PeD9iteXIf8j4GXw/images/on-premises/onboarding-user-list.png?w=1650\u0026fit=max\u0026auto=format\u0026n=PeD9iteXIf8j4GXw\u0026q=85\u0026s=878e51c2a94dd9bda8124b03321176d4 1650w, https://mintcdn.com/ayakaleaf-pro/PeD9iteXIf8j4GXw/images/on-premises/onboarding-user-list.png?w=2500\u0026fit=max\u0026auto=format\u0026n=PeD9iteXIf8j4GXw\u0026q=85\u0026s=ca54f98db27473b8dddaf69cff0860cb 2500w`})}),_jsxs(_components.p,{children:[`Enter the user’s email. `,_jsx(_components.strong,{children:`First name`}),` and `,_jsx(_components.strong,{children:`Last name`}),` are optional. Tick `,_jsx(_components.strong,{children:`Admin`}),` only for another administrator. Click `,_jsx(_components.strong,{children:`Create`}),`.`]}),_jsx(Frame,{caption:`The Create account dialog`,children:_jsx(OptimizedImage,{src:`https://mintcdn.com/ayakaleaf-pro/PeD9iteXIf8j4GXw/images/on-premises/onboarding-create-account.png?fit=max\u0026auto=format\u0026n=PeD9iteXIf8j4GXw\u0026q=85\u0026s=062b5fce0a96597e2cee442ba4aeffa8`,alt:`The Create account dialog filled in with user@example.com`,\"data-og-width\":`664`,width:`664`,\"data-og-height\":`461`,height:`461`,\"data-path\":`images/on-premises/onboarding-create-account.png`,\"data-optimize\":`true`,\"data-opv\":`3`,srcset:`https://mintcdn.com/ayakaleaf-pro/PeD9iteXIf8j4GXw/images/on-premises/onboarding-create-account.png?w=280\u0026fit=max\u0026auto=format\u0026n=PeD9iteXIf8j4GXw\u0026q=85\u0026s=cbbae58571fe89d782b712b7399f86ab 280w, https://mintcdn.com/ayakaleaf-pro/PeD9iteXIf8j4GXw/images/on-premises/onboarding-create-account.png?w=560\u0026fit=max\u0026auto=format\u0026n=PeD9iteXIf8j4GXw\u0026q=85\u0026s=0392b678cf3ab7ccddac5cc84f4b0e20 560w, https://mintcdn.com/ayakaleaf-pro/PeD9iteXIf8j4GXw/images/on-premises/onboarding-create-account.png?w=840\u0026fit=max\u0026auto=format\u0026n=PeD9iteXIf8j4GXw\u0026q=85\u0026s=97e1c1564cb042ed2b2da335c4fbd911 840w, https://mintcdn.com/ayakaleaf-pro/PeD9iteXIf8j4GXw/images/on-premises/onboarding-create-account.png?w=1100\u0026fit=max\u0026auto=format\u0026n=PeD9iteXIf8j4GXw\u0026q=85\u0026s=c9c0cbe9f9a54087134f8111ff8bb70a 1100w, https://mintcdn.com/ayakaleaf-pro/PeD9iteXIf8j4GXw/images/on-premises/onboarding-create-account.png?w=1650\u0026fit=max\u0026auto=format\u0026n=PeD9iteXIf8j4GXw\u0026q=85\u0026s=81334f961347eaa72cf49e3134780e11 1650w, https://mintcdn.com/ayakaleaf-pro/PeD9iteXIf8j4GXw/images/on-premises/onboarding-create-account.png?w=2500\u0026fit=max\u0026auto=format\u0026n=PeD9iteXIf8j4GXw\u0026q=85\u0026s=8b9e88a2b5b7b59bf966fdcc728974dc 2500w`})}),_jsxs(_components.p,{children:[`The account appears in the list with the status `,_jsx(_components.strong,{children:`Pending`}),`.`]}),_jsx(Frame,{caption:`A new account stays Pending until its first login`,children:_jsx(OptimizedImage,{src:`https://mintcdn.com/ayakaleaf-pro/PeD9iteXIf8j4GXw/images/on-premises/onboarding-user-pending.png?fit=max\u0026auto=format\u0026n=PeD9iteXIf8j4GXw\u0026q=85\u0026s=af6cfa1df17e2105c2a8dd079dad6b8c`,alt:`The user list with Demo User in the Pending status`,\"data-og-width\":`1120`,width:`1120`,\"data-og-height\":`350`,height:`350`,\"data-path\":`images/on-premises/onboarding-user-pending.png`,\"data-optimize\":`true`,\"data-opv\":`3`,srcset:`https://mintcdn.com/ayakaleaf-pro/PeD9iteXIf8j4GXw/images/on-premises/onboarding-user-pending.png?w=280\u0026fit=max\u0026auto=format\u0026n=PeD9iteXIf8j4GXw\u0026q=85\u0026s=74f364aab132132444c7f81d5a7d2ce4 280w, https://mintcdn.com/ayakaleaf-pro/PeD9iteXIf8j4GXw/images/on-premises/onboarding-user-pending.png?w=560\u0026fit=max\u0026auto=format\u0026n=PeD9iteXIf8j4GXw\u0026q=85\u0026s=1903ea2123eefd9392829722690b2ae9 560w, https://mintcdn.com/ayakaleaf-pro/PeD9iteXIf8j4GXw/images/on-premises/onboarding-user-pending.png?w=840\u0026fit=max\u0026auto=format\u0026n=PeD9iteXIf8j4GXw\u0026q=85\u0026s=722f0d47fad2464a89fe1a8b85aced71 840w, https://mintcdn.com/ayakaleaf-pro/PeD9iteXIf8j4GXw/images/on-premises/onboarding-user-pending.png?w=1100\u0026fit=max\u0026auto=format\u0026n=PeD9iteXIf8j4GXw\u0026q=85\u0026s=a1a6614e781208e28f88782b061dfeea 1100w, https://mintcdn.com/ayakaleaf-pro/PeD9iteXIf8j4GXw/images/on-premises/onboarding-user-pending.png?w=1650\u0026fit=max\u0026auto=format\u0026n=PeD9iteXIf8j4GXw\u0026q=85\u0026s=3a6472282a4b1706248cb8019e1b0224 1650w, https://mintcdn.com/ayakaleaf-pro/PeD9iteXIf8j4GXw/images/on-premises/onboarding-user-pending.png?w=2500\u0026fit=max\u0026auto=format\u0026n=PeD9iteXIf8j4GXw\u0026q=85\u0026s=ba957e3f1c5ab9650dfc52988d58fe56 2500w`})})]}),_jsxs(Step,{title:`Give the user access`,children:[_jsxs(_components.p,{children:[_jsx(_components.strong,{children:`With email delivery configured`}),`, the user receives an activation email with a `,_jsx(_components.strong,{children:`Set password`}),` link. The link opens this page. The user enters a password and clicks `,_jsx(_components.strong,{children:`Activate`}),`, and then lands on the projects page. The password rules above apply.`]}),_jsx(Frame,{caption:`What the user sees after opening the link`,children:_jsx(OptimizedImage,{src:`https://mintcdn.com/ayakaleaf-pro/PeD9iteXIf8j4GXw/images/on-premises/onboarding-activate.png?fit=max\u0026auto=format\u0026n=PeD9iteXIf8j4GXw\u0026q=85\u0026s=6db5a3f0fcafc3cc35759a049e4eaa72`,alt:`The activation page asking the user to set a password`,\"data-og-width\":`480`,width:`480`,\"data-og-height\":`385`,height:`385`,\"data-path\":`images/on-premises/onboarding-activate.png`,\"data-optimize\":`true`,\"data-opv\":`3`,srcset:`https://mintcdn.com/ayakaleaf-pro/PeD9iteXIf8j4GXw/images/on-premises/onboarding-activate.png?w=280\u0026fit=max\u0026auto=format\u0026n=PeD9iteXIf8j4GXw\u0026q=85\u0026s=97123829f52d17d315c38b66ddb301b0 280w, https://mintcdn.com/ayakaleaf-pro/PeD9iteXIf8j4GXw/images/on-premises/onboarding-activate.png?w=560\u0026fit=max\u0026auto=format\u0026n=PeD9iteXIf8j4GXw\u0026q=85\u0026s=62c64faf6ab340288db0580d56bb04c2 560w, https://mintcdn.com/ayakaleaf-pro/PeD9iteXIf8j4GXw/images/on-premises/onboarding-activate.png?w=840\u0026fit=max\u0026auto=format\u0026n=PeD9iteXIf8j4GXw\u0026q=85\u0026s=185cd6bb49f45c7b0df97e4f503b7817 840w, https://mintcdn.com/ayakaleaf-pro/PeD9iteXIf8j4GXw/images/on-premises/onboarding-activate.png?w=1100\u0026fit=max\u0026auto=format\u0026n=PeD9iteXIf8j4GXw\u0026q=85\u0026s=e780ef2597a0db43d713d555234712e6 1100w, https://mintcdn.com/ayakaleaf-pro/PeD9iteXIf8j4GXw/images/on-premises/onboarding-activate.png?w=1650\u0026fit=max\u0026auto=format\u0026n=PeD9iteXIf8j4GXw\u0026q=85\u0026s=871e4aca81f89088cb80f227bfedea3a 1650w, https://mintcdn.com/ayakaleaf-pro/PeD9iteXIf8j4GXw/images/on-premises/onboarding-activate.png?w=2500\u0026fit=max\u0026auto=format\u0026n=PeD9iteXIf8j4GXw\u0026q=85\u0026s=496c293a361574894d936a3aef56b3eb 2500w`})}),_jsxs(_components.p,{children:[_jsx(_components.strong,{children:`Without email delivery`}),`, pass the link on yourself. In `,_jsx(_components.strong,{children:`Manage Users`}),`, click the envelope icon on the user’s row, then `,_jsx(_components.strong,{children:`Send activation email`}),`. The dialog says `,_jsx(_components.strong,{children:`No email was sent`}),` and shows the link, which expires in 7 days. Click the copy icon and send the link to the user, who sets a password as above.`]}),_jsx(Frame,{caption:`The activation link to pass on`,children:_jsx(OptimizedImage,{src:`https://mintcdn.com/ayakaleaf-pro/PeD9iteXIf8j4GXw/images/on-premises/onboarding-activation-link.png?fit=max\u0026auto=format\u0026n=PeD9iteXIf8j4GXw\u0026q=85\u0026s=9e92753fb01774d491f0887c2bcad139`,alt:`The Send activation email dialog for Demo User with the warning that no email was sent, the link, a copy icon and Expires in 7 days`,\"data-og-width\":`664`,width:`664`,\"data-og-height\":`435`,height:`435`,\"data-path\":`images/on-premises/onboarding-activation-link.png`,\"data-optimize\":`true`,\"data-opv\":`3`,srcset:`https://mintcdn.com/ayakaleaf-pro/PeD9iteXIf8j4GXw/images/on-premises/onboarding-activation-link.png?w=280\u0026fit=max\u0026auto=format\u0026n=PeD9iteXIf8j4GXw\u0026q=85\u0026s=2d2c691fff49ef75dc84a6004e2b63e3 280w, https://mintcdn.com/ayakaleaf-pro/PeD9iteXIf8j4GXw/images/on-premises/onboarding-activation-link.png?w=560\u0026fit=max\u0026auto=format\u0026n=PeD9iteXIf8j4GXw\u0026q=85\u0026s=51e9075cc68b6bedcc474fa80f8116c0 560w, https://mintcdn.com/ayakaleaf-pro/PeD9iteXIf8j4GXw/images/on-premises/onboarding-activation-link.png?w=840\u0026fit=max\u0026auto=format\u0026n=PeD9iteXIf8j4GXw\u0026q=85\u0026s=fabe8982402c064f0f4e7b9dd431e780 840w, https://mintcdn.com/ayakaleaf-pro/PeD9iteXIf8j4GXw/images/on-premises/onboarding-activation-link.png?w=1100\u0026fit=max\u0026auto=format\u0026n=PeD9iteXIf8j4GXw\u0026q=85\u0026s=7952d24bace769371b413308637333ca 1100w, https://mintcdn.com/ayakaleaf-pro/PeD9iteXIf8j4GXw/images/on-premises/onboarding-activation-link.png?w=1650\u0026fit=max\u0026auto=format\u0026n=PeD9iteXIf8j4GXw\u0026q=85\u0026s=1088c6a464b620b3114066c6cddc9b23 1650w, https://mintcdn.com/ayakaleaf-pro/PeD9iteXIf8j4GXw/images/on-premises/onboarding-activation-link.png?w=2500\u0026fit=max\u0026auto=format\u0026n=PeD9iteXIf8j4GXw\u0026q=85\u0026s=ee2256ad83277fe876cc0fa239fccf42 2500w`})}),_jsxs(_components.p,{children:[`You can also set a password yourself. In `,_jsx(_components.strong,{children:`Manage Users`}),`, click the user’s name, then the pencil icon. Enter `,_jsx(_components.strong,{children:`New password`}),` and click `,_jsx(_components.strong,{children:`Save`}),`. Pass the password on to the user, who logs in at `,_jsx(_components.code,{children:`/login`}),`.`]}),_jsx(Frame,{caption:`Setting a password on the Account tab`,children:_jsx(OptimizedImage,{src:`https://mintcdn.com/ayakaleaf-pro/PeD9iteXIf8j4GXw/images/on-premises/onboarding-set-password.png?fit=max\u0026auto=format\u0026n=PeD9iteXIf8j4GXw\u0026q=85\u0026s=1646b633c88bad8c37c0f3ca48349eea`,alt:`The Account tab of a user in edit mode with the New password field filled in`,\"data-og-width\":`1110`,width:`1110`,\"data-og-height\":`510`,height:`510`,\"data-path\":`images/on-premises/onboarding-set-password.png`,\"data-optimize\":`true`,\"data-opv\":`3`,srcset:`https://mintcdn.com/ayakaleaf-pro/PeD9iteXIf8j4GXw/images/on-premises/onboarding-set-password.png?w=280\u0026fit=max\u0026auto=format\u0026n=PeD9iteXIf8j4GXw\u0026q=85\u0026s=de418021535911a82f72bd99bf3d5d58 280w, https://mintcdn.com/ayakaleaf-pro/PeD9iteXIf8j4GXw/images/on-premises/onboarding-set-password.png?w=560\u0026fit=max\u0026auto=format\u0026n=PeD9iteXIf8j4GXw\u0026q=85\u0026s=8d3d55ae34e5e88e21a22b3e40fe85c7 560w, https://mintcdn.com/ayakaleaf-pro/PeD9iteXIf8j4GXw/images/on-premises/onboarding-set-password.png?w=840\u0026fit=max\u0026auto=format\u0026n=PeD9iteXIf8j4GXw\u0026q=85\u0026s=810bbabaff0fa106b4f652555c99a70c 840w, https://mintcdn.com/ayakaleaf-pro/PeD9iteXIf8j4GXw/images/on-premises/onboarding-set-password.png?w=1100\u0026fit=max\u0026auto=format\u0026n=PeD9iteXIf8j4GXw\u0026q=85\u0026s=59265d3687a166eeb2aa5f31f2214859 1100w, https://mintcdn.com/ayakaleaf-pro/PeD9iteXIf8j4GXw/images/on-premises/onboarding-set-password.png?w=1650\u0026fit=max\u0026auto=format\u0026n=PeD9iteXIf8j4GXw\u0026q=85\u0026s=b215f4a6ed414e757ee66ebc52c1969f 1650w, https://mintcdn.com/ayakaleaf-pro/PeD9iteXIf8j4GXw/images/on-premises/onboarding-set-password.png?w=2500\u0026fit=max\u0026auto=format\u0026n=PeD9iteXIf8j4GXw\u0026q=85\u0026s=80acf05c63473f28d825ae3c0c672fd2 2500w`})})]}),_jsxs(Step,{title:`Confirm it worked`,children:[_jsxs(_components.p,{children:[`After the user’s first login, the status in `,_jsx(_components.strong,{children:`Manage Users`}),` changes to `,_jsx(_components.strong,{children:`Active`}),`.`]}),_jsx(Frame,{caption:`The user has logged in`,children:_jsx(OptimizedImage,{src:`https://mintcdn.com/ayakaleaf-pro/PeD9iteXIf8j4GXw/images/on-premises/onboarding-user-active.png?fit=max\u0026auto=format\u0026n=PeD9iteXIf8j4GXw\u0026q=85\u0026s=83bc92f638b2a5aa46be1d32bd5ece81`,alt:`The user list with Demo User in the Active status`,\"data-og-width\":`1120`,width:`1120`,\"data-og-height\":`300`,height:`300`,\"data-path\":`images/on-premises/onboarding-user-active.png`,\"data-optimize\":`true`,\"data-opv\":`3`,srcset:`https://mintcdn.com/ayakaleaf-pro/PeD9iteXIf8j4GXw/images/on-premises/onboarding-user-active.png?w=280\u0026fit=max\u0026auto=format\u0026n=PeD9iteXIf8j4GXw\u0026q=85\u0026s=bac79fd4516e45c02cedded34acac960 280w, https://mintcdn.com/ayakaleaf-pro/PeD9iteXIf8j4GXw/images/on-premises/onboarding-user-active.png?w=560\u0026fit=max\u0026auto=format\u0026n=PeD9iteXIf8j4GXw\u0026q=85\u0026s=3ce90c0f3f746c62485cdf904f30d8c4 560w, https://mintcdn.com/ayakaleaf-pro/PeD9iteXIf8j4GXw/images/on-premises/onboarding-user-active.png?w=840\u0026fit=max\u0026auto=format\u0026n=PeD9iteXIf8j4GXw\u0026q=85\u0026s=ed2b5598c87876571865369c50652ce8 840w, https://mintcdn.com/ayakaleaf-pro/PeD9iteXIf8j4GXw/images/on-premises/onboarding-user-active.png?w=1100\u0026fit=max\u0026auto=format\u0026n=PeD9iteXIf8j4GXw\u0026q=85\u0026s=5f2111063dd677cf3eb728d6ec3d689c 1100w, https://mintcdn.com/ayakaleaf-pro/PeD9iteXIf8j4GXw/images/on-premises/onboarding-user-active.png?w=1650\u0026fit=max\u0026auto=format\u0026n=PeD9iteXIf8j4GXw\u0026q=85\u0026s=c774d00ecd144ad9a44ca61727653bf0 1650w, https://mintcdn.com/ayakaleaf-pro/PeD9iteXIf8j4GXw/images/on-premises/onboarding-user-active.png?w=2500\u0026fit=max\u0026auto=format\u0026n=PeD9iteXIf8j4GXw\u0026q=85\u0026s=41cdcb093efe38f0f16d2f0fde8d09bb 2500w`})})]})]}),`\n`,_jsx(Info,{children:_jsxs(_components.p,{children:[_jsx(_components.strong,{children:`Sign up`}),` does not create accounts by default: the page asks visitors to contact the address in `,_jsx(_components.code,{children:`OVERLEAF_ADMIN_EMAIL`}),`. To let people register themselves, see `,_jsx(_components.a,{href:`/on-premises/configuration/overleaf-toolkit/authentication/public-access`,children:`Public Access`}),`.`]})})]})}function MDXContent(props={}){const{wrapper:MDXLayout}={..._provideComponents(),...props.components};return MDXLayout?_jsx(MDXLayout,{...props,children:_jsx(_createMdxContent,{...props})}):_createMdxContent(props)}return{default:MDXContent};function _missingMdxReference(id,component){throw new Error(`Expected `+(component?`component`:`object`)+\" `\"+id+\"` to be defined: you likely forgot to import, pass, or provide it.\")}","frontmatter":{},"scope":{"config":{},"pageMetadata":{"title":"Onboarding","description":"Create the first administrator, check your instance and add the first user.","icon":"user-plus","href":"/on-premises/user-guide/administrators/onboarding"}}},"mdxSourceWithNoJs":null},"mdxExtracts":{"tableOfContents":[],"codeExamples":{}},"jsLinks":[],"subdomain":"ayakaleaf-pro","siteName":"Ayakaleaf Pro","title":"Onboarding - Ayakaleaf Pro","navMaps":{"firstHrefInVersion":{},"firstHrefInLanguage":{"en":{"href":"/on-premises/user-guide/administrators/onboarding","matchLevel":0},"zh-CN":{"href":"/zh-CN","matchLevel":4},"zh-TW":{"href":"/zh-TW","matchLevel":4},"ja":{"href":"/ja","matchLevel":4},"de":{"href":"/de","matchLevel":4},"fr":{"href":"/fr","matchLevel":4},"es":{"href":"/es","matchLevel":4},"it":{"href":"/it","matchLevel":4},"ko":{"href":"/ko","matchLevel":4},"ru":{"href":"/ru","matchLevel":4},"nl":{"href":"/nl","matchLevel":4},"pt":{"href":"/pt","matchLevel":4},"tr":{"href":"/tr","matchLevel":4},"uk":{"href":"/uk","matchLevel":4},"pl":{"href":"/pl","matchLevel":4},"cs":{"href":"/cs","matchLevel":4},"sv":{"href":"/sv","matchLevel":4},"fi":{"href":"/fi","matchLevel":4},"ar":{"href":"/ar","matchLevel":4},"vi":{"href":"/vi","matchLevel":4},"no":{"href":"/no","matchLevel":4},"da":{"href":"/da","matchLevel":4},"id":{"href":"/id","matchLevel":4},"zh-Hans":{"href":"/zh-Hans","matchLevel":4},"zh-Hant":{"href":"/zh-Hant","matchLevel":4}}},"lastModified":"2026-11-07T03:05:41.663Z","gitLastModified":"2026-11-07T03:05:24.000Z","originalFileLocation":"on-premises/user-guide/administrators/onboarding.mdx","locale":"en"},"headHtml":"\u003cscript data-mint-head>(function(){var d=document.documentElement,p=null;if(!p){try{p=localStorage.getItem(\"isDarkMode\")}catch(e){}if(p==='true')p='dark';else if(p==='false')p='light';if(p!=='light'\u0026\u0026p!=='dark'\u0026\u0026p!=='system')p=\"system\"}var r=p==='system'?(matchMedia(\"(prefers-color-scheme: dark)\").matches?'dark':'light'):p;d.classList.remove(r==='dark'?'light':'dark');d.classList.add(r);d.setAttribute(\"data-theme-preference\",p)})();\u003c/script>\u003cmeta data-mint-head name=\"description\" content=\"Create the first administrator, check your instance and add the first user.\">\u003cmeta data-mint-head name=\"application-name\" content=\"Ayakaleaf Pro\">\u003cmeta data-mint-head name=\"generator\" content=\"Mintlify\">\u003clink data-mint-head rel=\"icon\" type=\"image/png\" sizes=\"192x192\" href=\"/mintlify-assets/_mintlify/favicons/ayakaleaf-pro/o_LAbiVNKQm96Y75/_generated/favicon/android-chrome-192x192.png\" media=\"(prefers-color-scheme: light)\">\u003clink data-mint-head rel=\"apple-touch-icon\" type=\"image/png\" sizes=\"180x180\" href=\"/mintlify-assets/_mintlify/favicons/ayakaleaf-pro/o_LAbiVNKQm96Y75/_generated/favicon/apple-touch-icon.png\">\u003clink data-mint-head rel=\"icon\" type=\"image/png\" sizes=\"16x16\" href=\"/mintlify-assets/_mintlify/favicons/ayakaleaf-pro/o_LAbiVNKQm96Y75/_generated/favicon/favicon-16x16.png\" media=\"(prefers-color-scheme: light)\">\u003clink data-mint-head rel=\"icon\" type=\"image/png\" sizes=\"32x32\" href=\"/mintlify-assets/_mintlify/favicons/ayakaleaf-pro/o_LAbiVNKQm96Y75/_generated/favicon/favicon-32x32.png\" media=\"(prefers-color-scheme: light)\">\u003clink data-mint-head rel=\"shortcut icon\" type=\"image/x-icon\" href=\"/mintlify-assets/_mintlify/favicons/ayakaleaf-pro/o_LAbiVNKQm96Y75/_generated/favicon/favicon.ico\" media=\"(prefers-color-scheme: light)\">\u003clink data-mint-head rel=\"icon\" type=\"image/png\" sizes=\"192x192\" href=\"/mintlify-assets/_mintlify/favicons/ayakaleaf-pro/o_LAbiVNKQm96Y75/_generated/favicon-dark/android-chrome-192x192.png\" media=\"(prefers-color-scheme: dark)\">\u003clink data-mint-head rel=\"icon\" type=\"image/png\" sizes=\"16x16\" href=\"/mintlify-assets/_mintlify/favicons/ayakaleaf-pro/o_LAbiVNKQm96Y75/_generated/favicon-dark/favicon-16x16.png\" media=\"(prefers-color-scheme: dark)\">\u003clink data-mint-head rel=\"icon\" type=\"image/png\" sizes=\"32x32\" href=\"/mintlify-assets/_mintlify/favicons/ayakaleaf-pro/o_LAbiVNKQm96Y75/_generated/favicon-dark/favicon-32x32.png\" media=\"(prefers-color-scheme: dark)\">\u003clink data-mint-head rel=\"shortcut icon\" type=\"image/x-icon\" href=\"/mintlify-assets/_mintlify/favicons/ayakaleaf-pro/o_LAbiVNKQm96Y75/_generated/favicon-dark/favicon.ico\" media=\"(prefers-color-scheme: dark)\">\u003cmeta data-mint-head property=\"og:title\" content=\"Onboarding - Ayakaleaf Pro\">\u003cmeta data-mint-head property=\"og:description\" content=\"Create the first administrator, check your instance and add the first user.\">\u003cmeta data-mint-head property=\"og:site_name\" content=\"Ayakaleaf Pro\">\u003cmeta data-mint-head property=\"og:url\" content=\"https://ayakaleaf-pro.mintlify.app/on-premises/user-guide/administrators/onboarding\">\u003cmeta data-mint-head property=\"og:type\" content=\"website\">\u003cmeta data-mint-head property=\"og:image\" content=\"https://ayakaleaf-pro.mintlify.site/_mintlify/api/og/v2?division=For+administrators\u0026amp;title=Onboarding\u0026amp;description=Create+the+first+administrator%2C+check+your+instance+and+add+the+first+user.\u0026amp;theme=a852d976fde0e13c2ab73efd\u0026amp;signature=c8ad9bb3c1d8c43fb71993ca0fe78d58a92c86235e4ada48cdecdf46222d6e11\">\u003cmeta data-mint-head property=\"og:image:width\" content=\"1200\">\u003cmeta data-mint-head property=\"og:image:height\" content=\"630\">\u003cmeta data-mint-head name=\"twitter:card\" content=\"summary_large_image\">\u003cmeta data-mint-head name=\"twitter:title\" content=\"Onboarding - Ayakaleaf Pro\">\u003cmeta data-mint-head name=\"twitter:description\" content=\"Create the first administrator, check your instance and add the first user.\">\u003cmeta data-mint-head name=\"twitter:image\" content=\"https://ayakaleaf-pro.mintlify.site/_mintlify/api/og/v2?division=For+administrators\u0026amp;title=Onboarding\u0026amp;description=Create+the+first+administrator%2C+check+your+instance+and+add+the+first+user.\u0026amp;theme=a852d976fde0e13c2ab73efd\u0026amp;signature=c8ad9bb3c1d8c43fb71993ca0fe78d58a92c86235e4ada48cdecdf46222d6e11\">\u003cmeta data-mint-head name=\"twitter:image:width\" content=\"1200\">\u003cmeta data-mint-head name=\"twitter:image:height\" content=\"630\">\u003cmeta data-mint-head name=\"msapplication-config\" content=\"/mintlify-assets/_mintlify/favicons/ayakaleaf-pro/o_LAbiVNKQm96Y75/_generated/favicon/browserconfig.xml\">\u003cmeta data-mint-head name=\"apple-mobile-web-app-title\" content=\"Ayakaleaf Pro\">\u003cmeta data-mint-head name=\"msapplication-TileColor\" content=\"#0E0E0E\">\u003clink data-mint-head rel=\"canonical\" href=\"https://ayakaleaf-pro.mintlify.app/on-premises/user-guide/administrators/onboarding\">\u003clink data-mint-head rel=\"alternate\" type=\"application/xml\" href=\"/sitemap.xml\">\u003clink data-mint-head rel=\"alternate\" type=\"text/markdown\" href=\"/on-premises/user-guide/administrators/onboarding.md\">\u003cscript data-mint-head type=\"application/ld+json\">{\"@context\":\"https://schema.org\",\"@graph\":[{\"@type\":\"Organization\",\"@id\":\"https://ayakaleaf-pro.mintlify.app/#organization\",\"name\":\"Ayakaleaf Pro\",\"url\":\"https://ayakaleaf-pro.mintlify.app\",\"logo\":{\"@type\":\"ImageObject\",\"url\":\"https://mintcdn.com/ayakaleaf-pro/JetHeEeglWIIXNds/logo/light.png?fit=max\u0026auto=format\u0026n=JetHeEeglWIIXNds\u0026q=85\u0026s=7f1abd8dcc74dd3b7cdafac9e6e82092\"}},{\"@type\":\"WebSite\",\"@id\":\"https://ayakaleaf-pro.mintlify.app#website\",\"name\":\"Ayakaleaf Pro\",\"url\":\"https://ayakaleaf-pro.mintlify.app\",\"publisher\":{\"@id\":\"https://ayakaleaf-pro.mintlify.app/#organization\"}},{\"@type\":\"WebPage\",\"@id\":\"https://ayakaleaf-pro.mintlify.app/on-premises/user-guide/administrators/onboarding#webpage\",\"url\":\"https://ayakaleaf-pro.mintlify.app/on-premises/user-guide/administrators/onboarding\",\"name\":\"Onboarding\",\"description\":\"Create the first administrator, check your instance and add the first user.\",\"dateModified\":\"2026-11-07T03:05:24.000Z\",\"isPartOf\":{\"@id\":\"https://ayakaleaf-pro.mintlify.app#website\"},\"breadcrumb\":{\"@id\":\"https://ayakaleaf-pro.mintlify.app/on-premises/user-guide/administrators/onboarding#breadcrumb\"}},{\"@type\":\"BreadcrumbList\",\"@id\":\"https://ayakaleaf-pro.mintlify.app/on-premises/user-guide/administrators/onboarding#breadcrumb\",\"itemListElement\":[{\"@type\":\"ListItem\",\"position\":1,\"name\":\"For administrators\",\"item\":\"https://ayakaleaf-pro.mintlify.app/on-premises/user-guide/administrators/index\"},{\"@type\":\"ListItem\",\"position\":2,\"name\":\"Onboarding\",\"item\":\"https://ayakaleaf-pro.mintlify.app/on-premises/user-guide/administrators/onboarding\"}]},{\"@type\":[\"Article\",\"TechArticle\"],\"@id\":\"https://ayakaleaf-pro.mintlify.app/on-premises/user-guide/administrators/onboarding#article\",\"headline\":\"Onboarding\",\"name\":\"Onboarding\",\"description\":\"Create the first administrator, check your instance and add the first user.\",\"url\":\"https://ayakaleaf-pro.mintlify.app/on-premises/user-guide/administrators/onboarding\",\"mainEntityOfPage\":{\"@id\":\"https://ayakaleaf-pro.mintlify.app/on-premises/user-guide/administrators/onboarding#webpage\"},\"dateModified\":\"2026-11-07T03:05:24.000Z\",\"publisher\":{\"@id\":\"https://ayakaleaf-pro.mintlify.app/#organization\"},\"isPartOf\":{\"@id\":\"https://ayakaleaf-pro.mintlify.app#website\"}}]}\u003c/script>\u003cscript data-mint-head type=\"application/ld+json\">{\"@context\":\"https://schema.org\",\"@type\":\"WebSite\",\"name\":\"Ayakaleaf Pro\",\"creator\":{\"@type\":\"Organization\",\"name\":\"Mintlify\",\"url\":\"https://mintlify.com\"}}\u003c/script>","siteName":"Ayakaleaf Pro","nav":{"global":null,"languages":[{"language":"en","default":true,"tabs":[{"tab":"Home","icon":"house-chimney","pages":[{"title":"Home","href":""}]},{"tab":"On-Premises","icon":"server","groups":[{"group":"Overview","pages":[{"group":"Welcome","icon":"hand-wave","root":{"title":"Welcome","icon":"hand-wave","href":"/on-premises"},"pages":[{"title":"Features and Copyright","icon":"layer-plus","href":"/on-premises/readme/features-and-copyright"},{"title":"Trust and Security","icon":"https://d3gk2c5xim1je2.cloudfront.net/fontawesome/v7.2.0/brands/expeditedssl.svg","href":"/on-premises/readme/trust-and-security"},{"title":"Overleaf Server Pro vs. Ayakaleaf Pro","icon":"scale-balanced","href":"/on-premises/readme/ayakaleaf-pro-vs-server-pro"},{"title":"Question and Answer","icon":"comment-question","href":"/on-premises/readme/question-and-answer"}]},{"group":"Release notes","icon":"code-branch","root":{"title":"Release notes","icon":"code-branch","href":"/on-premises/release-notes/index"},"pages":[{"title":"Release notes 6.x.x","href":"/on-premises/release-notes/release-notes-6.x.x"}]}]},{"group":"Installation","pages":[{"title":"Introduction","icon":"map-location","href":"/on-premises/installation/introduction"},{"group":"Using Docker Compose","icon":"https://d3gk2c5xim1je2.cloudfront.net/fontawesome/v7.2.0/brands/docker.svg","root":{"title":"Using Docker Compose","icon":"https://d3gk2c5xim1je2.cloudfront.net/fontawesome/v7.2.0/brands/docker.svg","href":"/on-premises/installation/using-docker-compose/index"},"pages":[{"group":"Linux","icon":"https://d3gk2c5xim1je2.cloudfront.net/fontawesome/v7.2.0/brands/linux.svg","root":{"title":"Linux","icon":"https://d3gk2c5xim1je2.cloudfront.net/fontawesome/v7.2.0/brands/linux.svg","href":"/on-premises/installation/using-docker-compose/linux/index"},"pages":[{"title":"0. Setup Docker","icon":"https://d3gk2c5xim1je2.cloudfront.net/fontawesome/v7.2.0/brands/docker.svg","href":"/on-premises/installation/using-docker-compose/linux/0.-setup-docker"},{"title":"1. Download the Toolkit","icon":"arrow-down-to-bracket","href":"/on-premises/installation/using-docker-compose/linux/1.-download-the-toolkit"},{"title":"2. Familiarize yourself with the Toolkit","icon":"magnifying-glass","href":"/on-premises/installation/using-docker-compose/linux/2.-familiarize-yourself-with-the-toolkit"},{"title":"3. Initialize the configuration","icon":"circle-play","href":"/on-premises/installation/using-docker-compose/linux/3.-initialize-the-configuration"},{"title":"4. Get Ayakaleaf Pro Images","icon":"split","href":"/on-premises/installation/using-docker-compose/linux/4.-get-overleaf-pro-images"},{"title":"5. Personalizing your instance","icon":"square-sliders","href":"/on-premises/installation/using-docker-compose/linux/5.-personalizing-your-instance"},{"title":"6. Post-installation tasks","icon":"ballot-check","href":"/on-premises/installation/using-docker-compose/linux/6.-post-installation-tasks"}]},{"group":"macOS","icon":"https://d3gk2c5xim1je2.cloudfront.net/fontawesome/v7.2.0/brands/apple.svg","root":{"title":"macOS","icon":"https://d3gk2c5xim1je2.cloudfront.net/fontawesome/v7.2.0/brands/apple.svg","href":"/on-premises/installation/using-docker-compose/macos/index"},"pages":[{"title":"0. Setup Docker Desktop","icon":"https://d3gk2c5xim1je2.cloudfront.net/fontawesome/v7.2.0/brands/docker.svg","href":"/on-premises/installation/using-docker-compose/macos/0.-setup-docker-desktop"},{"title":"1. Download the Toolkit","icon":"arrow-down-to-bracket","href":"/on-premises/installation/using-docker-compose/macos/1.-download-the-toolkit"},{"title":"2. Familiarize yourself with the Toolkit","icon":"magnifying-glass","href":"/on-premises/installation/using-docker-compose/macos/2.-familiarize-yourself-with-the-toolkit"},{"title":"3. Initialize the configuration","icon":"circle-play","href":"/on-premises/installation/using-docker-compose/macos/3.-initialize-the-configuration"},{"title":"4. Get Ayakaleaf Pro Images","icon":"split","href":"/on-premises/installation/using-docker-compose/macos/4.-get-ayakaleaf-pro-images"},{"title":"5. Personalizing your instance","icon":"square-sliders","href":"/on-premises/installation/using-docker-compose/macos/5.-personalizing-your-instance"},{"title":"6. Post-installation tasks","icon":"ballot-check","href":"/on-premises/installation/using-docker-compose/macos/6.-post-installation-tasks"},{"title":"Troubleshooting","icon":"screwdriver-wrench","href":"/on-premises/installation/using-docker-compose/macos/troubleshooting"}]},{"group":"Windows","icon":"https://d3gk2c5xim1je2.cloudfront.net/fontawesome/v7.2.0/brands/windows.svg","root":{"title":"Windows","icon":"https://d3gk2c5xim1je2.cloudfront.net/fontawesome/v7.2.0/brands/windows.svg","href":"/on-premises/installation/using-docker-compose/windows/index"},"pages":[{"title":"0. Setup WSL 2 and Docker Desktop","icon":"https://d3gk2c5xim1je2.cloudfront.net/fontawesome/v7.2.0/brands/docker.svg","href":"/on-premises/installation/using-docker-compose/windows/0.-setup-wsl-and-docker-desktop"},{"title":"1. Download the Toolkit","icon":"arrow-down-to-bracket","href":"/on-premises/installation/using-docker-compose/windows/1.-download-the-toolkit"},{"title":"2. Familiarize yourself with the Toolkit","icon":"magnifying-glass","href":"/on-premises/installation/using-docker-compose/windows/2.-familiarize-yourself-with-the-toolkit"},{"title":"3. Initialize the configuration","icon":"circle-play","href":"/on-premises/installation/using-docker-compose/windows/3.-initialize-the-configuration"},{"title":"4. Get Ayakaleaf Pro Images","icon":"split","href":"/on-premises/installation/using-docker-compose/windows/4.-get-ayakaleaf-pro-images"},{"title":"5. Personalizing your instance","icon":"square-sliders","href":"/on-premises/installation/using-docker-compose/windows/5.-personalizing-your-instance"},{"title":"6. Post-installation tasks","icon":"ballot-check","href":"/on-premises/installation/using-docker-compose/windows/6.-post-installation-tasks"},{"title":"Troubleshooting","icon":"wrench","href":"/on-premises/installation/using-docker-compose/windows/troubleshooting"}]}]},{"group":"Using Kubernetes","icon":"dharmachakra","root":{"title":"Using Kubernetes","icon":"dharmachakra","href":"/on-premises/installation/using-kubernetes/index"},"pages":[{"title":"0. Prepare the nodes","icon":"server","href":"/on-premises/installation/using-kubernetes/0.-prepare-the-nodes"},{"title":"1. Get Ayakaleaf Pro Images","icon":"split","href":"/on-premises/installation/using-kubernetes/1.-get-ayakaleaf-pro-images"},{"title":"2. Create the namespace and secrets","icon":"key","href":"/on-premises/installation/using-kubernetes/2.-create-the-namespace-and-secrets"},{"title":"3. Deploy MongoDB and Redis","icon":"database","href":"/on-premises/installation/using-kubernetes/3.-deploy-mongodb-and-redis"},{"title":"4. Personalizing your instance","icon":"square-sliders","href":"/on-premises/installation/using-kubernetes/4.-personalizing-your-instance"},{"title":"5. Deploy Ayakaleaf Pro","icon":"rocket-launch","href":"/on-premises/installation/using-kubernetes/5.-deploy-ayakaleaf-pro"},{"title":"6. Post-installation tasks","icon":"ballot-check","href":"/on-premises/installation/using-kubernetes/6.-post-installation-tasks"}]},{"title":"Using Claude or Codex","icon":"https://d3gk2c5xim1je2.cloudfront.net/fontawesome/v7.2.0/brands/claude.svg","href":"/on-premises/installation/using-claude-or-codex"},{"title":"Using GitHub Codespace","icon":"https://d3gk2c5xim1je2.cloudfront.net/fontawesome/v7.2.0/brands/github.svg","href":"/on-premises/installation/using-the-github-codespace"},{"title":"Air-gapped/offline deployments","icon":"block-brick","href":"/on-premises/installation/air-gapped-offline-deployments"},{"title":"Migrate from Existing","icon":"u-turn-up-right","href":"/on-premises/installation/migrate-from-existing"}]},{"group":"Configuration","pages":[{"group":"Docker Compose","icon":"https://d3gk2c5xim1je2.cloudfront.net/fontawesome/v7.2.0/brands/docker.svg","root":{"title":"Docker Compose","icon":"https://d3gk2c5xim1je2.cloudfront.net/fontawesome/v7.2.0/brands/docker.svg","href":"/on-premises/configuration/overleaf-toolkit/index"},"pages":[{"title":"Files and locations","icon":"folder-open","href":"/on-premises/configuration/overleaf-toolkit/files-and-locations"},{"title":"Toolkit settings","icon":"gear-complex","href":"/on-premises/configuration/overleaf-toolkit/toolkit-settings"},{"title":"Environment variables","icon":"seedling","href":"/on-premises/configuration/overleaf-toolkit/environment-variables"},{"group":"Authentication","icon":"address-card","root":{"title":"Authentication","icon":"address-card","href":"/on-premises/configuration/overleaf-toolkit/authentication/index"},"pages":[{"title":"OIDC Authentication","icon":"id-card-clip","href":"/on-premises/configuration/overleaf-toolkit/authentication/oidc-authentication"},{"title":"SAML Authentication","icon":"key","href":"/on-premises/configuration/overleaf-toolkit/authentication/saml-authentication"},{"title":"LDAP Authentication","icon":"lock","href":"/on-premises/configuration/overleaf-toolkit/authentication/ldap-authentication"},{"title":"Public Access","icon":"lock-open","href":"/on-premises/configuration/overleaf-toolkit/authentication/public-access"},{"title":"reCAPTCHA","icon":"robot","href":"/on-premises/configuration/overleaf-toolkit/authentication/recaptcha"},{"title":"Password restrictions","icon":"key","href":"/on-premises/configuration/overleaf-toolkit/authentication/password-restrictions"}]},{"title":"Sandboxed Compiles","icon":"gear-code","href":"/on-premises/configuration/overleaf-toolkit/sandboxed-compiles"},{"title":"Pandoc Import and Export","icon":"file-lines","href":"/on-premises/configuration/overleaf-toolkit/pandoc-import-and-export"},{"group":"Integrations","icon":"puzzle-piece","root":{"title":"Integrations","icon":"puzzle-piece","href":"/on-premises/configuration/overleaf-toolkit/integrations/index"},"pages":[{"title":"Git integration","icon":"https://d3gk2c5xim1je2.cloudfront.net/fontawesome/v7.2.0/brands/git-alt.svg","href":"/on-premises/configuration/overleaf-toolkit/integrations/git-integration"},{"title":"GitHub Synchronisation","icon":"https://d3gk2c5xim1je2.cloudfront.net/fontawesome/v7.2.0/brands/github.svg","href":"/on-premises/configuration/overleaf-toolkit/integrations/github-synchronisation"},{"title":"GitLab Synchronisation","icon":"https://d3gk2c5xim1je2.cloudfront.net/fontawesome/v7.2.0/brands/gitlab.svg","href":"/on-premises/configuration/overleaf-toolkit/integrations/gitlab-synchronisation"},{"title":"Gitea Synchronisation","icon":"mug-hot","href":"/on-premises/configuration/overleaf-toolkit/integrations/gitea-synchronisation"},{"title":"Dropbox Synchronisation","icon":"https://d3gk2c5xim1je2.cloudfront.net/fontawesome/v7.2.0/brands/dropbox.svg","href":"/on-premises/configuration/overleaf-toolkit/integrations/dropbox-synchronisation"},{"title":"Zotero Integration","icon":"z","href":"/on-premises/configuration/overleaf-toolkit/integrations/zotero-integration"},{"title":"Mendeley Integration","icon":"https://d3gk2c5xim1je2.cloudfront.net/fontawesome/v7.2.0/brands/mendeley.svg","href":"/on-premises/configuration/overleaf-toolkit/integrations/mendeley-integration"},{"title":"MCP Server","icon":"plug","href":"/on-premises/configuration/overleaf-toolkit/integrations/mcp-server"},{"title":"AI Integration","icon":"https://d3gk2c5xim1je2.cloudfront.net/fontawesome/v7.2.0/brands/openai.svg","href":"/on-premises/configuration/overleaf-toolkit/integrations/ai-integration"},{"title":"Overleaf Import API","icon":"rectangle-api","href":"/on-premises/configuration/overleaf-toolkit/integrations/overleaf-import-api"}]},{"title":"Templates","icon":"paste","href":"/on-premises/configuration/overleaf-toolkit/templates"},{"title":"External URL","icon":"link","href":"/on-premises/configuration/overleaf-toolkit/external-url"},{"title":"Logging","icon":"memo-circle-info","href":"/on-premises/configuration/overleaf-toolkit/logging"},{"title":"TLS proxy","icon":"lock","href":"/on-premises/configuration/overleaf-toolkit/tls-proxy"},{"title":"Branding","icon":"copyright","href":"/on-premises/configuration/overleaf-toolkit/branding"},{"title":"Localization","icon":"globe-pointer","href":"/on-premises/configuration/overleaf-toolkit/localization"},{"title":"Email delivery","icon":"paper-plane-top","href":"/on-premises/configuration/overleaf-toolkit/email-delivery"},{"title":"Redis","icon":"memory","href":"/on-premises/configuration/overleaf-toolkit/redis"},{"title":"S3","icon":"https://d3gk2c5xim1je2.cloudfront.net/fontawesome/v7.2.0/brands/aws.svg","href":"/on-premises/configuration/overleaf-toolkit/s3"},{"title":"Adding LaTeX user help","icon":"graduation-cap","href":"/on-premises/configuration/overleaf-toolkit/adding-latex-user-help"}]},{"group":"Kubernetes","icon":"dharmachakra","root":{"title":"Kubernetes","icon":"dharmachakra","href":"/on-premises/configuration/kubernetes/index"},"pages":[{"group":"Authentication","icon":"address-card","root":{"title":"Authentication","icon":"address-card","href":"/on-premises/configuration/kubernetes/authentication/index"},"pages":[{"title":"OIDC Authentication","icon":"id-card-clip","href":"/on-premises/configuration/kubernetes/authentication/oidc-authentication"},{"title":"SAML Authentication","icon":"building-columns","href":"/on-premises/configuration/kubernetes/authentication/saml-authentication"},{"title":"LDAP Authentication","icon":"address-book","href":"/on-premises/configuration/kubernetes/authentication/ldap-authentication"},{"title":"Public Access","icon":"lock-open","href":"/on-premises/configuration/kubernetes/authentication/public-access"},{"title":"reCAPTCHA","icon":"robot","href":"/on-premises/configuration/kubernetes/authentication/recaptcha"},{"title":"Password restrictions","icon":"key","href":"/on-premises/configuration/kubernetes/authentication/password-restrictions"}]},{"title":"Sandboxed Compiles","icon":"gear-code","href":"/on-premises/configuration/kubernetes/sandboxed-compiles"},{"title":"Pandoc Import and Export","icon":"file-lines","href":"/on-premises/configuration/kubernetes/pandoc-import-and-export"},{"group":"Integrations","icon":"puzzle-piece","root":{"title":"Integrations","icon":"puzzle-piece","href":"/on-premises/configuration/kubernetes/integrations/index"},"pages":[{"title":"Git integration","icon":"code-branch","href":"/on-premises/configuration/kubernetes/integrations/git-integration"},{"title":"GitHub Synchronisation","icon":"https://d3gk2c5xim1je2.cloudfront.net/fontawesome/v7.2.0/brands/github.svg","href":"/on-premises/configuration/kubernetes/integrations/github-synchronisation"},{"title":"GitLab Synchronisation","icon":"https://d3gk2c5xim1je2.cloudfront.net/fontawesome/v7.2.0/brands/gitlab.svg","href":"/on-premises/configuration/kubernetes/integrations/gitlab-synchronisation"},{"title":"Gitea Synchronisation","icon":"mug-hot","href":"/on-premises/configuration/kubernetes/integrations/gitea-synchronisation"},{"title":"Dropbox Synchronisation","icon":"https://d3gk2c5xim1je2.cloudfront.net/fontawesome/v7.2.0/brands/dropbox.svg","href":"/on-premises/configuration/kubernetes/integrations/dropbox-synchronisation"},{"title":"Zotero Integration","icon":"z","href":"/on-premises/configuration/kubernetes/integrations/zotero-integration"},{"title":"Mendeley Integration","icon":"https://d3gk2c5xim1je2.cloudfront.net/fontawesome/v7.2.0/brands/mendeley.svg","href":"/on-premises/configuration/kubernetes/integrations/mendeley-integration"},{"title":"MCP Server","icon":"plug","href":"/on-premises/configuration/kubernetes/integrations/mcp-server"},{"title":"AI Integration","icon":"https://d3gk2c5xim1je2.cloudfront.net/fontawesome/v7.2.0/brands/openai.svg","href":"/on-premises/configuration/kubernetes/integrations/ai-integration"},{"title":"Overleaf Import API","icon":"rectangle-api","href":"/on-premises/configuration/kubernetes/integrations/overleaf-import-api"}]},{"title":"Templates","icon":"paste","href":"/on-premises/configuration/kubernetes/templates"},{"title":"External URL","icon":"link","href":"/on-premises/configuration/kubernetes/external-url"},{"title":"Logging","icon":"memo-circle-info","href":"/on-premises/configuration/kubernetes/logging"},{"title":"TLS proxy","icon":"lock","href":"/on-premises/configuration/kubernetes/tls-proxy"},{"title":"Branding","icon":"copyright","href":"/on-premises/configuration/kubernetes/branding"},{"title":"Localization","icon":"globe-pointer","href":"/on-premises/configuration/kubernetes/localization"},{"title":"Email delivery","icon":"paper-plane-top","href":"/on-premises/configuration/kubernetes/email-delivery"},{"title":"Redis","icon":"memory","href":"/on-premises/configuration/kubernetes/redis"},{"title":"S3","icon":"https://d3gk2c5xim1je2.cloudfront.net/fontawesome/v7.2.0/brands/aws.svg","href":"/on-premises/configuration/kubernetes/s3"},{"title":"Adding LaTeX user help","icon":"graduation-cap","href":"/on-premises/configuration/kubernetes/adding-latex-user-help"},{"title":"Horizontal scaling","icon":"layer-group","href":"/on-premises/configuration/kubernetes/horizontal-scaling"}]}]},{"group":"User guide","pages":[{"group":"For administrators","icon":"user-gear","root":{"title":"For administrators","description":"Step-by-step guides for the administrators of an instance.","icon":"user-gear","href":"/on-premises/user-guide/administrators/index"},"pages":[{"title":"Onboarding","icon":"user-plus","href":"/on-premises/user-guide/administrators/onboarding"},{"title":"Basic management","description":"Post system messages, read open sockets, and close or reopen the editor for maintenance.","icon":"sliders","href":"/on-premises/user-guide/administrators/basic-management"},{"title":"User management","icon":"users-gear","href":"/on-premises/user-guide/administrators/user-management"},{"title":"Project management","icon":"folder-gear","href":"/on-premises/user-guide/administrators/project-management"},{"title":"Template management","icon":"paste","href":"/on-premises/user-guide/administrators/template-management"}]},{"group":"For users","icon":"users","root":{"title":"For users","icon":"users","href":"/on-premises/user-guide/users/index"},"pages":[{"title":"Git integration","icon":"https://d3gk2c5xim1je2.cloudfront.net/fontawesome/v7.2.0/brands/git-alt.svg","href":"/on-premises/user-guide/users/git-integration"},{"title":"GitHub Synchronisation","icon":"https://d3gk2c5xim1je2.cloudfront.net/fontawesome/v7.2.0/brands/github.svg","href":"/on-premises/user-guide/users/github-synchronisation"},{"title":"GitLab Synchronisation","icon":"https://d3gk2c5xim1je2.cloudfront.net/fontawesome/v7.2.0/brands/gitlab.svg","href":"/on-premises/user-guide/users/gitlab-synchronisation"},{"title":"Gitea Synchronisation","icon":"mug-hot","href":"/on-premises/user-guide/users/gitea-synchronisation"},{"title":"Dropbox Synchronisation","icon":"https://d3gk2c5xim1je2.cloudfront.net/fontawesome/v7.2.0/brands/dropbox.svg","href":"/on-premises/user-guide/users/dropbox-synchronisation"},{"title":"Zotero Integration","icon":"z","href":"/on-premises/user-guide/users/zotero-integration"},{"title":"Mendeley Integration","icon":"https://d3gk2c5xim1je2.cloudfront.net/fontawesome/v7.2.0/brands/mendeley.svg","href":"/on-premises/user-guide/users/mendeley-integration"},{"title":"Templates","icon":"paste","href":"/on-premises/user-guide/users/templates"},{"title":"Symbol Palette","icon":"omega","href":"/on-premises/user-guide/users/symbol-palette"},{"title":"Advanced Reference Search","icon":"magnifying-glass","href":"/on-premises/user-guide/users/advanced-reference-search"},{"title":"AI Assistant","icon":"sparkles","href":"/on-premises/user-guide/users/ai-assistant"},{"title":"Error Assistant","icon":"wand-magic-sparkles","href":"/on-premises/user-guide/users/error-assistant"},{"title":"MCP Server","icon":"plug","href":"/on-premises/user-guide/users/mcp-server"},{"title":"Python Runner","icon":"https://d3gk2c5xim1je2.cloudfront.net/fontawesome/v7.2.0/brands/python.svg","href":"/on-premises/user-guide/users/python-runner"},{"title":"Word import and export","icon":"file-word","href":"/on-premises/user-guide/users/word-import-export"},{"title":"Open in Overleaf","icon":"arrow-up-right-from-square","href":"/on-premises/user-guide/users/open-in-overleaf"}]}]},{"group":"Maintenance","pages":[{"title":"docker-compose.yml to Toolkit migration","icon":"right-left","href":"/on-premises/maintenance/docker-compose.yml-to-toolkit-migration"},{"title":"Upgrading your deployment","icon":"arrow-up-from-square","href":"/on-premises/maintenance/upgrading-your-deployment"},{"title":"Upgrading on Kubernetes","icon":"arrow-up-from-square","href":"/on-premises/maintenance/upgrading-on-kubernetes"},{"group":"Data and backups","icon":"database","root":{"title":"Data and backups","icon":"database","href":"/on-premises/maintenance/data-and-backups/index"},"pages":[{"title":"Exporting projects","icon":"file-export","href":"/on-premises/maintenance/data-and-backups/exporting-projects"}]},{"title":"Extending TeX Live","icon":"rectangle-pro","href":"/on-premises/maintenance/extending-tex-live"},{"title":"Updating TeX Live Full Images Automatically","icon":"arrows-rotate","href":"/on-premises/maintenance/updating-tex-live-full-images-automatically"},{"title":"Horizontal scaling","icon":"distribute-spacing-horizontal","href":"/on-premises/maintenance/horizontal-scaling"},{"title":"S3 migration","icon":"https://d3gk2c5xim1je2.cloudfront.net/fontawesome/v7.2.0/brands/aws.svg","href":"/on-premises/maintenance/s3-migration"},{"title":"Updating MongoDB","icon":"database","href":"/on-premises/maintenance/updating-mongodb"}]},{"group":"User and project management","pages":[{"title":"Roles and permissions","icon":"list-check","href":"/on-premises/user-and-project-management/roles-and-permissions"},{"group":"User management","icon":"users-between-lines","root":{"title":"User management","icon":"users-between-lines","href":"/on-premises/user-and-project-management/user-management/index"},"pages":[{"title":"Username migration","icon":"lock","href":"/on-premises/user-and-project-management/user-management/username-migration"},{"title":"Migrating to LDAP or SAML","icon":"rectangle-pro","href":"/on-premises/user-and-project-management/user-management/migrating-to-ldap-or-saml"}]},{"group":"Project management","icon":"rectangle-history","root":{"title":"Project management","icon":"rectangle-history","href":"/on-premises/user-and-project-management/project-management/index"},"pages":[{"title":"Bulk transfer of project ownership","icon":"lock","href":"/on-premises/user-and-project-management/project-management/bulk-transfer-of-project-ownership"}]}]},{"group":"Support","pages":[{"title":"Project limits","icon":"list-check","href":"/on-premises/support/project-limits"},{"title":"Troubleshooting","icon":"comments-question-check","href":"/on-premises/support/troubleshooting"},{"title":"Getting help","icon":"truck-medical","href":"/on-premises/support/getting-help"},{"group":"Support guides","icon":"message-question","root":{"title":"Support guides","icon":"message-question","href":"/on-premises/support/support-guides/index"},"pages":[{"title":"Using templates as an individual","icon":"rectangle-vertical-history","href":"/on-premises/support/support-guides/using-templates-as-an-individual"}]}]}]},{"tab":"Blog","icon":"rss","pages":[{"title":"Blog","href":"/blog"}]},{"tab":"TeXLive","icon":"compact-disc","pages":[{"title":"TeXLive","href":"/texlive"}]},{"tab":"Developer","icon":"rectangle-terminal","pages":[{"title":"Developer","href":"/dev"}]}]},{"language":"zh-CN","pages":[{"title":"zh-CN","href":"/zh-CN"}]},{"language":"zh-TW","pages":[{"title":"zh-TW","href":"/zh-TW"}]},{"language":"ja","pages":[{"title":"ja","href":"/ja"}]},{"language":"de","pages":[{"title":"de","href":"/de"}]},{"language":"fr","pages":[{"title":"fr","href":"/fr"}]},{"language":"es","pages":[{"title":"es","href":"/es"}]},{"language":"it","pages":[{"title":"it","href":"/it"}]},{"language":"ko","pages":[{"title":"ko","href":"/ko"}]},{"language":"ru","pages":[{"title":"ru","href":"/ru"}]},{"language":"nl","pages":[{"title":"nl","href":"/nl"}]},{"language":"pt","pages":[{"title":"pt","href":"/pt"}]},{"language":"tr","pages":[{"title":"tr","href":"/tr"}]},{"language":"uk","pages":[{"title":"uk","href":"/uk"}]},{"language":"pl","pages":[{"title":"pl","href":"/pl"}]},{"language":"cs","pages":[{"title":"cs","href":"/cs"}]},{"language":"sv","pages":[{"title":"sv","href":"/sv"}]},{"language":"fi","pages":[{"title":"fi","href":"/fi"}]},{"language":"ar","pages":[{"title":"ar","href":"/ar"}]},{"language":"vi","pages":[{"title":"vi","href":"/vi"}]},{"language":"no","pages":[{"title":"no","href":"/no"}]},{"language":"da","pages":[{"title":"da","href":"/da"}]},{"language":"id","pages":[{"title":"id","href":"/id"}]},{"language":"zh-Hans","pages":[{"title":"zh-Hans","href":"/zh-Hans"}]},{"language":"zh-Hant","pages":[{"title":"zh-Hant","href":"/zh-Hant"}]}]},"basePath":"","title":"Onboarding - Ayakaleaf Pro","buildId":"dpl_8LJbrAiZvr1K98WQNZXCyY5AvT34","deploymentId":"dpl_8LJbrAiZvr1K98WQNZXCyY5AvT34","dynamics":["07c022d89b","a74be98ba7"],"chunks":["Frame-NdetNziF.js","DynamicMarkdown-CD8713Yy.js","zoom-image-lightbox-DMoL6lHz.js","lightbox-handle-r17bVUz3.js"]}