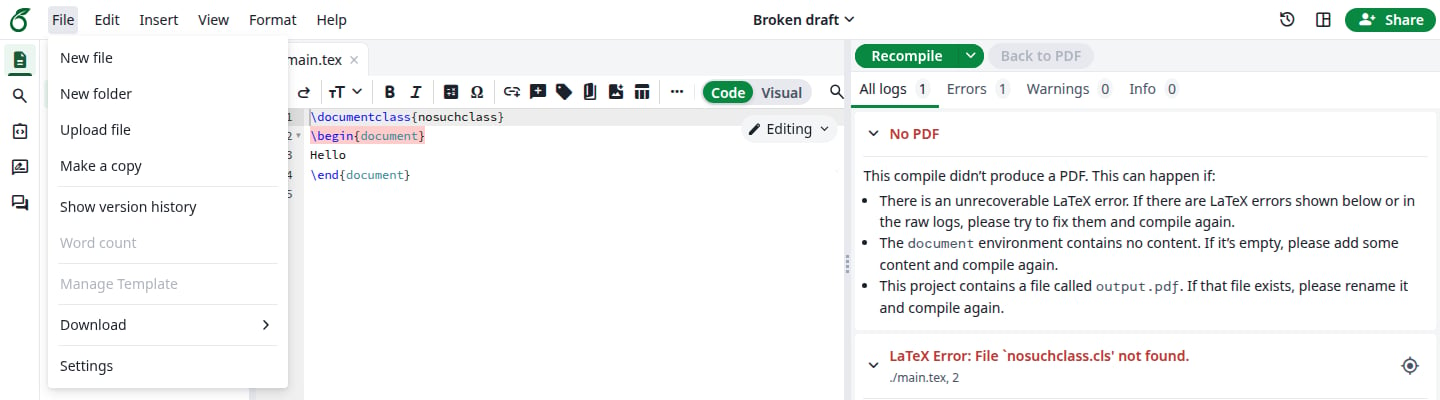
Open the project and click Recompile. The PDF you see is the one the gallery will show.While the editor has no PDF, for example when you open a project that does not compile, Manage Template is greyed out.
No PDF yet, so nothing to publish
Publishing saves the files as they are now, and the PDF of the last successful compile. If you edited the project after that compile, or the last compile failed, the gallery shows an old PDF next to newer files, which may not compile. Recompile until the PDF is right, then publish.
2
Open the form
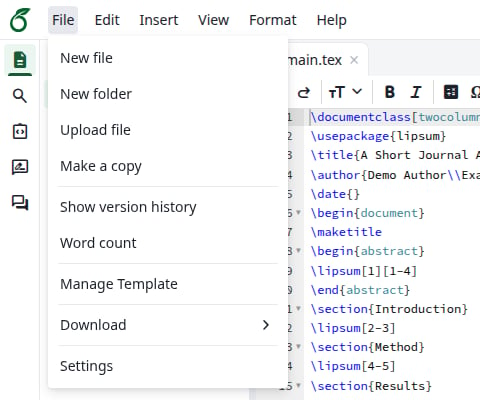
In the top menu of the editor, click File, then Manage Template.
The File menu
3
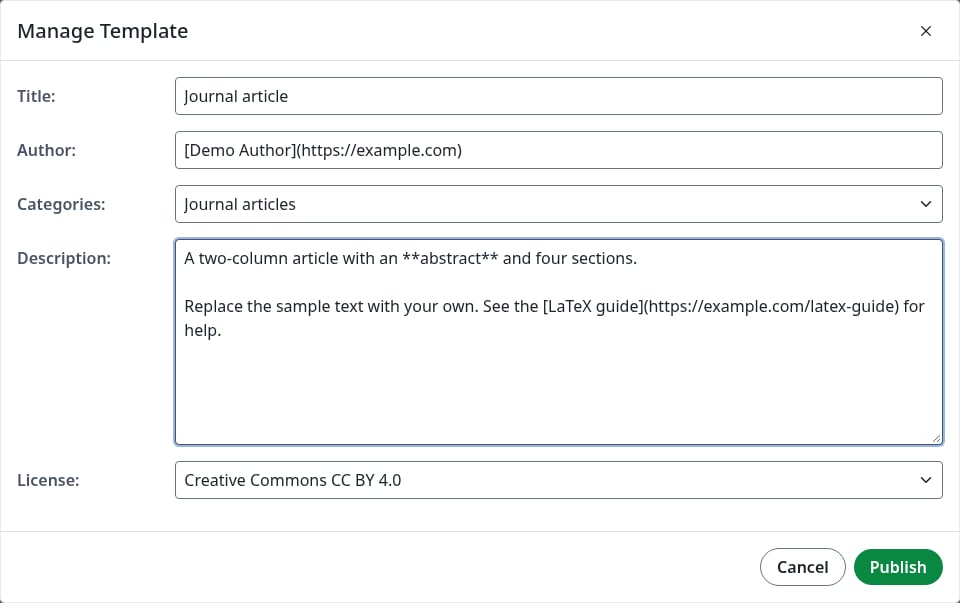
Fill in the form
The Manage Template dialog
Field
Notes
Title
Starts as the project’s name. Must be unique in the gallery. At most 150 characters.
Author
Starts as your name. A Markdown link such as [Demo Author](https://example.com) becomes a link on the template page.
Supports Markdown. At most 4096 characters. The template page shows it as Abstract, and the gallery shows the start of it as plain text.
License
Creative Commons CC BY 4.0, LaTeX Project Public License 1.3c or Other (as stated in the work).
The compiler and the main document of the project go with the template, so set them in the project first. Projects opened from the template use the same ones.
4
Click Publish
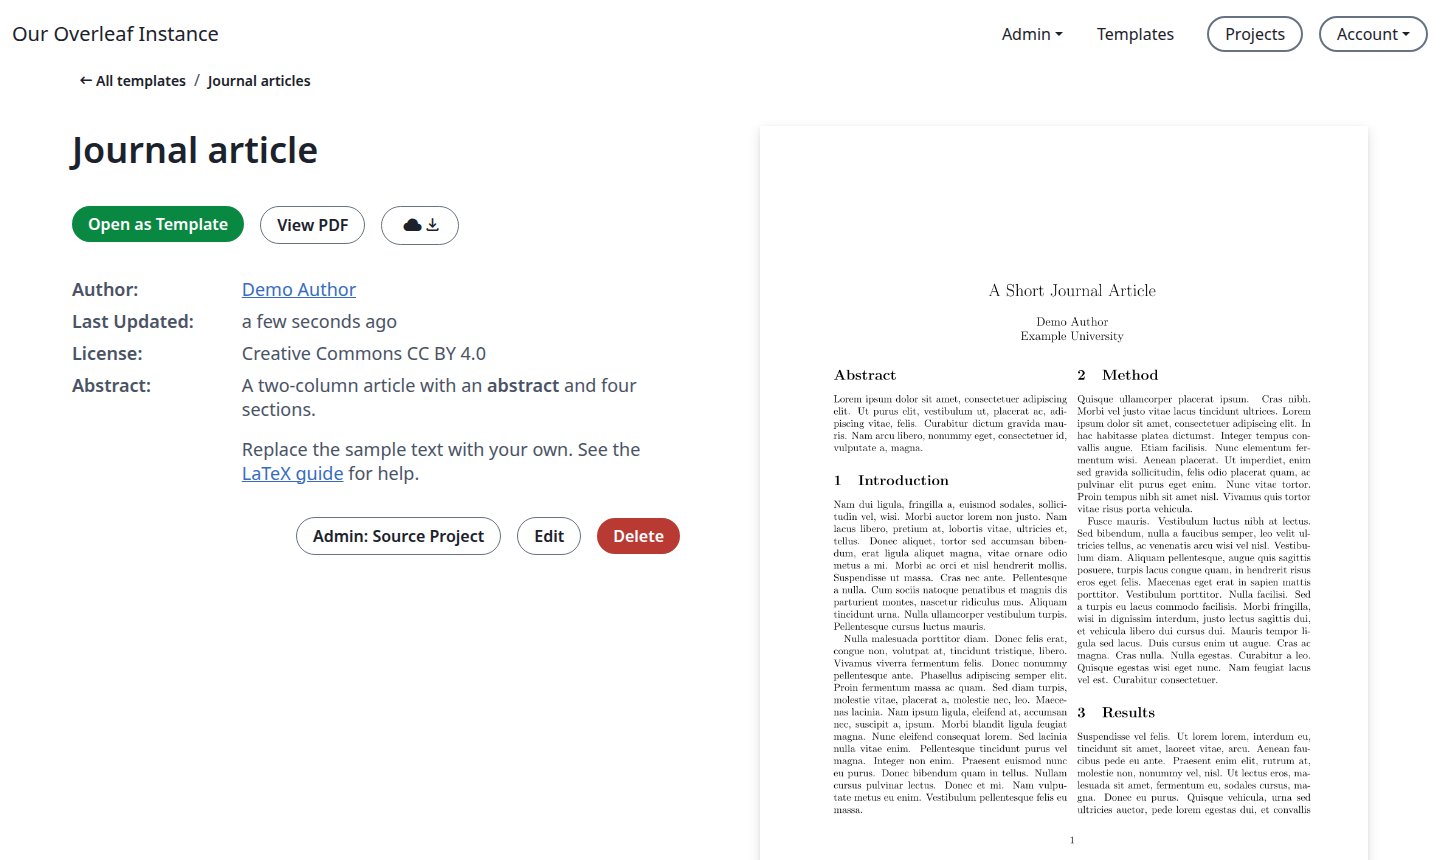
The template page opens.
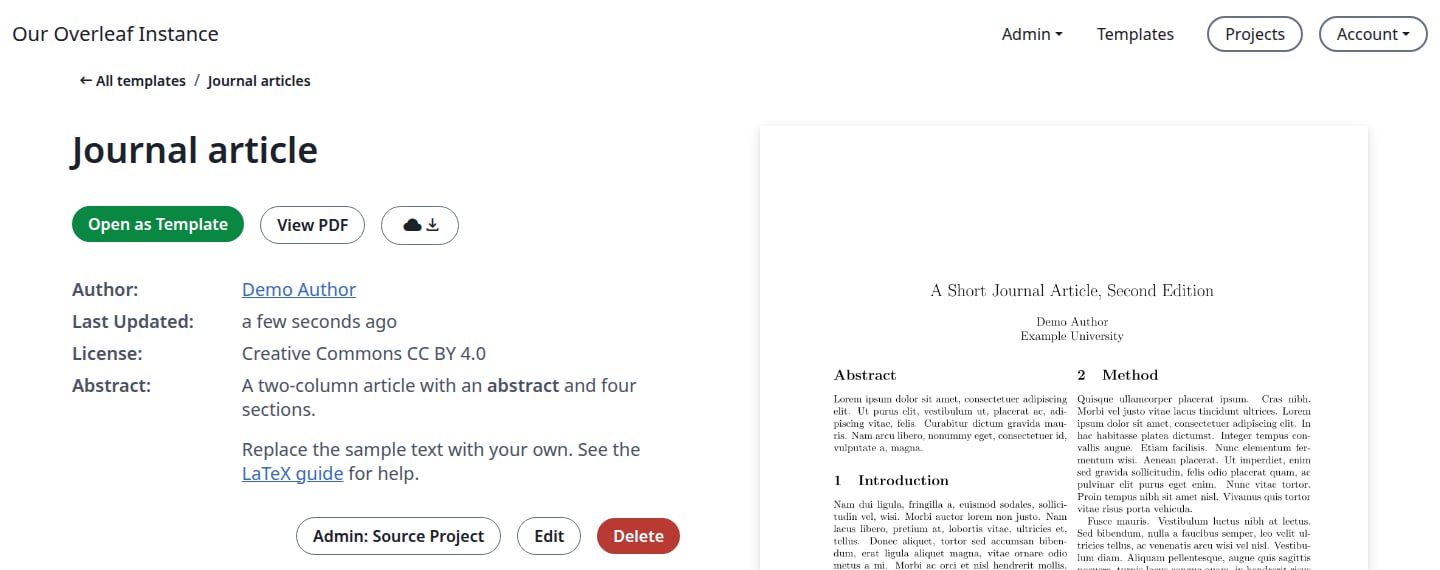
The new template
Admin: Source Project, Edit and Delete are for you. Other users see only Open as Template, View PDF and the download button.
5
Check the gallery
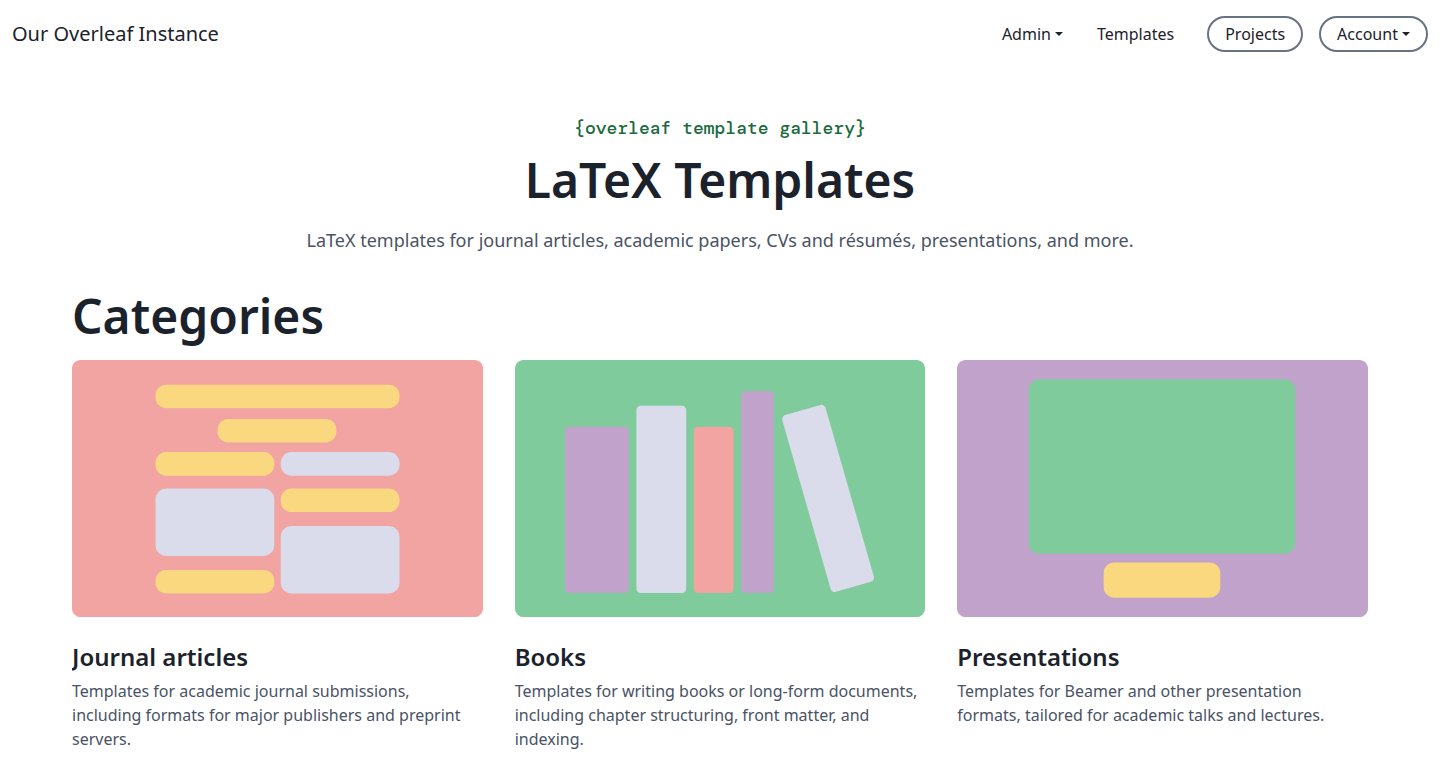
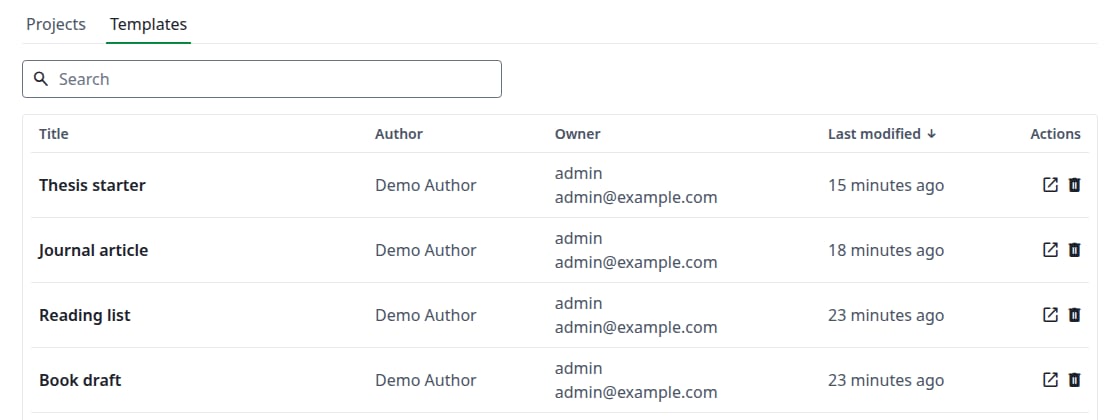
Click Templates at the top right. The new template is first in the list.
To change the files and the PDF, publish the project again under the same title.
1
Change the project
Edit the project and click Recompile.
2
Publish again
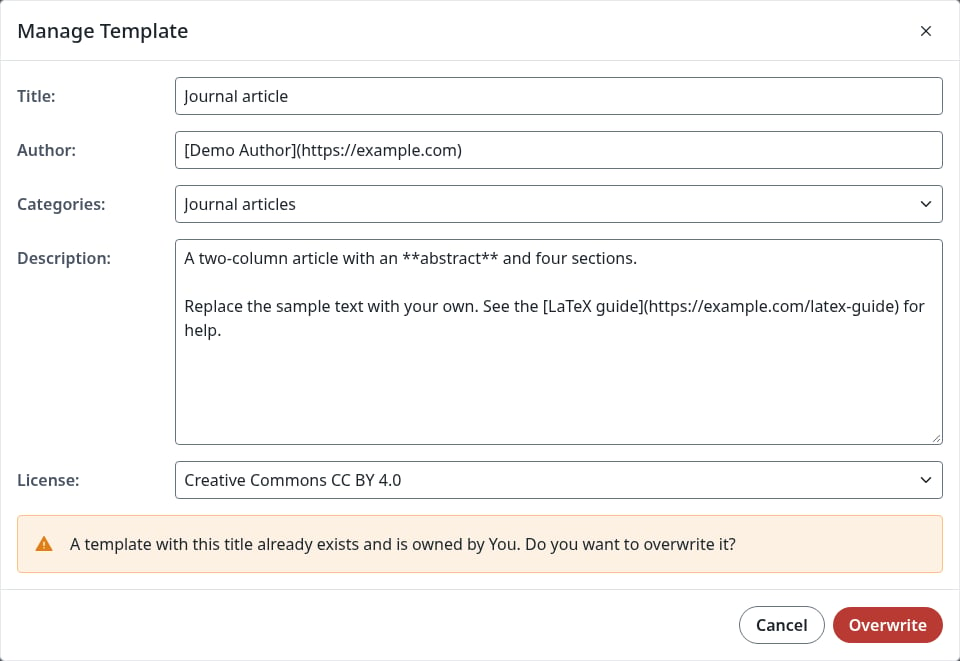
Click File, then Manage Template. The form shows the details of the template, which you can change. Click Publish.A message says that the title already exists, and the button becomes Overwrite.
Publishing under the same title
If you change Title now, the message goes away and Publish creates a new template.
3
Click Overwrite
The same template page opens, with the new PDF.
The updated template
Projects that users already opened from the template do not change.
The form finds the template by the project’s name. If you renamed the template with Edit, the form opens with the project’s name, your name, the first category and an empty description, and typing the template’s title does not bring its details back. Overwrite then replaces the details with what is in the form, so fill them in again first.
This changes what the gallery shows about a template, not its files or PDF.
1
Open the template
Click Templates at the top right, click the template, then click Edit.
2
Change the fields
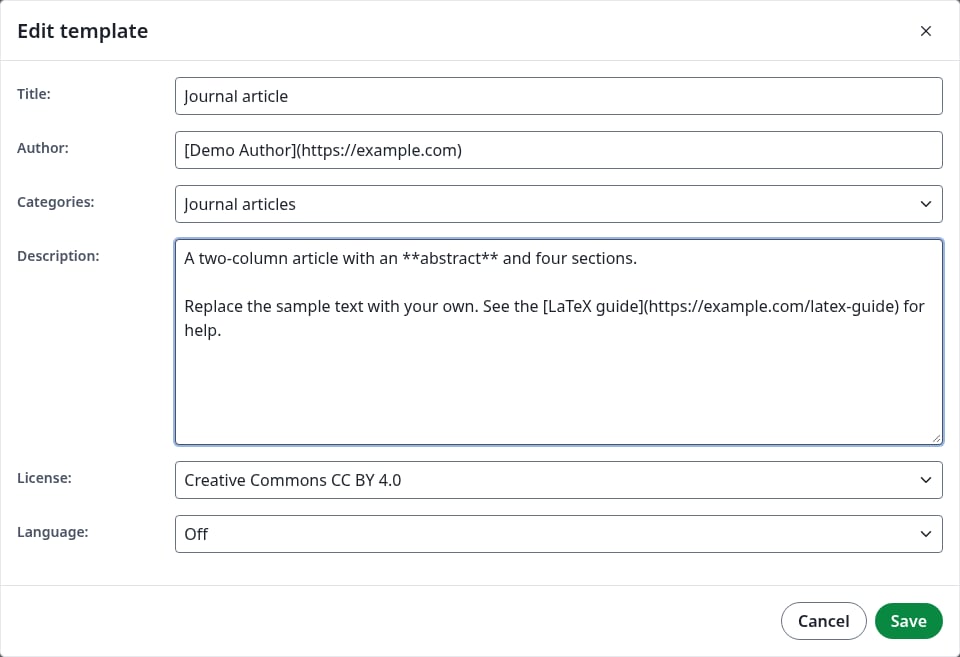
The fields are the same as when publishing, with one more: Language is the spell check language of projects opened from the template. For a project published with the default language it shows Off, and projects opened from it use English (American).
The Edit template dialog
A title that another template has is refused: Save stays greyed out until you change Title.
3
Click Save
The dialog closes and the template page shows the new details.
Admin: Source Project opens the project the template was published from.The template keeps its own copy of the files. If you delete the project forever, the button disappears, and users can still open the template. A project that is only in Trash keeps the button. See also the Q&A under Templates.
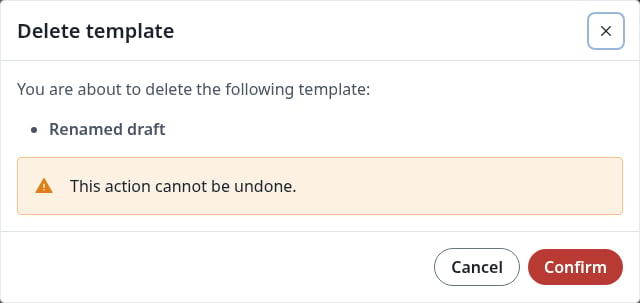
On the template page, click Delete. The dialog names the template.
The Delete template dialog
2
Click Confirm
You are back on the page you came from, and the template is no longer in the gallery. Its link now shows Not found.The source project stays, and so do the projects that users opened from the template.
The form lets you type more than the site accepts. A Title over 150 characters shows Template title exceeds the maximum length of 150 characters., and a Description over 4096 characters shows Template description exceeds the maximum length of 4096 characters.Publish then stays greyed out even when you shorten the text. Click Cancel, click File, then Manage Template, and fill in the form again.
Last modified on November 7, 2026
Was this page helpful?
{"docsConfig":{"theme":"mint","$schema":"https://mintlify.com/docs.json","name":"Ayakaleaf Pro","description":"Overleaf Community Edition enhanced with all Pro features: open source, free to use, self-hostable.","colors":{"primary":"#0E0E0E","light":"#D4A27F","dark":"#0E0E0E"},"logo":{"light":"https://mintcdn.com/ayakaleaf-pro/JetHeEeglWIIXNds/logo/light.png?fit=max\u0026auto=format\u0026n=JetHeEeglWIIXNds\u0026q=85\u0026s=7f1abd8dcc74dd3b7cdafac9e6e82092","dark":"https://mintcdn.com/ayakaleaf-pro/JetHeEeglWIIXNds/logo/dark.png?fit=max\u0026auto=format\u0026n=JetHeEeglWIIXNds\u0026q=85\u0026s=4e369d29a8c5a6cd8b4b7697ddb1f7e2","href":"/"},"favicon":"https://mintcdn.com/ayakaleaf-pro/x9kfDjtWlyyhG_mR/favicon.png?fit=max\u0026auto=format\u0026n=x9kfDjtWlyyhG_mR\u0026q=85\u0026s=832c6bfafce5eb69ebc83783083a4a85","background":{"color":{"light":"#FDFDF7","dark":"#09090B"}},"navbar":{"links":[{"href":"https://github.com/ayaka-notes/ayakaleaf-pro-playground","label":"Playground"},{"href":"https://github.com/orgs/ayaka-notes/packages/container/package/overleaf-pro","label":"Docker Image"},{"href":"https://github.com/ayaka-notes/texlive-full","label":"TeXLive Full"}],"primary":{"type":"button","label":"Open GitHub","href":"https://github.com/ayaka-notes/ayakaleaf-pro"}},"footer":{"socials":{"github":"https://github.com/ayaka-notes"}},"styling":{"latex":true},"contextual":{"options":["copy","view","chatgpt","claude","perplexity","mcp","cursor","vscode","assistant","download-pdf","download-spec"],"display":"header"},"metadata":{"timestamp":true},"navigation":{"languages":[{"language":"en","default":true,"href":""},{"language":"zh-CN","href":"zh-CN"},{"language":"zh-TW","href":"zh-TW"},{"language":"ja","href":"ja"},{"language":"de","href":"de"},{"language":"fr","href":"fr"},{"language":"es","href":"es"},{"language":"it","href":"it"},{"language":"ko","href":"ko"},{"language":"ru","href":"ru"},{"language":"nl","href":"nl"},{"language":"pt","href":"pt"},{"language":"tr","href":"tr"},{"language":"uk","href":"uk"},{"language":"pl","href":"pl"},{"language":"cs","href":"cs"},{"language":"sv","href":"sv"},{"language":"fi","href":"fi"},{"language":"ar","href":"ar"},{"language":"vi","href":"vi"},{"language":"no","href":"no"},{"language":"da","href":"da"},{"language":"id","href":"id"},{"language":"zh-Hans","href":"zh-Hans"},{"language":"zh-Hant","href":"zh-Hant"}]}},"deployment":{"deploymentMetadataValue":{"subdomain":"ayakaleaf-pro","hasAudioNarration":false,"actualSubdomain":"ayakaleaf-pro","customDomains":[],"gitSource":{"type":"github","owner":"ayaka-notes","repo":"docs","deployBranch":"main","contentDirectory":"","isPrivate":false,"mountPath":"","label":""},"feedback":{"thumbs":true},"entitlements":{"AI_CHAT":{"status":"ENABLED"},"WEB_MCP":{"status":"ENABLED"},"NARRATION":{"status":"ENABLED"}},"buildId":"6aee957818cb0ff786610e20","clientVersion":"0.0.4076","searchFilterCounts":[{"language":"en","tag":"On-Premises","count":138},{"language":"ar","tag":"الاستضافة المحلية","count":101},{"language":"cs","tag":"On-Premises","count":101},{"language":"da","tag":"On-premises","count":101},{"language":"de","tag":"On-Premises","count":101},{"language":"es","tag":"Local","count":101},{"language":"fi","tag":"Paikallinen asennus","count":101},{"language":"fr","tag":"Sur site","count":101},{"language":"id","tag":"On-Premises","count":101},{"language":"it","tag":"On-premise","count":101},{"language":"ja","tag":"オンプレミス","count":101},{"language":"ko","tag":"온프레미스","count":101},{"language":"nl","tag":"On-premises","count":101},{"language":"no","tag":"Lokal drift","count":101},{"language":"pl","tag":"On-Premises","count":101},{"language":"pt","tag":"On-Premises","count":101},{"language":"ru","tag":"Локальное развертывание","count":101},{"language":"sv","tag":"On-Premises","count":101},{"language":"tr","tag":"Şirket İçi Kurulum","count":101},{"language":"uk","tag":"Локальне розгортання","count":101},{"language":"vi","tag":"Tự triển khai (On-Premises)","count":101},{"language":"zh-CN","tag":"本地部署","count":101},{"language":"zh-Hans","tag":"本地部署","count":101},{"language":"zh-Hant","tag":"本地部署","count":101},{"language":"zh-TW","tag":"本地部署","count":101},{"language":"ar","tag":"الإعداد","count":60},{"language":"en","tag":"Configuration","count":60},{"language":"cs","tag":"Konfigurace","count":60},{"language":"da","tag":"Konfiguration","count":60},{"language":"de","tag":"Konfiguration","count":60},{"language":"es","tag":"Configuración","count":60},{"language":"fi","tag":"Määritys","count":60},{"language":"fr","tag":"Configuration","count":60},{"language":"id","tag":"Konfigurasi","count":60},{"language":"it","tag":"Configurazione","count":60},{"language":"ja","tag":"設定","count":60},{"language":"ko","tag":"구성","count":60},{"language":"nl","tag":"Configuratie","count":60},{"language":"no","tag":"Konfigurasjon","count":60},{"language":"pl","tag":"Konfiguracja","count":60},{"language":"pt","tag":"Configuração","count":60},{"language":"ru","tag":"Настройка","count":60},{"language":"sv","tag":"Konfiguration","count":60},{"language":"tr","tag":"Yapılandırma","count":60},{"language":"uk","tag":"Конфігурація","count":60},{"language":"vi","tag":"Cấu hình","count":60},{"language":"zh-CN","tag":"配置","count":60},{"language":"zh-Hans","tag":"配置","count":60},{"language":"zh-Hant","tag":"設定","count":60},{"language":"zh-TW","tag":"設定","count":60},{"language":"en","tag":"Installation","count":35},{"language":"ar","tag":"Ayakaleaf Toolkit","count":31},{"language":"en","tag":"Docker Compose","count":31},{"language":"cs","tag":"Ayakaleaf Toolkit","count":31},{"language":"da","tag":"Ayakaleaf Toolkit","count":31},{"language":"de","tag":"Ayakaleaf Toolkit","count":31},{"language":"es","tag":"Ayakaleaf Toolkit","count":31},{"language":"fi","tag":"Ayakaleaf Toolkit","count":31},{"language":"fr","tag":"Ayakaleaf Toolkit","count":31},{"language":"id","tag":"Ayakaleaf Toolkit","count":31},{"language":"it","tag":"Ayakaleaf Toolkit","count":31},{"language":"ja","tag":"Ayakaleaf Toolkit","count":31},{"language":"ko","tag":"Ayakaleaf Toolkit","count":31},{"language":"nl","tag":"Ayakaleaf Toolkit","count":31},{"language":"no","tag":"Ayakaleaf Toolkit","count":31},{"language":"pl","tag":"Ayakaleaf Toolkit","count":31},{"language":"pt","tag":"Ayakaleaf Toolkit","count":31},{"language":"ru","tag":"Ayakaleaf Toolkit","count":31},{"language":"sv","tag":"Ayakaleaf Toolkit","count":31},{"language":"tr","tag":"Ayakaleaf Toolkit","count":31},{"language":"uk","tag":"Ayakaleaf Toolkit","count":31},{"language":"vi","tag":"Ayakaleaf Toolkit","count":31},{"language":"zh-CN","tag":"Ayakaleaf Toolkit","count":31},{"language":"zh-Hans","tag":"Ayakaleaf Toolkit","count":31},{"language":"zh-Hant","tag":"Ayakaleaf Toolkit","count":31},{"language":"zh-TW","tag":"Ayakaleaf Toolkit","count":31},{"language":"ar","tag":"Kubernetes","count":29},{"language":"en","tag":"Kubernetes","count":29},{"language":"cs","tag":"Kubernetes","count":29},{"language":"da","tag":"Kubernetes","count":29},{"language":"de","tag":"Kubernetes","count":29},{"language":"es","tag":"Kubernetes","count":29},{"language":"fi","tag":"Kubernetes","count":29},{"language":"fr","tag":"Kubernetes","count":29},{"language":"id","tag":"Kubernetes","count":29},{"language":"it","tag":"Kubernetes","count":29},{"language":"ja","tag":"Kubernetes","count":29},{"language":"ko","tag":"Kubernetes","count":29},{"language":"nl","tag":"Kubernetes","count":29},{"language":"no","tag":"Kubernetes","count":29},{"language":"pl","tag":"Kubernetes","count":29},{"language":"pt","tag":"Kubernetes","count":29},{"language":"ru","tag":"Kubernetes","count":29},{"language":"sv","tag":"Kubernetes","count":29},{"language":"tr","tag":"Kubernetes","count":29},{"language":"uk","tag":"Kubernetes","count":29},{"language":"vi","tag":"Kubernetes","count":29},{"language":"zh-CN","tag":"Kubernetes","count":29},{"language":"zh-Hans","tag":"Kubernetes","count":29},{"language":"zh-Hant","tag":"Kubernetes","count":29},{"language":"zh-TW","tag":"Kubernetes","count":29},{"language":"en","tag":"Using Docker Compose","count":23},{"language":"en","tag":"User guide","count":21},{"language":"ar","tag":"التكاملات","count":20},{"language":"en","tag":"Integrations","count":20},{"language":"cs","tag":"Integrace","count":20},{"language":"da","tag":"Integrationer","count":20},{"language":"de","tag":"Integrationen","count":20},{"language":"es","tag":"Integraciones","count":20},{"language":"fi","tag":"Integraatiot","count":20},{"language":"fr","tag":"Intégrations","count":20},{"language":"id","tag":"Integrasi","count":20},{"language":"it","tag":"Integrazioni","count":20},{"language":"ja","tag":"連携","count":20},{"language":"ko","tag":"통합","count":20},{"language":"nl","tag":"Integraties","count":20},{"language":"no","tag":"Integrasjoner","count":20},{"language":"pl","tag":"Integracje","count":20},{"language":"pt","tag":"Integrações","count":20},{"language":"ru","tag":"Интеграции","count":20},{"language":"sv","tag":"Integrationer","count":20},{"language":"tr","tag":"Entegrasyonlar","count":20},{"language":"uk","tag":"Інтеграції","count":20},{"language":"vi","tag":"Tích hợp","count":20},{"language":"zh-CN","tag":"集成","count":20},{"language":"zh-Hans","tag":"集成","count":20},{"language":"zh-Hant","tag":"整合","count":20},{"language":"zh-TW","tag":"整合","count":20},{"language":"ar","tag":"التثبيت","count":19},{"language":"cs","tag":"Instalace","count":19},{"language":"da","tag":"Installation","count":19},{"language":"de","tag":"Installation","count":19},{"language":"es","tag":"Instalación","count":19},{"language":"fi","tag":"Asennus","count":19},{"language":"fr","tag":"Installation","count":19},{"language":"id","tag":"Instalasi","count":19},{"language":"it","tag":"Installazione","count":19},{"language":"ja","tag":"インストール","count":19},{"language":"ko","tag":"설치","count":19},{"language":"nl","tag":"Installatie","count":19},{"language":"no","tag":"Installasjon","count":19},{"language":"pl","tag":"Instalacja","count":19},{"language":"pt","tag":"Instalação","count":19},{"language":"ru","tag":"Установка","count":19},{"language":"sv","tag":"Installation","count":19},{"language":"tr","tag":"Kurulum","count":19},{"language":"uk","tag":"Встановлення","count":19},{"language":"vi","tag":"Cài đặt","count":19},{"language":"zh-CN","tag":"安装","count":19},{"language":"zh-Hans","tag":"安装","count":19},{"language":"zh-Hant","tag":"安裝","count":19},{"language":"zh-TW","tag":"安裝","count":19},{"language":"en","tag":"For users","count":16},{"language":"ar","tag":"المصادقة","count":12},{"language":"en","tag":"Authentication","count":12},{"language":"cs","tag":"Ověřování","count":12},{"language":"da","tag":"Godkendelse","count":12},{"language":"de","tag":"Authentifizierung","count":12},{"language":"es","tag":"Autenticación","count":12},{"language":"fi","tag":"Todennus","count":12},{"language":"fr","tag":"Authentification","count":12},{"language":"id","tag":"Autentikasi","count":12},{"language":"it","tag":"Autenticazione","count":12},{"language":"ja","tag":"認証","count":12},{"language":"ko","tag":"인증","count":12},{"language":"nl","tag":"Authenticatie","count":12},{"language":"no","tag":"Autentisering","count":12},{"language":"pl","tag":"Uwierzytelnianie","count":12},{"language":"pt","tag":"Autenticação","count":12},{"language":"ru","tag":"Аутентификация","count":12},{"language":"sv","tag":"Autentisering","count":12},{"language":"tr","tag":"Kimlik Doğrulama","count":12},{"language":"uk","tag":"Автентифікація","count":12},{"language":"vi","tag":"Xác thực","count":12},{"language":"zh-CN","tag":"身份验证","count":12},{"language":"zh-Hans","tag":"身份验证","count":12},{"language":"zh-Hant","tag":"身分驗證","count":12},{"language":"zh-TW","tag":"身分驗證","count":12},{"language":"ar","tag":"المطوّرون","count":11},{"language":"cs","tag":"Vývojáři","count":11},{"language":"da","tag":"Udvikler","count":11},{"language":"de","tag":"Entwickler","count":11},{"language":"es","tag":"Desarrollador","count":11},{"language":"fi","tag":"Kehittäjä","count":11},{"language":"fr","tag":"Développeur","count":11},{"language":"id","tag":"Pengembang","count":11},{"language":"it","tag":"Sviluppatore","count":11},{"language":"ja","tag":"開発者","count":11},{"language":"ko","tag":"개발자","count":11},{"language":"nl","tag":"Ontwikkelaar","count":11},{"language":"no","tag":"Utvikler","count":11},{"language":"pl","tag":"Dla deweloperów","count":11},{"language":"pt","tag":"Desenvolvedor","count":11},{"language":"ru","tag":"Разработчикам","count":11},{"language":"sv","tag":"Utvecklare","count":11},{"language":"tr","tag":"Geliştirici","count":11},{"language":"uk","tag":"Розробникам","count":11},{"language":"vi","tag":"Nhà phát triển","count":11},{"language":"zh-CN","tag":"开发者","count":11},{"language":"zh-Hans","tag":"开发者","count":11},{"language":"zh-Hant","tag":"開發者","count":11},{"language":"zh-TW","tag":"開發者","count":11},{"language":"ar","tag":"نظرة عامة","count":9},{"language":"ar","tag":"الصيانة","count":9},{"language":"cs","tag":"Přehled","count":9},{"language":"cs","tag":"Údržba","count":9},{"language":"da","tag":"Oversigt","count":9},{"language":"da","tag":"Vedligeholdelse","count":9},{"language":"de","tag":"Überblick","count":9},{"language":"de","tag":"Wartung","count":9},{"language":"es","tag":"Descripción general","count":9},{"language":"es","tag":"Mantenimiento","count":9},{"language":"fi","tag":"Yleiskatsaus","count":9},{"language":"fi","tag":"Ylläpito","count":9},{"language":"fr","tag":"Aperçu","count":9},{"language":"fr","tag":"Maintenance","count":9},{"language":"id","tag":"Ikhtisar","count":9},{"language":"id","tag":"Pemeliharaan","count":9},{"language":"it","tag":"Panoramica","count":9},{"language":"it","tag":"Manutenzione","count":9},{"language":"ja","tag":"概要","count":9},{"language":"ja","tag":"メンテナンス","count":9},{"language":"ko","tag":"개요","count":9},{"language":"ko","tag":"유지 관리","count":9},{"language":"nl","tag":"Overzicht","count":9},{"language":"nl","tag":"Onderhoud","count":9},{"language":"no","tag":"Oversikt","count":9},{"language":"no","tag":"Vedlikehold","count":9},{"language":"pl","tag":"Przegląd","count":9},{"language":"pl","tag":"Utrzymanie","count":9},{"language":"pt","tag":"Visão geral","count":9},{"language":"pt","tag":"Manutenção","count":9},{"language":"ru","tag":"Обзор","count":9},{"language":"ru","tag":"Обслуживание","count":9},{"language":"sv","tag":"Översikt","count":9},{"language":"sv","tag":"Underhåll","count":9},{"language":"tr","tag":"Genel Bakış","count":9},{"language":"tr","tag":"Bakım","count":9},{"language":"uk","tag":"Огляд","count":9},{"language":"uk","tag":"Обслуговування","count":9},{"language":"vi","tag":"Tổng quan","count":9},{"language":"vi","tag":"Bảo trì","count":9},{"language":"zh-CN","tag":"概览","count":9},{"language":"zh-CN","tag":"维护","count":9},{"language":"zh-Hans","tag":"概览","count":9},{"language":"zh-Hans","tag":"维护","count":9},{"language":"zh-Hant","tag":"概覽","count":9},{"language":"zh-Hant","tag":"維護","count":9},{"language":"zh-TW","tag":"概覽","count":9},{"language":"zh-TW","tag":"維護","count":9}],"searchSettings":{"maxResults":6}},"assistantConfig":{"enableAskAiButton":false,"enableStarterQuestions":false,"enableContextualStarterQuestions":false,"enableAskAiSearchBar":true},"basePath":"","hasChatPermissions":true,"hasWebMcpPermissions":true,"toggles":[{"name":"kill-isr","enabled":true,"variant":{"name":"disabled","enabled":false,"feature_enabled":true},"impressionData":false},{"name":"agent-mintlify-slack","enabled":true,"variant":{"name":"disabled","enabled":false,"feature_enabled":true},"impressionData":false},{"name":"agent-integrations-settings","enabled":true,"variant":{"name":"disabled","enabled":false,"feature_enabled":true},"impressionData":false},{"name":"rbac-expansion","enabled":true,"variant":{"name":"disabled","enabled":false,"feature_enabled":true},"impressionData":false},{"name":"automations-pr-grouping","enabled":true,"variant":{"name":"disabled","enabled":false,"feature_enabled":true},"impressionData":false},{"name":"custom-prefix","enabled":true,"variant":{"name":"disabled","enabled":false,"feature_enabled":true},"impressionData":false},{"name":"analytics-v7","enabled":true,"variant":{"name":"disabled","enabled":false,"feature_enabled":true},"impressionData":false},{"name":"user-flows-analytics","enabled":true,"variant":{"name":"disabled","enabled":false,"feature_enabled":true},"impressionData":false},{"name":"no-publish-flow","enabled":true,"variant":{"name":"disabled","enabled":false,"feature_enabled":true},"impressionData":false},{"name":"workos-onboarding","enabled":true,"variant":{"name":"disabled","enabled":false,"feature_enabled":true},"impressionData":false},{"name":"llms-txt-v2","enabled":true,"variant":{"name":"disabled","enabled":false,"feature_enabled":true},"impressionData":false},{"name":"snapshot-serving-live","enabled":true,"variant":{"name":"disabled","enabled":false,"feature_enabled":true},"impressionData":false},{"name":"stripTemperatureMiddleware","enabled":true,"variant":{"name":"disabled","enabled":false,"feature_enabled":true},"impressionData":false},{"name":"support-platform-pylon-zendesk","enabled":true,"variant":{"name":"disabled","enabled":false,"feature_enabled":true},"impressionData":false},{"name":"snapshot-serving","enabled":true,"variant":{"name":"disabled","enabled":false,"feature_enabled":true},"impressionData":false},{"name":"instant-rollback","enabled":true,"variant":{"name":"disabled","enabled":false,"feature_enabled":true},"impressionData":false},{"name":"granular-notifications-server","enabled":true,"variant":{"name":"disabled","enabled":false,"feature_enabled":true},"impressionData":false},{"name":"granular-notifications","enabled":true,"variant":{"name":"disabled","enabled":false,"feature_enabled":true},"impressionData":false},{"name":"automations-fable","enabled":true,"variant":{"name":"disabled","enabled":false,"feature_enabled":true},"impressionData":false},{"name":"fixed-ai-action-pricing","enabled":true,"variant":{"name":"disabled","enabled":false,"feature_enabled":true},"impressionData":false},{"name":"automation-resolve-merge-conflict","enabled":true,"variant":{"name":"disabled","enabled":false,"feature_enabled":true},"impressionData":false},{"name":"scoped-publishing","enabled":true,"variant":{"name":"disabled","enabled":false,"feature_enabled":true},"impressionData":false},{"name":"mintql","enabled":true,"variant":{"name":"disabled","enabled":false,"feature_enabled":true},"impressionData":false},{"name":"page-level-analytics","enabled":true,"variant":{"name":"disabled","enabled":false,"feature_enabled":true},"impressionData":false},{"name":"editor-version-history-v2","enabled":true,"variant":{"name":"disabled","enabled":false,"feature_enabled":true},"impressionData":false},{"name":"billing-page-v2","enabled":true,"variant":{"name":"disabled","enabled":false,"feature_enabled":true},"impressionData":false},{"name":"full-page-search","enabled":true,"variant":{"name":"disabled","enabled":false,"feature_enabled":true},"impressionData":false},{"name":"workspace-projects","enabled":true,"variant":{"name":"disabled","enabled":false,"feature_enabled":true},"impressionData":false},{"name":"assistant-v5","enabled":true,"variant":{"name":"disabled","enabled":false,"feature_enabled":true},"impressionData":false},{"name":"fork-pr-previews","enabled":true,"variant":{"name":"disabled","enabled":false,"feature_enabled":true},"impressionData":false},{"name":"revalidation-jwt","enabled":true,"variant":{"name":"disabled","enabled":false,"feature_enabled":true},"impressionData":false},{"name":"workos-sso-scim","enabled":true,"variant":{"name":"disabled","enabled":false,"feature_enabled":true},"impressionData":false},{"name":"hobby-abuse-scan","enabled":true,"variant":{"name":"disabled","enabled":false,"feature_enabled":true},"impressionData":false},{"name":"dashboard-inbox","enabled":true,"variant":{"name":"disabled","enabled":false,"feature_enabled":true},"impressionData":false},{"name":"workos-signup","enabled":true,"variant":{"name":"disabled","enabled":false,"feature_enabled":true},"impressionData":false},{"name":"turbopuffer-dual-write","enabled":true,"variant":{"name":"disabled","enabled":false,"feature_enabled":true},"impressionData":false},{"name":"workos-enabled","enabled":true,"variant":{"name":"disabled","enabled":false,"feature_enabled":true},"impressionData":false},{"name":"approve-review-flow","enabled":true,"variant":{"name":"disabled","enabled":false,"feature_enabled":true},"impressionData":false},{"name":"editor-metadata","enabled":true,"variant":{"name":"disabled","enabled":false,"feature_enabled":true},"impressionData":false},{"name":"sso-setup-deadline-banner","enabled":true,"variant":{"name":"disabled","enabled":false,"feature_enabled":true},"impressionData":false},{"name":"turbopuffer-serve","enabled":true,"variant":{"name":"disabled","enabled":false,"feature_enabled":true},"impressionData":false},{"name":"live-agents","enabled":true,"variant":{"name":"disabled","enabled":false,"feature_enabled":true},"impressionData":false},{"name":"comment-mode","enabled":true,"variant":{"name":"disabled","enabled":false,"feature_enabled":true},"impressionData":false}],"googleFontsInlined":false},"customCss":[{"filePath":"style.css","content":"@font-face{font-family:\"Site Sans\";src:url(\"/fonts/SiteSans-Text-Regular-Static.otf\") format(\"opentype\");font-weight:400;font-style:normal;font-display:swap}@font-face{font-family:\"Site Sans\";src:url(\"/fonts/SiteSans-Text-RegularItalic-Static.otf\") format(\"opentype\");font-weight:400;font-style:italic;font-display:swap}@font-face{font-family:\"Site Sans\";src:url(\"/fonts/SiteSans-Text-Medium-Static.otf\") format(\"opentype\");font-weight:500;font-style:normal;font-display:swap}@font-face{font-family:\"Site Sans\";src:url(\"/fonts/SiteSans-Text-MediumItalic-Static.otf\") format(\"opentype\");font-weight:500;font-style:italic;font-display:swap}@font-face{font-family:\"Site Sans\";src:url(\"/fonts/SiteSans-Text-Semibold-Static.otf\") format(\"opentype\");font-weight:600;font-style:normal;font-display:swap}@font-face{font-family:\"Site Sans\";src:url(\"/fonts/SiteSans-Text-SemiboldItalic-Static.otf\") format(\"opentype\");font-weight:600;font-style:italic;font-display:swap}@font-face{font-family:\"Site Sans\";src:url(\"/fonts/SiteSans-Text-Bold-Static.otf\") format(\"opentype\");font-weight:700;font-style:normal;font-display:swap}@font-face{font-family:\"Site Sans\";src:url(\"/fonts/SiteSans-Text-BoldItalic-Static.otf\") format(\"opentype\");font-weight:700;font-style:italic;font-display:swap}@font-face{font-family:\"Site Serif Display\";src:url(\"/fonts/SiteSerif-Display-Regular-Static.otf\") format(\"opentype\");font-weight:400;font-style:normal;font-display:swap}@font-face{font-family:\"Site Serif Display\";src:url(\"/fonts/SiteSerif-Display-RegularItalic-Static.otf\") format(\"opentype\");font-weight:400;font-style:italic;font-display:swap}@font-face{font-family:\"Site Serif Display\";src:url(\"/fonts/SiteSerif-Display-Medium-Static.otf\") format(\"opentype\");font-weight:500;font-style:normal;font-display:swap}@font-face{font-family:\"Site Serif Display\";src:url(\"/fonts/SiteSerif-Display-Semibold-Static.otf\") format(\"opentype\");font-weight:600;font-style:normal;font-display:swap}@font-face{font-family:\"Site Serif Display\";src:url(\"/fonts/SiteSerif-Display-Bold-Static.otf\") format(\"opentype\");font-weight:700;font-style:normal;font-display:swap}@font-face{font-family:\"Site Serif\";src:url(\"/fonts/SiteSerif-Text-Regular-Static.otf\") format(\"opentype\");font-weight:400;font-style:normal;font-display:swap}@font-face{font-family:\"Site Serif\";src:url(\"/fonts/SiteSerif-Text-RegularItalic-Static.otf\") format(\"opentype\");font-weight:400;font-style:italic;font-display:swap}@font-face{font-family:\"Site Serif\";src:url(\"/fonts/SiteSerif-Text-Medium-Static.otf\") format(\"opentype\");font-weight:500;font-style:normal;font-display:swap}@font-face{font-family:\"Site Serif\";src:url(\"/fonts/SiteSerif-Text-MediumItalic-Static.otf\") format(\"opentype\");font-weight:500;font-style:italic;font-display:swap}@font-face{font-family:\"Site Serif\";src:url(\"/fonts/SiteSerif-Text-Semibold-Static.otf\") format(\"opentype\");font-weight:600;font-style:normal;font-display:swap}@font-face{font-family:\"Site Serif\";src:url(\"/fonts/SiteSerif-Text-SemiboldItalic-Static.otf\") format(\"opentype\");font-weight:600;font-style:italic;font-display:swap}@font-face{font-family:\"Site Serif\";src:url(\"/fonts/SiteSerif-Text-Bold-Static.otf\") format(\"opentype\");font-weight:700;font-style:normal;font-display:swap}@font-face{font-family:\"Site Serif\";src:url(\"/fonts/SiteSerif-Text-BoldItalic-Static.otf\") format(\"opentype\");font-weight:700;font-style:italic;font-display:swap}:root{--always-white: 0 0% 100%;--always-black: 0 0% 0%;--constant-book-cloth: 15 55% 80%;--constant-clay: 15 60% 85%;--constant-kraft: 25 40% 83%;--constant-manilla: 40 20% 92%;--constant-slate-000: 0 0% 100%;--constant-slate-050: 48 33.3% 97.1%;--constant-slate-100: 53 28.6% 94.5%;--constant-slate-150: 48 25% 92.2%;--constant-slate-200: 50 20.7% 88.6%;--constant-slate-250: 51 16.5% 84.5%;--constant-slate-300: 50 11.5% 79.6%;--constant-slate-350: 50 9% 73.7%;--constant-slate-400: 49 6.5% 66.9%;--constant-slate-450: 48 4.8% 59.2%;--constant-slate-500: 53 3.2% 51.4%;--constant-slate-550: 51 3.1% 43.7%;--constant-slate-600: 48 2.7% 35.9%;--constant-slate-650: 48 3.4% 29.2%;--constant-slate-700: 60 2.5% 23.3%;--constant-slate-750: 60 2.1% 18.4%;--constant-slate-800: 60 2.7% 14.5%;--constant-slate-850: 30 3.3% 11.8%;--constant-slate-900: 30 4% 9.8%;--constant-slate-950: 60 2.6% 7.6%;--constant-slate-1000: 60 3.4% 5.7%}:root:not(.dark){--accent-brand: 15 63.1% 59.6%;--accent-main-000: 15 55.6% 52.4%;--accent-main-100: 15 55.6% 52.4%;--accent-main-200: 15 63.1% 59.6%;--accent-main-900: 0 0% 0%;--accent-pro-000: 251 34.2% 33.3%;--accent-pro-100: 251 40% 45.1%;--accent-pro-200: 251 61% 72.2%;--accent-pro-900: 253 33.3% 91.8%;--accent-secondary-000: 210 73.7% 40.2%;--accent-secondary-100: 210 70.9% 51.6%;--accent-secondary-200: 210 70.9% 51.6%;--accent-secondary-900: 211 72% 90%;--bg-000: 0 0% 100%;--bg-100: 48 33.3% 97.1%;--bg-200: 53 28.6% 94.5%;--bg-300: 48 25% 92.2%;--bg-400: 50 20.7% 88.6%;--bg-500: 50 20.7% 88.6%;--border-100: 30 3.3% 11.8%;--border-200: 30 3.3% 11.8%;--border-300: 30 3.3% 11.8%;--border-400: 30 3.3% 11.8%;--danger-000: 0 61.4% 22.4%;--danger-100: 0 58.6% 34.1%;--danger-200: 0 58.6% 34.1%;--danger-900: 0 50% 95%;--oncolor-100: 0 0% 100%;--oncolor-200: 60 6.7% 97.1%;--oncolor-300: 60 6.7% 97.1%;--text-000: 60 2.6% 7.6%;--text-100: 60 2.6% 7.6%;--text-200: 60 2.5% 23.3%;--text-300: 60 2.5% 23.3%;--text-400: 51 3.1% 43.7%;--text-500: 51 3.1% 43.7%}:root.dark{--accent-brand: 15 63.1% 59.6%;--accent-main-000: 15 55.6% 52.4%;--accent-main-100: 15 63.1% 59.6%;--accent-main-200: 15 63.1% 59.6%;--accent-main-900: 0 0% 0%;--accent-pro-000: 251 84.6% 74.5%;--accent-pro-100: 251 40.2% 54.1%;--accent-pro-200: 251 40% 45.1%;--accent-pro-900: 250 25.3% 19.4%;--accent-secondary-000: 210 71.1% 62%;--accent-secondary-100: 210 70.9% 51.6%;--accent-secondary-200: 210 70.9% 51.6%;--accent-secondary-900: 210 55.9% 24.6%;--bg-000: 60 2.1% 18.4%;--bg-100: 60 2.7% 14.5%;--bg-200: 30 3.3% 11.8%;--bg-300: 60 2.6% 7.6%;--bg-400: 60 3.4% 5.7%;--bg-500: 60 3.4% 5.7%;--border-100: 51 16.5% 84.5%;--border-200: 51 16.5% 84.5%;--border-300: 51 16.5% 84.5%;--border-400: 51 16.5% 84.5%;--danger-000: 0 73.1% 66.5%;--danger-100: 0 58.6% 34.1%;--danger-200: 0 58.6% 34.1%;--danger-900: 0 23% 15.6%;--oncolor-100: 0 0% 100%;--oncolor-200: 60 6.7% 97.1%;--oncolor-300: 60 6.7% 97.1%;--text-000: 48 33.3% 97.1%;--text-100: 48 33.3% 97.1%;--text-200: 50 9% 73.7%;--text-300: 50 9% 73.7%;--text-400: 48 4.8% 59.2%;--text-500: 48 4.8% 59.2%}#home-header{font-family:\"Site Sans\", system-ui, \"Segoe UI\", Roboto, Helvetica, Arial, sans-serif;font-weight:400!important;font-size:50px;line-height:1.2;margin-bottom:1rem;color:--text-000;display:flex;align-items:baseline;justify-content:center;flex-wrap:nowrap}#localization-select-trigger>:has(img[src*=\"flags\"]){display:none}div[id^=\"localization-select-item\"]>:has(img[src*=\"flags\"]){display:none}@media (min-width: 768px){#home-header{justify-content:center}}.build-with{font-family:\"Site Sans\", system-ui, \"Segoe UI\", Roboto, Helvetica, Arial, sans-serif;letter-spacing:-0.02em}.claude-wordmark-wrapper{display:inline-flex;align-items:baseline;margin-left:10px}.claude-wordmark{height:40px;width:auto;position:relative}.dark #home-header{color:white}.description-text{color:black}.dark .description-text{color:white}.dark .claude-wordmark{filter:invert(1)}:root{--bg-color: #f0efea}.dark{--bg-color: #2b2b2b}body,input,#category-select,.dropdown-item,#table-of-contents{font-family:\"Site Sans\", system-ui, \"Segoe UI\", Roboto, Helvetica, Arial, sans-serif}.eyebrow{font-family:\"Site Sans\", system-ui, \"Segoe UI\", Roboto, Helvetica, Arial, sans-serif;text-transform:uppercase;letter-spacing:0.02rem}#content-container{font-family:\"Site Sans\", system-ui, \"Segoe UI\", Roboto, Helvetica, Arial, sans-serif}#content-container h1,#content-container h2,#content-container h3,#content-container h4,#content-container h5,#content-container h6{font-family:\"Site Serif Display\", Georgia, \"Times New Roman\", Times, serif;font-weight:400;letter-spacing:0;word-spacing:0.1em}#content-container p{font-size:1rem;line-height:1.65rem}.font-extrabold{font-weight:600!important}.wide-table{width:100%;overflow-x:auto}.wide-table table{width:175%;margin-bottom:0}#prompt-library-container{margin:4rem auto;max-width:48rem;padding-left:1.25rem;padding-right:1.25rem}.prompt-library-title{font-size:24px;text-align:center;font-weight:700;color:#1f2937}.dark .prompt-library-title{color:#e5e7eb}.prompt-library-description{margin-top:1rem;text-align:center}.main-content{margin-bottom:10rem;max-width:64rem;margin-left:auto;margin-right:auto;padding-left:1.25rem;padding-right:1.25rem}.prompt-controllers{display:flex;gap:0.5rem}.prompt-search-container{position:relative;flex:1 1 0%}.prompt-search-icon-container{display:flex;position:absolute;top:0;bottom:0;left:0;align-items:center;padding-left:0.75rem}.prompt-search-icon{margin-left:0.25rem;margin-right:0.75rem;flex:none;width:1rem;height:1rem;background-color:#6b7280;mask-image:url(https://mintlify.b-cdn.net/v6.5.1/solid/magnifying-glass.svg);mask-repeat:no-repeat;mask-position:center center}input.prompt-search-bar{display:block;height:2.5rem;padding-left:2.5rem;border-radius:0.75rem;border-width:1px;background-color:#ffffff;width:100%;color:#111827;box-shadow:0 1px 2px 0 rgba(0, 0, 0, 0.05)}.dark input.prompt-search-bar{color:#ffffff;background-color:rgb(var(--background-dark));border-color:#d1d5db1a}input.prompt-search-bar:focus{outline-color:rgb(var(--primary))}.dark input.prompt-search-bar:focus{outline-color:rgb(var(--primary-light))}.dark .prompt-search-icon{background-color:#ffffff80}#category-select{padding-left:1rem;padding-right:2.5rem;height:2.5rem;display:flex;align-items:center;border-radius:0.75rem;border-width:1px;color:#111827;background-color:#ffffff;cursor:pointer;box-shadow:0 1px 2px 0 rgba(0, 0, 0, 0.05);white-space:nowrap}.dark #category-select{background-color:rgb(var(--background-dark));border-color:#d1d5db1a;color:#ffffff}#category-select:hover{background-color:#f9fafb}.dark #category-select:hover{background-color:#ffffff0d}#category-select:focus{outline-color:rgb(var(--primary))}.dark #category-select:focus{outline-color:rgb(var(--primary-light))}#categories-dropdown{top:calc(100% + 4px);padding:0.5rem 0.5rem;display:none;position:absolute;z-index:10;border-radius:0.75rem;border-width:1px;width:100%;color:#111827;background-color:#ffffff;box-shadow:0 1px 2px 0 rgba(0, 0, 0, 0.05)}.dark #categories-dropdown{background-color:rgb(var(--background-dark));border-color:#d1d5db1a;color:#ffffff}#categories-dropdown-clickout{position:fixed;top:0;right:0;bottom:0;left:0;z-index:0}.dropdown-icon-container{display:flex;position:absolute;top:0;bottom:0;right:0;align-items:center;padding-right:0.25rem}.dropdown-icon{margin-left:0.25rem;margin-right:0.75rem;flex:none;width:0.75rem;height:0.75rem;background-color:#6b7280;mask-image:url(https://mintlify.b-cdn.net/v6.5.1/solid/caret-down.svg);mask-repeat:no-repeat;mask-position:center center}.dark .dropdown-icon{background-color:#ffffff80}#prompts-container{grid-template-columns:repeat(1, minmax(0, 1fr));gap:2rem}.dropdown-item{padding:0.25rem 0.5rem;border-radius:0.375rem;display:flex;align-items:center;cursor:pointer}.dropdown-item:hover{background-color:#f9fafb}.dark .dropdown-item:hover{background-color:#ffffff0d}.check-icon{mask-image:url(https://mintlify.b-cdn.net/v6.5.1/solid/check.svg);height:0.875rem;width:1rem;background-color:rgb(var(--primary-light));mask-repeat:no-repeat;mask-position:center center}.prompt-card{margin:-0.75rem;padding:0.75rem;display:flex;border-radius:1rem}.prompt-card:hover{background-color:#03071208}.dark .prompt-card:hover{background-color:#ffffff08}.prompt-icon-container{display:flex;flex:none;align-items:center;justify-content:center;margin-right:1.5rem;border-radius:0.75rem;height:4rem;width:4rem;background-color:#cb785c1a}.prompt-icon{height:1.5rem;width:1.5rem;background-color:rgb(var(--primary-light));mask-repeat:no-repeat;mask-position:center center}.prompt-title{color:rgb(31 41 55);font-weight:600}.dark .prompt-title{color:rgb(229 231 235)}.prompt-description{margin-top:0.25rem}#prompts-container{display:grid;margin-top:2.5rem}@media (min-width: 640px){#category-select{width:16rem}}@media (min-width: 1024px){#prompts-container{grid-template-columns:repeat(2, minmax(0, 1fr))}}.home-cards-custom{display:grid;grid-template-columns:repeat(3, 1fr);grid-template-rows:repeat(2, auto);gap:1.5rem}.home-cards-custom .card{background:transparent;border:0.5px solid hsl(var(--border-300));border-radius:12px;padding:0.25rem}@media (max-width: 1024px){.home-cards-custom{grid-template-columns:repeat(2, 1fr);grid-template-rows:repeat(3, auto)}}@media (max-width: 768px){.home-cards-custom{grid-template-columns:1fr;grid-template-rows:repeat(6, auto)}}.relative{position:relative}.flex-1{flex:1 1 0%}.mermaid{position:relative;background-color:#FDFDFB;background-image:linear-gradient(rgba(235, 219, 188, .25) 1px, transparent 1px), /* Secondary color #EBDBBC with low opacity */\n linear-gradient(90deg, rgba(235, 219, 188, .25) 1px, transparent 1px),\n linear-gradient(rgba(235, 219, 188, .1) 1px, transparent 1px),\n linear-gradient(90deg, rgba(235, 219, 188, .1) 1px, transparent 1px);background-size:20px 20px,\n 20px 20px,\n 4px 4px,\n 4px 4px;background-position:-1px -1px,\n -1px -1px,\n -1px -1px,\n -1px -1px;padding:20px;border-radius:8px;border:1px solid rgba(235, 219, 188, .4);box-shadow:0 2px 4px rgba(64, 64, 62, 0.08)}.dark .mermaid{background-color:#1a1918;background-image:linear-gradient(rgba(212, 162, 127, .15) 1px, transparent 1px), /* Tertiary color #D4A27F with low opacity */\n linear-gradient(90deg, rgba(212, 162, 127, .15) 1px, transparent 1px),\n linear-gradient(rgba(212, 162, 127, .08) 1px, transparent 1px),\n linear-gradient(90deg, rgba(212, 162, 127, .08) 1px, transparent 1px);border:1px solid rgba(102, 102, 99, .5);box-shadow:0 2px 4px rgba(0, 0, 0, 0.2)}.digest-meta{display:flex;align-items:center;justify-content:space-between;flex-wrap:wrap;gap:0.5rem 1rem;padding:0.75rem 1rem;margin:1.5rem 0 2.5rem;border:1px solid hsl(var(--border-300) / 0.15);background:hsl(var(--bg-200));font-variant-numeric:tabular-nums;font-size:0.875rem;color:hsl(var(--text-400))}#content-container .digest-meta a{color:hsl(var(--accent-main-100));font-weight:500;text-decoration:none;border-bottom:none}#content-container .digest-meta a:hover{text-decoration:underline}.digest-feature{position:relative;margin:2.5rem 0;padding:1.875rem 1.875rem 1.625rem;background:radial-gradient(circle, hsl(var(--text-000) / 0.025) 1px, transparent 1px) 0 0 / 18px 18px,\n linear-gradient(180deg, hsl(var(--constant-manilla) / 0.55), hsl(var(--constant-manilla) / 0.38));border:1px solid hsl(var(--border-300) / 0.12);box-shadow:inset 0 1px 0 hsl(var(--text-000) / 0.04),\n 0 1px 2px hsl(var(--always-black) / 0.04)}.digest-feature::before{content:\"\";position:absolute;inset:0 auto 0 0;width:4px;background:hsl(var(--accent-brand))}.dark .digest-feature{background:radial-gradient(circle, hsl(var(--text-000) / 0.02) 1px, transparent 1px) 0 0 / 18px 18px,\n linear-gradient(180deg, hsl(var(--bg-000) / 0.75), hsl(var(--bg-000) / 0.5));border-color:hsl(var(--border-300) / 0.1);box-shadow:inset 0 1px 0 hsl(var(--text-000) / 0.03),\n 0 1px 2px hsl(var(--always-black) / 0.25)}.digest-feature>:first-child{margin-top:0}.digest-feature>:last-child{margin-bottom:0}.digest-feature-header{display:flex;align-items:center;flex-wrap:wrap;gap:0.625rem;margin:0 0 0.75rem}#content-container .digest-feature-title{font-family:\"Site Serif Display\", Georgia, serif;font-size:1.75rem;line-height:1.15;font-weight:500;letter-spacing:-0.015em;color:hsl(var(--text-000));margin:0}#content-container .digest-feature-pill{font-family:ui-monospace, \"SF Mono\", Menlo, Consolas, monospace;font-size:0.75rem;line-height:1;letter-spacing:0.01em;padding:0.3rem 0.6rem;border-radius:999px;background:hsl(var(--accent-brand) / 0.12);color:hsl(var(--accent-main-000));border:1px solid hsl(var(--accent-brand) / 0.25);white-space:nowrap;transform:translateY(1px)}#content-container .digest-feature-lede{font-size:1.0625rem;line-height:1.65;color:hsl(var(--text-100));margin:0 0 1.25rem;max-width:none}#content-container .digest-feature-lede code{font-size:0.875em;padding:0.1em 0.35em}#content-container .digest-feature-try{font-size:0.875rem;color:hsl(var(--text-400));margin:1.25rem 0 0.5rem}#content-container .digest-feature .frame{margin:1rem 0;border-radius:0;padding:0}#content-container .digest-feature .frame>*{border-radius:0}#content-container .digest-feature pre,#content-container .digest-feature [class*=\"CodeBlock\"]{border-radius:0}#content-container .digest-feature-link{display:inline-flex;align-items:center;gap:0.35rem;font-size:0.875rem;font-weight:500;color:hsl(var(--accent-main-100));text-decoration:none;border-bottom:none;margin-top:0.75rem}#content-container .digest-feature-link::after{content:\"→\";transition:transform 120ms ease-out}#content-container .digest-feature-link:hover::after{transform:translateX(3px)}.digest-wins{margin:2.5rem 0;padding:1.5rem 1.75rem 1.25rem;background:hsl(var(--bg-200));border:1px solid hsl(var(--border-300) / 0.1)}.dark .digest-wins{background:hsl(var(--bg-200) / 0.6)}#content-container .digest-wins-title{font-family:\"Site Serif Display\", Georgia, serif;font-size:1.25rem;font-weight:500;color:hsl(var(--text-000));margin:0 0 0.75rem}.digest-wins-grid{display:grid;grid-template-columns:repeat(auto-fit, minmax(16rem, 1fr));column-gap:2rem}#content-container .digest-wins-grid>div{position:relative;font-size:0.875rem;line-height:1.5;color:hsl(var(--text-300));padding:0.5rem 0 0.5rem 1.125rem;border-top:1px solid hsl(var(--border-300) / 0.06);margin:0}#content-container .digest-wins-grid>div::before{content:\"+\";position:absolute;left:0;top:0.5rem;font-family:ui-monospace, \"SF Mono\", Menlo, Consolas, monospace;font-size:0.8125rem;font-weight:600;color:hsl(var(--accent-brand))}#content-container .digest-wins-grid>div:first-child,#content-container .digest-wins-grid>div:nth-child(2){border-top:none;padding-top:0}#content-container .digest-wins-grid>div:first-child::before,#content-container .digest-wins-grid>div:nth-child(2)::before{top:0}#content-container .digest-wins-grid code{font-size:0.8125rem;padding:0.1em 0.3em}:root{--toc-wrapper-max: 92rem;--toc-wrapper-pad: 2rem;--toc-col: 19rem;--toc-side: 28rem;--toc-btn-size: 1.75rem}#toc-collapse-toggle{display:none;align-items:center;justify-content:center;position:fixed;top:10rem;right:calc(\n max((100% - var(--toc-wrapper-max)) / 2, 0px) + var(--toc-wrapper-pad) +\n var(--toc-col) - var(--toc-btn-size) - 0.35rem\n );transition:right 200ms ease-out;z-index:30;width:var(--toc-btn-size);height:var(--toc-btn-size);border-radius:9999px;border:1px solid hsl(var(--border-300) / 0.15);background:hsl(var(--bg-100));color:hsl(var(--text-400));cursor:pointer}#toc-collapse-toggle:hover{background:hsl(var(--bg-300));color:hsl(var(--text-100))}#toc-collapse-toggle svg{width:14px;height:14px;fill:none;stroke:currentColor;stroke-width:2.5;stroke-linecap:round;stroke-linejoin:round}#toc-collapse-toggle .toc-glyph{display:none;stroke-width:2}@media print{#toc-collapse-toggle{display:none!important}}@media (prefers-reduced-motion: reduce){#toc-collapse-toggle{transition:none}}@media (min-width: 1280px){html:has(#table-of-contents-layout) #toc-collapse-toggle{display:flex}html.toc-collapsed #toc-collapse-toggle .toc-chevron{transform:rotate(180deg)}html.toc-collapsed #toc-collapse-toggle{right:0.5rem;width:auto;padding:0 0.5rem;gap:0.25rem}html.toc-collapsed #toc-collapse-toggle .toc-glyph{display:block}html.toc-collapsed #table-of-contents-layout{display:none!important}html.toc-collapsed #content-side-layout:has(#table-of-contents-layout){display:none!important}html.toc-collapsed #content-container:has(#table-of-contents-layout) #content-area{width:100%!important}html.toc-collapsed #content-container:has(#table-of-contents-layout) #content-area>*{max-width:calc(var(--toc-wrapper-max) - var(--toc-side))}}@media (max-width: 640px){.digest-feature{padding:1.25rem 1rem 1rem;margin:1.5rem 0}#content-container .digest-feature-title{font-size:1.375rem}.digest-wins{padding:1.25rem 1rem 1rem}.digest-wins-grid{grid-template-columns:1fr}#content-container .digest-wins-grid>div:nth-child(2){border-top:1px solid hsl(var(--border-300) / 0.06);padding-top:0.5rem}#content-container .digest-wins-grid>div:nth-child(2)::before{top:0.5rem}}img[data-component-part=\"card-image\"]{aspect-ratio:16 / 9;height:auto;object-fit:cover;object-position:top center}"},{"filePath":"button.css","content":".btn{position:relative;display:inline-flex;gap:0.5rem;align-items:center;justify-content:center;flex-shrink:0;min-width:5rem;height:2.25rem;padding:0.5rem 1rem;white-space:nowrap;font-family:Styrene;font-weight:600;border-radius:0.5rem;\u0026:active{transform:scale(0.985)}\u0026.size-xs{height:1.75rem;min-width:3.5rem;padding:0 0.5rem;border-radius:0.25rem;font-size:0.75rem;gap:0.25rem}\u0026.size-sm{height:2rem;min-width:4rem;padding:0 0.75rem;border-radius:0.375rem;font-size:0.75rem}\u0026.size-lg{height:2.75rem;min-width:6rem;padding:0 1.25rem;border-radius:0.6rem}\u0026:disabled{pointer-events:none;opacity:0.5;box-shadow:none}\u0026:focus-visible{outline:none;--tw-ring-offset-shadow: var(--tw-ring-inset) 0 0 0 var(--tw-ring-offset-width) var(--tw-ring-offset-color);--tw-ring-shadow: var(--tw-ring-inset) 0 0 0 calc(1px + var(--tw-ring-offset-width)) var(--tw-ring-color);box-shadow:var(--tw-ring-offset-shadow), var(--tw-ring-shadow)}\u0026.primary{font-weight:600;color:hsl(var(--oncolor-100));background-color:hsl(var(--accent-main-100));background-image:linear-gradient(\n to right,\n hsl(var(--accent-main-100)) 0%,\n hsl(var(--accent-main-200) / 0.5) 50%,\n hsl(var(--accent-main-200)) 100%\n );background-size:200% 100%;background-position:0% 0%;border:0.5px solid hsl(var(--border-300) / 0.25);box-shadow:inset 0 0.5px 0px rgba(255, 255, 0, 0.15),\n 0 1px 1px rgba(0, 0, 0, 0.05);text-shadow:0 1px 2px rgb(0 0 0 / 10%);transition:all 150ms cubic-bezier(0.4, 0, 0.2, 1);\u0026:hover{background-position:100% 0%;background-image:linear-gradient(\n to right,\n hsl(var(--accent-main-200)) 0%,\n hsl(var(--accent-main-200)) 100%\n )}\u0026:active{background-color:hsl(var(--accent-main-000));box-shadow:inset 0 1px 6px rgba(0, 0, 0, 0.2);transform:scale(0.985)}}\u0026.flat{font-weight:500;color:hsl(var(--oncolor-100));background-color:hsl(var(--accent-main-100));transition:background-color 150ms;\u0026:hover{background-color:hsl(var(--accent-main-200))}}\u0026.secondary{font-weight:600;color:hsl(var(--text-100) / 0.9);background-image:radial-gradient(\n ellipse at center,\n hsl(var(--bg-500) / 0.1) 50%,\n hsl(var(--bg-500) / 0.3) 100%\n );border:0.5px solid hsl(var(--border-400));transition:color 150ms, background-color 150ms;\u0026:hover{color:hsl(var(--text-000));background-color:hsl(var(--bg-500) / 0.6)}\u0026:active{background-color:hsl(var(--bg-500) / 0.5)}}\u0026.outline{font-weight:600;color:hsl(var(--text-200));background-color:transparent;border:1.5px solid currentColor;transition:color 150ms, background-color 150ms;\u0026:hover{color:hsl(var(--text-100));background-color:hsl(var(--bg-400));border-color:hsl(var(--bg-400))}}\u0026.ghost{color:hsl(var(--text-200));border-color:transparent;transition:color 150ms, background-color 150ms;\u0026:hover{color:hsl(var(--text-100));background-color:hsl(var(--bg-500) / 0.4)}\u0026:active{background-color:hsl(var(--bg-400))}}\u0026.underline{opacity:0.8;text-decoration-line:none;text-underline-offset:3px;transition:all 150ms;\u0026:hover{opacity:1;text-decoration-line:underline}\u0026:active{transform:scale(0.985)}}\u0026.danger{font-weight:600;color:hsl(var(--oncolor-100));background-color:hsl(var(--danger-100));transition:background-color 150ms;\u0026:hover{background-color:hsl(var(--danger-200))}}}"}],"page":{"pagePath":"on-premises/user-guide/administrators/template-management","slug":"/on-premises/user-guide/administrators/template-management","pageMetadata":{"title":"Template management","description":"Publish a project as a template, update it, edit its details and delete it.","icon":"paste","href":"/on-premises/user-guide/administrators/template-management"},"description":{"compiledSource":"\"use strict\";\nconst {jsx: _jsx} = arguments[0];\nconst {useMDXComponents: _provideComponents} = arguments[0];\nfunction _createMdxContent(props) {\n const _components = {\n p: \"p\",\n ..._provideComponents(),\n ...props.components\n };\n return _jsx(_components.p, {\n children: \"Publish a project as a template, update it, edit its details and delete it.\"\n });\n}\nfunction MDXContent(props = {}) {\n const {wrapper: MDXLayout} = {\n ..._provideComponents(),\n ...props.components\n };\n return MDXLayout ? _jsx(MDXLayout, {\n ...props,\n children: _jsx(_createMdxContent, {\n ...props\n })\n }) : _createMdxContent(props);\n}\nreturn {\n default: MDXContent\n};\n","frontmatter":{},"scope":{}},"pageType":"default","mdx":{"mdxSource":{"compiledSource":"\"use strict\";const{Fragment:_Fragment,jsx:_jsx,jsxs:_jsxs}=arguments[0];const{useMDXComponents:_provideComponents}=arguments[0];function _createMdxContent(props){const _components={a:`a`,code:`code`,li:`li`,p:`p`,strong:`strong`,tbody:`tbody`,td:`td`,th:`th`,thead:`thead`,tr:`tr`,ul:`ul`,..._provideComponents(),...props.components},{Frame,Heading,Info,OptimizedImage,Step,Steps,Table,Warning}=_components;if(!Frame)_missingMdxReference(`Frame`,true);if(!Heading)_missingMdxReference(`Heading`,true);if(!Info)_missingMdxReference(`Info`,true);if(!OptimizedImage)_missingMdxReference(`OptimizedImage`,true);if(!Step)_missingMdxReference(`Step`,true);if(!Steps)_missingMdxReference(`Steps`,true);if(!Table)_missingMdxReference(`Table`,true);if(!Warning)_missingMdxReference(`Warning`,true);return _jsxs(_Fragment,{children:[_jsx(_components.p,{children:`You publish templates from the editor, and manage them on their page in the gallery or in the admin panel.`}),`\n`,_jsx(Info,{children:_jsxs(_components.p,{children:[`To turn the gallery on, choose its categories or let a user who is not an administrator publish, see `,_jsx(_components.a,{href:`/on-premises/configuration/overleaf-toolkit/templates`,children:`Templates`}),`.`]})}),`\n`,_jsx(Heading,{level:`2`,id:`publish-a-project`,children:`Publish a project`}),`\n`,_jsxs(Steps,{children:[_jsxs(Step,{title:`Compile the project`,children:[_jsxs(_components.p,{children:[`Open the project and click `,_jsx(_components.strong,{children:`Recompile`}),`. The PDF you see is the one the gallery will show.`]}),_jsxs(_components.p,{children:[`While the editor has no PDF, for example when you open a project that does not compile, `,_jsx(_components.strong,{children:`Manage Template`}),` is greyed out.`]}),_jsx(Frame,{caption:`No PDF yet, so nothing to publish`,children:_jsx(OptimizedImage,{src:`https://mintcdn.com/ayakaleaf-pro/PeD9iteXIf8j4GXw/images/on-premises/templates-admin-no-pdf.png?fit=max\u0026auto=format\u0026n=PeD9iteXIf8j4GXw\u0026q=85\u0026s=4936daf821ae290a1fdbd4bd554b8b57`,alt:`The File menu with Manage Template greyed out, next to the No PDF message`,\"data-og-width\":`1440`,width:`1440`,\"data-og-height\":`400`,height:`400`,\"data-path\":`images/on-premises/templates-admin-no-pdf.png`,\"data-optimize\":`true`,\"data-opv\":`3`,srcset:`https://mintcdn.com/ayakaleaf-pro/PeD9iteXIf8j4GXw/images/on-premises/templates-admin-no-pdf.png?w=280\u0026fit=max\u0026auto=format\u0026n=PeD9iteXIf8j4GXw\u0026q=85\u0026s=eeaab1ee4edc5cd7be50cde425199a26 280w, https://mintcdn.com/ayakaleaf-pro/PeD9iteXIf8j4GXw/images/on-premises/templates-admin-no-pdf.png?w=560\u0026fit=max\u0026auto=format\u0026n=PeD9iteXIf8j4GXw\u0026q=85\u0026s=8ff2316377936dac67f819861243e3cb 560w, https://mintcdn.com/ayakaleaf-pro/PeD9iteXIf8j4GXw/images/on-premises/templates-admin-no-pdf.png?w=840\u0026fit=max\u0026auto=format\u0026n=PeD9iteXIf8j4GXw\u0026q=85\u0026s=51c11da9e75a685a2bee5cad5c2709ca 840w, https://mintcdn.com/ayakaleaf-pro/PeD9iteXIf8j4GXw/images/on-premises/templates-admin-no-pdf.png?w=1100\u0026fit=max\u0026auto=format\u0026n=PeD9iteXIf8j4GXw\u0026q=85\u0026s=6a820683d8154cd94d0e04a5bf269bcf 1100w, https://mintcdn.com/ayakaleaf-pro/PeD9iteXIf8j4GXw/images/on-premises/templates-admin-no-pdf.png?w=1650\u0026fit=max\u0026auto=format\u0026n=PeD9iteXIf8j4GXw\u0026q=85\u0026s=0117f250c805dae04bca4f1950104479 1650w, https://mintcdn.com/ayakaleaf-pro/PeD9iteXIf8j4GXw/images/on-premises/templates-admin-no-pdf.png?w=2500\u0026fit=max\u0026auto=format\u0026n=PeD9iteXIf8j4GXw\u0026q=85\u0026s=44f92567856f9360298983066fac37e7 2500w`})}),_jsx(Warning,{children:_jsx(_components.p,{children:`Publishing saves the files as they are now, and the PDF of the last successful compile. If you edited the project after that compile, or the last compile failed, the gallery shows an old PDF next to newer files, which may not compile. Recompile until the PDF is right, then publish.`})})]}),_jsxs(Step,{title:`Open the form`,children:[_jsxs(_components.p,{children:[`In the top menu of the editor, click `,_jsx(_components.strong,{children:`File`}),`, then `,_jsx(_components.strong,{children:`Manage Template`}),`.`]}),_jsx(Frame,{caption:`The File menu`,children:_jsx(OptimizedImage,{src:`https://mintcdn.com/ayakaleaf-pro/PeD9iteXIf8j4GXw/images/on-premises/templates-admin-file-menu.png?fit=max\u0026auto=format\u0026n=PeD9iteXIf8j4GXw\u0026q=85\u0026s=d0dbe9ae74e4aa062ad0648bdff1d8d0`,alt:`The File menu with Manage Template`,\"data-og-width\":`480`,width:`480`,\"data-og-height\":`400`,height:`400`,\"data-path\":`images/on-premises/templates-admin-file-menu.png`,\"data-optimize\":`true`,\"data-opv\":`3`,srcset:`https://mintcdn.com/ayakaleaf-pro/PeD9iteXIf8j4GXw/images/on-premises/templates-admin-file-menu.png?w=280\u0026fit=max\u0026auto=format\u0026n=PeD9iteXIf8j4GXw\u0026q=85\u0026s=a07e27ccb5295d926bc8340110b218b6 280w, https://mintcdn.com/ayakaleaf-pro/PeD9iteXIf8j4GXw/images/on-premises/templates-admin-file-menu.png?w=560\u0026fit=max\u0026auto=format\u0026n=PeD9iteXIf8j4GXw\u0026q=85\u0026s=040013828fe44ed025b7b359d214e0e9 560w, https://mintcdn.com/ayakaleaf-pro/PeD9iteXIf8j4GXw/images/on-premises/templates-admin-file-menu.png?w=840\u0026fit=max\u0026auto=format\u0026n=PeD9iteXIf8j4GXw\u0026q=85\u0026s=0328062f7962d832abb3aa9aa7a726cb 840w, https://mintcdn.com/ayakaleaf-pro/PeD9iteXIf8j4GXw/images/on-premises/templates-admin-file-menu.png?w=1100\u0026fit=max\u0026auto=format\u0026n=PeD9iteXIf8j4GXw\u0026q=85\u0026s=89dfc540db9e9dfe14d31485262dfc28 1100w, https://mintcdn.com/ayakaleaf-pro/PeD9iteXIf8j4GXw/images/on-premises/templates-admin-file-menu.png?w=1650\u0026fit=max\u0026auto=format\u0026n=PeD9iteXIf8j4GXw\u0026q=85\u0026s=a733815504d75606036bfd81c0310765 1650w, https://mintcdn.com/ayakaleaf-pro/PeD9iteXIf8j4GXw/images/on-premises/templates-admin-file-menu.png?w=2500\u0026fit=max\u0026auto=format\u0026n=PeD9iteXIf8j4GXw\u0026q=85\u0026s=c1b06bc62e07d3d05661d7b6af7983d4 2500w`})})]}),_jsxs(Step,{title:`Fill in the form`,children:[_jsx(Frame,{caption:`The Manage Template dialog`,children:_jsx(OptimizedImage,{src:`https://mintcdn.com/ayakaleaf-pro/PeD9iteXIf8j4GXw/images/on-premises/templates-admin-publish-form.png?fit=max\u0026auto=format\u0026n=PeD9iteXIf8j4GXw\u0026q=85\u0026s=6588cacfcde7488276b15ea6533736b6`,alt:`The Manage Template dialog filled in, with a Markdown link as the author and Markdown in the description`,\"data-og-width\":`960`,width:`960`,\"data-og-height\":`603`,height:`603`,\"data-path\":`images/on-premises/templates-admin-publish-form.png`,\"data-optimize\":`true`,\"data-opv\":`3`,srcset:`https://mintcdn.com/ayakaleaf-pro/PeD9iteXIf8j4GXw/images/on-premises/templates-admin-publish-form.png?w=280\u0026fit=max\u0026auto=format\u0026n=PeD9iteXIf8j4GXw\u0026q=85\u0026s=8c6968413255819091e6034ed8bd4420 280w, https://mintcdn.com/ayakaleaf-pro/PeD9iteXIf8j4GXw/images/on-premises/templates-admin-publish-form.png?w=560\u0026fit=max\u0026auto=format\u0026n=PeD9iteXIf8j4GXw\u0026q=85\u0026s=c135f59a01810af23845defe6a98249f 560w, https://mintcdn.com/ayakaleaf-pro/PeD9iteXIf8j4GXw/images/on-premises/templates-admin-publish-form.png?w=840\u0026fit=max\u0026auto=format\u0026n=PeD9iteXIf8j4GXw\u0026q=85\u0026s=7c013cd11185a2c217dee7f0dab33938 840w, https://mintcdn.com/ayakaleaf-pro/PeD9iteXIf8j4GXw/images/on-premises/templates-admin-publish-form.png?w=1100\u0026fit=max\u0026auto=format\u0026n=PeD9iteXIf8j4GXw\u0026q=85\u0026s=5677c2ed9ba2a8788efb113eb9aaf9b4 1100w, https://mintcdn.com/ayakaleaf-pro/PeD9iteXIf8j4GXw/images/on-premises/templates-admin-publish-form.png?w=1650\u0026fit=max\u0026auto=format\u0026n=PeD9iteXIf8j4GXw\u0026q=85\u0026s=a5c3e6b20877612587a09b56ec6fcc4b 1650w, https://mintcdn.com/ayakaleaf-pro/PeD9iteXIf8j4GXw/images/on-premises/templates-admin-publish-form.png?w=2500\u0026fit=max\u0026auto=format\u0026n=PeD9iteXIf8j4GXw\u0026q=85\u0026s=f3951432d782f062b96d88fca2fc342e 2500w`})}),_jsxs(Table,{children:[_jsx(_components.thead,{children:_jsxs(_components.tr,{children:[_jsx(_components.th,{children:`Field`}),_jsx(_components.th,{children:`Notes`})]})}),_jsxs(_components.tbody,{children:[_jsxs(_components.tr,{children:[_jsx(_components.td,{children:_jsx(_components.strong,{children:`Title`})}),_jsx(_components.td,{children:`Starts as the project’s name. Must be unique in the gallery. At most 150 characters.`})]}),_jsxs(_components.tr,{children:[_jsx(_components.td,{children:_jsx(_components.strong,{children:`Author`})}),_jsxs(_components.td,{children:[`Starts as your name. A Markdown link such as `,_jsx(_components.code,{children:`[Demo Author](https://example.com)`}),` becomes a link on the template page.`]})]}),_jsxs(_components.tr,{children:[_jsx(_components.td,{children:_jsx(_components.strong,{children:`Categories`})}),_jsxs(_components.td,{children:[`One category, see `,_jsx(_components.a,{href:`/on-premises/user-guide/administrators/template-management#categories`,children:`Categories`}),`.`]})]}),_jsxs(_components.tr,{children:[_jsx(_components.td,{children:_jsx(_components.strong,{children:`Description`})}),_jsxs(_components.td,{children:[`Supports Markdown. At most 4096 characters. The template page shows it as `,_jsx(_components.strong,{children:`Abstract`}),`, and the gallery shows the start of it as plain text.`]})]}),_jsxs(_components.tr,{children:[_jsx(_components.td,{children:_jsx(_components.strong,{children:`License`})}),_jsxs(_components.td,{children:[_jsx(_components.strong,{children:`Creative Commons CC BY 4.0`}),`, `,_jsx(_components.strong,{children:`LaTeX Project Public License 1.3c`}),` or `,_jsx(`strong`,{children:`Other (as stated in the work)`}),`.`]})]})]})]}),_jsx(_components.p,{children:`The compiler and the main document of the project go with the template, so set them in the project first. Projects opened from the template use the same ones.`})]}),_jsxs(Step,{title:`Click Publish`,children:[_jsx(_components.p,{children:`The template page opens.`}),_jsx(Frame,{caption:`The new template`,children:_jsx(OptimizedImage,{src:`https://mintcdn.com/ayakaleaf-pro/PeD9iteXIf8j4GXw/images/on-premises/templates-admin-template-page.png?fit=max\u0026auto=format\u0026n=PeD9iteXIf8j4GXw\u0026q=85\u0026s=5cd9fa2ac828a55f2b63737d55ff35e8`,alt:`The template page with Open as Template, View PDF and download buttons, the details, and Admin: Source Project, Edit and Delete`,\"data-og-width\":`1440`,width:`1440`,\"data-og-height\":`860`,height:`860`,\"data-path\":`images/on-premises/templates-admin-template-page.png`,\"data-optimize\":`true`,\"data-opv\":`3`,srcset:`https://mintcdn.com/ayakaleaf-pro/PeD9iteXIf8j4GXw/images/on-premises/templates-admin-template-page.png?w=280\u0026fit=max\u0026auto=format\u0026n=PeD9iteXIf8j4GXw\u0026q=85\u0026s=ee3ed4c693e09a0d2414f360e166580d 280w, https://mintcdn.com/ayakaleaf-pro/PeD9iteXIf8j4GXw/images/on-premises/templates-admin-template-page.png?w=560\u0026fit=max\u0026auto=format\u0026n=PeD9iteXIf8j4GXw\u0026q=85\u0026s=2dd06b29772dccfa2d4d1386d4a2c708 560w, https://mintcdn.com/ayakaleaf-pro/PeD9iteXIf8j4GXw/images/on-premises/templates-admin-template-page.png?w=840\u0026fit=max\u0026auto=format\u0026n=PeD9iteXIf8j4GXw\u0026q=85\u0026s=d4775940318e47dd999199c1febcb3cb 840w, https://mintcdn.com/ayakaleaf-pro/PeD9iteXIf8j4GXw/images/on-premises/templates-admin-template-page.png?w=1100\u0026fit=max\u0026auto=format\u0026n=PeD9iteXIf8j4GXw\u0026q=85\u0026s=d8cb09199944196e0bd1d5fbf3118bdf 1100w, https://mintcdn.com/ayakaleaf-pro/PeD9iteXIf8j4GXw/images/on-premises/templates-admin-template-page.png?w=1650\u0026fit=max\u0026auto=format\u0026n=PeD9iteXIf8j4GXw\u0026q=85\u0026s=a8c574285ac99526fce9dcf9e2a69677 1650w, https://mintcdn.com/ayakaleaf-pro/PeD9iteXIf8j4GXw/images/on-premises/templates-admin-template-page.png?w=2500\u0026fit=max\u0026auto=format\u0026n=PeD9iteXIf8j4GXw\u0026q=85\u0026s=6cf6c0f063d60a940fbf1d0ec590c850 2500w`})}),_jsxs(_components.p,{children:[_jsx(_components.strong,{children:`Admin: Source Project`}),`, `,_jsx(_components.strong,{children:`Edit`}),` and `,_jsx(_components.strong,{children:`Delete`}),` are for you. Other users see only `,_jsx(_components.strong,{children:`Open as Template`}),`, `,_jsx(_components.strong,{children:`View PDF`}),` and the download button.`]})]}),_jsx(Step,{title:`Check the gallery`,children:_jsxs(_components.p,{children:[`Click `,_jsx(_components.strong,{children:`Templates`}),` at the top right. The new template is first in the list.`]})})]}),`\n`,_jsx(Heading,{level:`2`,id:`categories`,children:`Categories`}),`\n`,_jsxs(_components.p,{children:[`A template is in one category. The names and descriptions come from your `,_jsx(_components.a,{href:`/on-premises/configuration/overleaf-toolkit/templates#configuration`,children:`configuration`}),` and cannot be changed in the site.`]}),`\n`,_jsx(_components.p,{children:`You see them in these places:`}),`\n`,_jsxs(_components.ul,{children:[`\n`,_jsxs(_components.li,{children:[_jsx(_components.strong,{children:`Categories`}),` in the form.`]}),`\n`,_jsxs(_components.li,{children:[`The cards at the top of the gallery page, `,_jsx(_components.code,{children:`/templates`}),`. Click `,_jsx(_components.strong,{children:`Template Gallery`}),` on the `,_jsx(_components.strong,{children:`All templates`}),` page to get there.`]}),`\n`,_jsxs(_components.li,{children:[`A page for each category, for example `,_jsx(_components.code,{children:`/templates/presentation`}),`. A category without templates shows `,_jsx(`strong`,{children:`No Templates.`})]}),`\n`,_jsxs(_components.li,{children:[_jsx(_components.strong,{children:`New project`}),`, then `,_jsx(_components.strong,{children:`More templates`}),`, on the projects page.`]}),`\n`,_jsx(_components.li,{children:`The link above the title on the template page.`}),`\n`]}),`\n`,_jsx(Frame,{caption:`Categories on the gallery page`,children:_jsx(OptimizedImage,{src:`https://mintcdn.com/ayakaleaf-pro/PeD9iteXIf8j4GXw/images/on-premises/templates-admin-categories.png?fit=max\u0026auto=format\u0026n=PeD9iteXIf8j4GXw\u0026q=85\u0026s=c3ca7290d56846fcd3b6168d74f31589`,alt:`The gallery page with the cards Journal articles, Books and Presentations`,\"data-og-width\":`1440`,width:`1440`,\"data-og-height\":`770`,height:`770`,\"data-path\":`images/on-premises/templates-admin-categories.png`,\"data-optimize\":`true`,\"data-opv\":`3`,srcset:`https://mintcdn.com/ayakaleaf-pro/PeD9iteXIf8j4GXw/images/on-premises/templates-admin-categories.png?w=280\u0026fit=max\u0026auto=format\u0026n=PeD9iteXIf8j4GXw\u0026q=85\u0026s=0b1a330c0e582c9b0be86533b72983b5 280w, https://mintcdn.com/ayakaleaf-pro/PeD9iteXIf8j4GXw/images/on-premises/templates-admin-categories.png?w=560\u0026fit=max\u0026auto=format\u0026n=PeD9iteXIf8j4GXw\u0026q=85\u0026s=845fa00fd71d7a5dc337201f7a3d1a3a 560w, https://mintcdn.com/ayakaleaf-pro/PeD9iteXIf8j4GXw/images/on-premises/templates-admin-categories.png?w=840\u0026fit=max\u0026auto=format\u0026n=PeD9iteXIf8j4GXw\u0026q=85\u0026s=afd75d7df6bf918efc8d9e024fc604d5 840w, https://mintcdn.com/ayakaleaf-pro/PeD9iteXIf8j4GXw/images/on-premises/templates-admin-categories.png?w=1100\u0026fit=max\u0026auto=format\u0026n=PeD9iteXIf8j4GXw\u0026q=85\u0026s=d1a544bd0b38b731cfd429fc47a131c2 1100w, https://mintcdn.com/ayakaleaf-pro/PeD9iteXIf8j4GXw/images/on-premises/templates-admin-categories.png?w=1650\u0026fit=max\u0026auto=format\u0026n=PeD9iteXIf8j4GXw\u0026q=85\u0026s=62a0429167ef15f9e0e365065da0105d 1650w, https://mintcdn.com/ayakaleaf-pro/PeD9iteXIf8j4GXw/images/on-premises/templates-admin-categories.png?w=2500\u0026fit=max\u0026auto=format\u0026n=PeD9iteXIf8j4GXw\u0026q=85\u0026s=7704e2084d03f3a09abd2764f80c80ac 2500w`})}),`\n`,_jsxs(_components.p,{children:[_jsx(_components.strong,{children:`All templates`}),` in the form means no category of its own: the template is only in the full list.`]}),`\n`,_jsx(Heading,{level:`2`,id:`update-a-template`,children:`Update a template`}),`\n`,_jsx(_components.p,{children:`To change the files and the PDF, publish the project again under the same title.`}),`\n`,_jsxs(Steps,{children:[_jsx(Step,{title:`Change the project`,children:_jsxs(_components.p,{children:[`Edit the project and click `,_jsx(_components.strong,{children:`Recompile`}),`.`]})}),_jsxs(Step,{title:`Publish again`,children:[_jsxs(_components.p,{children:[`Click `,_jsx(_components.strong,{children:`File`}),`, then `,_jsx(_components.strong,{children:`Manage Template`}),`. The form shows the details of the template, which you can change. Click `,_jsx(_components.strong,{children:`Publish`}),`.`]}),_jsxs(_components.p,{children:[`A message says that the title already exists, and the button becomes `,_jsx(_components.strong,{children:`Overwrite`}),`.`]}),_jsx(Frame,{caption:`Publishing under the same title`,children:_jsx(OptimizedImage,{src:`https://mintcdn.com/ayakaleaf-pro/PeD9iteXIf8j4GXw/images/on-premises/templates-admin-overwrite.png?fit=max\u0026auto=format\u0026n=PeD9iteXIf8j4GXw\u0026q=85\u0026s=ad215f871bfb5b4940297b6569ef4c4b`,alt:`The Manage Template dialog with the message A template with this title already exists and an Overwrite button`,\"data-og-width\":`960`,width:`960`,\"data-og-height\":`661`,height:`661`,\"data-path\":`images/on-premises/templates-admin-overwrite.png`,\"data-optimize\":`true`,\"data-opv\":`3`,srcset:`https://mintcdn.com/ayakaleaf-pro/PeD9iteXIf8j4GXw/images/on-premises/templates-admin-overwrite.png?w=280\u0026fit=max\u0026auto=format\u0026n=PeD9iteXIf8j4GXw\u0026q=85\u0026s=e490cb52fa04fd51b532ef7958037d21 280w, https://mintcdn.com/ayakaleaf-pro/PeD9iteXIf8j4GXw/images/on-premises/templates-admin-overwrite.png?w=560\u0026fit=max\u0026auto=format\u0026n=PeD9iteXIf8j4GXw\u0026q=85\u0026s=9470c0faf97ae9416aa95e3d03715549 560w, https://mintcdn.com/ayakaleaf-pro/PeD9iteXIf8j4GXw/images/on-premises/templates-admin-overwrite.png?w=840\u0026fit=max\u0026auto=format\u0026n=PeD9iteXIf8j4GXw\u0026q=85\u0026s=79ed287c373aaa300d65daab84e1defd 840w, https://mintcdn.com/ayakaleaf-pro/PeD9iteXIf8j4GXw/images/on-premises/templates-admin-overwrite.png?w=1100\u0026fit=max\u0026auto=format\u0026n=PeD9iteXIf8j4GXw\u0026q=85\u0026s=078f78e4e0f5e4c412bded127970c819 1100w, https://mintcdn.com/ayakaleaf-pro/PeD9iteXIf8j4GXw/images/on-premises/templates-admin-overwrite.png?w=1650\u0026fit=max\u0026auto=format\u0026n=PeD9iteXIf8j4GXw\u0026q=85\u0026s=6f0613d6fe837218fb47f55537d1ce0b 1650w, https://mintcdn.com/ayakaleaf-pro/PeD9iteXIf8j4GXw/images/on-premises/templates-admin-overwrite.png?w=2500\u0026fit=max\u0026auto=format\u0026n=PeD9iteXIf8j4GXw\u0026q=85\u0026s=45060ca16544b3a57561addff83b0116 2500w`})}),_jsxs(_components.p,{children:[`If you change `,_jsx(_components.strong,{children:`Title`}),` now, the message goes away and `,_jsx(_components.strong,{children:`Publish`}),` creates a new template.`]})]}),_jsxs(Step,{title:`Click Overwrite`,children:[_jsx(_components.p,{children:`The same template page opens, with the new PDF.`}),_jsx(Frame,{caption:`The updated template`,children:_jsx(OptimizedImage,{src:`https://mintcdn.com/ayakaleaf-pro/PeD9iteXIf8j4GXw/images/on-premises/templates-admin-overwritten.png?fit=max\u0026auto=format\u0026n=PeD9iteXIf8j4GXw\u0026q=85\u0026s=7d862a0455bef693f5945b2027e1d6dd`,alt:`The template page whose preview now shows the new title of the document`,\"data-og-width\":`1440`,width:`1440`,\"data-og-height\":`570`,height:`570`,\"data-path\":`images/on-premises/templates-admin-overwritten.png`,\"data-optimize\":`true`,\"data-opv\":`3`,srcset:`https://mintcdn.com/ayakaleaf-pro/PeD9iteXIf8j4GXw/images/on-premises/templates-admin-overwritten.png?w=280\u0026fit=max\u0026auto=format\u0026n=PeD9iteXIf8j4GXw\u0026q=85\u0026s=2efe7129c6a0a4416ce698d7c07480c5 280w, https://mintcdn.com/ayakaleaf-pro/PeD9iteXIf8j4GXw/images/on-premises/templates-admin-overwritten.png?w=560\u0026fit=max\u0026auto=format\u0026n=PeD9iteXIf8j4GXw\u0026q=85\u0026s=d55ab2289fa827927b810edd413bb4ac 560w, https://mintcdn.com/ayakaleaf-pro/PeD9iteXIf8j4GXw/images/on-premises/templates-admin-overwritten.png?w=840\u0026fit=max\u0026auto=format\u0026n=PeD9iteXIf8j4GXw\u0026q=85\u0026s=a448d05c2afd75f3638e52a4d920744d 840w, https://mintcdn.com/ayakaleaf-pro/PeD9iteXIf8j4GXw/images/on-premises/templates-admin-overwritten.png?w=1100\u0026fit=max\u0026auto=format\u0026n=PeD9iteXIf8j4GXw\u0026q=85\u0026s=504d48912ac3c1cfc1a36988e38f192d 1100w, https://mintcdn.com/ayakaleaf-pro/PeD9iteXIf8j4GXw/images/on-premises/templates-admin-overwritten.png?w=1650\u0026fit=max\u0026auto=format\u0026n=PeD9iteXIf8j4GXw\u0026q=85\u0026s=4d586a6e8d5ad7de05fa047a89aae4c9 1650w, https://mintcdn.com/ayakaleaf-pro/PeD9iteXIf8j4GXw/images/on-premises/templates-admin-overwritten.png?w=2500\u0026fit=max\u0026auto=format\u0026n=PeD9iteXIf8j4GXw\u0026q=85\u0026s=13dd43fd6da723390804616100a429ed 2500w`})}),_jsx(_components.p,{children:`Projects that users already opened from the template do not change.`})]})]}),`\n`,_jsx(Warning,{children:_jsxs(_components.p,{children:[`The form finds the template by the project’s name. If you renamed the template with `,_jsx(_components.strong,{children:`Edit`}),`, the form opens with the project’s name, your name, the first category and an empty description, and typing the template’s title does not bring its details back. `,_jsx(_components.strong,{children:`Overwrite`}),` then replaces the details with what is in the form, so fill them in again first.`]})}),`\n`,_jsx(Heading,{level:`2`,id:`edit-the-details`,children:`Edit the details`}),`\n`,_jsx(_components.p,{children:`This changes what the gallery shows about a template, not its files or PDF.`}),`\n`,_jsxs(Steps,{children:[_jsx(Step,{title:`Open the template`,children:_jsxs(_components.p,{children:[`Click `,_jsx(_components.strong,{children:`Templates`}),` at the top right, click the template, then click `,_jsx(_components.strong,{children:`Edit`}),`.`]})}),_jsxs(Step,{title:`Change the fields`,children:[_jsxs(_components.p,{children:[`The fields are the same as when publishing, with one more: `,_jsx(_components.strong,{children:`Language`}),` is the spell check language of projects opened from the template. For a project published with the default language it shows `,_jsx(_components.strong,{children:`Off`}),`, and projects opened from it use `,_jsx(`strong`,{children:`English (American)`}),`.`]}),_jsx(Frame,{caption:`The Edit template dialog`,children:_jsx(OptimizedImage,{src:`https://mintcdn.com/ayakaleaf-pro/PeD9iteXIf8j4GXw/images/on-premises/templates-admin-edit.png?fit=max\u0026auto=format\u0026n=PeD9iteXIf8j4GXw\u0026q=85\u0026s=c8909cecc8735f0e98a08df2b6d44ad9`,alt:`The Edit template dialog with Title, Author, Categories, Description, License and Language`,\"data-og-width\":`960`,width:`960`,\"data-og-height\":`657`,height:`657`,\"data-path\":`images/on-premises/templates-admin-edit.png`,\"data-optimize\":`true`,\"data-opv\":`3`,srcset:`https://mintcdn.com/ayakaleaf-pro/PeD9iteXIf8j4GXw/images/on-premises/templates-admin-edit.png?w=280\u0026fit=max\u0026auto=format\u0026n=PeD9iteXIf8j4GXw\u0026q=85\u0026s=a73d8b589be0f7e6d075493e86e5dec3 280w, https://mintcdn.com/ayakaleaf-pro/PeD9iteXIf8j4GXw/images/on-premises/templates-admin-edit.png?w=560\u0026fit=max\u0026auto=format\u0026n=PeD9iteXIf8j4GXw\u0026q=85\u0026s=9d0b90c11311cd9935a86d9f42451264 560w, https://mintcdn.com/ayakaleaf-pro/PeD9iteXIf8j4GXw/images/on-premises/templates-admin-edit.png?w=840\u0026fit=max\u0026auto=format\u0026n=PeD9iteXIf8j4GXw\u0026q=85\u0026s=1a5ae0a61c53529e361c4c1e7bf2a146 840w, https://mintcdn.com/ayakaleaf-pro/PeD9iteXIf8j4GXw/images/on-premises/templates-admin-edit.png?w=1100\u0026fit=max\u0026auto=format\u0026n=PeD9iteXIf8j4GXw\u0026q=85\u0026s=4e4bcd7bbf6764ebce9d35f994f94da4 1100w, https://mintcdn.com/ayakaleaf-pro/PeD9iteXIf8j4GXw/images/on-premises/templates-admin-edit.png?w=1650\u0026fit=max\u0026auto=format\u0026n=PeD9iteXIf8j4GXw\u0026q=85\u0026s=f6aca2e8268aa18e2a04dd2deff755a5 1650w, https://mintcdn.com/ayakaleaf-pro/PeD9iteXIf8j4GXw/images/on-premises/templates-admin-edit.png?w=2500\u0026fit=max\u0026auto=format\u0026n=PeD9iteXIf8j4GXw\u0026q=85\u0026s=3e9d5a9731dc71066502a36f102d5988 2500w`})}),_jsxs(_components.p,{children:[`A title that another template has is refused: `,_jsx(_components.strong,{children:`Save`}),` stays greyed out until you change `,_jsx(_components.strong,{children:`Title`}),`.`]})]}),_jsx(Step,{title:`Click Save`,children:_jsx(_components.p,{children:`The dialog closes and the template page shows the new details.`})})]}),`\n`,_jsx(Heading,{level:`2`,id:`the-source-project`,children:`The source project`}),`\n`,_jsxs(_components.p,{children:[_jsx(_components.strong,{children:`Admin: Source Project`}),` opens the project the template was published from.`]}),`\n`,_jsxs(_components.p,{children:[`The template keeps its own copy of the files. If you delete the project forever, the button disappears, and users can still open the template. A project that is only in `,_jsx(_components.strong,{children:`Trash`}),` keeps the button. See also the Q\u0026A under `,_jsx(_components.a,{href:`/on-premises/configuration/overleaf-toolkit/templates`,children:`Templates`}),`.`]}),`\n`,_jsx(Heading,{level:`2`,id:`delete-a-template`,children:`Delete a template`}),`\n`,_jsxs(Steps,{children:[_jsxs(Step,{title:`Click Delete`,children:[_jsxs(_components.p,{children:[`On the template page, click `,_jsx(_components.strong,{children:`Delete`}),`. The dialog names the template.`]}),_jsx(Frame,{caption:`The Delete template dialog`,children:_jsx(OptimizedImage,{src:`https://mintcdn.com/ayakaleaf-pro/PeD9iteXIf8j4GXw/images/on-premises/templates-admin-delete.png?fit=max\u0026auto=format\u0026n=PeD9iteXIf8j4GXw\u0026q=85\u0026s=105ea36d23b90f08cda2f5c8831d6c2d`,alt:`The Delete template dialog with a Confirm button`,\"data-og-width\":`640`,width:`640`,\"data-og-height\":`303`,height:`303`,\"data-path\":`images/on-premises/templates-admin-delete.png`,\"data-optimize\":`true`,\"data-opv\":`3`,srcset:`https://mintcdn.com/ayakaleaf-pro/PeD9iteXIf8j4GXw/images/on-premises/templates-admin-delete.png?w=280\u0026fit=max\u0026auto=format\u0026n=PeD9iteXIf8j4GXw\u0026q=85\u0026s=595ba56740cd055be0992e68af70a7f7 280w, https://mintcdn.com/ayakaleaf-pro/PeD9iteXIf8j4GXw/images/on-premises/templates-admin-delete.png?w=560\u0026fit=max\u0026auto=format\u0026n=PeD9iteXIf8j4GXw\u0026q=85\u0026s=4d4467938b40b6ba1ceb71cf11cd3b6c 560w, https://mintcdn.com/ayakaleaf-pro/PeD9iteXIf8j4GXw/images/on-premises/templates-admin-delete.png?w=840\u0026fit=max\u0026auto=format\u0026n=PeD9iteXIf8j4GXw\u0026q=85\u0026s=a853ed72d46b57d3b7c2f8fac25ae7b6 840w, https://mintcdn.com/ayakaleaf-pro/PeD9iteXIf8j4GXw/images/on-premises/templates-admin-delete.png?w=1100\u0026fit=max\u0026auto=format\u0026n=PeD9iteXIf8j4GXw\u0026q=85\u0026s=c63f74d267ea5c1c618b16ca54b10771 1100w, https://mintcdn.com/ayakaleaf-pro/PeD9iteXIf8j4GXw/images/on-premises/templates-admin-delete.png?w=1650\u0026fit=max\u0026auto=format\u0026n=PeD9iteXIf8j4GXw\u0026q=85\u0026s=d081073fa59f21d6fb53efe7f309252c 1650w, https://mintcdn.com/ayakaleaf-pro/PeD9iteXIf8j4GXw/images/on-premises/templates-admin-delete.png?w=2500\u0026fit=max\u0026auto=format\u0026n=PeD9iteXIf8j4GXw\u0026q=85\u0026s=62838285ca375296c2ffe8c4f09e009c 2500w`})})]}),_jsxs(Step,{title:`Click Confirm`,children:[_jsxs(_components.p,{children:[`You are back on the page you came from, and the template is no longer in the gallery. Its link now shows `,_jsx(_components.strong,{children:`Not found`}),`.`]}),_jsx(_components.p,{children:`The source project stays, and so do the projects that users opened from the template.`})]})]}),`\n`,_jsx(Heading,{level:`2`,id:`manage-templates-in-the-admin-panel`,children:`Manage templates in the admin panel`}),`\n`,_jsxs(_components.p,{children:[`Click `,_jsx(_components.strong,{children:`Admin`}),`, then `,_jsx(_components.strong,{children:`Project/Object Lookup`}),`, then the `,_jsx(_components.strong,{children:`Templates`}),` tab. It lists every template with its author and owner, and you can search it.`]}),`\n`,_jsx(Frame,{caption:`All templates in the admin panel`,children:_jsx(OptimizedImage,{src:`https://mintcdn.com/ayakaleaf-pro/PeD9iteXIf8j4GXw/images/on-premises/templates-admin-panel-tab.png?fit=max\u0026auto=format\u0026n=PeD9iteXIf8j4GXw\u0026q=85\u0026s=141883e946dda193d3a1b5534602b18e`,alt:`The Templates tab of the admin panel with the title, author, owner and last modified date of each template`,\"data-og-width\":`1120`,width:`1120`,\"data-og-height\":`420`,height:`420`,\"data-path\":`images/on-premises/templates-admin-panel-tab.png`,\"data-optimize\":`true`,\"data-opv\":`3`,srcset:`https://mintcdn.com/ayakaleaf-pro/PeD9iteXIf8j4GXw/images/on-premises/templates-admin-panel-tab.png?w=280\u0026fit=max\u0026auto=format\u0026n=PeD9iteXIf8j4GXw\u0026q=85\u0026s=f1f4a0656a91ff5a246ec405284a3880 280w, https://mintcdn.com/ayakaleaf-pro/PeD9iteXIf8j4GXw/images/on-premises/templates-admin-panel-tab.png?w=560\u0026fit=max\u0026auto=format\u0026n=PeD9iteXIf8j4GXw\u0026q=85\u0026s=6eea10c9843a8ce2b96709c5431c5609 560w, https://mintcdn.com/ayakaleaf-pro/PeD9iteXIf8j4GXw/images/on-premises/templates-admin-panel-tab.png?w=840\u0026fit=max\u0026auto=format\u0026n=PeD9iteXIf8j4GXw\u0026q=85\u0026s=da372e362a7a05c9a7c95fc9bc310b15 840w, https://mintcdn.com/ayakaleaf-pro/PeD9iteXIf8j4GXw/images/on-premises/templates-admin-panel-tab.png?w=1100\u0026fit=max\u0026auto=format\u0026n=PeD9iteXIf8j4GXw\u0026q=85\u0026s=7a027757949091477a7280014ee09297 1100w, https://mintcdn.com/ayakaleaf-pro/PeD9iteXIf8j4GXw/images/on-premises/templates-admin-panel-tab.png?w=1650\u0026fit=max\u0026auto=format\u0026n=PeD9iteXIf8j4GXw\u0026q=85\u0026s=30ff2e9cc859a367afaf5b266710cf67 1650w, https://mintcdn.com/ayakaleaf-pro/PeD9iteXIf8j4GXw/images/on-premises/templates-admin-panel-tab.png?w=2500\u0026fit=max\u0026auto=format\u0026n=PeD9iteXIf8j4GXw\u0026q=85\u0026s=a87f1510b405d205a8d288a935937bb2 2500w`})}),`\n`,_jsxs(_components.ul,{children:[`\n`,_jsx(_components.li,{children:`Click a title to open the template page, or the open icon to open it in a new tab.`}),`\n`,_jsx(_components.li,{children:`Click an owner to open that user’s page.`}),`\n`,_jsxs(_components.li,{children:[`Click the bin icon, then `,_jsx(_components.strong,{children:`Delete`}),`, to delete a template. The dialog warns that this cannot be undone, and the template leaves the gallery.`]}),`\n`]}),`\n`,_jsx(Heading,{level:`2`,id:`if-publishing-is-refused`,children:`If publishing is refused`}),`\n`,_jsxs(_components.p,{children:[`The form lets you type more than the site accepts. A `,_jsx(_components.strong,{children:`Title`}),` over 150 characters shows `,_jsx(_components.code,{children:`Template title exceeds the maximum length of 150 characters.`}),`, and a `,_jsx(_components.strong,{children:`Description`}),` over 4096 characters shows `,_jsx(_components.code,{children:`Template description exceeds the maximum length of 4096 characters.`})]}),`\n`,_jsxs(_components.p,{children:[_jsx(_components.strong,{children:`Publish`}),` then stays greyed out even when you shorten the text. Click `,_jsx(_components.strong,{children:`Cancel`}),`, click `,_jsx(_components.strong,{children:`File`}),`, then `,_jsx(_components.strong,{children:`Manage Template`}),`, and fill in the form again.`]})]})}function MDXContent(props={}){const{wrapper:MDXLayout}={..._provideComponents(),...props.components};return MDXLayout?_jsx(MDXLayout,{...props,children:_jsx(_createMdxContent,{...props})}):_createMdxContent(props)}return{default:MDXContent};function _missingMdxReference(id,component){throw new Error(`Expected `+(component?`component`:`object`)+\" `\"+id+\"` to be defined: you likely forgot to import, pass, or provide it.\")}","frontmatter":{},"scope":{"config":{},"pageMetadata":{"title":"Template management","description":"Publish a project as a template, update it, edit its details and delete it.","icon":"paste","href":"/on-premises/user-guide/administrators/template-management"}}},"mdxSourceWithNoJs":null},"mdxExtracts":{"tableOfContents":[{"title":"Publish a project","slug":"publish-a-project","depth":2,"children":[]},{"title":"Categories","slug":"categories","depth":2,"children":[]},{"title":"Update a template","slug":"update-a-template","depth":2,"children":[]},{"title":"Edit the details","slug":"edit-the-details","depth":2,"children":[]},{"title":"The source project","slug":"the-source-project","depth":2,"children":[]},{"title":"Delete a template","slug":"delete-a-template","depth":2,"children":[]},{"title":"Manage templates in the admin panel","slug":"manage-templates-in-the-admin-panel","depth":2,"children":[]},{"title":"If publishing is refused","slug":"if-publishing-is-refused","depth":2,"children":[]}],"codeExamples":{}},"jsLinks":[],"subdomain":"ayakaleaf-pro","siteName":"Ayakaleaf Pro","title":"Template management - Ayakaleaf Pro","navMaps":{"firstHrefInVersion":{},"firstHrefInLanguage":{"en":{"href":"/on-premises/user-guide/administrators/template-management","matchLevel":0},"zh-CN":{"href":"/zh-CN","matchLevel":4},"zh-TW":{"href":"/zh-TW","matchLevel":4},"ja":{"href":"/ja","matchLevel":4},"de":{"href":"/de","matchLevel":4},"fr":{"href":"/fr","matchLevel":4},"es":{"href":"/es","matchLevel":4},"it":{"href":"/it","matchLevel":4},"ko":{"href":"/ko","matchLevel":4},"ru":{"href":"/ru","matchLevel":4},"nl":{"href":"/nl","matchLevel":4},"pt":{"href":"/pt","matchLevel":4},"tr":{"href":"/tr","matchLevel":4},"uk":{"href":"/uk","matchLevel":4},"pl":{"href":"/pl","matchLevel":4},"cs":{"href":"/cs","matchLevel":4},"sv":{"href":"/sv","matchLevel":4},"fi":{"href":"/fi","matchLevel":4},"ar":{"href":"/ar","matchLevel":4},"vi":{"href":"/vi","matchLevel":4},"no":{"href":"/no","matchLevel":4},"da":{"href":"/da","matchLevel":4},"id":{"href":"/id","matchLevel":4},"zh-Hans":{"href":"/zh-Hans","matchLevel":4},"zh-Hant":{"href":"/zh-Hant","matchLevel":4}}},"lastModified":"2026-11-07T03:05:41.664Z","gitLastModified":"2026-11-07T03:05:24.000Z","originalFileLocation":"on-premises/user-guide/administrators/template-management.mdx","locale":"en"},"headHtml":"\u003cscript data-mint-head>(function(){var d=document.documentElement,p=null;if(!p){try{p=localStorage.getItem(\"isDarkMode\")}catch(e){}if(p==='true')p='dark';else if(p==='false')p='light';if(p!=='light'\u0026\u0026p!=='dark'\u0026\u0026p!=='system')p=\"system\"}var r=p==='system'?(matchMedia(\"(prefers-color-scheme: dark)\").matches?'dark':'light'):p;d.classList.remove(r==='dark'?'light':'dark');d.classList.add(r);d.setAttribute(\"data-theme-preference\",p)})();\u003c/script>\u003cmeta data-mint-head name=\"description\" content=\"Publish a project as a template, update it, edit its details and delete it.\">\u003cmeta data-mint-head name=\"application-name\" content=\"Ayakaleaf Pro\">\u003cmeta data-mint-head name=\"generator\" content=\"Mintlify\">\u003clink data-mint-head rel=\"icon\" type=\"image/png\" sizes=\"192x192\" href=\"/mintlify-assets/_mintlify/favicons/ayakaleaf-pro/o_LAbiVNKQm96Y75/_generated/favicon/android-chrome-192x192.png\" media=\"(prefers-color-scheme: light)\">\u003clink data-mint-head rel=\"apple-touch-icon\" type=\"image/png\" sizes=\"180x180\" href=\"/mintlify-assets/_mintlify/favicons/ayakaleaf-pro/o_LAbiVNKQm96Y75/_generated/favicon/apple-touch-icon.png\">\u003clink data-mint-head rel=\"icon\" type=\"image/png\" sizes=\"16x16\" href=\"/mintlify-assets/_mintlify/favicons/ayakaleaf-pro/o_LAbiVNKQm96Y75/_generated/favicon/favicon-16x16.png\" media=\"(prefers-color-scheme: light)\">\u003clink data-mint-head rel=\"icon\" type=\"image/png\" sizes=\"32x32\" href=\"/mintlify-assets/_mintlify/favicons/ayakaleaf-pro/o_LAbiVNKQm96Y75/_generated/favicon/favicon-32x32.png\" media=\"(prefers-color-scheme: light)\">\u003clink data-mint-head rel=\"shortcut icon\" type=\"image/x-icon\" href=\"/mintlify-assets/_mintlify/favicons/ayakaleaf-pro/o_LAbiVNKQm96Y75/_generated/favicon/favicon.ico\" media=\"(prefers-color-scheme: light)\">\u003clink data-mint-head rel=\"icon\" type=\"image/png\" sizes=\"192x192\" href=\"/mintlify-assets/_mintlify/favicons/ayakaleaf-pro/o_LAbiVNKQm96Y75/_generated/favicon-dark/android-chrome-192x192.png\" media=\"(prefers-color-scheme: dark)\">\u003clink data-mint-head rel=\"icon\" type=\"image/png\" sizes=\"16x16\" href=\"/mintlify-assets/_mintlify/favicons/ayakaleaf-pro/o_LAbiVNKQm96Y75/_generated/favicon-dark/favicon-16x16.png\" media=\"(prefers-color-scheme: dark)\">\u003clink data-mint-head rel=\"icon\" type=\"image/png\" sizes=\"32x32\" href=\"/mintlify-assets/_mintlify/favicons/ayakaleaf-pro/o_LAbiVNKQm96Y75/_generated/favicon-dark/favicon-32x32.png\" media=\"(prefers-color-scheme: dark)\">\u003clink data-mint-head rel=\"shortcut icon\" type=\"image/x-icon\" href=\"/mintlify-assets/_mintlify/favicons/ayakaleaf-pro/o_LAbiVNKQm96Y75/_generated/favicon-dark/favicon.ico\" media=\"(prefers-color-scheme: dark)\">\u003cmeta data-mint-head property=\"og:title\" content=\"Template management - Ayakaleaf Pro\">\u003cmeta data-mint-head property=\"og:description\" content=\"Publish a project as a template, update it, edit its details and delete it.\">\u003cmeta data-mint-head property=\"og:site_name\" content=\"Ayakaleaf Pro\">\u003cmeta data-mint-head property=\"og:url\" content=\"https://ayakaleaf-pro.mintlify.app/on-premises/user-guide/administrators/template-management\">\u003cmeta data-mint-head property=\"og:type\" content=\"website\">\u003cmeta data-mint-head property=\"og:image\" content=\"https://ayakaleaf-pro.mintlify.site/_mintlify/api/og/v2?division=For+administrators\u0026amp;title=Template+management\u0026amp;description=Publish+a+project+as+a+template%2C+update+it%2C+edit+its+details+and+delete+it.\u0026amp;theme=a852d976fde0e13c2ab73efd\u0026amp;signature=2d9f2c79897de24c1159dced54b0c6744924f5d9b81db42d3ac94b05988cadf4\">\u003cmeta data-mint-head property=\"og:image:width\" content=\"1200\">\u003cmeta data-mint-head property=\"og:image:height\" content=\"630\">\u003cmeta data-mint-head name=\"twitter:card\" content=\"summary_large_image\">\u003cmeta data-mint-head name=\"twitter:title\" content=\"Template management - Ayakaleaf Pro\">\u003cmeta data-mint-head name=\"twitter:description\" content=\"Publish a project as a template, update it, edit its details and delete it.\">\u003cmeta data-mint-head name=\"twitter:image\" content=\"https://ayakaleaf-pro.mintlify.site/_mintlify/api/og/v2?division=For+administrators\u0026amp;title=Template+management\u0026amp;description=Publish+a+project+as+a+template%2C+update+it%2C+edit+its+details+and+delete+it.\u0026amp;theme=a852d976fde0e13c2ab73efd\u0026amp;signature=2d9f2c79897de24c1159dced54b0c6744924f5d9b81db42d3ac94b05988cadf4\">\u003cmeta data-mint-head name=\"twitter:image:width\" content=\"1200\">\u003cmeta data-mint-head name=\"twitter:image:height\" content=\"630\">\u003cmeta data-mint-head name=\"msapplication-config\" content=\"/mintlify-assets/_mintlify/favicons/ayakaleaf-pro/o_LAbiVNKQm96Y75/_generated/favicon/browserconfig.xml\">\u003cmeta data-mint-head name=\"apple-mobile-web-app-title\" content=\"Ayakaleaf Pro\">\u003cmeta data-mint-head name=\"msapplication-TileColor\" content=\"#0E0E0E\">\u003clink data-mint-head rel=\"canonical\" href=\"https://ayakaleaf-pro.mintlify.app/on-premises/user-guide/administrators/template-management\">\u003clink data-mint-head rel=\"alternate\" type=\"application/xml\" href=\"/sitemap.xml\">\u003clink data-mint-head rel=\"alternate\" type=\"text/markdown\" href=\"/on-premises/user-guide/administrators/template-management.md\">\u003cscript data-mint-head type=\"application/ld+json\">{\"@context\":\"https://schema.org\",\"@graph\":[{\"@type\":\"Organization\",\"@id\":\"https://ayakaleaf-pro.mintlify.app/#organization\",\"name\":\"Ayakaleaf Pro\",\"url\":\"https://ayakaleaf-pro.mintlify.app\",\"logo\":{\"@type\":\"ImageObject\",\"url\":\"https://mintcdn.com/ayakaleaf-pro/JetHeEeglWIIXNds/logo/light.png?fit=max\u0026auto=format\u0026n=JetHeEeglWIIXNds\u0026q=85\u0026s=7f1abd8dcc74dd3b7cdafac9e6e82092\"}},{\"@type\":\"WebSite\",\"@id\":\"https://ayakaleaf-pro.mintlify.app#website\",\"name\":\"Ayakaleaf Pro\",\"url\":\"https://ayakaleaf-pro.mintlify.app\",\"publisher\":{\"@id\":\"https://ayakaleaf-pro.mintlify.app/#organization\"}},{\"@type\":\"WebPage\",\"@id\":\"https://ayakaleaf-pro.mintlify.app/on-premises/user-guide/administrators/template-management#webpage\",\"url\":\"https://ayakaleaf-pro.mintlify.app/on-premises/user-guide/administrators/template-management\",\"name\":\"Template management\",\"description\":\"Publish a project as a template, update it, edit its details and delete it.\",\"dateModified\":\"2026-11-07T03:05:24.000Z\",\"isPartOf\":{\"@id\":\"https://ayakaleaf-pro.mintlify.app#website\"},\"breadcrumb\":{\"@id\":\"https://ayakaleaf-pro.mintlify.app/on-premises/user-guide/administrators/template-management#breadcrumb\"}},{\"@type\":\"BreadcrumbList\",\"@id\":\"https://ayakaleaf-pro.mintlify.app/on-premises/user-guide/administrators/template-management#breadcrumb\",\"itemListElement\":[{\"@type\":\"ListItem\",\"position\":1,\"name\":\"User guide\",\"item\":\"https://ayakaleaf-pro.mintlify.app/on-premises/user-guide/administrators/onboarding\"},{\"@type\":\"ListItem\",\"position\":2,\"name\":\"For administrators\",\"item\":\"https://ayakaleaf-pro.mintlify.app/on-premises/user-guide/administrators/index\"},{\"@type\":\"ListItem\",\"position\":3,\"name\":\"Template management\",\"item\":\"https://ayakaleaf-pro.mintlify.app/on-premises/user-guide/administrators/template-management\"}]},{\"@type\":[\"Article\",\"TechArticle\"],\"@id\":\"https://ayakaleaf-pro.mintlify.app/on-premises/user-guide/administrators/template-management#article\",\"headline\":\"Template management\",\"name\":\"Template management\",\"description\":\"Publish a project as a template, update it, edit its details and delete it.\",\"url\":\"https://ayakaleaf-pro.mintlify.app/on-premises/user-guide/administrators/template-management\",\"mainEntityOfPage\":{\"@id\":\"https://ayakaleaf-pro.mintlify.app/on-premises/user-guide/administrators/template-management#webpage\"},\"dateModified\":\"2026-11-07T03:05:24.000Z\",\"publisher\":{\"@id\":\"https://ayakaleaf-pro.mintlify.app/#organization\"},\"isPartOf\":{\"@id\":\"https://ayakaleaf-pro.mintlify.app#website\"}}]}\u003c/script>\u003cscript data-mint-head type=\"application/ld+json\">{\"@context\":\"https://schema.org\",\"@type\":\"WebSite\",\"name\":\"Ayakaleaf Pro\",\"creator\":{\"@type\":\"Organization\",\"name\":\"Mintlify\",\"url\":\"https://mintlify.com\"}}\u003c/script>","siteName":"Ayakaleaf Pro","nav":{"global":null,"languages":[{"language":"en","default":true,"tabs":[{"tab":"Home","icon":"house-chimney","pages":[{"title":"Home","href":""}]},{"tab":"On-Premises","icon":"server","groups":[{"group":"Overview","pages":[{"group":"Welcome","icon":"hand-wave","root":{"title":"Welcome","icon":"hand-wave","href":"/on-premises"},"pages":[{"title":"Features and Copyright","icon":"layer-plus","href":"/on-premises/readme/features-and-copyright"},{"title":"Trust and Security","icon":"https://d3gk2c5xim1je2.cloudfront.net/fontawesome/v7.2.0/brands/expeditedssl.svg","href":"/on-premises/readme/trust-and-security"},{"title":"Overleaf Server Pro vs. Ayakaleaf Pro","icon":"scale-balanced","href":"/on-premises/readme/ayakaleaf-pro-vs-server-pro"},{"title":"Question and Answer","icon":"comment-question","href":"/on-premises/readme/question-and-answer"}]},{"group":"Release notes","icon":"code-branch","root":{"title":"Release notes","icon":"code-branch","href":"/on-premises/release-notes/index"},"pages":[{"title":"Release notes 6.x.x","href":"/on-premises/release-notes/release-notes-6.x.x"}]}]},{"group":"Installation","pages":[{"title":"Introduction","icon":"map-location","href":"/on-premises/installation/introduction"},{"group":"Using Docker Compose","icon":"https://d3gk2c5xim1je2.cloudfront.net/fontawesome/v7.2.0/brands/docker.svg","root":{"title":"Using Docker Compose","icon":"https://d3gk2c5xim1je2.cloudfront.net/fontawesome/v7.2.0/brands/docker.svg","href":"/on-premises/installation/using-docker-compose/index"},"pages":[{"group":"Linux","icon":"https://d3gk2c5xim1je2.cloudfront.net/fontawesome/v7.2.0/brands/linux.svg","root":{"title":"Linux","icon":"https://d3gk2c5xim1je2.cloudfront.net/fontawesome/v7.2.0/brands/linux.svg","href":"/on-premises/installation/using-docker-compose/linux/index"},"pages":[{"title":"0. Setup Docker","icon":"https://d3gk2c5xim1je2.cloudfront.net/fontawesome/v7.2.0/brands/docker.svg","href":"/on-premises/installation/using-docker-compose/linux/0.-setup-docker"},{"title":"1. Download the Toolkit","icon":"arrow-down-to-bracket","href":"/on-premises/installation/using-docker-compose/linux/1.-download-the-toolkit"},{"title":"2. Familiarize yourself with the Toolkit","icon":"magnifying-glass","href":"/on-premises/installation/using-docker-compose/linux/2.-familiarize-yourself-with-the-toolkit"},{"title":"3. Initialize the configuration","icon":"circle-play","href":"/on-premises/installation/using-docker-compose/linux/3.-initialize-the-configuration"},{"title":"4. Get Ayakaleaf Pro Images","icon":"split","href":"/on-premises/installation/using-docker-compose/linux/4.-get-overleaf-pro-images"},{"title":"5. Personalizing your instance","icon":"square-sliders","href":"/on-premises/installation/using-docker-compose/linux/5.-personalizing-your-instance"},{"title":"6. Post-installation tasks","icon":"ballot-check","href":"/on-premises/installation/using-docker-compose/linux/6.-post-installation-tasks"}]},{"group":"macOS","icon":"https://d3gk2c5xim1je2.cloudfront.net/fontawesome/v7.2.0/brands/apple.svg","root":{"title":"macOS","icon":"https://d3gk2c5xim1je2.cloudfront.net/fontawesome/v7.2.0/brands/apple.svg","href":"/on-premises/installation/using-docker-compose/macos/index"},"pages":[{"title":"0. Setup Docker Desktop","icon":"https://d3gk2c5xim1je2.cloudfront.net/fontawesome/v7.2.0/brands/docker.svg","href":"/on-premises/installation/using-docker-compose/macos/0.-setup-docker-desktop"},{"title":"1. Download the Toolkit","icon":"arrow-down-to-bracket","href":"/on-premises/installation/using-docker-compose/macos/1.-download-the-toolkit"},{"title":"2. Familiarize yourself with the Toolkit","icon":"magnifying-glass","href":"/on-premises/installation/using-docker-compose/macos/2.-familiarize-yourself-with-the-toolkit"},{"title":"3. Initialize the configuration","icon":"circle-play","href":"/on-premises/installation/using-docker-compose/macos/3.-initialize-the-configuration"},{"title":"4. Get Ayakaleaf Pro Images","icon":"split","href":"/on-premises/installation/using-docker-compose/macos/4.-get-ayakaleaf-pro-images"},{"title":"5. Personalizing your instance","icon":"square-sliders","href":"/on-premises/installation/using-docker-compose/macos/5.-personalizing-your-instance"},{"title":"6. Post-installation tasks","icon":"ballot-check","href":"/on-premises/installation/using-docker-compose/macos/6.-post-installation-tasks"},{"title":"Troubleshooting","icon":"screwdriver-wrench","href":"/on-premises/installation/using-docker-compose/macos/troubleshooting"}]},{"group":"Windows","icon":"https://d3gk2c5xim1je2.cloudfront.net/fontawesome/v7.2.0/brands/windows.svg","root":{"title":"Windows","icon":"https://d3gk2c5xim1je2.cloudfront.net/fontawesome/v7.2.0/brands/windows.svg","href":"/on-premises/installation/using-docker-compose/windows/index"},"pages":[{"title":"0. Setup WSL 2 and Docker Desktop","icon":"https://d3gk2c5xim1je2.cloudfront.net/fontawesome/v7.2.0/brands/docker.svg","href":"/on-premises/installation/using-docker-compose/windows/0.-setup-wsl-and-docker-desktop"},{"title":"1. Download the Toolkit","icon":"arrow-down-to-bracket","href":"/on-premises/installation/using-docker-compose/windows/1.-download-the-toolkit"},{"title":"2. Familiarize yourself with the Toolkit","icon":"magnifying-glass","href":"/on-premises/installation/using-docker-compose/windows/2.-familiarize-yourself-with-the-toolkit"},{"title":"3. Initialize the configuration","icon":"circle-play","href":"/on-premises/installation/using-docker-compose/windows/3.-initialize-the-configuration"},{"title":"4. Get Ayakaleaf Pro Images","icon":"split","href":"/on-premises/installation/using-docker-compose/windows/4.-get-ayakaleaf-pro-images"},{"title":"5. Personalizing your instance","icon":"square-sliders","href":"/on-premises/installation/using-docker-compose/windows/5.-personalizing-your-instance"},{"title":"6. Post-installation tasks","icon":"ballot-check","href":"/on-premises/installation/using-docker-compose/windows/6.-post-installation-tasks"},{"title":"Troubleshooting","icon":"wrench","href":"/on-premises/installation/using-docker-compose/windows/troubleshooting"}]}]},{"group":"Using Kubernetes","icon":"dharmachakra","root":{"title":"Using Kubernetes","icon":"dharmachakra","href":"/on-premises/installation/using-kubernetes/index"},"pages":[{"title":"0. Prepare the nodes","icon":"server","href":"/on-premises/installation/using-kubernetes/0.-prepare-the-nodes"},{"title":"1. Get Ayakaleaf Pro Images","icon":"split","href":"/on-premises/installation/using-kubernetes/1.-get-ayakaleaf-pro-images"},{"title":"2. Create the namespace and secrets","icon":"key","href":"/on-premises/installation/using-kubernetes/2.-create-the-namespace-and-secrets"},{"title":"3. Deploy MongoDB and Redis","icon":"database","href":"/on-premises/installation/using-kubernetes/3.-deploy-mongodb-and-redis"},{"title":"4. Personalizing your instance","icon":"square-sliders","href":"/on-premises/installation/using-kubernetes/4.-personalizing-your-instance"},{"title":"5. Deploy Ayakaleaf Pro","icon":"rocket-launch","href":"/on-premises/installation/using-kubernetes/5.-deploy-ayakaleaf-pro"},{"title":"6. Post-installation tasks","icon":"ballot-check","href":"/on-premises/installation/using-kubernetes/6.-post-installation-tasks"}]},{"title":"Using Claude or Codex","icon":"https://d3gk2c5xim1je2.cloudfront.net/fontawesome/v7.2.0/brands/claude.svg","href":"/on-premises/installation/using-claude-or-codex"},{"title":"Using GitHub Codespace","icon":"https://d3gk2c5xim1je2.cloudfront.net/fontawesome/v7.2.0/brands/github.svg","href":"/on-premises/installation/using-the-github-codespace"},{"title":"Air-gapped/offline deployments","icon":"block-brick","href":"/on-premises/installation/air-gapped-offline-deployments"},{"title":"Migrate from Existing","icon":"u-turn-up-right","href":"/on-premises/installation/migrate-from-existing"}]},{"group":"Configuration","pages":[{"group":"Docker Compose","icon":"https://d3gk2c5xim1je2.cloudfront.net/fontawesome/v7.2.0/brands/docker.svg","root":{"title":"Docker Compose","icon":"https://d3gk2c5xim1je2.cloudfront.net/fontawesome/v7.2.0/brands/docker.svg","href":"/on-premises/configuration/overleaf-toolkit/index"},"pages":[{"title":"Files and locations","icon":"folder-open","href":"/on-premises/configuration/overleaf-toolkit/files-and-locations"},{"title":"Toolkit settings","icon":"gear-complex","href":"/on-premises/configuration/overleaf-toolkit/toolkit-settings"},{"title":"Environment variables","icon":"seedling","href":"/on-premises/configuration/overleaf-toolkit/environment-variables"},{"group":"Authentication","icon":"address-card","root":{"title":"Authentication","icon":"address-card","href":"/on-premises/configuration/overleaf-toolkit/authentication/index"},"pages":[{"title":"OIDC Authentication","icon":"id-card-clip","href":"/on-premises/configuration/overleaf-toolkit/authentication/oidc-authentication"},{"title":"SAML Authentication","icon":"key","href":"/on-premises/configuration/overleaf-toolkit/authentication/saml-authentication"},{"title":"LDAP Authentication","icon":"lock","href":"/on-premises/configuration/overleaf-toolkit/authentication/ldap-authentication"},{"title":"Public Access","icon":"lock-open","href":"/on-premises/configuration/overleaf-toolkit/authentication/public-access"},{"title":"reCAPTCHA","icon":"robot","href":"/on-premises/configuration/overleaf-toolkit/authentication/recaptcha"},{"title":"Password restrictions","icon":"key","href":"/on-premises/configuration/overleaf-toolkit/authentication/password-restrictions"}]},{"title":"Sandboxed Compiles","icon":"gear-code","href":"/on-premises/configuration/overleaf-toolkit/sandboxed-compiles"},{"title":"Pandoc Import and Export","icon":"file-lines","href":"/on-premises/configuration/overleaf-toolkit/pandoc-import-and-export"},{"group":"Integrations","icon":"puzzle-piece","root":{"title":"Integrations","icon":"puzzle-piece","href":"/on-premises/configuration/overleaf-toolkit/integrations/index"},"pages":[{"title":"Git integration","icon":"https://d3gk2c5xim1je2.cloudfront.net/fontawesome/v7.2.0/brands/git-alt.svg","href":"/on-premises/configuration/overleaf-toolkit/integrations/git-integration"},{"title":"GitHub Synchronisation","icon":"https://d3gk2c5xim1je2.cloudfront.net/fontawesome/v7.2.0/brands/github.svg","href":"/on-premises/configuration/overleaf-toolkit/integrations/github-synchronisation"},{"title":"GitLab Synchronisation","icon":"https://d3gk2c5xim1je2.cloudfront.net/fontawesome/v7.2.0/brands/gitlab.svg","href":"/on-premises/configuration/overleaf-toolkit/integrations/gitlab-synchronisation"},{"title":"Gitea Synchronisation","icon":"mug-hot","href":"/on-premises/configuration/overleaf-toolkit/integrations/gitea-synchronisation"},{"title":"Dropbox Synchronisation","icon":"https://d3gk2c5xim1je2.cloudfront.net/fontawesome/v7.2.0/brands/dropbox.svg","href":"/on-premises/configuration/overleaf-toolkit/integrations/dropbox-synchronisation"},{"title":"Zotero Integration","icon":"z","href":"/on-premises/configuration/overleaf-toolkit/integrations/zotero-integration"},{"title":"Mendeley Integration","icon":"https://d3gk2c5xim1je2.cloudfront.net/fontawesome/v7.2.0/brands/mendeley.svg","href":"/on-premises/configuration/overleaf-toolkit/integrations/mendeley-integration"},{"title":"MCP Server","icon":"plug","href":"/on-premises/configuration/overleaf-toolkit/integrations/mcp-server"},{"title":"AI Integration","icon":"https://d3gk2c5xim1je2.cloudfront.net/fontawesome/v7.2.0/brands/openai.svg","href":"/on-premises/configuration/overleaf-toolkit/integrations/ai-integration"},{"title":"Overleaf Import API","icon":"rectangle-api","href":"/on-premises/configuration/overleaf-toolkit/integrations/overleaf-import-api"}]},{"title":"Templates","icon":"paste","href":"/on-premises/configuration/overleaf-toolkit/templates"},{"title":"External URL","icon":"link","href":"/on-premises/configuration/overleaf-toolkit/external-url"},{"title":"Logging","icon":"memo-circle-info","href":"/on-premises/configuration/overleaf-toolkit/logging"},{"title":"TLS proxy","icon":"lock","href":"/on-premises/configuration/overleaf-toolkit/tls-proxy"},{"title":"Branding","icon":"copyright","href":"/on-premises/configuration/overleaf-toolkit/branding"},{"title":"Localization","icon":"globe-pointer","href":"/on-premises/configuration/overleaf-toolkit/localization"},{"title":"Email delivery","icon":"paper-plane-top","href":"/on-premises/configuration/overleaf-toolkit/email-delivery"},{"title":"Redis","icon":"memory","href":"/on-premises/configuration/overleaf-toolkit/redis"},{"title":"S3","icon":"https://d3gk2c5xim1je2.cloudfront.net/fontawesome/v7.2.0/brands/aws.svg","href":"/on-premises/configuration/overleaf-toolkit/s3"},{"title":"Adding LaTeX user help","icon":"graduation-cap","href":"/on-premises/configuration/overleaf-toolkit/adding-latex-user-help"}]},{"group":"Kubernetes","icon":"dharmachakra","root":{"title":"Kubernetes","icon":"dharmachakra","href":"/on-premises/configuration/kubernetes/index"},"pages":[{"group":"Authentication","icon":"address-card","root":{"title":"Authentication","icon":"address-card","href":"/on-premises/configuration/kubernetes/authentication/index"},"pages":[{"title":"OIDC Authentication","icon":"id-card-clip","href":"/on-premises/configuration/kubernetes/authentication/oidc-authentication"},{"title":"SAML Authentication","icon":"building-columns","href":"/on-premises/configuration/kubernetes/authentication/saml-authentication"},{"title":"LDAP Authentication","icon":"address-book","href":"/on-premises/configuration/kubernetes/authentication/ldap-authentication"},{"title":"Public Access","icon":"lock-open","href":"/on-premises/configuration/kubernetes/authentication/public-access"},{"title":"reCAPTCHA","icon":"robot","href":"/on-premises/configuration/kubernetes/authentication/recaptcha"},{"title":"Password restrictions","icon":"key","href":"/on-premises/configuration/kubernetes/authentication/password-restrictions"}]},{"title":"Sandboxed Compiles","icon":"gear-code","href":"/on-premises/configuration/kubernetes/sandboxed-compiles"},{"title":"Pandoc Import and Export","icon":"file-lines","href":"/on-premises/configuration/kubernetes/pandoc-import-and-export"},{"group":"Integrations","icon":"puzzle-piece","root":{"title":"Integrations","icon":"puzzle-piece","href":"/on-premises/configuration/kubernetes/integrations/index"},"pages":[{"title":"Git integration","icon":"code-branch","href":"/on-premises/configuration/kubernetes/integrations/git-integration"},{"title":"GitHub Synchronisation","icon":"https://d3gk2c5xim1je2.cloudfront.net/fontawesome/v7.2.0/brands/github.svg","href":"/on-premises/configuration/kubernetes/integrations/github-synchronisation"},{"title":"GitLab Synchronisation","icon":"https://d3gk2c5xim1je2.cloudfront.net/fontawesome/v7.2.0/brands/gitlab.svg","href":"/on-premises/configuration/kubernetes/integrations/gitlab-synchronisation"},{"title":"Gitea Synchronisation","icon":"mug-hot","href":"/on-premises/configuration/kubernetes/integrations/gitea-synchronisation"},{"title":"Dropbox Synchronisation","icon":"https://d3gk2c5xim1je2.cloudfront.net/fontawesome/v7.2.0/brands/dropbox.svg","href":"/on-premises/configuration/kubernetes/integrations/dropbox-synchronisation"},{"title":"Zotero Integration","icon":"z","href":"/on-premises/configuration/kubernetes/integrations/zotero-integration"},{"title":"Mendeley Integration","icon":"https://d3gk2c5xim1je2.cloudfront.net/fontawesome/v7.2.0/brands/mendeley.svg","href":"/on-premises/configuration/kubernetes/integrations/mendeley-integration"},{"title":"MCP Server","icon":"plug","href":"/on-premises/configuration/kubernetes/integrations/mcp-server"},{"title":"AI Integration","icon":"https://d3gk2c5xim1je2.cloudfront.net/fontawesome/v7.2.0/brands/openai.svg","href":"/on-premises/configuration/kubernetes/integrations/ai-integration"},{"title":"Overleaf Import API","icon":"rectangle-api","href":"/on-premises/configuration/kubernetes/integrations/overleaf-import-api"}]},{"title":"Templates","icon":"paste","href":"/on-premises/configuration/kubernetes/templates"},{"title":"External URL","icon":"link","href":"/on-premises/configuration/kubernetes/external-url"},{"title":"Logging","icon":"memo-circle-info","href":"/on-premises/configuration/kubernetes/logging"},{"title":"TLS proxy","icon":"lock","href":"/on-premises/configuration/kubernetes/tls-proxy"},{"title":"Branding","icon":"copyright","href":"/on-premises/configuration/kubernetes/branding"},{"title":"Localization","icon":"globe-pointer","href":"/on-premises/configuration/kubernetes/localization"},{"title":"Email delivery","icon":"paper-plane-top","href":"/on-premises/configuration/kubernetes/email-delivery"},{"title":"Redis","icon":"memory","href":"/on-premises/configuration/kubernetes/redis"},{"title":"S3","icon":"https://d3gk2c5xim1je2.cloudfront.net/fontawesome/v7.2.0/brands/aws.svg","href":"/on-premises/configuration/kubernetes/s3"},{"title":"Adding LaTeX user help","icon":"graduation-cap","href":"/on-premises/configuration/kubernetes/adding-latex-user-help"},{"title":"Horizontal scaling","icon":"layer-group","href":"/on-premises/configuration/kubernetes/horizontal-scaling"}]}]},{"group":"User guide","pages":[{"group":"For administrators","icon":"user-gear","root":{"title":"For administrators","icon":"user-gear","href":"/on-premises/user-guide/administrators/index"},"pages":[{"title":"Onboarding","icon":"user-plus","href":"/on-premises/user-guide/administrators/onboarding"},{"title":"Basic management","icon":"sliders","href":"/on-premises/user-guide/administrators/basic-management"},{"title":"User management","icon":"users-gear","href":"/on-premises/user-guide/administrators/user-management"},{"title":"Project management","description":"Find any project, read its status, change its owner and members, and delete or restore it.","icon":"folder-gear","href":"/on-premises/user-guide/administrators/project-management"},{"title":"Template management","icon":"paste","href":"/on-premises/user-guide/administrators/template-management"}]},{"group":"For users","icon":"users","root":{"title":"For users","description":"Step-by-step guides for the users of an instance.","icon":"users","href":"/on-premises/user-guide/users/index"},"pages":[{"title":"Git integration","icon":"https://d3gk2c5xim1je2.cloudfront.net/fontawesome/v7.2.0/brands/git-alt.svg","href":"/on-premises/user-guide/users/git-integration"},{"title":"GitHub Synchronisation","icon":"https://d3gk2c5xim1je2.cloudfront.net/fontawesome/v7.2.0/brands/github.svg","href":"/on-premises/user-guide/users/github-synchronisation"},{"title":"GitLab Synchronisation","icon":"https://d3gk2c5xim1je2.cloudfront.net/fontawesome/v7.2.0/brands/gitlab.svg","href":"/on-premises/user-guide/users/gitlab-synchronisation"},{"title":"Gitea Synchronisation","icon":"mug-hot","href":"/on-premises/user-guide/users/gitea-synchronisation"},{"title":"Dropbox Synchronisation","icon":"https://d3gk2c5xim1je2.cloudfront.net/fontawesome/v7.2.0/brands/dropbox.svg","href":"/on-premises/user-guide/users/dropbox-synchronisation"},{"title":"Zotero Integration","icon":"z","href":"/on-premises/user-guide/users/zotero-integration"},{"title":"Mendeley Integration","icon":"https://d3gk2c5xim1je2.cloudfront.net/fontawesome/v7.2.0/brands/mendeley.svg","href":"/on-premises/user-guide/users/mendeley-integration"},{"title":"Templates","icon":"paste","href":"/on-premises/user-guide/users/templates"},{"title":"Symbol Palette","icon":"omega","href":"/on-premises/user-guide/users/symbol-palette"},{"title":"Advanced Reference Search","icon":"magnifying-glass","href":"/on-premises/user-guide/users/advanced-reference-search"},{"title":"AI Assistant","icon":"sparkles","href":"/on-premises/user-guide/users/ai-assistant"},{"title":"Error Assistant","icon":"wand-magic-sparkles","href":"/on-premises/user-guide/users/error-assistant"},{"title":"MCP Server","icon":"plug","href":"/on-premises/user-guide/users/mcp-server"},{"title":"Python Runner","icon":"https://d3gk2c5xim1je2.cloudfront.net/fontawesome/v7.2.0/brands/python.svg","href":"/on-premises/user-guide/users/python-runner"},{"title":"Word import and export","icon":"file-word","href":"/on-premises/user-guide/users/word-import-export"},{"title":"Open in Overleaf","icon":"arrow-up-right-from-square","href":"/on-premises/user-guide/users/open-in-overleaf"}]}]},{"group":"Maintenance","pages":[{"title":"docker-compose.yml to Toolkit migration","icon":"right-left","href":"/on-premises/maintenance/docker-compose.yml-to-toolkit-migration"},{"title":"Upgrading your deployment","icon":"arrow-up-from-square","href":"/on-premises/maintenance/upgrading-your-deployment"},{"title":"Upgrading on Kubernetes","icon":"arrow-up-from-square","href":"/on-premises/maintenance/upgrading-on-kubernetes"},{"group":"Data and backups","icon":"database","root":{"title":"Data and backups","icon":"database","href":"/on-premises/maintenance/data-and-backups/index"},"pages":[{"title":"Exporting projects","icon":"file-export","href":"/on-premises/maintenance/data-and-backups/exporting-projects"}]},{"title":"Extending TeX Live","icon":"rectangle-pro","href":"/on-premises/maintenance/extending-tex-live"},{"title":"Updating TeX Live Full Images Automatically","icon":"arrows-rotate","href":"/on-premises/maintenance/updating-tex-live-full-images-automatically"},{"title":"Horizontal scaling","icon":"distribute-spacing-horizontal","href":"/on-premises/maintenance/horizontal-scaling"},{"title":"S3 migration","icon":"https://d3gk2c5xim1je2.cloudfront.net/fontawesome/v7.2.0/brands/aws.svg","href":"/on-premises/maintenance/s3-migration"},{"title":"Updating MongoDB","icon":"database","href":"/on-premises/maintenance/updating-mongodb"}]},{"group":"User and project management","pages":[{"title":"Roles and permissions","icon":"list-check","href":"/on-premises/user-and-project-management/roles-and-permissions"},{"group":"User management","icon":"users-between-lines","root":{"title":"User management","icon":"users-between-lines","href":"/on-premises/user-and-project-management/user-management/index"},"pages":[{"title":"Username migration","icon":"lock","href":"/on-premises/user-and-project-management/user-management/username-migration"},{"title":"Migrating to LDAP or SAML","icon":"rectangle-pro","href":"/on-premises/user-and-project-management/user-management/migrating-to-ldap-or-saml"}]},{"group":"Project management","icon":"rectangle-history","root":{"title":"Project management","icon":"rectangle-history","href":"/on-premises/user-and-project-management/project-management/index"},"pages":[{"title":"Bulk transfer of project ownership","icon":"lock","href":"/on-premises/user-and-project-management/project-management/bulk-transfer-of-project-ownership"}]}]},{"group":"Support","pages":[{"title":"Project limits","icon":"list-check","href":"/on-premises/support/project-limits"},{"title":"Troubleshooting","icon":"comments-question-check","href":"/on-premises/support/troubleshooting"},{"title":"Getting help","icon":"truck-medical","href":"/on-premises/support/getting-help"},{"group":"Support guides","icon":"message-question","root":{"title":"Support guides","icon":"message-question","href":"/on-premises/support/support-guides/index"},"pages":[{"title":"Using templates as an individual","icon":"rectangle-vertical-history","href":"/on-premises/support/support-guides/using-templates-as-an-individual"}]}]}]},{"tab":"Blog","icon":"rss","pages":[{"title":"Blog","href":"/blog"}]},{"tab":"TeXLive","icon":"compact-disc","pages":[{"title":"TeXLive","href":"/texlive"}]},{"tab":"Developer","icon":"rectangle-terminal","pages":[{"title":"Developer","href":"/dev"}]}]},{"language":"zh-CN","pages":[{"title":"zh-CN","href":"/zh-CN"}]},{"language":"zh-TW","pages":[{"title":"zh-TW","href":"/zh-TW"}]},{"language":"ja","pages":[{"title":"ja","href":"/ja"}]},{"language":"de","pages":[{"title":"de","href":"/de"}]},{"language":"fr","pages":[{"title":"fr","href":"/fr"}]},{"language":"es","pages":[{"title":"es","href":"/es"}]},{"language":"it","pages":[{"title":"it","href":"/it"}]},{"language":"ko","pages":[{"title":"ko","href":"/ko"}]},{"language":"ru","pages":[{"title":"ru","href":"/ru"}]},{"language":"nl","pages":[{"title":"nl","href":"/nl"}]},{"language":"pt","pages":[{"title":"pt","href":"/pt"}]},{"language":"tr","pages":[{"title":"tr","href":"/tr"}]},{"language":"uk","pages":[{"title":"uk","href":"/uk"}]},{"language":"pl","pages":[{"title":"pl","href":"/pl"}]},{"language":"cs","pages":[{"title":"cs","href":"/cs"}]},{"language":"sv","pages":[{"title":"sv","href":"/sv"}]},{"language":"fi","pages":[{"title":"fi","href":"/fi"}]},{"language":"ar","pages":[{"title":"ar","href":"/ar"}]},{"language":"vi","pages":[{"title":"vi","href":"/vi"}]},{"language":"no","pages":[{"title":"no","href":"/no"}]},{"language":"da","pages":[{"title":"da","href":"/da"}]},{"language":"id","pages":[{"title":"id","href":"/id"}]},{"language":"zh-Hans","pages":[{"title":"zh-Hans","href":"/zh-Hans"}]},{"language":"zh-Hant","pages":[{"title":"zh-Hant","href":"/zh-Hant"}]}]},"basePath":"","title":"Template management - Ayakaleaf Pro","buildId":"dpl_8LJbrAiZvr1K98WQNZXCyY5AvT34","deploymentId":"dpl_8LJbrAiZvr1K98WQNZXCyY5AvT34","dynamics":["07c022d89b","a74be98ba7"],"chunks":["Frame-NdetNziF.js","DynamicMarkdown-CD8713Yy.js","zoom-image-lightbox-DMoL6lHz.js","lightbox-handle-r17bVUz3.js"]}