> ## Documentation Index
> Fetch the complete documentation index at: https://ayakaleaf-pro.mintlify.site/llms.txt
> Use this file to discover all available pages before exploring further.
# R 程式碼(knitr)
Overleaf 提供與 **knitr** 的整合,讓您可以在 LaTeX 文件中加入 R 程式碼,以產生動態輸出。
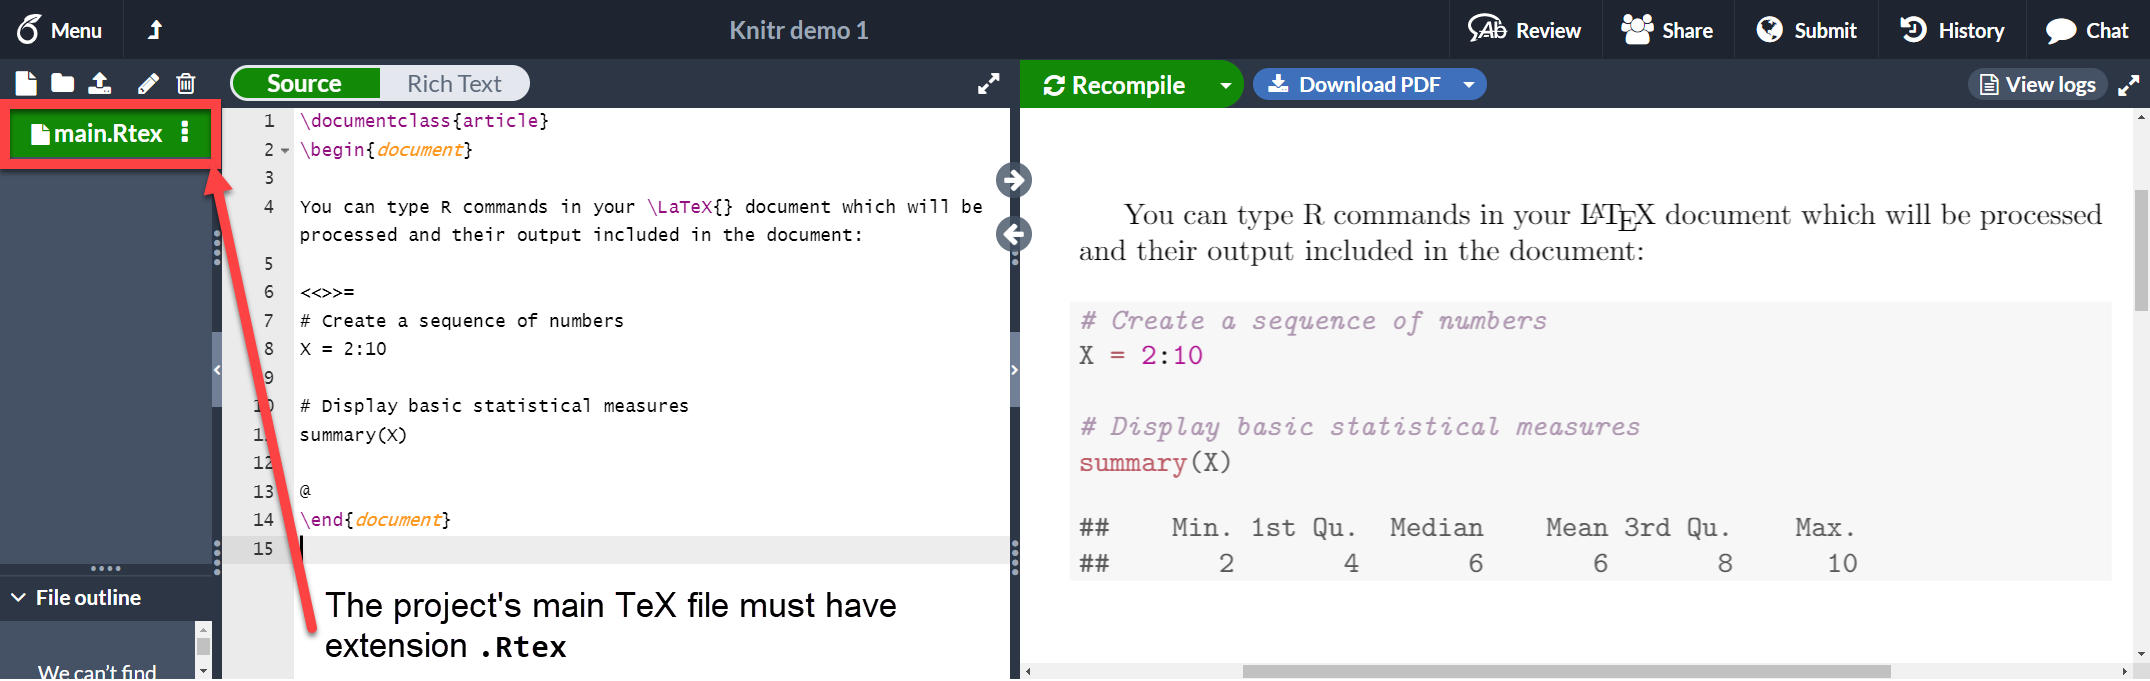
包含 R 程式碼的文件必須以 `.Rtex` 或 `.Rnw` 副檔名儲存,否則程式碼將無法運作。我們來看一個範例:
```latex wrap theme={null}
\documentclass{article}
\begin{document}
You can type R commands in your \LaTeX{} document which will be processed and their output included in the document:
<<>>=
# Create a sequence of numbers
X = 2:10
# Display basic statistical measures
summary(X)
@
\end{document}
```
 [在 Overleaf 上開啟這個 `knitr` 範例](https://www.overleaf.com/project/new/template/20421?id=69881107\&templateName=Knitr+demo+1\&latexEngine=pdflatex\&texImage=texlive-full%3A2020.1\&mainFile=)
如您所見,位於字元 `<<>>=` 與 `@` 之間的文字就是 R 程式碼。這段程式碼及其輸出會以類似程式碼清單的格式印出。這段程式碼可以接受一些額外參數,以自訂動態輸出,詳見下一節。
### 程式碼區塊(Chunk)
像上一節所示的程式碼區塊,通常稱為 *chunk*。您可以在 knitr chunk 中設定一些額外選項。請看以下範例:
```latex wrap theme={null}
\documentclass{article}
\begin{document}
You can type R commands in your \LaTeX{} document which will be processed and their output included in the document:
<>=
# Create a sequence of numbers
X = 2:10
# Display basic statistical measures
summary(X)
@
\end{document}
```
[在 Overleaf 上開啟這個 `knitr` 範例](https://www.overleaf.com/project/new/template/20421?id=69881107\&templateName=Knitr+demo+1\&latexEngine=pdflatex\&texImage=texlive-full%3A2020.1\&mainFile=)
如您所見,位於字元 `<<>>=` 與 `@` 之間的文字就是 R 程式碼。這段程式碼及其輸出會以類似程式碼清單的格式印出。這段程式碼可以接受一些額外參數,以自訂動態輸出,詳見下一節。
### 程式碼區塊(Chunk)
像上一節所示的程式碼區塊,通常稱為 *chunk*。您可以在 knitr chunk 中設定一些額外選項。請看以下範例:
```latex wrap theme={null}
\documentclass{article}
\begin{document}
You can type R commands in your \LaTeX{} document which will be processed and their output included in the document:
<>=
# Create a sequence of numbers
X = 2:10
# Display basic statistical measures
summary(X)
@
\end{document}
```
 [在 Overleaf 上開啟這個 `knitr` 範例](https://www.overleaf.com/project/new/template/20423?id=69885763\&templateName=Knitr+demo+2\&latexEngine=pdflatex\&texImage=texlive-full%3A2020.1\&mainFile=)
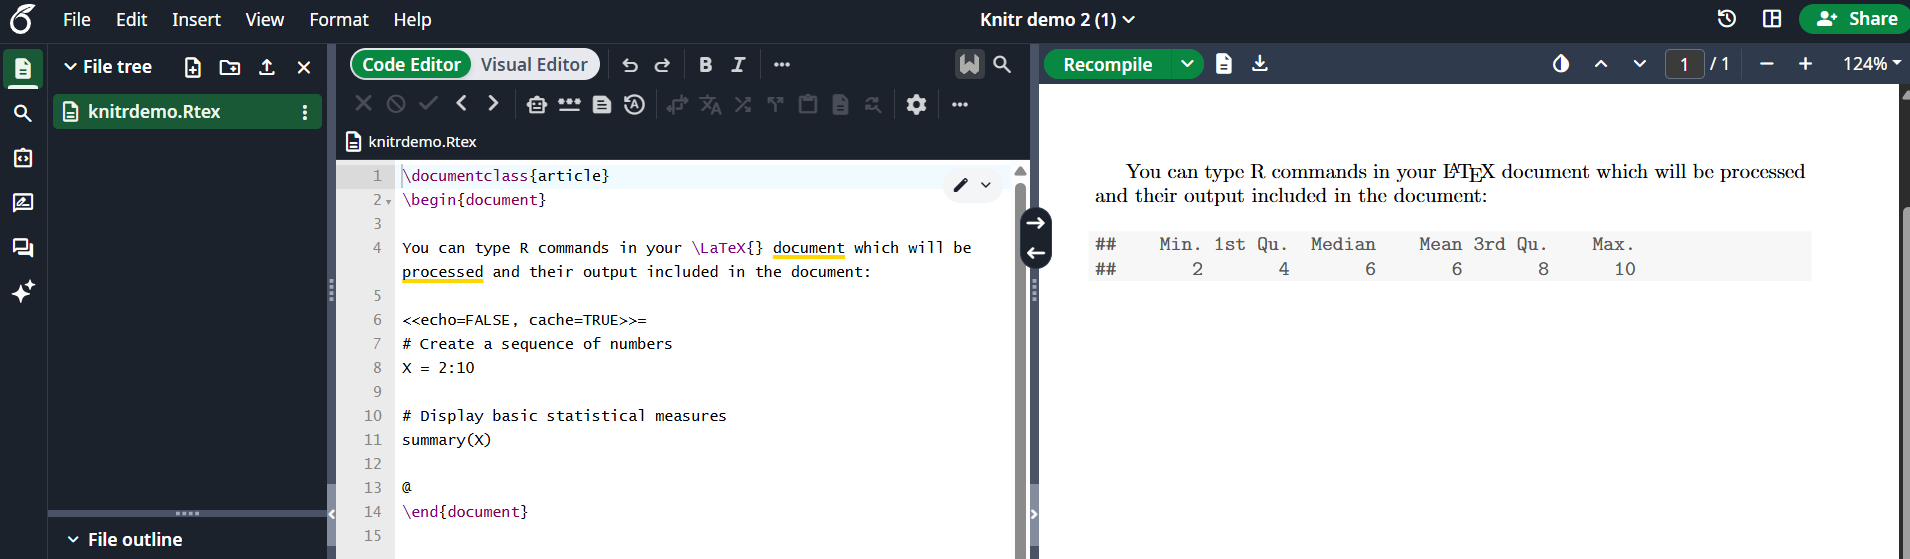
在 `<<` 與 `>>` 之間傳入了兩個額外選項。
* `echo=FALSE`:隱藏程式碼,只印出 R 產生的輸出。
* `cache=TRUE`:若將 cache 設為 true,則不會執行該 chunk,只會使用它先前產生的物件。若該 chunk 中的資料沒有變更,這能節省時間。
請注意,Overleaf 目前不支援 cache=TRUE 選項,但在本機上應可正常運作。
更多選項請參閱[參考指南](https://learn.overleaf.com/learn/Knitr#Reference_guide)。
### 行內指令
您可以存取 chunk 中產生的物件,並將其以行內方式印出。
```latex wrap theme={null}
\documentclass{article}
\begin{document}
You can type R commands in your \LaTeX{} document which will be processed and their output included in the document:
<>=
# Create a sequence of numbers
X = 2:10
# Display basic statistical measures
summary(X)
@
So, the mean of the data is $\Sexpr{mean(X)}$
\end{document}
```
[在 Overleaf 上開啟這個 `knitr` 範例](https://www.overleaf.com/project/new/template/20423?id=69885763\&templateName=Knitr+demo+2\&latexEngine=pdflatex\&texImage=texlive-full%3A2020.1\&mainFile=)
在 `<<` 與 `>>` 之間傳入了兩個額外選項。
* `echo=FALSE`:隱藏程式碼,只印出 R 產生的輸出。
* `cache=TRUE`:若將 cache 設為 true,則不會執行該 chunk,只會使用它先前產生的物件。若該 chunk 中的資料沒有變更,這能節省時間。
請注意,Overleaf 目前不支援 cache=TRUE 選項,但在本機上應可正常運作。
更多選項請參閱[參考指南](https://learn.overleaf.com/learn/Knitr#Reference_guide)。
### 行內指令
您可以存取 chunk 中產生的物件,並將其以行內方式印出。
```latex wrap theme={null}
\documentclass{article}
\begin{document}
You can type R commands in your \LaTeX{} document which will be processed and their output included in the document:
<>=
# Create a sequence of numbers
X = 2:10
# Display basic statistical measures
summary(X)
@
So, the mean of the data is $\Sexpr{mean(X)}$
\end{document}
```
 [在 Overleaf 上開啟這個 `knitr` 範例](https://www.overleaf.com/project/new/template/20425?id=69886866\&templateName=Knitr+demo+3\&latexEngine=pdflatex\&texImage=texlive-full%3A2020.1\&mainFile=)
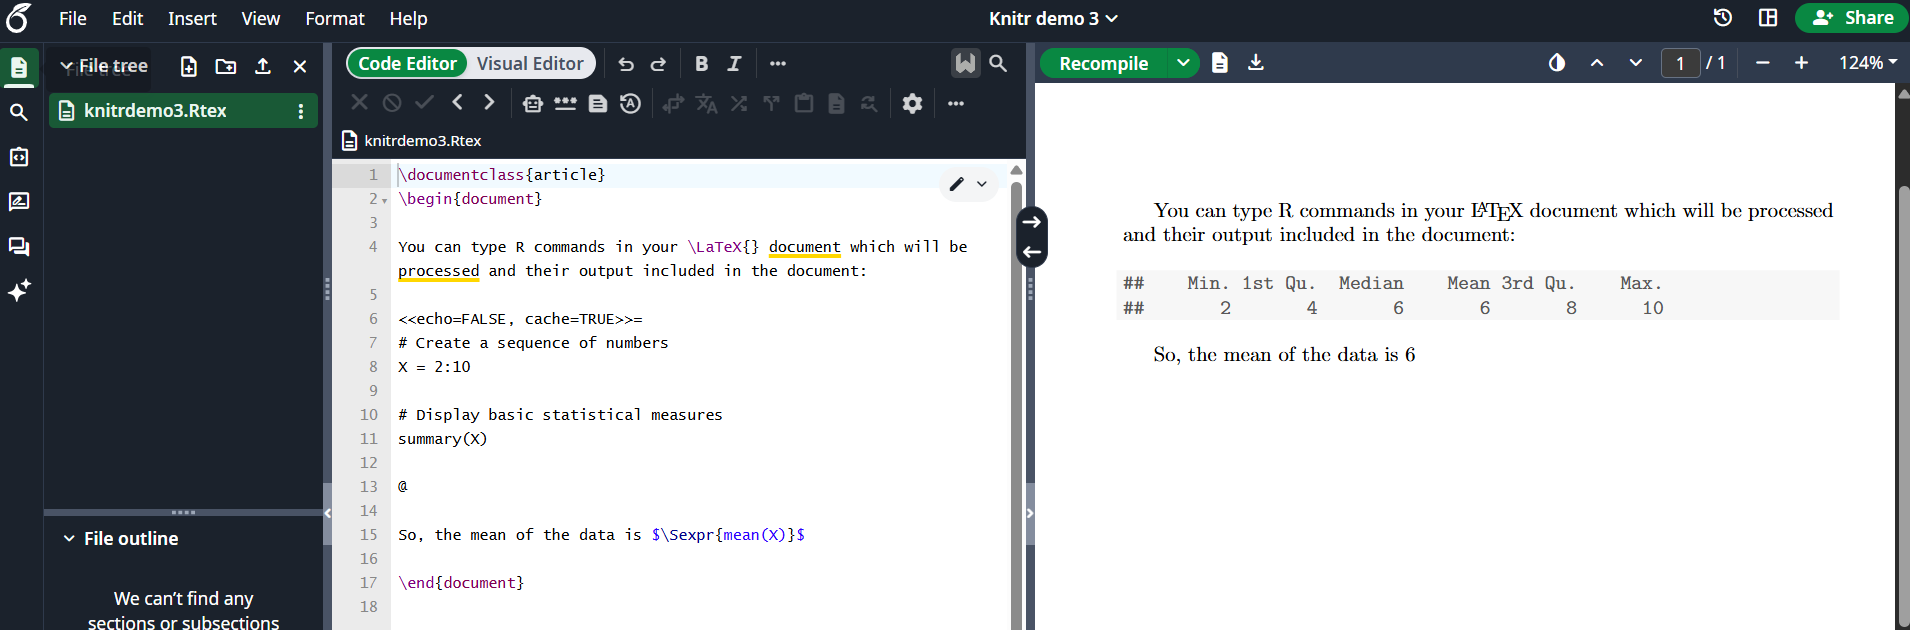
指令 `\Sexpr{mean(X)}` 會印出 R 程式碼 `mean(X)` 所回傳的結果。大括號內可以傳入任何 R 指令。
### 圖表
您也可以在 knitr 文件中加入圖表,如下例所示:
```latex wrap theme={null}
\documentclass{article}
\begin{document}
<>=
xdata = read.csv(file="data.txt", head=TRUE,sep=" ")
hist(xdata$data, main="Overleaf histogram", xlab="Data")
@
The figure \ref{fig:plot1} is simple histogram.
\end{document}
```
[在 Overleaf 上開啟這個 `knitr` 範例](https://www.overleaf.com/project/new/template/20425?id=69886866\&templateName=Knitr+demo+3\&latexEngine=pdflatex\&texImage=texlive-full%3A2020.1\&mainFile=)
指令 `\Sexpr{mean(X)}` 會印出 R 程式碼 `mean(X)` 所回傳的結果。大括號內可以傳入任何 R 指令。
### 圖表
您也可以在 knitr 文件中加入圖表,如下例所示:
```latex wrap theme={null}
\documentclass{article}
\begin{document}
<>=
xdata = read.csv(file="data.txt", head=TRUE,sep=" ")
hist(xdata$data, main="Overleaf histogram", xlab="Data")
@
The figure \ref{fig:plot1} is simple histogram.
\end{document}
```
 [在 Overleaf 上開啟這個 `knitr` 範例](https://www.overleaf.com/project/new/template/20427?id=69890965\&templateName=Knitr+demo+3\&latexEngine=pdflatex\&texImage=texlive-full%3A2020.1\&mainFile=)
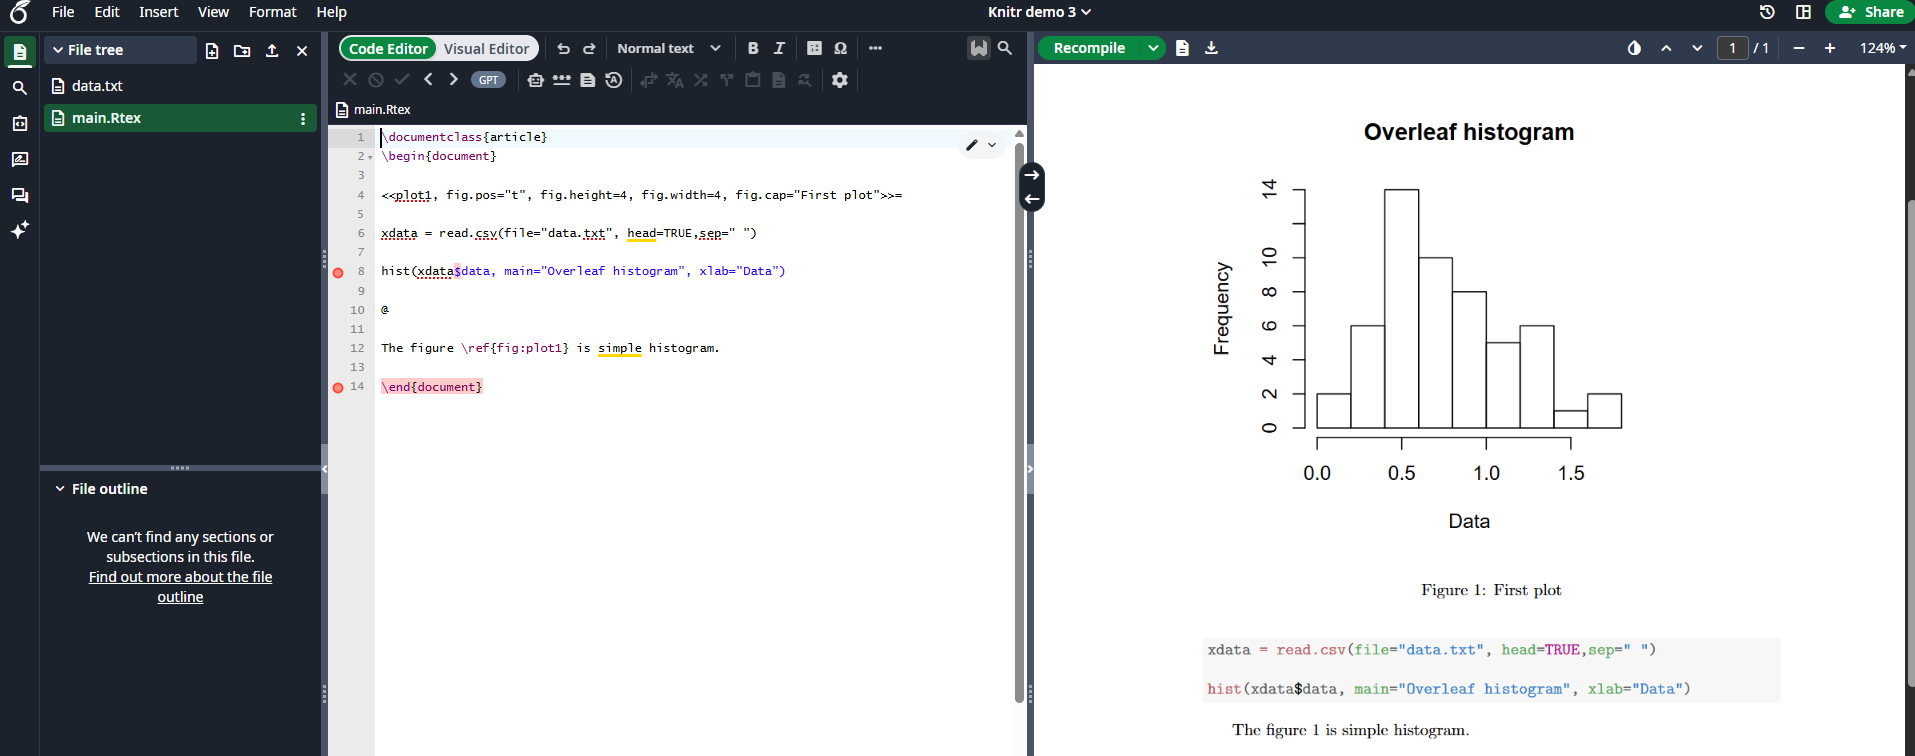
這個直方圖使用儲存在目前工作目錄中「data.txt」的資料。chunk 中傳入了幾個與圖形相關的選項。
`plot1`:這是用來參照圖表的標籤。前綴「fig:」是必要的。您可以在範例中看到,圖表是以 `\ref{fig:plot1}` 參照的。`fig.pos="t"`:位置參數,與 [figure 環境](https://learn.overleaf.com/learn/Positioning_images_and_tables#The_figure_environment)中使用的相同。`fig.height=4, fig.width=4`:圖形的寬度與高度。`fig.cap="First plot"`:圖形的標題。
### 外部 R 腳本
您可以將外部 R 腳本的部分內容匯入 knitr 文件。這非常實用,因為在將腳本納入文件之前,先在外部程式中撰寫並除錯是相當常見的做法。
假設我們在名為 `mycode.R` 的檔案中有以下 R 程式碼,並要將它納入 LaTeX 文件:
```r theme={null}
## ---- myrcode1
# Create a sequence of numbers
X = 2:10
## ---- myrcode2
# Display basic statistical measures
summary(X)
```
請注意以下這幾行:
```r theme={null}
## ---- myrcode1
```
以及
```r theme={null}
## ---- myrcode2
```
這些行標記了程式碼 chunk 的開頭,若要在文件中使用此腳本,這些標記是必要的,如以下程式碼片段所示:
```r theme={null}
The chunk below will not be printed
<>=
read_chunk("mycode.R")
@
The code must show up here
<>=
@
```
[在 Overleaf 上開啟這個 `knitr` 範例](https://www.overleaf.com/project/new/template/20427?id=69890965\&templateName=Knitr+demo+3\&latexEngine=pdflatex\&texImage=texlive-full%3A2020.1\&mainFile=)
這個直方圖使用儲存在目前工作目錄中「data.txt」的資料。chunk 中傳入了幾個與圖形相關的選項。
`plot1`:這是用來參照圖表的標籤。前綴「fig:」是必要的。您可以在範例中看到,圖表是以 `\ref{fig:plot1}` 參照的。`fig.pos="t"`:位置參數,與 [figure 環境](https://learn.overleaf.com/learn/Positioning_images_and_tables#The_figure_environment)中使用的相同。`fig.height=4, fig.width=4`:圖形的寬度與高度。`fig.cap="First plot"`:圖形的標題。
### 外部 R 腳本
您可以將外部 R 腳本的部分內容匯入 knitr 文件。這非常實用,因為在將腳本納入文件之前,先在外部程式中撰寫並除錯是相當常見的做法。
假設我們在名為 `mycode.R` 的檔案中有以下 R 程式碼,並要將它納入 LaTeX 文件:
```r theme={null}
## ---- myrcode1
# Create a sequence of numbers
X = 2:10
## ---- myrcode2
# Display basic statistical measures
summary(X)
```
請注意以下這幾行:
```r theme={null}
## ---- myrcode1
```
以及
```r theme={null}
## ---- myrcode2
```
這些行標記了程式碼 chunk 的開頭,若要在文件中使用此腳本,這些標記是必要的,如以下程式碼片段所示:
```r theme={null}
The chunk below will not be printed
<>=
read_chunk("mycode.R")
@
The code must show up here
<>=
@
```
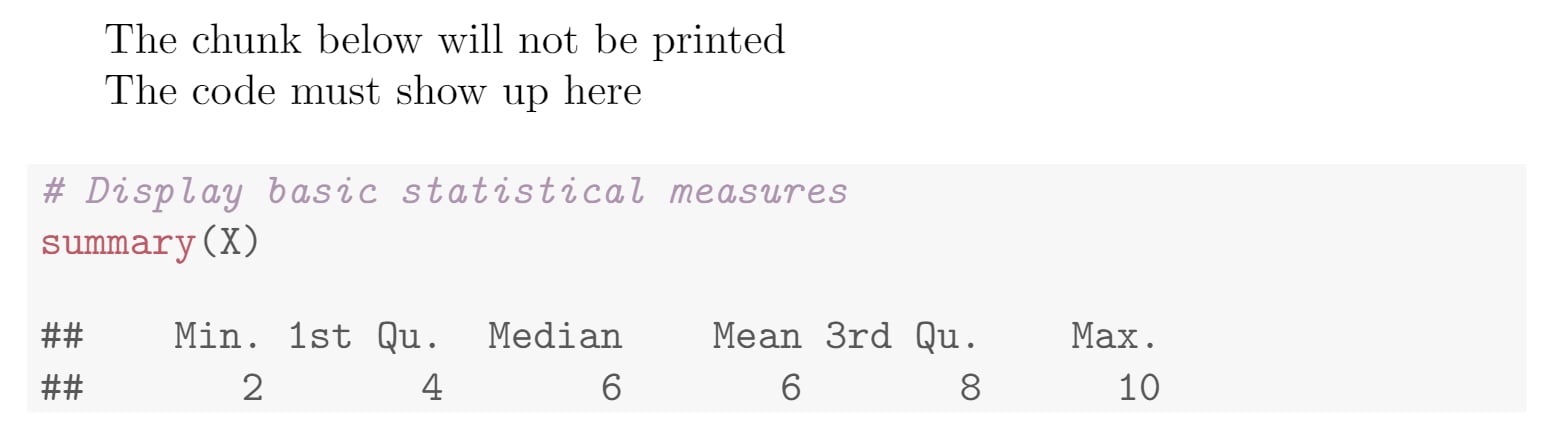 第一個 chunk 不會被印出,僅用於以指令 `read_chunk("mycode.R")` 匯入腳本,這就是設定 `echo=FALSE` 選項的原因。此外,腳本不可被快取。匯入腳本後,您就可以使用在 `## ----` 之後設定的標籤來印出某個 chunk,在此例中為 `myrcode2`。
我們已將本文所有的程式碼片段放入一個專案中,[您可以在 Overleaf 上開啟](https://www.overleaf.com/project/new/template/20429?id=69894649\&templateName=Knitr+full+demo\&latexEngine=pdflatex\&texImage=texlive-full%3A2020.1\&mainFile=)。
### 參考指南
部分 chunk 選項:
* `results`:變更 R 程式碼所產生結果的呈現方式。可能的值有:
* `markup`:使用 LaTeX 格式化輸出。
* `asis`:印出 R 的原始結果。
* `hold`:保留輸出結果,並將其移至 chunk 的結尾。
* `hide`:隱藏結果。
* `echo`:是否納入 R 原始碼。其他參數包括:
* `echo=2:3` 只印出第二與第三行;
* `echo=-2:-3` 只排除第二與第三行。
* `cache`:是否快取該程式碼 chunk。可能的值為:`TRUE` 與 `FALSE`
* `highlight`:是否對原始碼進行語法醒目提示。可能的值為:`TRUE` 與 `FALSE`
* `background`:chunk 的背景顏色,可使用 rgb 與 HTML 格式。預設值為 *"#F7F7F7"*。
This documentation is built and hosted on [Mintlify](https://mintlify.com), a developer documentation platform.
第一個 chunk 不會被印出,僅用於以指令 `read_chunk("mycode.R")` 匯入腳本,這就是設定 `echo=FALSE` 選項的原因。此外,腳本不可被快取。匯入腳本後,您就可以使用在 `## ----` 之後設定的標籤來印出某個 chunk,在此例中為 `myrcode2`。
我們已將本文所有的程式碼片段放入一個專案中,[您可以在 Overleaf 上開啟](https://www.overleaf.com/project/new/template/20429?id=69894649\&templateName=Knitr+full+demo\&latexEngine=pdflatex\&texImage=texlive-full%3A2020.1\&mainFile=)。
### 參考指南
部分 chunk 選項:
* `results`:變更 R 程式碼所產生結果的呈現方式。可能的值有:
* `markup`:使用 LaTeX 格式化輸出。
* `asis`:印出 R 的原始結果。
* `hold`:保留輸出結果,並將其移至 chunk 的結尾。
* `hide`:隱藏結果。
* `echo`:是否納入 R 原始碼。其他參數包括:
* `echo=2:3` 只印出第二與第三行;
* `echo=-2:-3` 只排除第二與第三行。
* `cache`:是否快取該程式碼 chunk。可能的值為:`TRUE` 與 `FALSE`
* `highlight`:是否對原始碼進行語法醒目提示。可能的值為:`TRUE` 與 `FALSE`
* `background`:chunk 的背景顏色,可使用 rgb 與 HTML 格式。預設值為 *"#F7F7F7"*。
This documentation is built and hosted on [Mintlify](https://mintlify.com), a developer documentation platform.