> ## Documentation Index
> Fetch the complete documentation index at: https://ayakaleaf-pro.mintlify.site/llms.txt
> Use this file to discover all available pages before exploring further.
# 设置开发工具
## 推荐的开发工具
这些可选服务并非运行 Overleaf 所必需,但在本地开发过程中,强烈推荐使用它们进行开发、调试和检查。
* **Hoppscotch** 是一款类似 Postman 的轻量级 API 测试工具,但基于浏览器,开发时非常方便。
* 前端:[http://localhost:3000](http://localhost:3000/)
* 代理(用于绕过 CORS):[http://localhost:9159](http://localhost:9159/)
* **RedisInsight** 提供用于查看 Redis 数据的可视化界面。界面地址:[http://localhost:5540](http://localhost:5540/)
* **Mongo Express** 是 MongoDB 的 Web 界面。你可以访问 [http://localhost:8081](http://localhost:8081/),**凭据**为:`admin:pass`
请将以下内容添加到你的 `docker-compose.yml` 中:
```yml title="develop/docker-compose.yml" theme={null}
# services:
# Overleaf Dev Containers
# ...
# Add those for your development
# API debug
hoppscotch-frontend:
image: hoppscotch/hoppscotch-frontend:latest
ports:
- "3000:3000"
hoppscotch-proxy:
image: hoppscotch/proxyscotch:latest
environment:
- PORT=9159
ports:
- "9159:9159"
# Redis-insight
redis-insight:
image: redislabs/redisinsight:latest
ports:
- "5540:5540"
depends_on:
- redis
volumes:
- ./data/redis-insight:/data
# mongo-express
# basicAuth credentials are "admin:pass"
mongo-express:
image: mongo-express
ports:
- "8081:8081"
environment:
ME_CONFIG_MONGODB_SERVER: mongo
```
### 设置 Hoppscotch
#### 代理 API 请求
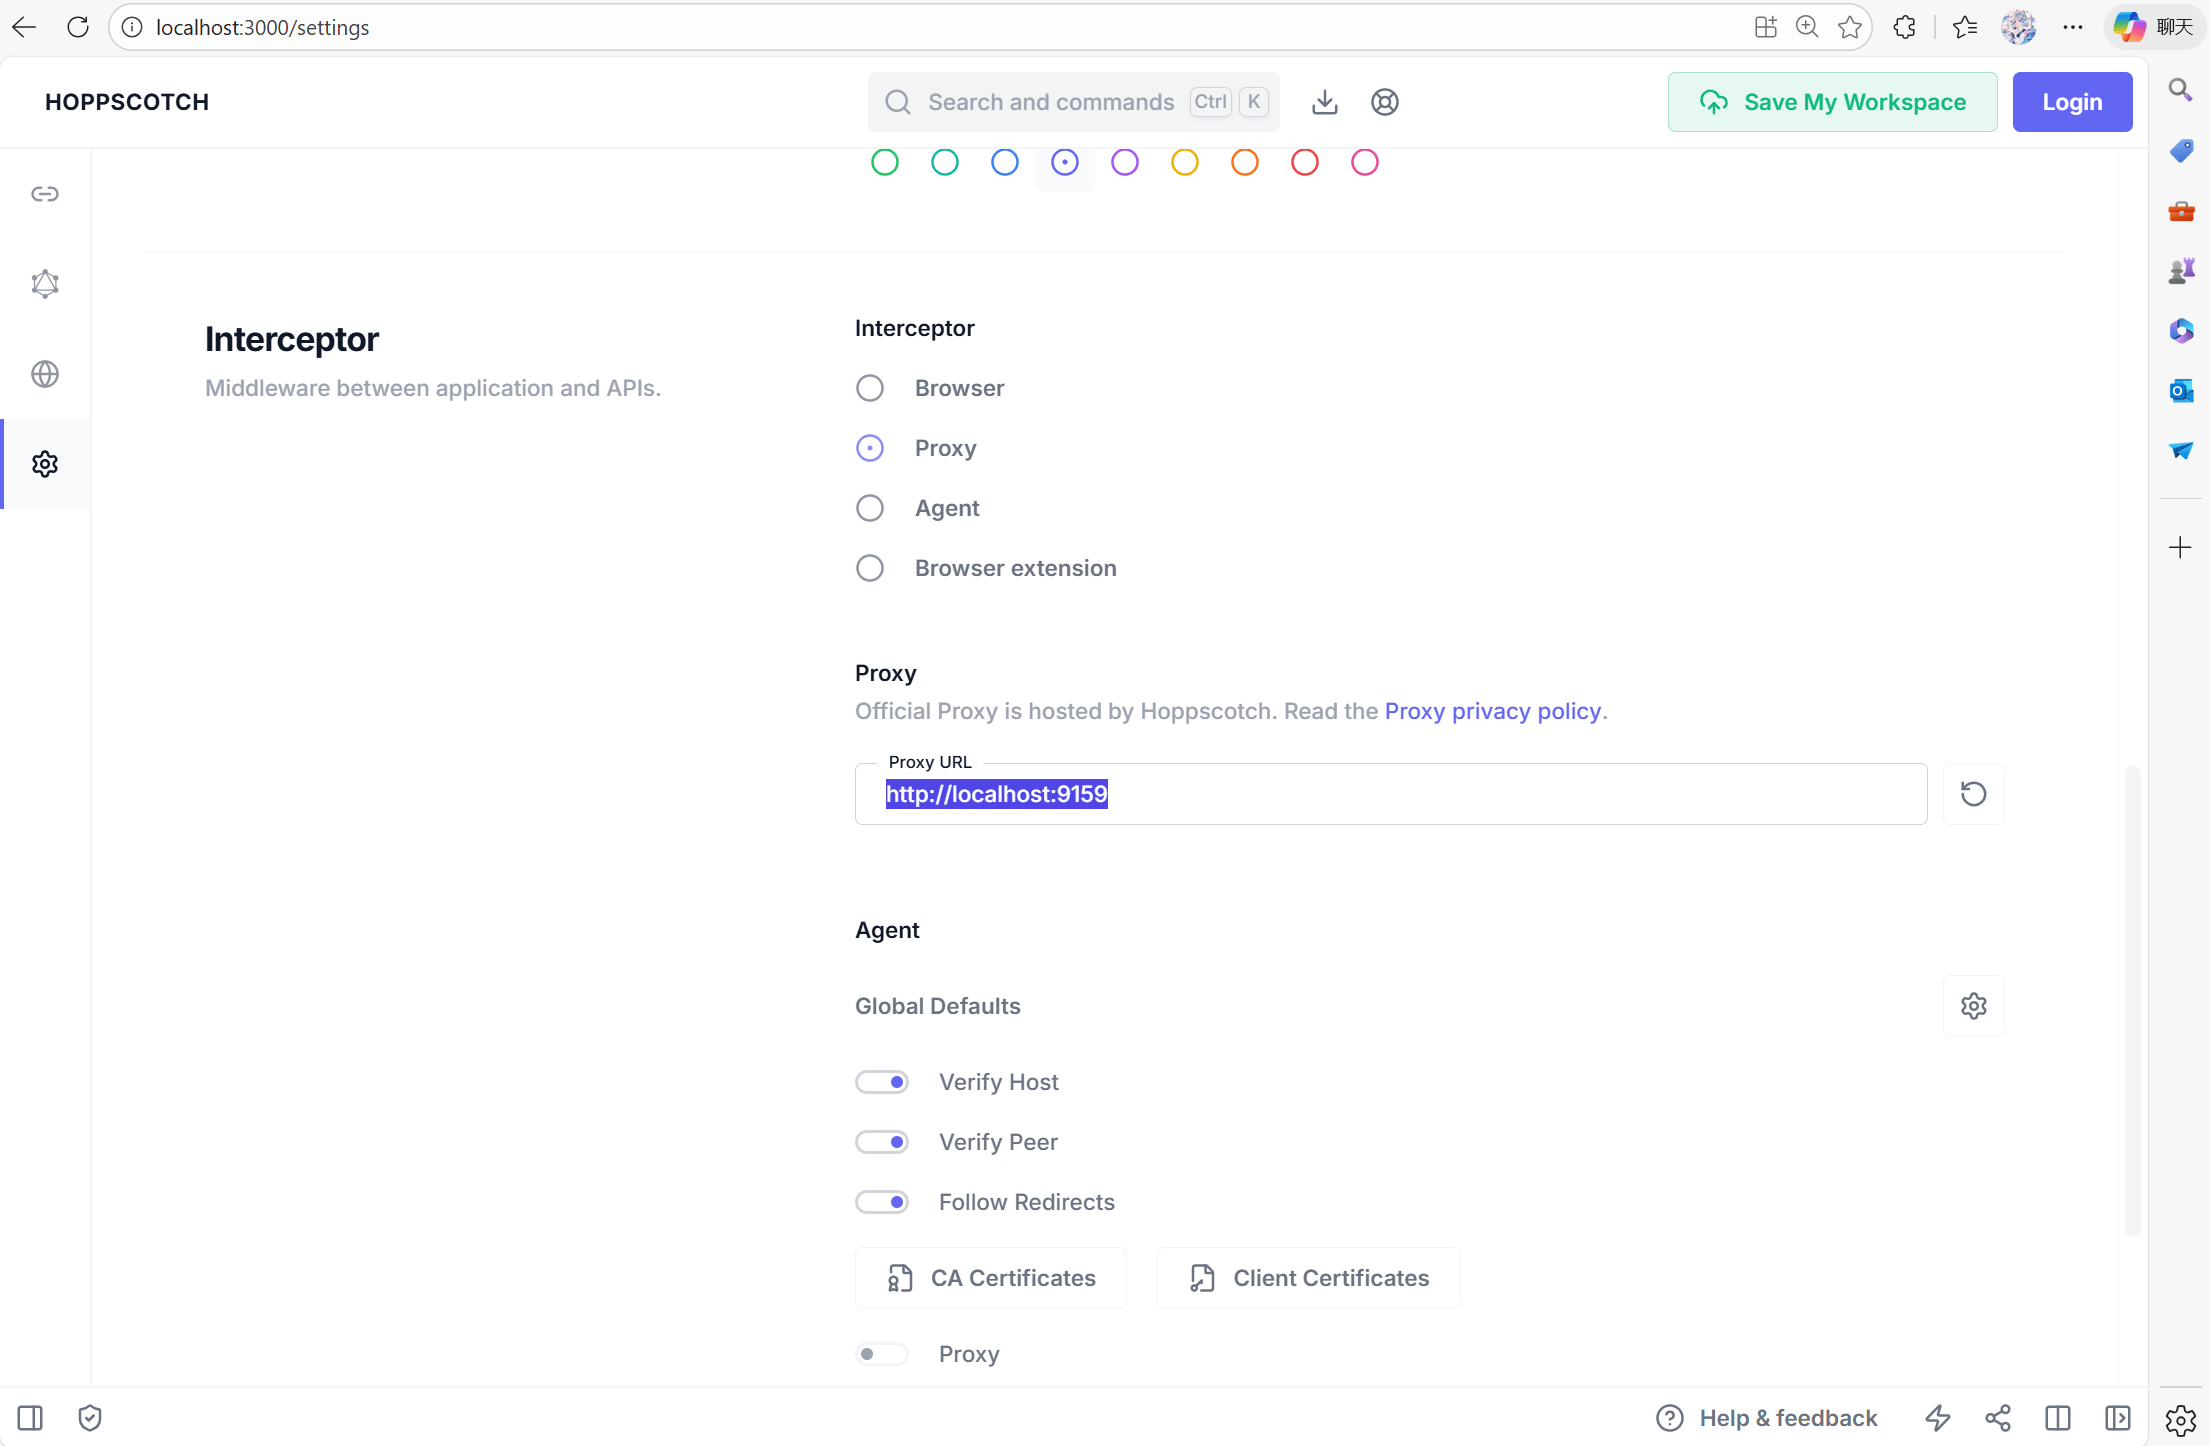
要设置 Hoppscotch,你可以访问 [http://localhost:3000](http://localhost:3000/),然后进入设置选项卡。你需要将 `Proxy` 设置为 [http://localhost:9159](http://localhost:9159/),以便你的调试工具能够与容器内部网络交互。
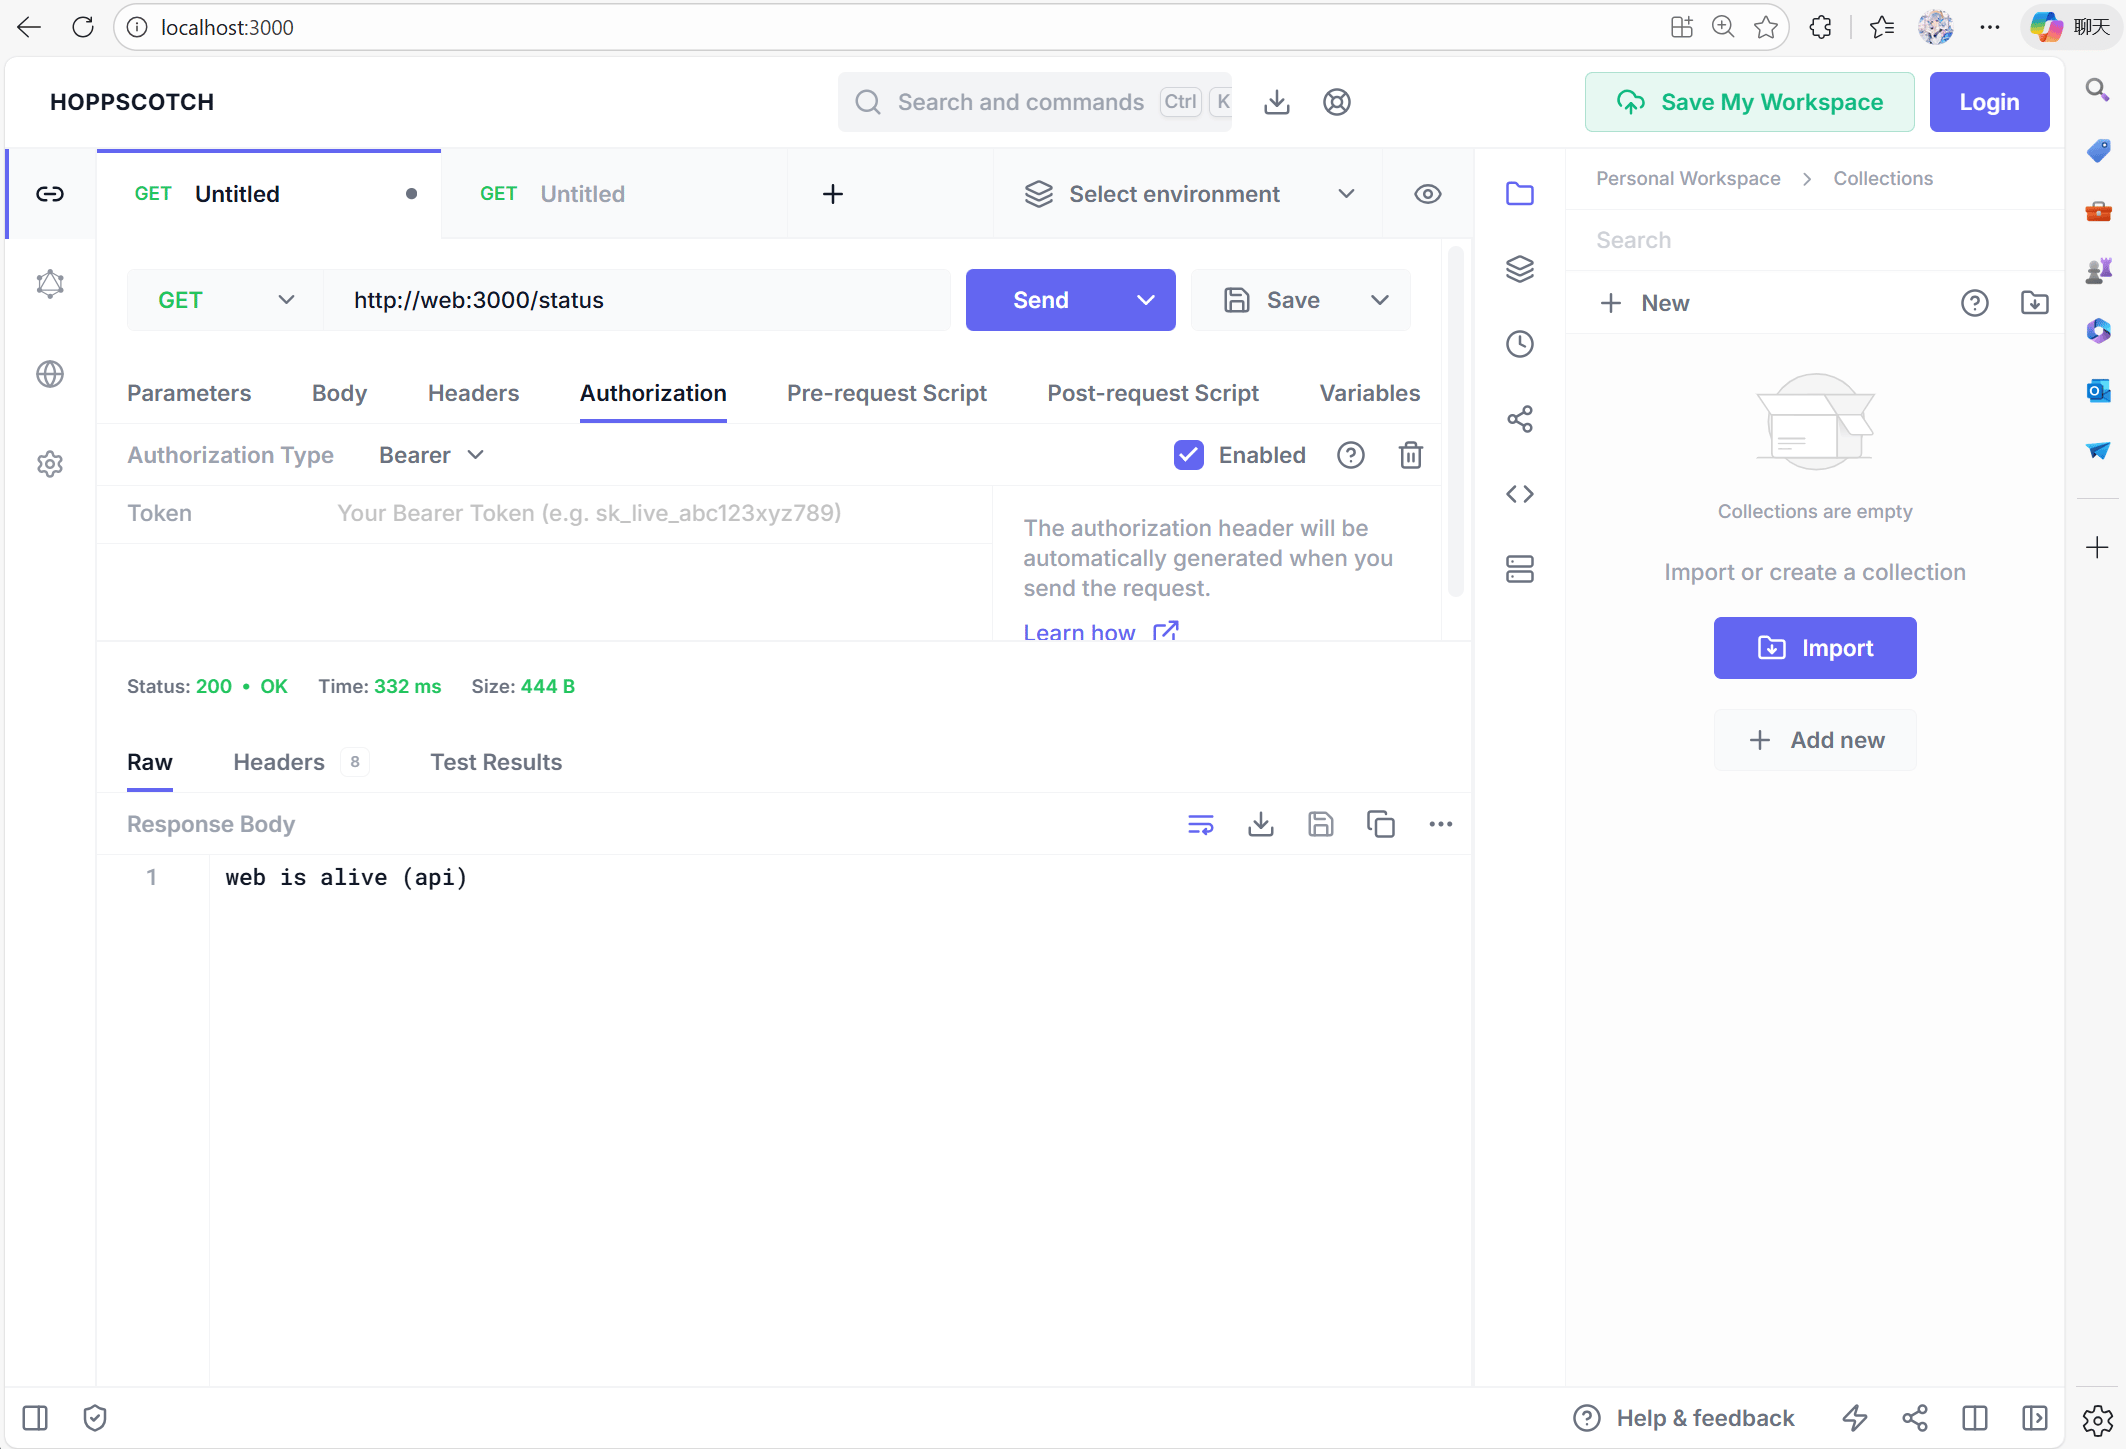
 现在你可以使用 [http://web:3000/status](http://web:3000/status) 来测试 web 服务是否正常运行:
 #### CSRF 问题
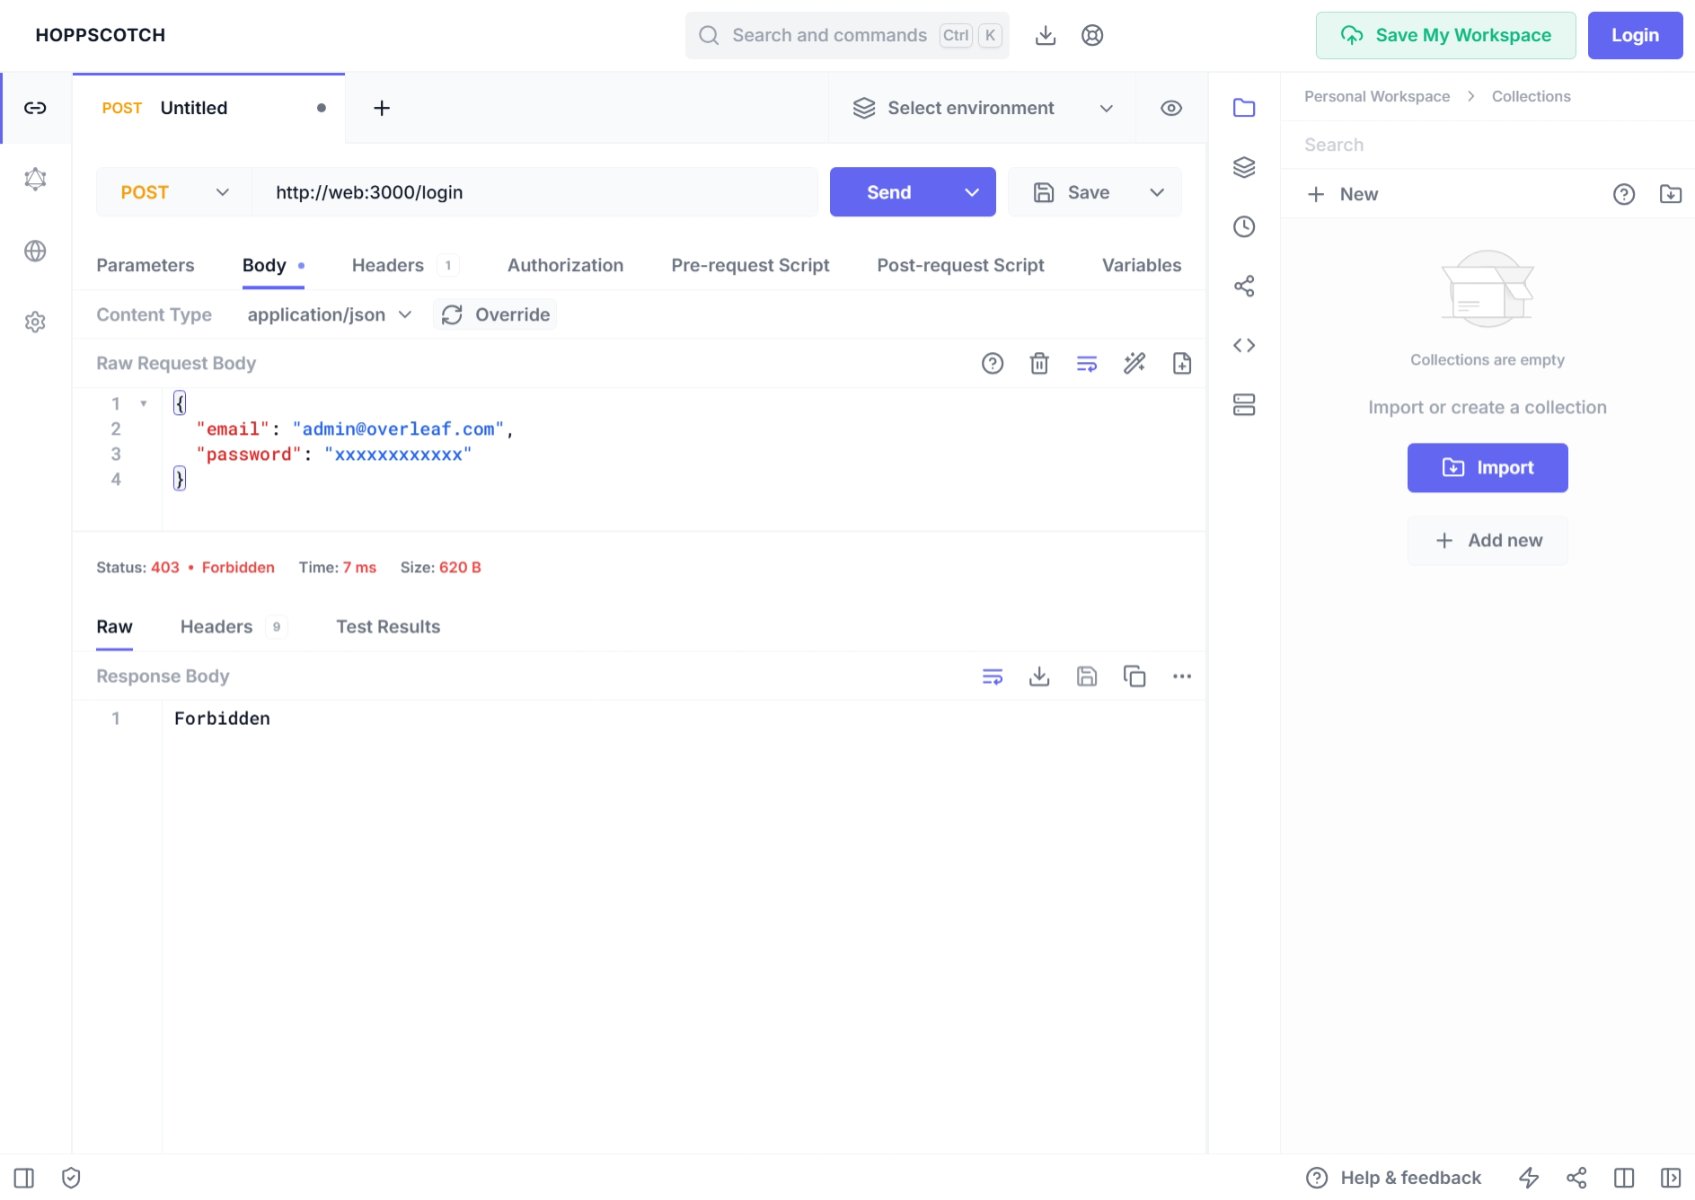
如果你使用 Postman 或其他调试工具发起 **POST** 请求,可能会发现登录被**禁止**,原因是 401 错误。这是因为 Overleaf 受到 **CSRF** 验证保护。
#### CSRF 问题
如果你使用 Postman 或其他调试工具发起 **POST** 请求,可能会发现登录被**禁止**,原因是 401 错误。这是因为 Overleaf 受到 **CSRF** 验证保护。
 在控制台中,你可能会看到:
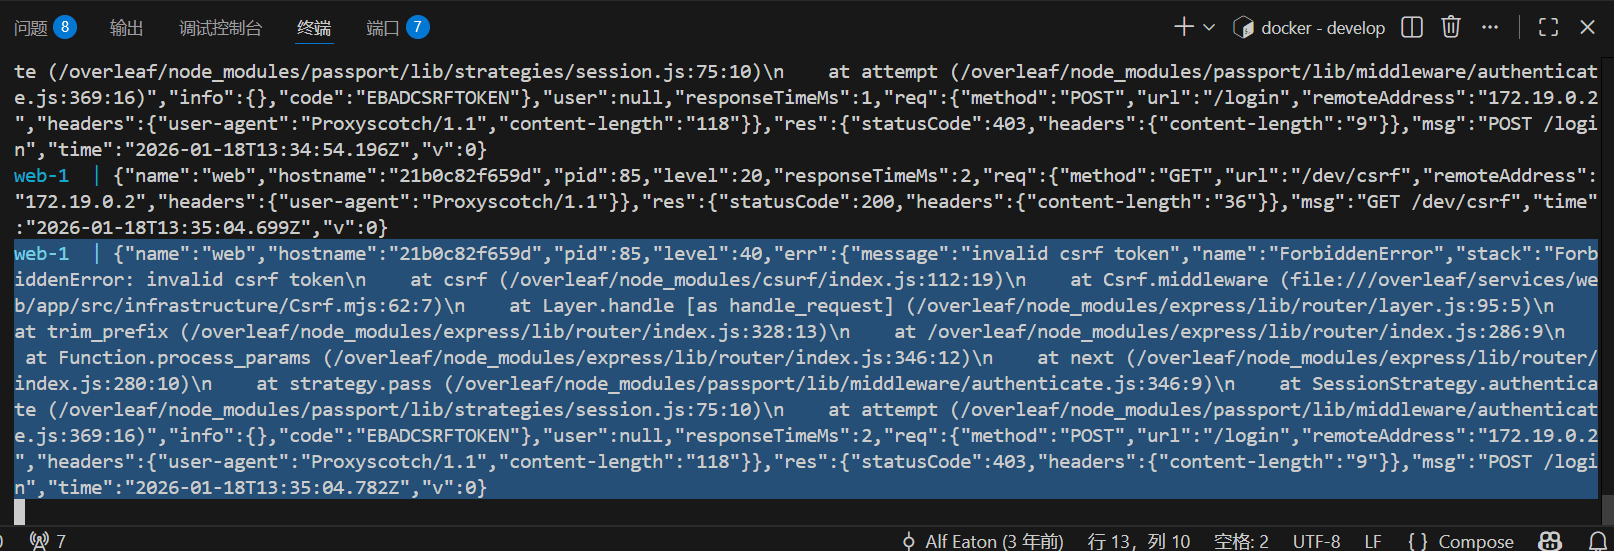 要在 Overleaf 开发中解决此问题,你需要设置 CSRF 令牌。以下是详细教程。
将以下代码添加到 Pre-Request 中
要在 Overleaf 开发中解决此问题,你需要设置 CSRF 令牌。以下是详细教程。
将以下代码添加到 Pre-Request 中
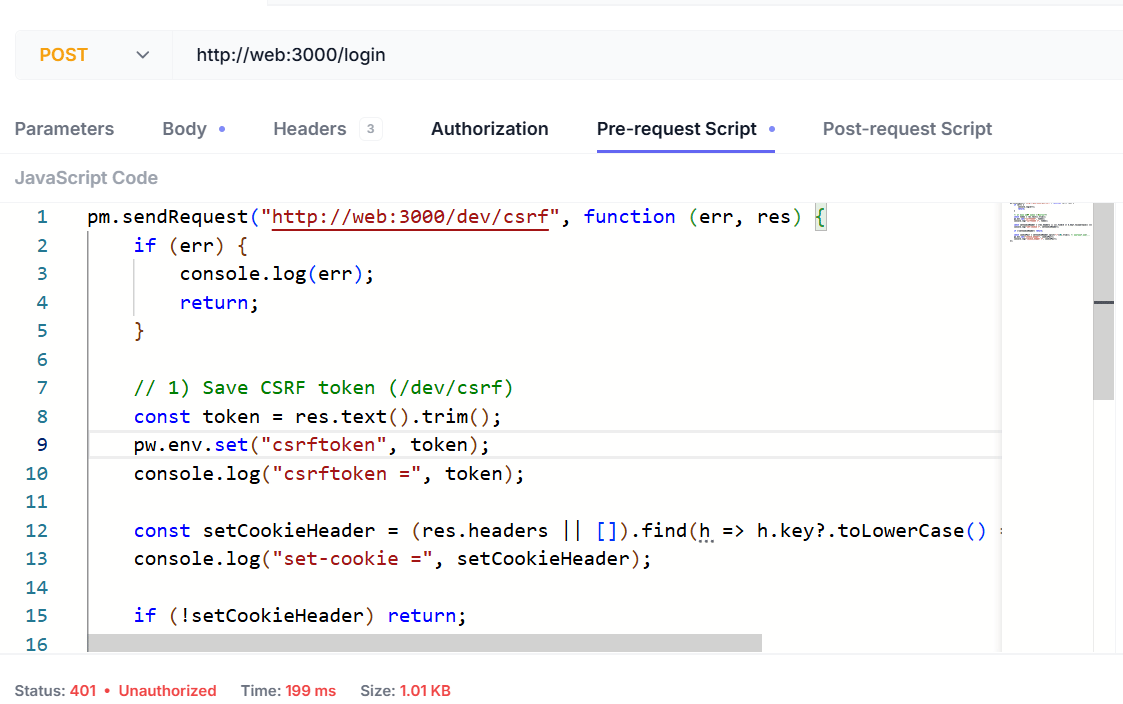 脚本如下:
```js wrap theme={null}
pm.sendRequest("http://web:3000/dev/csrf", function (err, res) {
if (err) {
console.log(err);
return;
}
// 1) Save CSRF token (/dev/csrf)
const token = res.text().trim();
pw.env.set("csrftoken", token);
console.log("csrftoken =", token);
const setCookieHeader = (res.headers || []).find(h => h.key?.toLowerCase() === "set-cookie")?.value;
console.log("set-cookie =", setCookieHeader);
if (!setCookieHeader) return;
const cookiePair = setCookieHeader.split(";")[0].trim(); // overleaf.sid=...
pw.env.set("cookie_header", cookiePair);
console.log("cookie_header =", cookiePair);
});
```
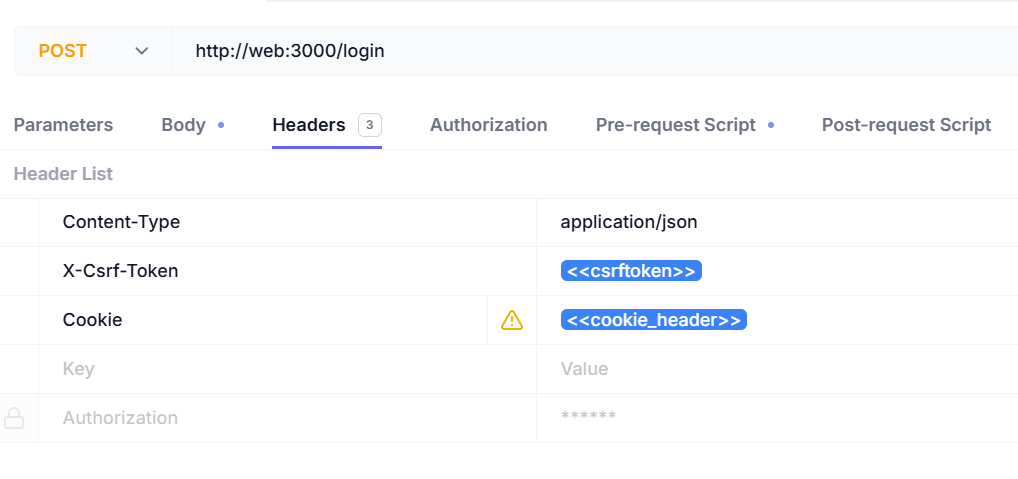
你需要添加以下请求头:
| 请求头名称 | 请求头值 |
| - | - |
| Content-Type | `application/json` |
| X-Csrf-Token | `<>` |
| Cookie | `<>` |
脚本如下:
```js wrap theme={null}
pm.sendRequest("http://web:3000/dev/csrf", function (err, res) {
if (err) {
console.log(err);
return;
}
// 1) Save CSRF token (/dev/csrf)
const token = res.text().trim();
pw.env.set("csrftoken", token);
console.log("csrftoken =", token);
const setCookieHeader = (res.headers || []).find(h => h.key?.toLowerCase() === "set-cookie")?.value;
console.log("set-cookie =", setCookieHeader);
if (!setCookieHeader) return;
const cookiePair = setCookieHeader.split(";")[0].trim(); // overleaf.sid=...
pw.env.set("cookie_header", cookiePair);
console.log("cookie_header =", cookiePair);
});
```
你需要添加以下请求头:
| 请求头名称 | 请求头值 |
| - | - |
| Content-Type | `application/json` |
| X-Csrf-Token | `<>` |
| Cookie | `<>` |
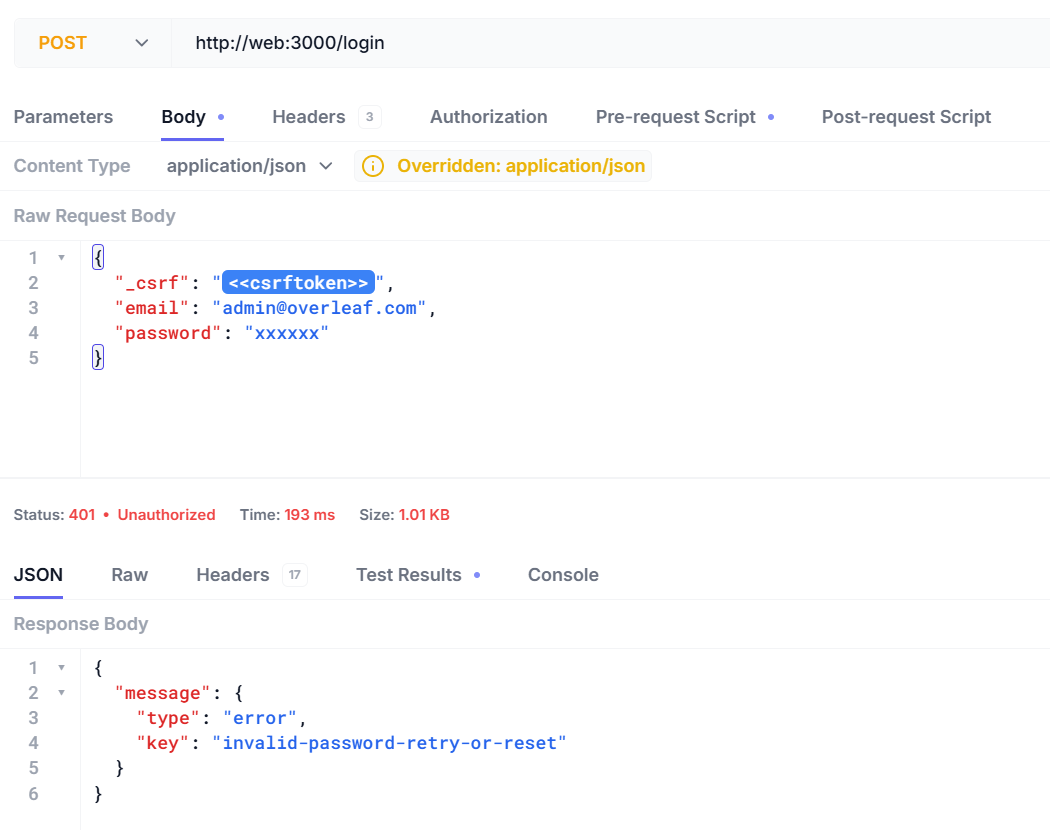
 现在你可以使用用户名和密码登录。
```json5 theme={null}
{
"_csrf": "<>",
"email": "admin@overleaf.com",
"password": "xxxxxx"
}
```
以下是输入错误的用户名或密码时的响应。
现在你可以使用用户名和密码登录。
```json5 theme={null}
{
"_csrf": "<>",
"email": "admin@overleaf.com",
"password": "xxxxxx"
}
```
以下是输入错误的用户名或密码时的响应。
 This documentation is built and hosted on [Mintlify](https://mintlify.com), a developer documentation platform.