> ## Documentation Index
> Fetch the complete documentation index at: https://ayakaleaf-pro.mintlify.site/llms.txt
> Use this file to discover all available pages before exploring further.
# R 코드 (knitr)
Overleaf는 **knitr**와의 통합을 제공하므로, LaTeX 문서에 R 코드를 추가하여 동적 출력을 생성할 수 있습니다.
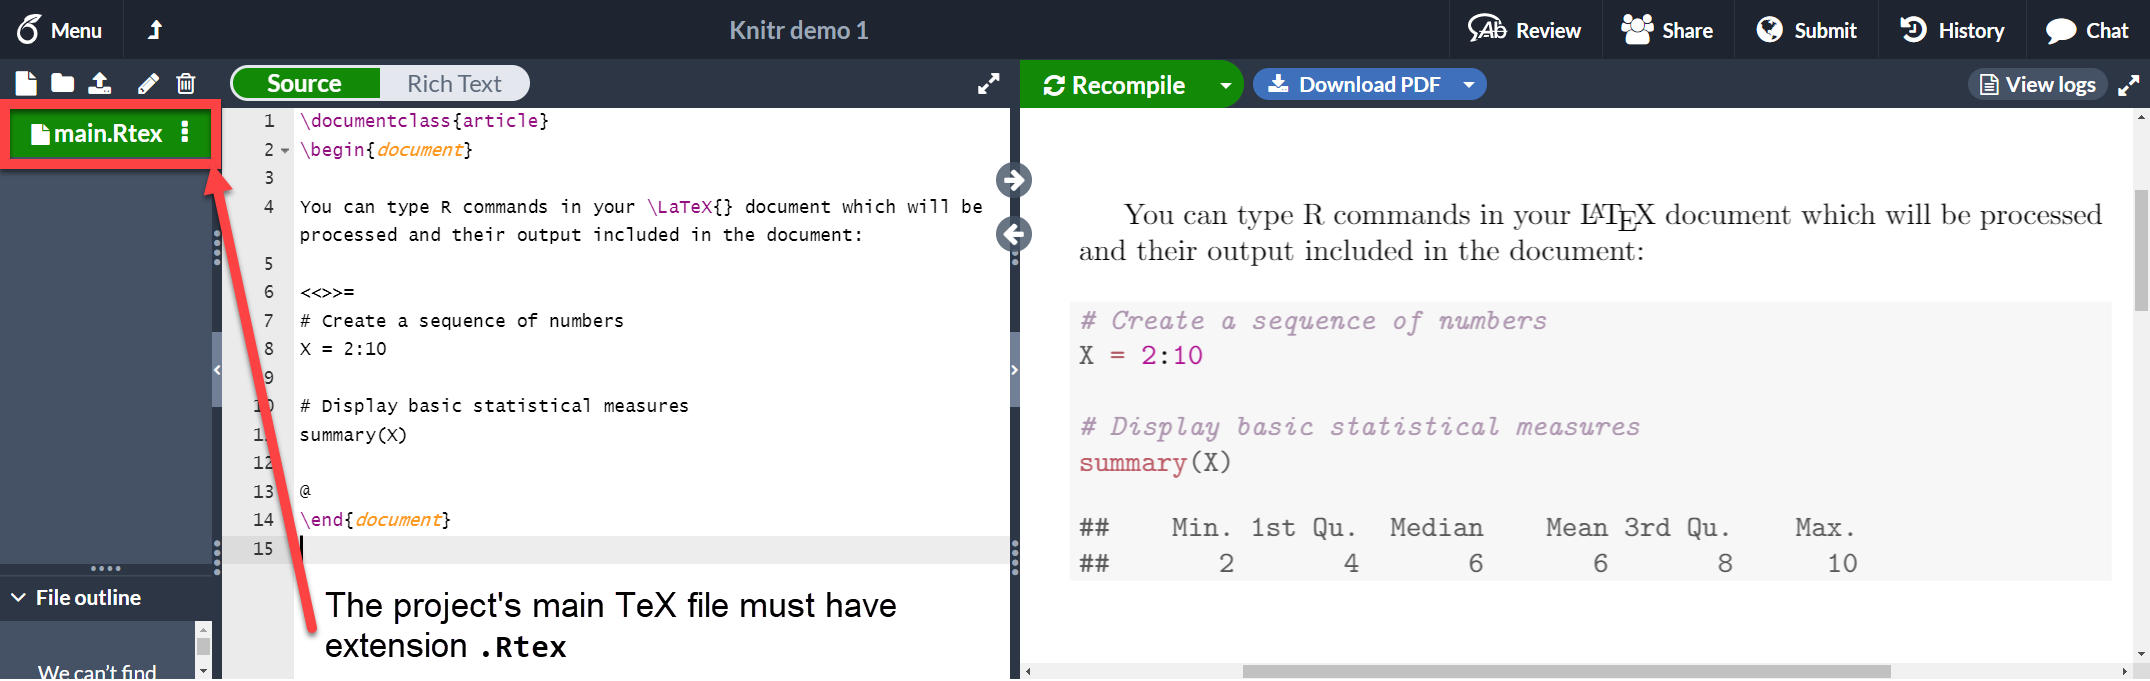
R 코드가 포함된 문서는 `.Rtex` 또는 `.Rnw` 확장자로 저장해야 하며, 그렇지 않으면 코드가 작동하지 않습니다. 예시를 살펴보겠습니다.
```latex wrap theme={null}
\documentclass{article}
\begin{document}
You can type R commands in your \LaTeX{} document which will be processed and their output included in the document:
<<>>=
# Create a sequence of numbers
X = 2:10
# Display basic statistical measures
summary(X)
@
\end{document}
```
 [Overleaf에서 이 `knitr` 예제 열기](https://www.overleaf.com/project/new/template/20421?id=69881107\&templateName=Knitr+demo+1\&latexEngine=pdflatex\&texImage=texlive-full%3A2020.1\&mainFile=)
보시다시피 `<<>>=`와 `@` 문자 사이의 텍스트가 R 코드입니다. 이 코드와 그 출력은 코드 목록과 비슷한 형식으로 출력됩니다. 다음 섹션에서 설명하는 것처럼, 이 코드 조각에 추가 매개변수를 지정하여 동적 출력을 사용자 지정할 수 있습니다.
### 코드 청크
이전 섹션에서 소개한 것과 같은 코드 블록을 일반적으로 *청크(chunk)* 라고 합니다. knitr 청크에는 몇 가지 추가 옵션을 설정할 수 있습니다. 아래 예시를 참조하세요.
```latex wrap theme={null}
\documentclass{article}
\begin{document}
You can type R commands in your \LaTeX{} document which will be processed and their output included in the document:
<>=
# Create a sequence of numbers
X = 2:10
# Display basic statistical measures
summary(X)
@
\end{document}
```
[Overleaf에서 이 `knitr` 예제 열기](https://www.overleaf.com/project/new/template/20421?id=69881107\&templateName=Knitr+demo+1\&latexEngine=pdflatex\&texImage=texlive-full%3A2020.1\&mainFile=)
보시다시피 `<<>>=`와 `@` 문자 사이의 텍스트가 R 코드입니다. 이 코드와 그 출력은 코드 목록과 비슷한 형식으로 출력됩니다. 다음 섹션에서 설명하는 것처럼, 이 코드 조각에 추가 매개변수를 지정하여 동적 출력을 사용자 지정할 수 있습니다.
### 코드 청크
이전 섹션에서 소개한 것과 같은 코드 블록을 일반적으로 *청크(chunk)* 라고 합니다. knitr 청크에는 몇 가지 추가 옵션을 설정할 수 있습니다. 아래 예시를 참조하세요.
```latex wrap theme={null}
\documentclass{article}
\begin{document}
You can type R commands in your \LaTeX{} document which will be processed and their output included in the document:
<>=
# Create a sequence of numbers
X = 2:10
# Display basic statistical measures
summary(X)
@
\end{document}
```
 [Overleaf에서 이 `knitr` 예제 열기](https://www.overleaf.com/project/new/template/20423?id=69885763\&templateName=Knitr+demo+2\&latexEngine=pdflatex\&texImage=texlive-full%3A2020.1\&mainFile=)
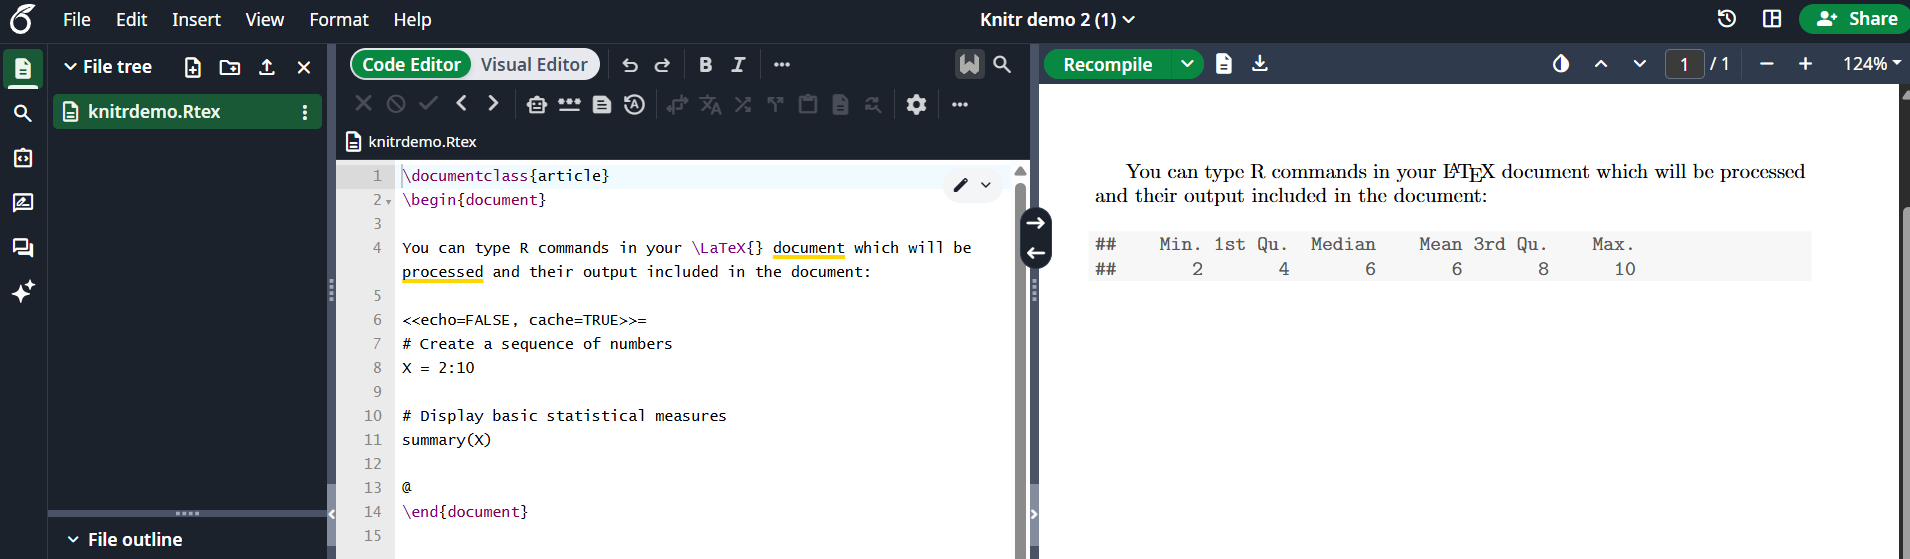
`<<`와 `>>` 안에 두 가지 추가 옵션이 전달되었습니다.
* `echo=FALSE` 코드를 숨기고 R이 생성한 출력만 표시합니다.
* `cache=TRUE` cache를 true로 설정하면 청크가 실행되지 않고 청크가 생성한 객체만 사용됩니다. 해당 청크의 데이터가 변경되지 않은 경우 시간을 절약할 수 있습니다.
cache=TRUE 옵션은 현재 Overleaf에서 지원되지 않지만, 로컬에서는 작동합니다.
더 많은 옵션은 [참조 가이드](https://learn.overleaf.com/learn/Knitr#Reference_guide)를 참조하세요.
### 인라인 명령
청크에서 생성된 객체에 접근하여 본문 중에 인라인으로 출력할 수 있습니다.
```latex wrap theme={null}
\documentclass{article}
\begin{document}
You can type R commands in your \LaTeX{} document which will be processed and their output included in the document:
<>=
# Create a sequence of numbers
X = 2:10
# Display basic statistical measures
summary(X)
@
So, the mean of the data is $\Sexpr{mean(X)}$
\end{document}
```
[Overleaf에서 이 `knitr` 예제 열기](https://www.overleaf.com/project/new/template/20423?id=69885763\&templateName=Knitr+demo+2\&latexEngine=pdflatex\&texImage=texlive-full%3A2020.1\&mainFile=)
`<<`와 `>>` 안에 두 가지 추가 옵션이 전달되었습니다.
* `echo=FALSE` 코드를 숨기고 R이 생성한 출력만 표시합니다.
* `cache=TRUE` cache를 true로 설정하면 청크가 실행되지 않고 청크가 생성한 객체만 사용됩니다. 해당 청크의 데이터가 변경되지 않은 경우 시간을 절약할 수 있습니다.
cache=TRUE 옵션은 현재 Overleaf에서 지원되지 않지만, 로컬에서는 작동합니다.
더 많은 옵션은 [참조 가이드](https://learn.overleaf.com/learn/Knitr#Reference_guide)를 참조하세요.
### 인라인 명령
청크에서 생성된 객체에 접근하여 본문 중에 인라인으로 출력할 수 있습니다.
```latex wrap theme={null}
\documentclass{article}
\begin{document}
You can type R commands in your \LaTeX{} document which will be processed and their output included in the document:
<>=
# Create a sequence of numbers
X = 2:10
# Display basic statistical measures
summary(X)
@
So, the mean of the data is $\Sexpr{mean(X)}$
\end{document}
```
 [Overleaf에서 이 `knitr` 예제 열기](https://www.overleaf.com/project/new/template/20425?id=69886866\&templateName=Knitr+demo+3\&latexEngine=pdflatex\&texImage=texlive-full%3A2020.1\&mainFile=)
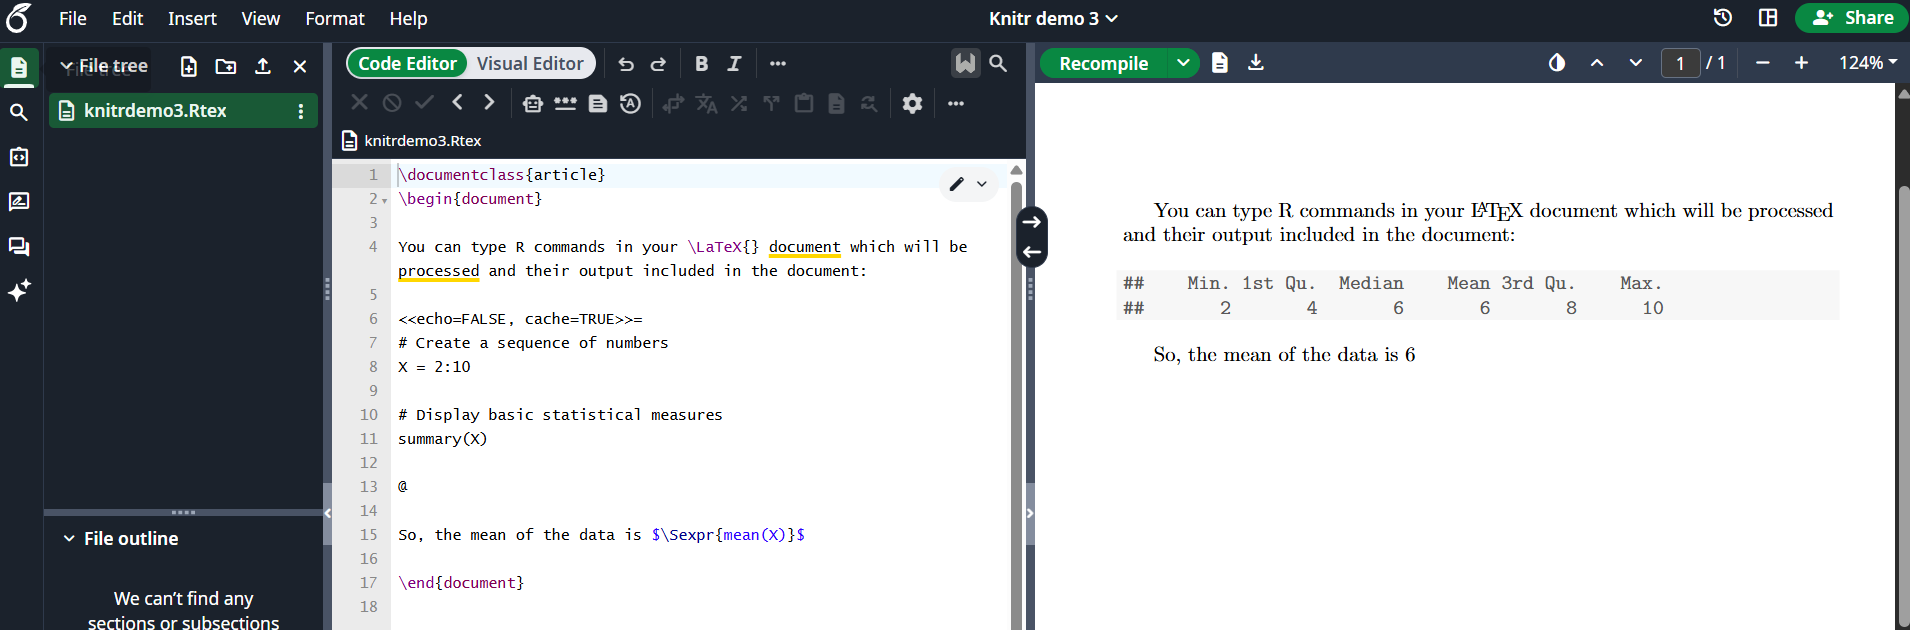
`\Sexpr{mean(X)}` 명령은 R 코드 `mean(X)`가 반환한 출력을 표시합니다. 중괄호 안에는 어떤 R 명령이든 넣을 수 있습니다.
### 플롯
다음 예시처럼 knitr 문서에 플롯을 추가할 수도 있습니다.
```latex wrap theme={null}
\documentclass{article}
\begin{document}
<>=
xdata = read.csv(file="data.txt", head=TRUE,sep=" ")
hist(xdata$data, main="Overleaf histogram", xlab="Data")
@
The figure \ref{fig:plot1} is simple histogram.
\end{document}
```
[Overleaf에서 이 `knitr` 예제 열기](https://www.overleaf.com/project/new/template/20425?id=69886866\&templateName=Knitr+demo+3\&latexEngine=pdflatex\&texImage=texlive-full%3A2020.1\&mainFile=)
`\Sexpr{mean(X)}` 명령은 R 코드 `mean(X)`가 반환한 출력을 표시합니다. 중괄호 안에는 어떤 R 명령이든 넣을 수 있습니다.
### 플롯
다음 예시처럼 knitr 문서에 플롯을 추가할 수도 있습니다.
```latex wrap theme={null}
\documentclass{article}
\begin{document}
<>=
xdata = read.csv(file="data.txt", head=TRUE,sep=" ")
hist(xdata$data, main="Overleaf histogram", xlab="Data")
@
The figure \ref{fig:plot1} is simple histogram.
\end{document}
```
 [Overleaf에서 이 `knitr` 예제 열기](https://www.overleaf.com/project/new/template/20427?id=69890965\&templateName=Knitr+demo+3\&latexEngine=pdflatex\&texImage=texlive-full%3A2020.1\&mainFile=)
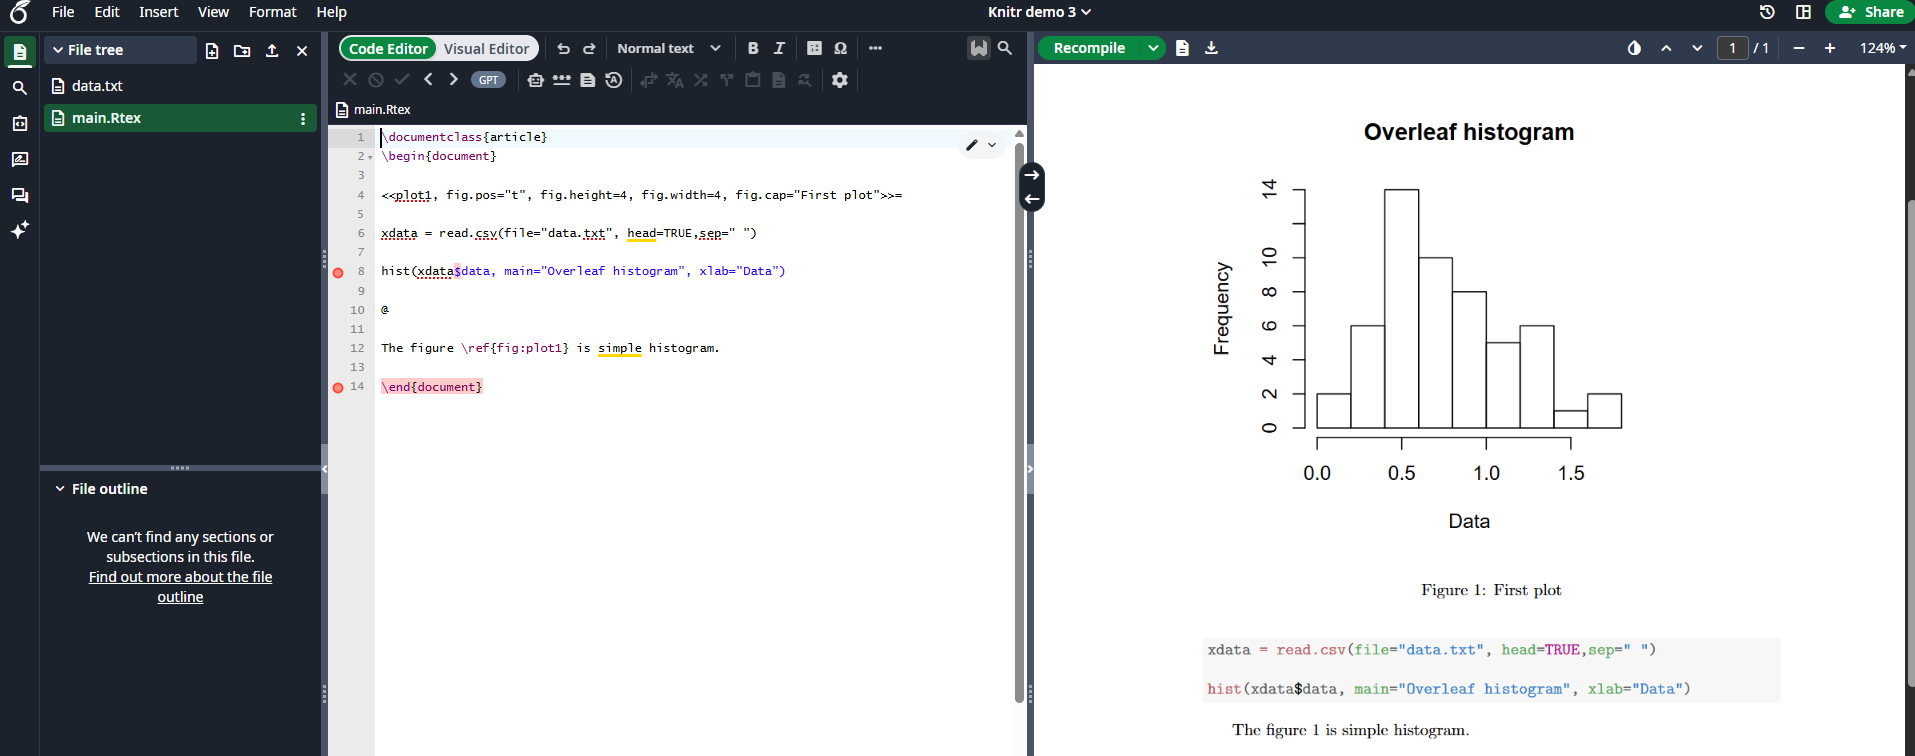
이 히스토그램은 현재 작업 디렉터리에 저장된 "data.txt"의 데이터를 사용합니다. 청크에는 그림 관련 옵션이 몇 가지 전달됩니다.
`plot1` 플롯을 참조하는 데 사용되는 레이블입니다. 접두사 "fig:"는 필수입니다. 예시에서 그림이 `\ref{fig:plot1}`으로 참조되는 것을 볼 수 있습니다. `fig.pos="t"` 위치 지정 매개변수입니다. [figure 환경](https://learn.overleaf.com/learn/Positioning_images_and_tables#The_figure_environment)에서 사용하는 것과 같습니다. `fig.height=4, fig.width=4` 그림의 너비와 높이입니다. `fig.cap="First plot"` 그림의 캡션입니다.
### 외부 R 스크립트
외부 R 스크립트의 일부를 knitr 문서로 가져올 수 있습니다. 스크립트를 문서에 포함하기 전에 외부 프로그램에서 작성하고 디버깅하는 경우가 꽤 흔하므로 매우 유용합니다.
LaTeX 문서에 포함할 다음 R 코드가 `mycode.R`이라는 파일에 있다고 가정해 보겠습니다.
```r theme={null}
## ---- myrcode1
# Create a sequence of numbers
X = 2:10
## ---- myrcode2
# Display basic statistical measures
summary(X)
```
다음 줄과
```r theme={null}
## ---- myrcode1
```
다음 줄에 주목하세요.
```r theme={null}
## ---- myrcode2
```
이 줄들은 코드 청크의 시작을 표시하며, 다음 코드 조각처럼 이 스크립트를 문서에서 사용하려면 반드시 필요합니다.
```r theme={null}
The chunk below will not be printed
<>=
read_chunk("mycode.R")
@
The code must show up here
<>=
@
```
[Overleaf에서 이 `knitr` 예제 열기](https://www.overleaf.com/project/new/template/20427?id=69890965\&templateName=Knitr+demo+3\&latexEngine=pdflatex\&texImage=texlive-full%3A2020.1\&mainFile=)
이 히스토그램은 현재 작업 디렉터리에 저장된 "data.txt"의 데이터를 사용합니다. 청크에는 그림 관련 옵션이 몇 가지 전달됩니다.
`plot1` 플롯을 참조하는 데 사용되는 레이블입니다. 접두사 "fig:"는 필수입니다. 예시에서 그림이 `\ref{fig:plot1}`으로 참조되는 것을 볼 수 있습니다. `fig.pos="t"` 위치 지정 매개변수입니다. [figure 환경](https://learn.overleaf.com/learn/Positioning_images_and_tables#The_figure_environment)에서 사용하는 것과 같습니다. `fig.height=4, fig.width=4` 그림의 너비와 높이입니다. `fig.cap="First plot"` 그림의 캡션입니다.
### 외부 R 스크립트
외부 R 스크립트의 일부를 knitr 문서로 가져올 수 있습니다. 스크립트를 문서에 포함하기 전에 외부 프로그램에서 작성하고 디버깅하는 경우가 꽤 흔하므로 매우 유용합니다.
LaTeX 문서에 포함할 다음 R 코드가 `mycode.R`이라는 파일에 있다고 가정해 보겠습니다.
```r theme={null}
## ---- myrcode1
# Create a sequence of numbers
X = 2:10
## ---- myrcode2
# Display basic statistical measures
summary(X)
```
다음 줄과
```r theme={null}
## ---- myrcode1
```
다음 줄에 주목하세요.
```r theme={null}
## ---- myrcode2
```
이 줄들은 코드 청크의 시작을 표시하며, 다음 코드 조각처럼 이 스크립트를 문서에서 사용하려면 반드시 필요합니다.
```r theme={null}
The chunk below will not be printed
<>=
read_chunk("mycode.R")
@
The code must show up here
<>=
@
```
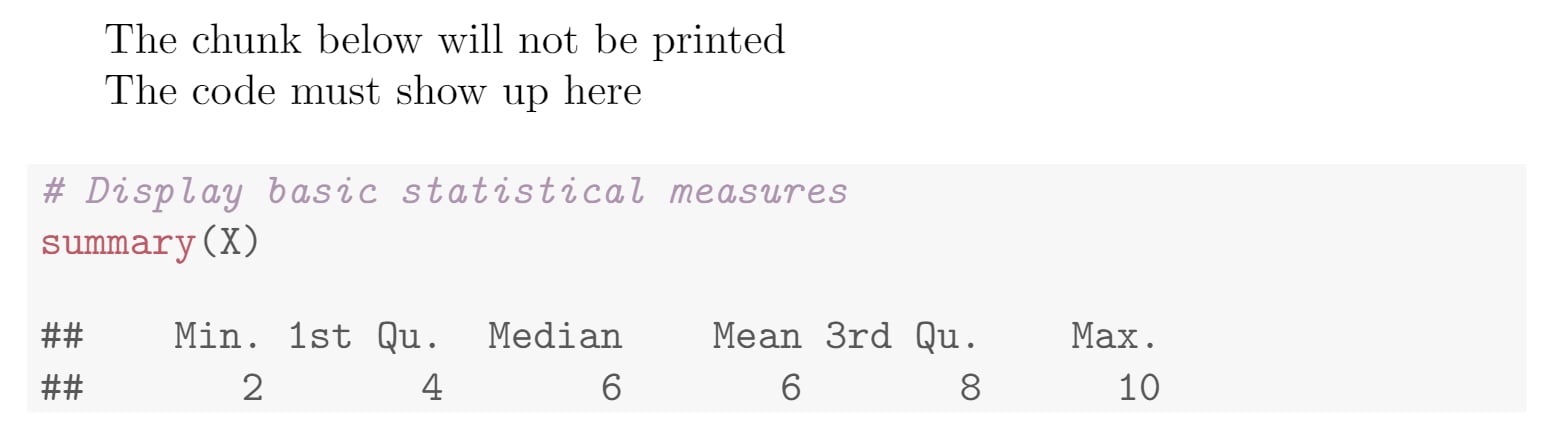 첫 번째 청크는 출력되지 않으며 `read_chunk("mycode.R")` 명령으로 스크립트를 가져오는 데만 사용됩니다. 그래서 `echo=FALSE` 옵션이 설정되어 있습니다. 또한 스크립트는 캐시되면 안 됩니다. 스크립트를 가져온 후에는 `## ----` 뒤에 설정한 레이블을 사용하여 청크를 출력할 수 있습니다. 이 경우에는 `myrcode2`입니다.
이 문서의 모든 코드 조각을 [Overleaf에서 열 수 있는](https://www.overleaf.com/project/new/template/20429?id=69894649\&templateName=Knitr+full+demo\&latexEngine=pdflatex\&texImage=texlive-full%3A2020.1\&mainFile=) 프로젝트에 모아 두었습니다.
### 참조 가이드
몇 가지 청크 옵션:
* `results`. R 코드가 생성한 결과의 동작 방식을 변경합니다. 가능한 값은 다음과 같습니다.
* `markup` LaTeX를 사용하여 출력 형식을 지정합니다.
* `asis` R의 원시 결과를 출력합니다.
* `hold` 출력 결과를 보류했다가 청크 끝으로 보냅니다.
* `hide` 결과를 숨깁니다.
* `echo`. R 소스 코드를 포함할지 여부입니다. 다른 매개변수는 다음과 같습니다.
* `echo=2:3` 두 번째와 세 번째 줄만 출력합니다.
* `echo=-2:-3` 두 번째와 세 번째 줄만 제외합니다.
* `cache`. 코드 청크를 캐시할지 여부입니다. 가능한 값: `TRUE` 및 `FALSE`
* `highlight`. 소스 코드를 강조 표시할지 여부입니다. 가능한 값: `TRUE` 및 `FALSE`
* `background`. 청크의 배경색입니다. rgb 및 HTML 형식을 사용할 수 있습니다. 기본값은 *"#F7F7F7"* 입니다.
This documentation is built and hosted on [Mintlify](https://mintlify.com), a developer documentation platform.
첫 번째 청크는 출력되지 않으며 `read_chunk("mycode.R")` 명령으로 스크립트를 가져오는 데만 사용됩니다. 그래서 `echo=FALSE` 옵션이 설정되어 있습니다. 또한 스크립트는 캐시되면 안 됩니다. 스크립트를 가져온 후에는 `## ----` 뒤에 설정한 레이블을 사용하여 청크를 출력할 수 있습니다. 이 경우에는 `myrcode2`입니다.
이 문서의 모든 코드 조각을 [Overleaf에서 열 수 있는](https://www.overleaf.com/project/new/template/20429?id=69894649\&templateName=Knitr+full+demo\&latexEngine=pdflatex\&texImage=texlive-full%3A2020.1\&mainFile=) 프로젝트에 모아 두었습니다.
### 참조 가이드
몇 가지 청크 옵션:
* `results`. R 코드가 생성한 결과의 동작 방식을 변경합니다. 가능한 값은 다음과 같습니다.
* `markup` LaTeX를 사용하여 출력 형식을 지정합니다.
* `asis` R의 원시 결과를 출력합니다.
* `hold` 출력 결과를 보류했다가 청크 끝으로 보냅니다.
* `hide` 결과를 숨깁니다.
* `echo`. R 소스 코드를 포함할지 여부입니다. 다른 매개변수는 다음과 같습니다.
* `echo=2:3` 두 번째와 세 번째 줄만 출력합니다.
* `echo=-2:-3` 두 번째와 세 번째 줄만 제외합니다.
* `cache`. 코드 청크를 캐시할지 여부입니다. 가능한 값: `TRUE` 및 `FALSE`
* `highlight`. 소스 코드를 강조 표시할지 여부입니다. 가능한 값: `TRUE` 및 `FALSE`
* `background`. 청크의 배경색입니다. rgb 및 HTML 형식을 사용할 수 있습니다. 기본값은 *"#F7F7F7"* 입니다.
This documentation is built and hosted on [Mintlify](https://mintlify.com), a developer documentation platform.