> ## Documentation Index
> Fetch the complete documentation index at: https://ayakaleaf-pro.mintlify.site/llms.txt
> Use this file to discover all available pages before exploring further.
# 개발 도구 설정
## 권장 개발 도구
이 선택적 서비스들은 Overleaf를 실행하는 데 필수는 아니지만, 로컬 개발 중 개발, 디버깅 및 검사에 적극 권장됩니다.
* **Hoppscotch**는 Postman과 유사한 경량 API 테스트 도구로, 브라우저 기반이라 개발에 매우 편리합니다.
* 프런트엔드: [http://localhost:3000](http://localhost:3000/)
* 프록시(CORS 우회용): [http://localhost:9159](http://localhost:9159/)
* **RedisInsight**는 Redis 데이터를 검사할 수 있는 시각적 인터페이스를 제공합니다. UI 주소: [http://localhost:5540](http://localhost:5540/)
* **Mongo Express**는 MongoDB용 웹 기반 UI입니다. [http://localhost:8081](http://localhost:8081/)에 접속하며, **자격 증명**은 `admin:pass`입니다.
`docker-compose.yml`에 다음 내용을 추가하세요.
```yml title="develop/docker-compose.yml" theme={null}
# services:
# Overleaf Dev Containers
# ...
# Add those for your development
# API debug
hoppscotch-frontend:
image: hoppscotch/hoppscotch-frontend:latest
ports:
- "3000:3000"
hoppscotch-proxy:
image: hoppscotch/proxyscotch:latest
environment:
- PORT=9159
ports:
- "9159:9159"
# Redis-insight
redis-insight:
image: redislabs/redisinsight:latest
ports:
- "5540:5540"
depends_on:
- redis
volumes:
- ./data/redis-insight:/data
# mongo-express
# basicAuth credentials are "admin:pass"
mongo-express:
image: mongo-express
ports:
- "8081:8081"
environment:
ME_CONFIG_MONGODB_SERVER: mongo
```
### Hoppscotch 설정
#### API 요청 프록시
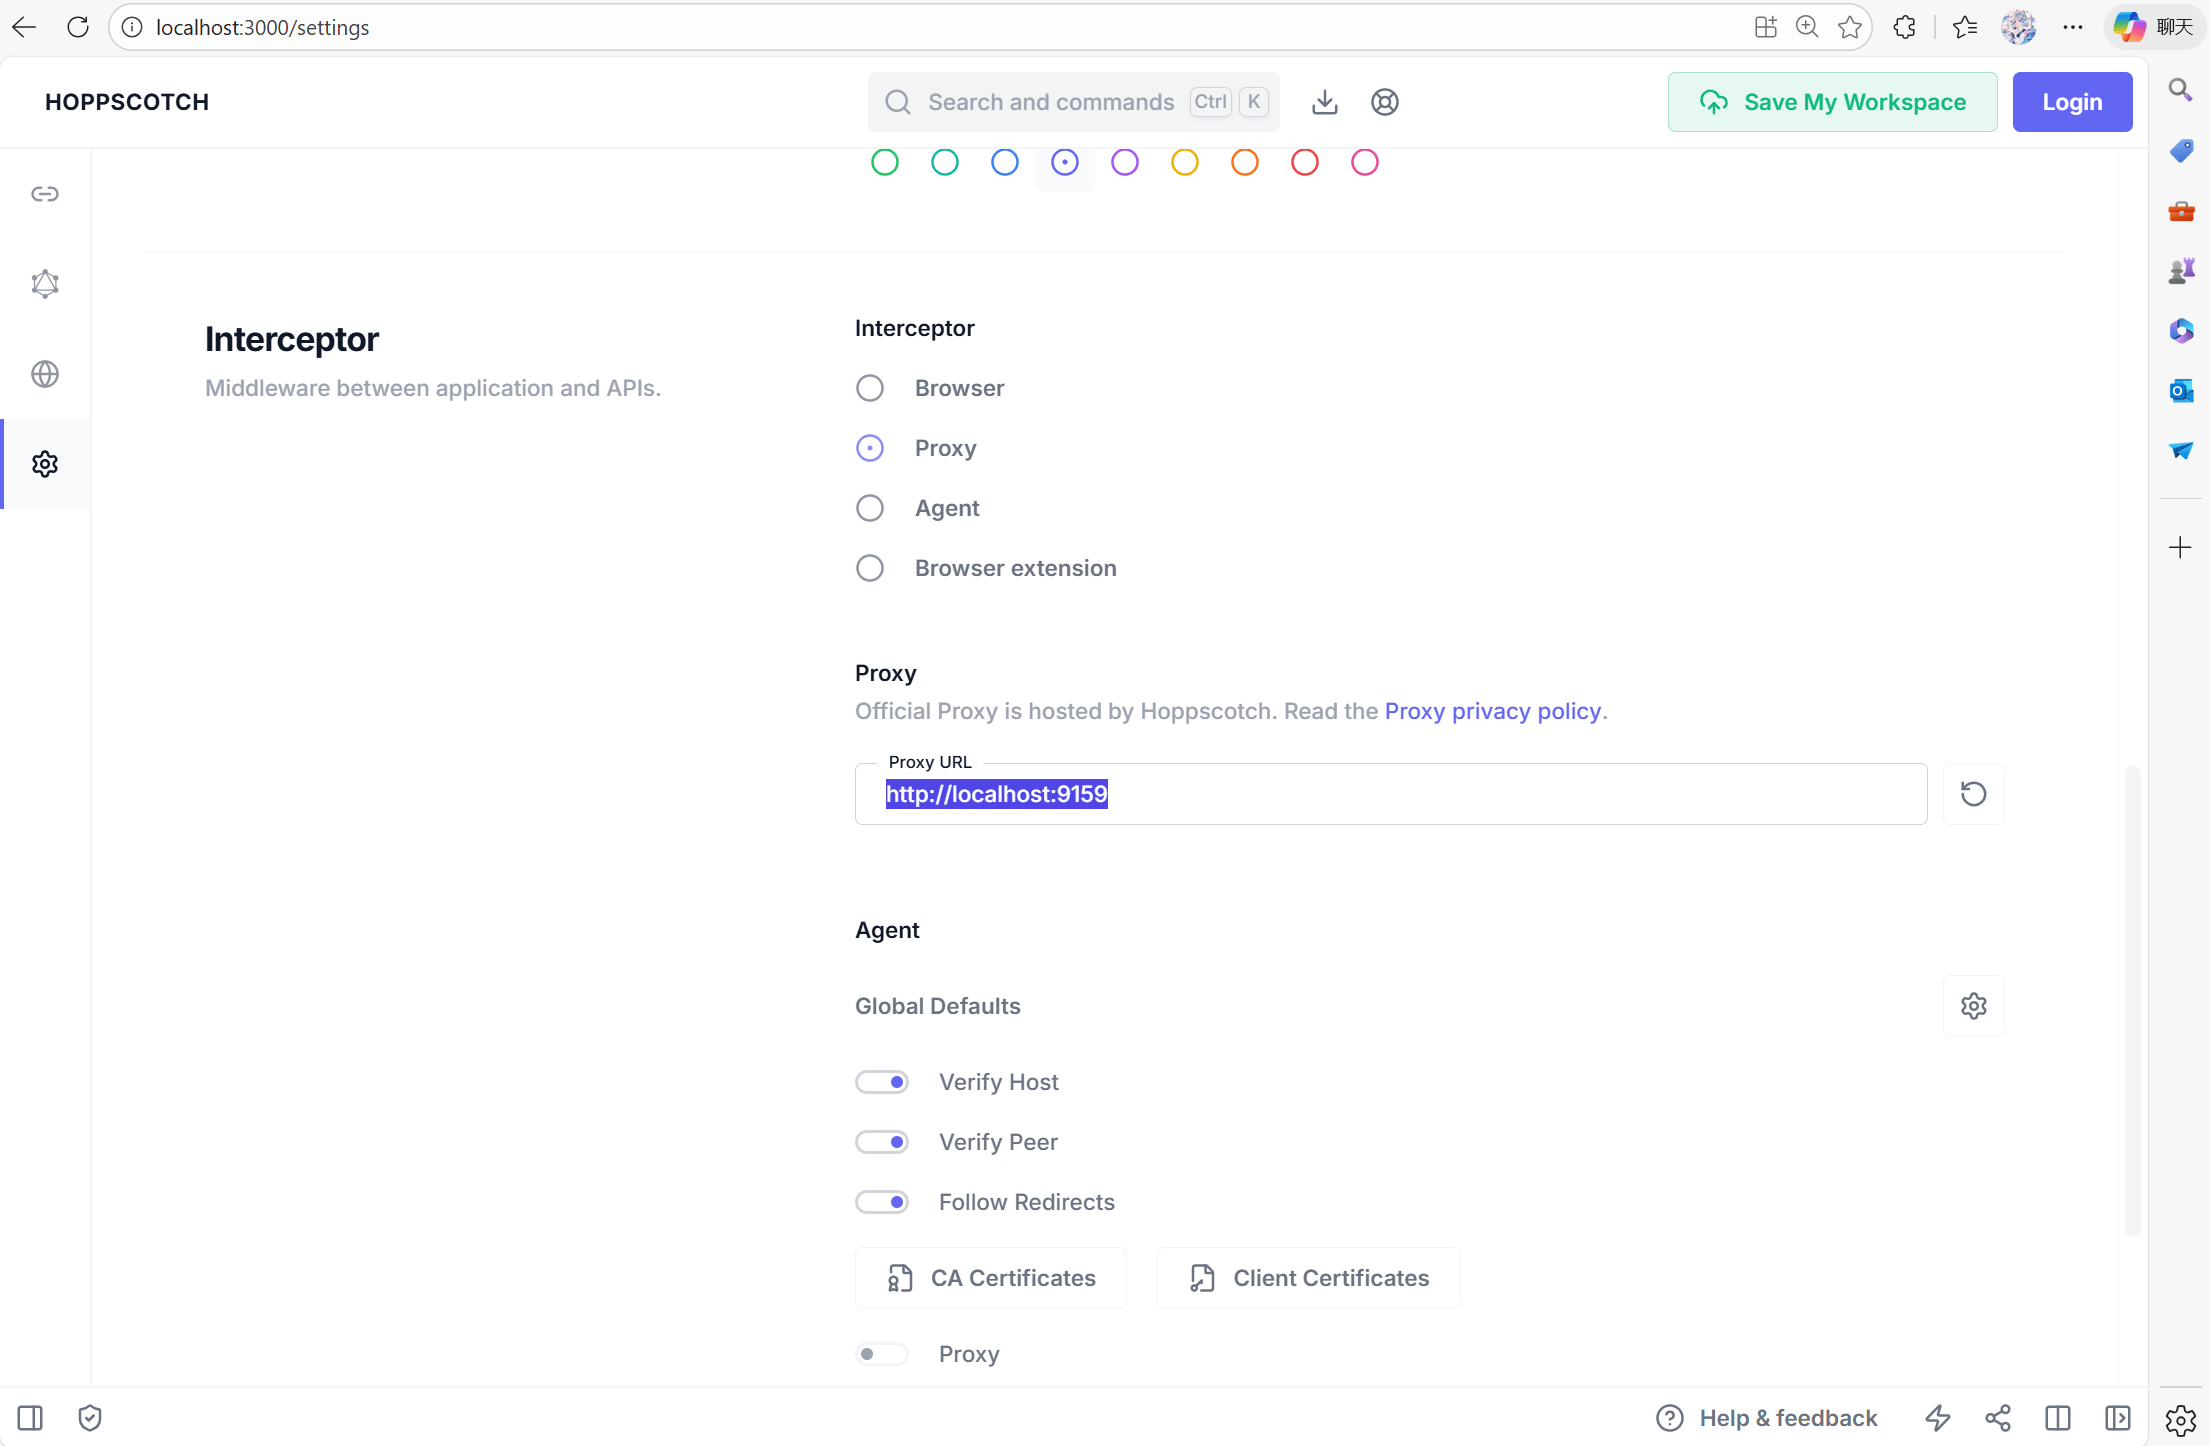
Hoppscotch를 설정하려면 [http://localhost:3000](http://localhost:3000/)에 접속한 다음 설정 탭으로 이동합니다. 디버그 도구가 컨테이너 내부 네트워크와 상호 작용할 수 있도록 `Proxy`를 [http://localhost:9159](http://localhost:9159/)로 설정해야 합니다.
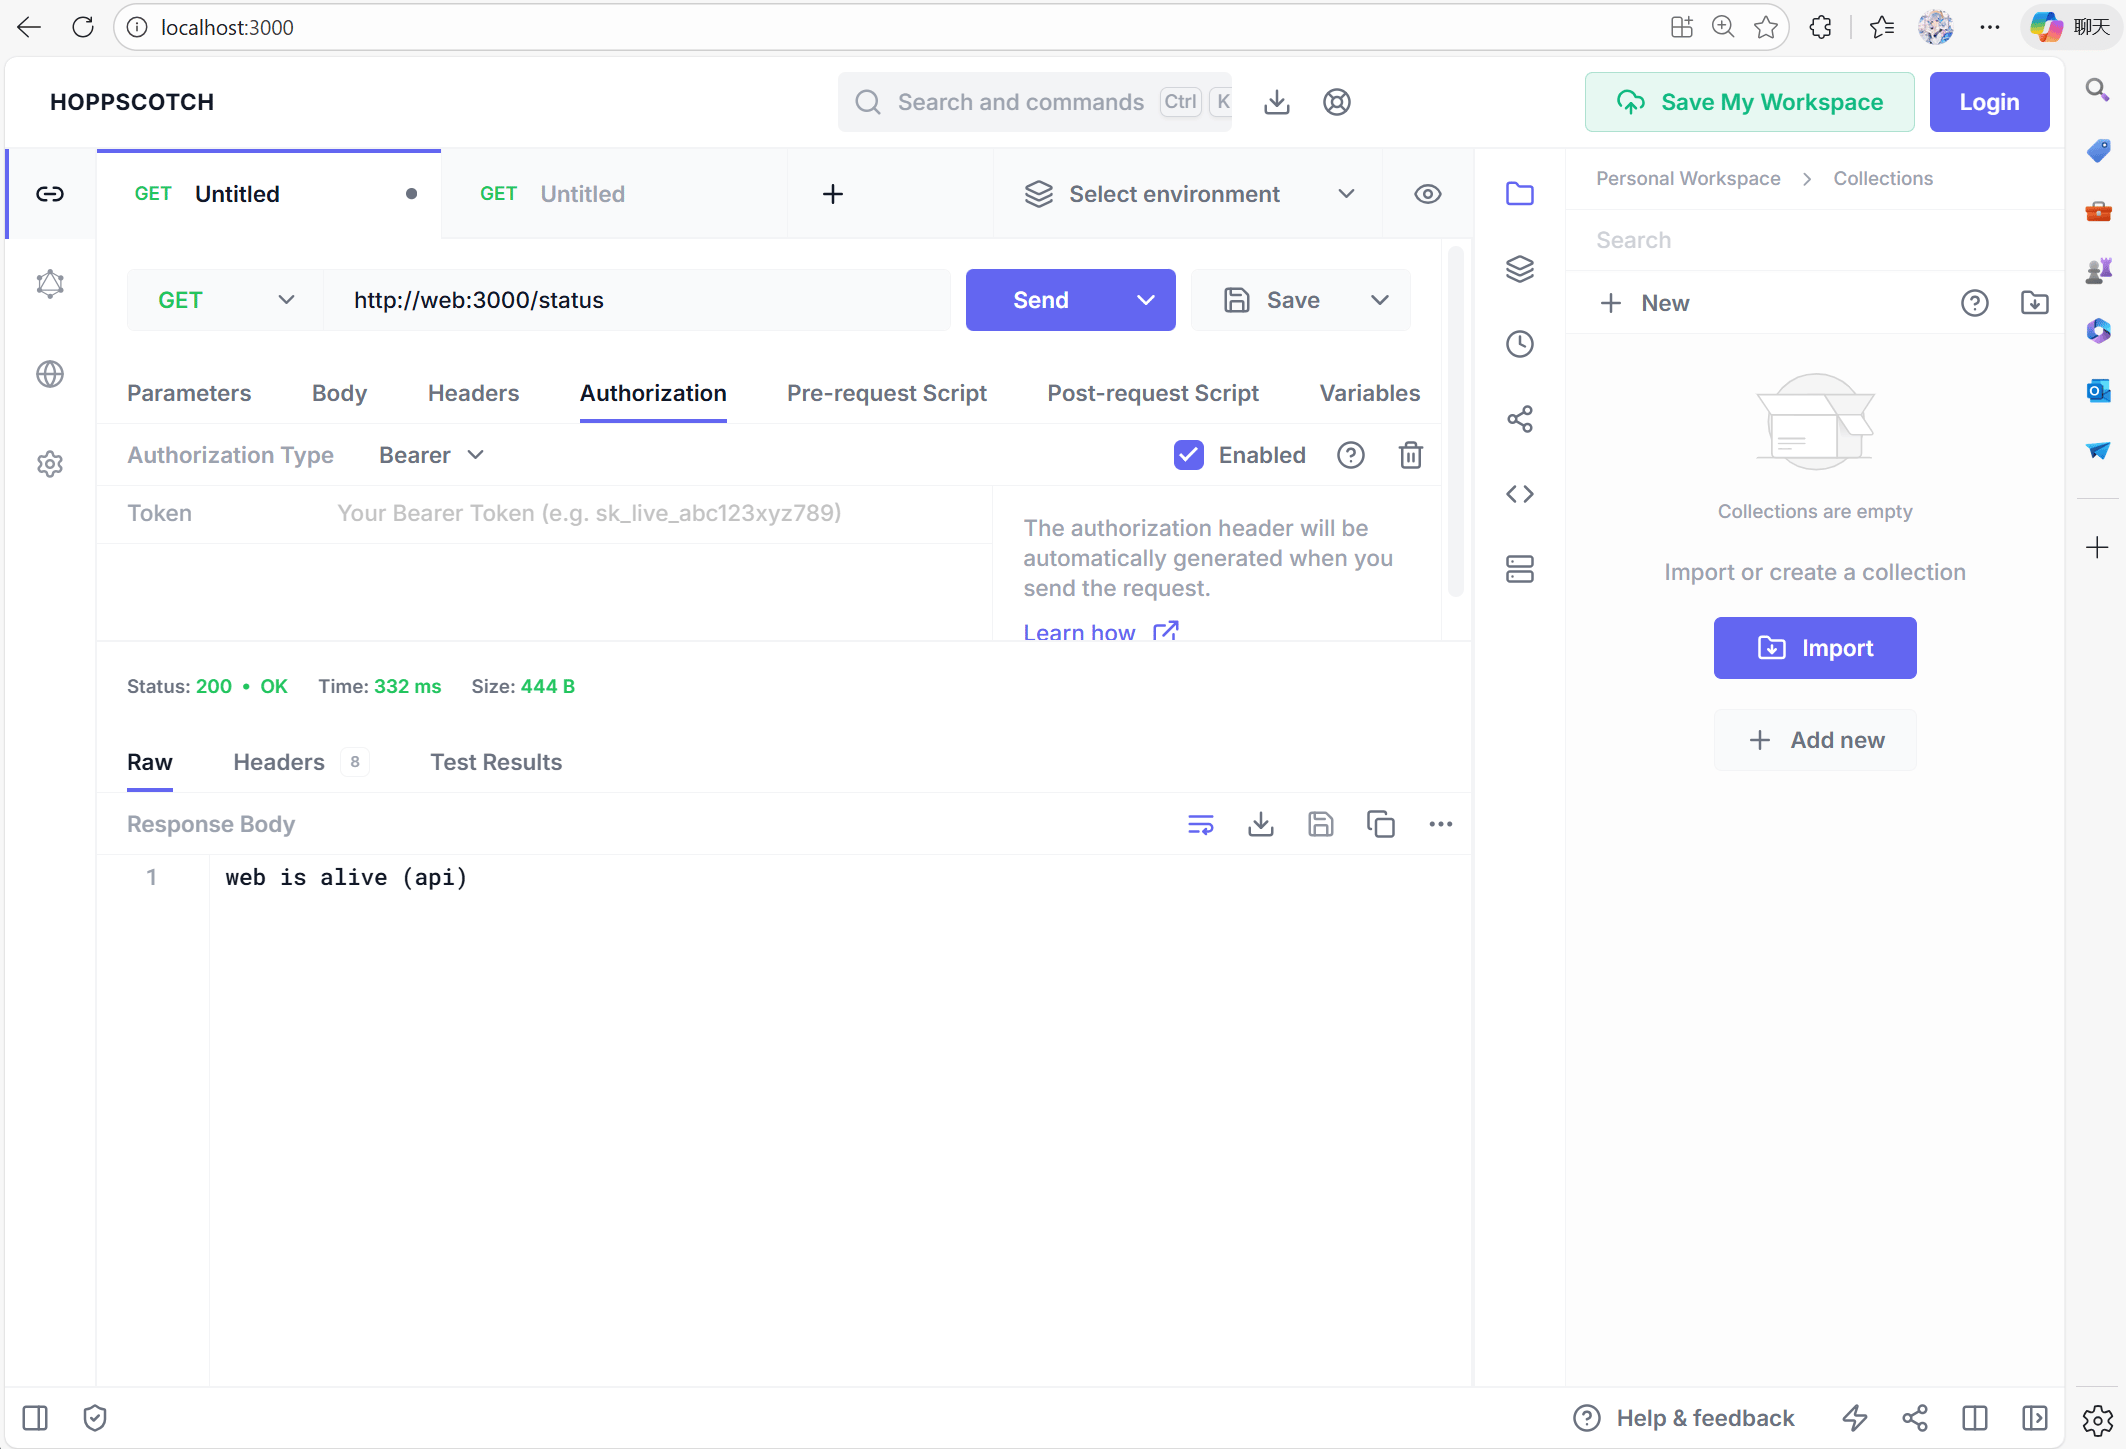
 이제 [http://web:3000/status](http://web:3000/status)로 테스트하여 web이 살아 있는지 확인할 수 있습니다.
 #### CSRF 문제
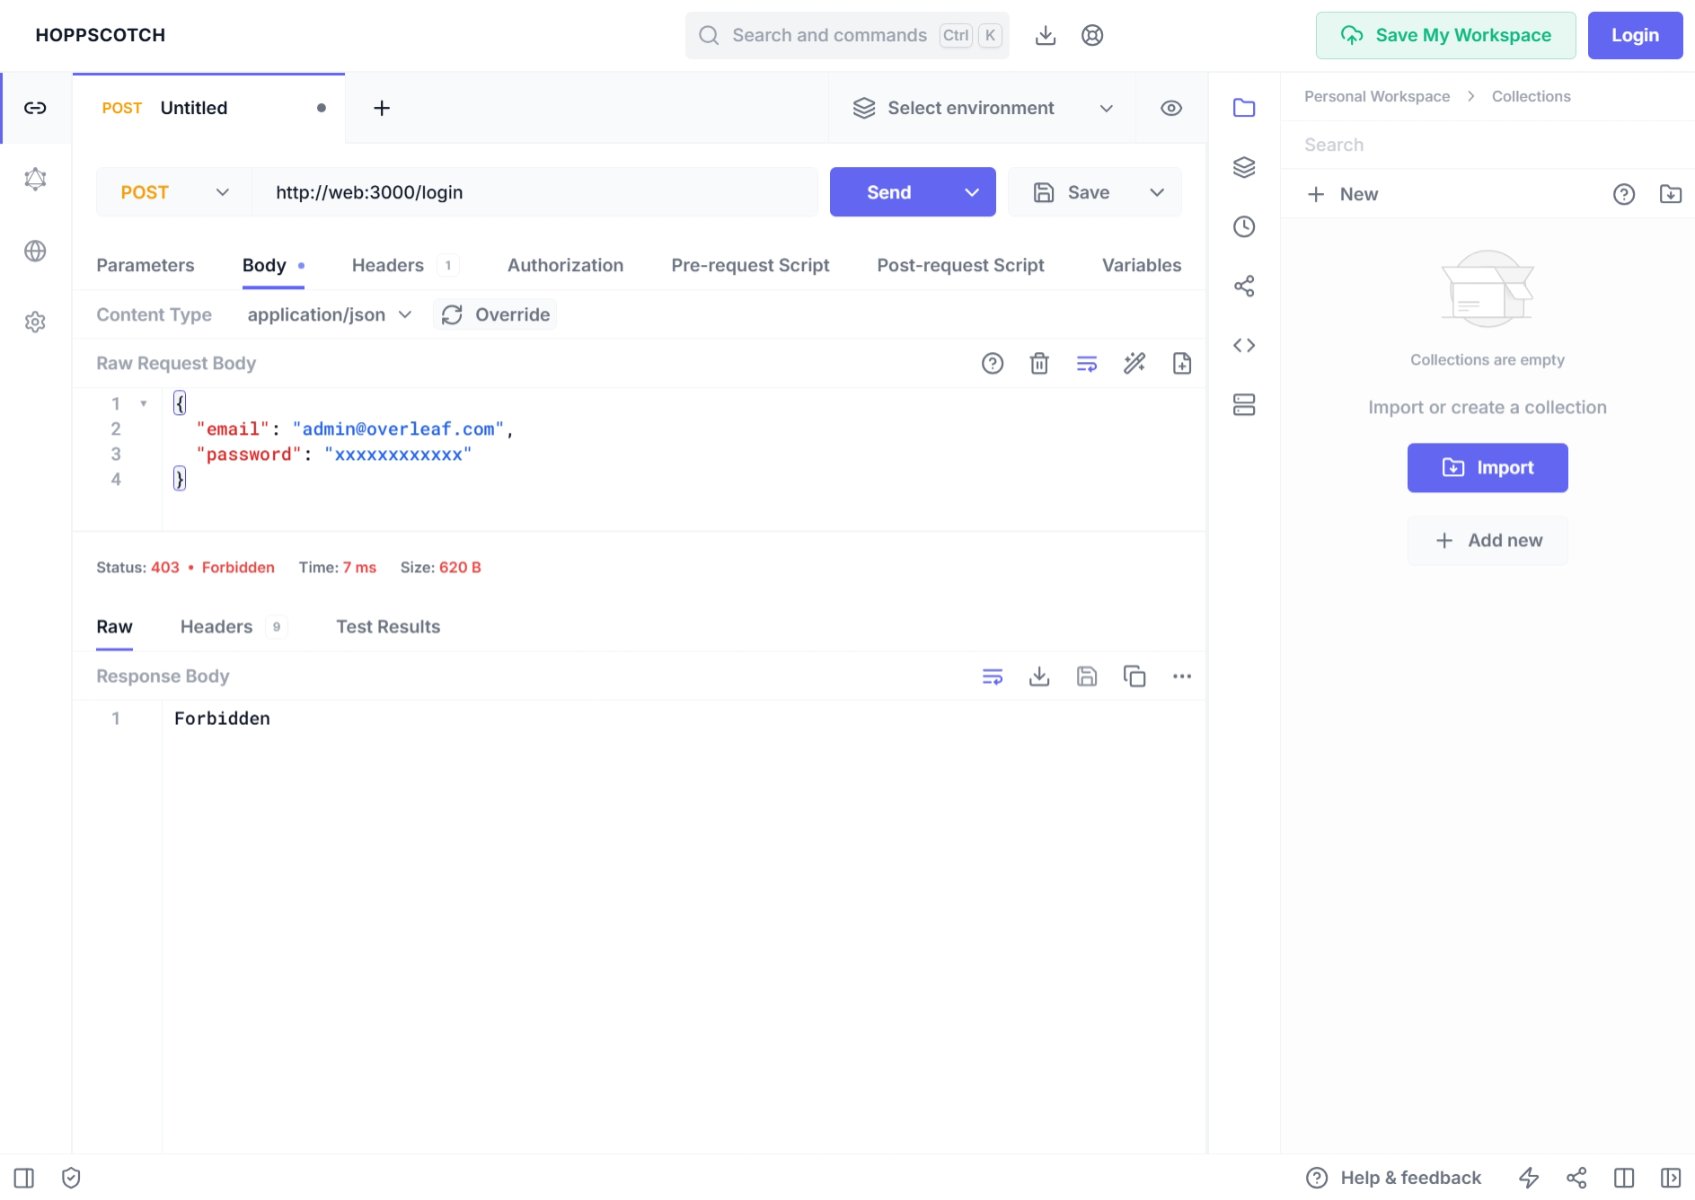
Postman이나 다른 디버그 도구로 **post** 요청을 보내면 로그인이 **금지**되며 401 오류가 발생하는 것을 볼 수 있습니다. 이는 Overleaf가 **csrf** 검증으로 보호되고 있기 때문입니다.
#### CSRF 문제
Postman이나 다른 디버그 도구로 **post** 요청을 보내면 로그인이 **금지**되며 401 오류가 발생하는 것을 볼 수 있습니다. 이는 Overleaf가 **csrf** 검증으로 보호되고 있기 때문입니다.
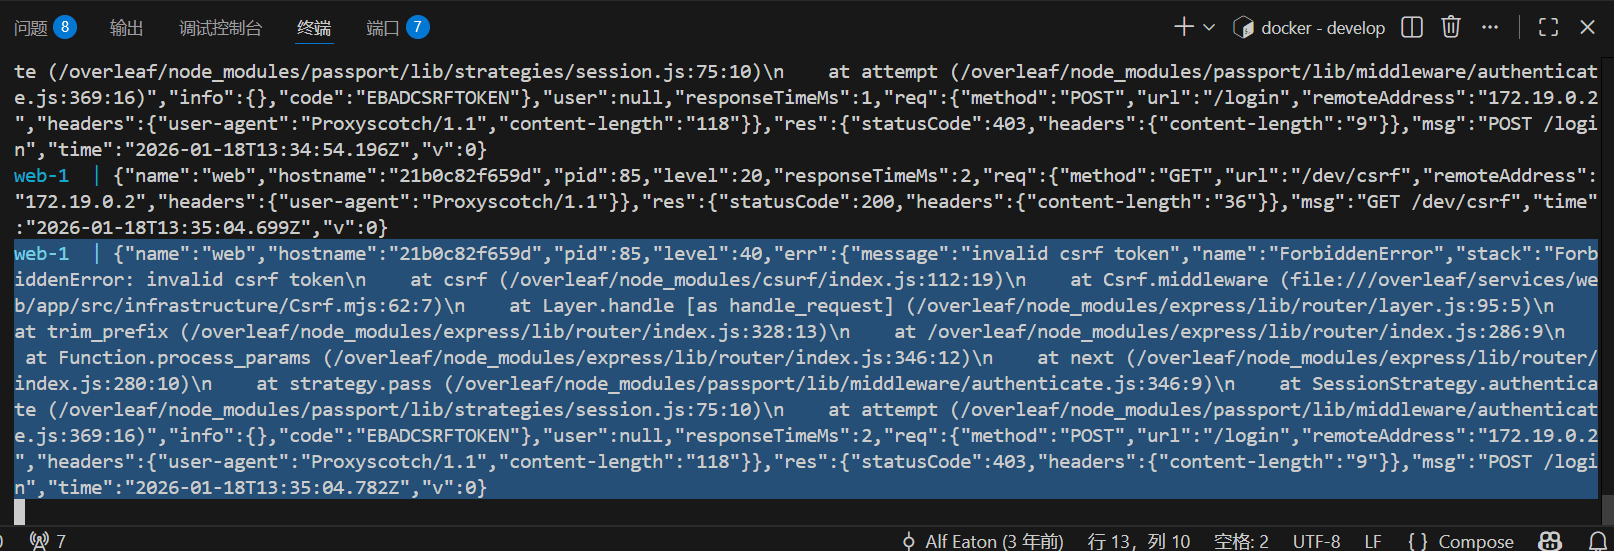
 콘솔에서 다음과 같은 내용을 볼 수 있습니다.
 Overleaf 개발 중 이 문제를 해결하려면 csrf 토큰을 설정해야 합니다. 자세한 방법은 다음과 같습니다.
Pre-Request에 다음 코드를 추가합니다.
Overleaf 개발 중 이 문제를 해결하려면 csrf 토큰을 설정해야 합니다. 자세한 방법은 다음과 같습니다.
Pre-Request에 다음 코드를 추가합니다.
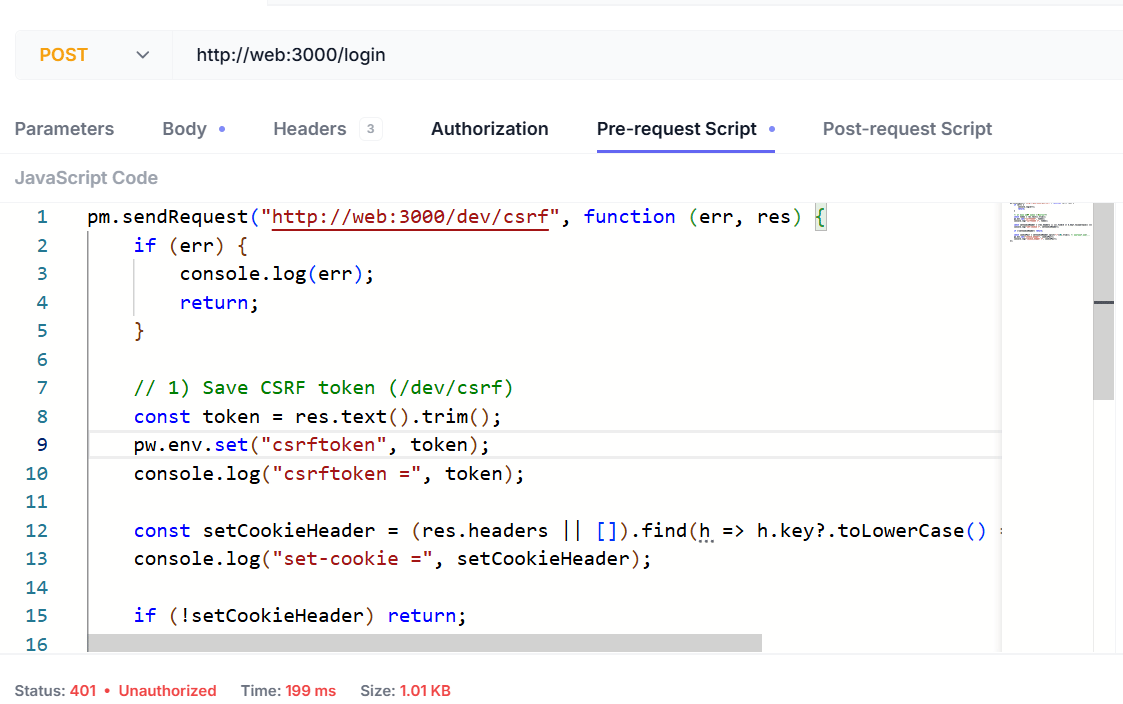 스크립트는 다음과 같습니다.
```js wrap theme={null}
pm.sendRequest("http://web:3000/dev/csrf", function (err, res) {
if (err) {
console.log(err);
return;
}
// 1) Save CSRF token (/dev/csrf)
const token = res.text().trim();
pw.env.set("csrftoken", token);
console.log("csrftoken =", token);
const setCookieHeader = (res.headers || []).find(h => h.key?.toLowerCase() === "set-cookie")?.value;
console.log("set-cookie =", setCookieHeader);
if (!setCookieHeader) return;
const cookiePair = setCookieHeader.split(";")[0].trim(); // overleaf.sid=...
pw.env.set("cookie_header", cookiePair);
console.log("cookie_header =", cookiePair);
});
```
다음 헤더를 추가해야 합니다.
| 헤더 이름 | 헤더 값 |
| - | - |
| Content-Type | `application/json` |
| X-Csrf-Token | `<>` |
| Cookie | `<>` |
스크립트는 다음과 같습니다.
```js wrap theme={null}
pm.sendRequest("http://web:3000/dev/csrf", function (err, res) {
if (err) {
console.log(err);
return;
}
// 1) Save CSRF token (/dev/csrf)
const token = res.text().trim();
pw.env.set("csrftoken", token);
console.log("csrftoken =", token);
const setCookieHeader = (res.headers || []).find(h => h.key?.toLowerCase() === "set-cookie")?.value;
console.log("set-cookie =", setCookieHeader);
if (!setCookieHeader) return;
const cookiePair = setCookieHeader.split(";")[0].trim(); // overleaf.sid=...
pw.env.set("cookie_header", cookiePair);
console.log("cookie_header =", cookiePair);
});
```
다음 헤더를 추가해야 합니다.
| 헤더 이름 | 헤더 값 |
| - | - |
| Content-Type | `application/json` |
| X-Csrf-Token | `<>` |
| Cookie | `<>` |
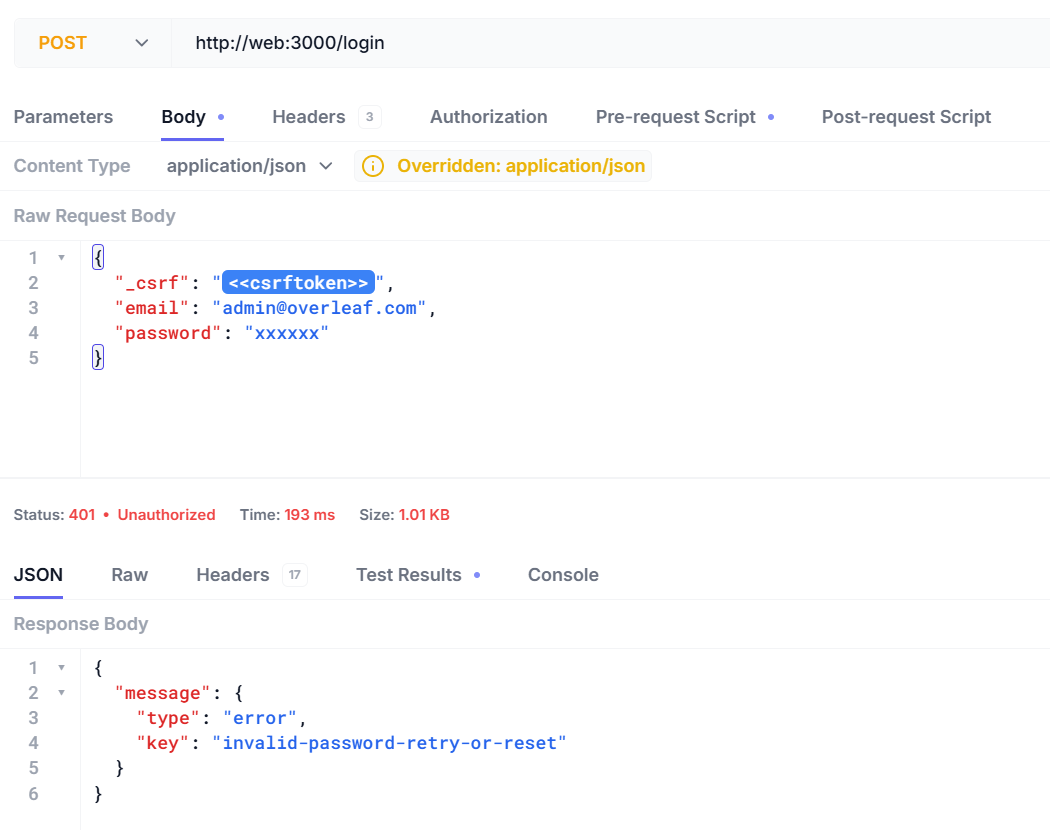
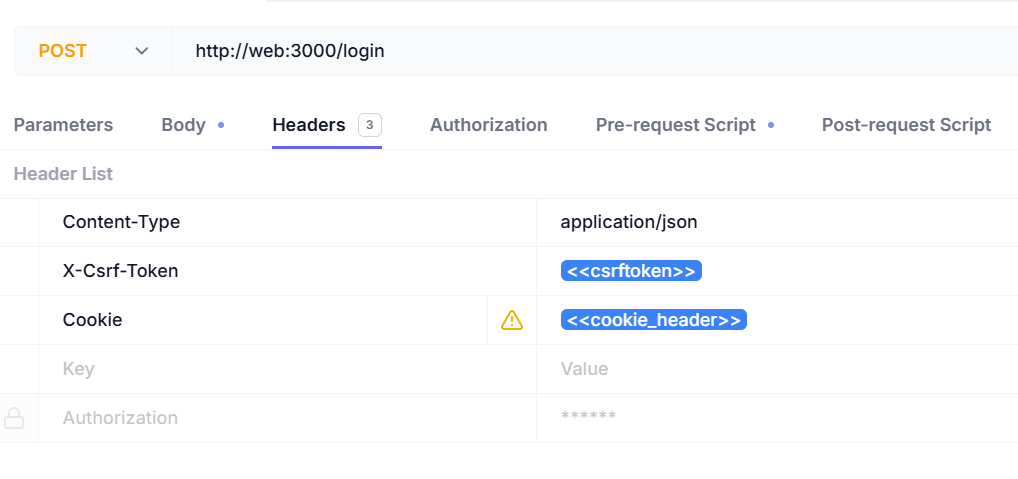 이제 사용자 이름과 비밀번호로 로그인할 수 있습니다.
```json5 theme={null}
{
"_csrf": "<>",
"email": "admin@overleaf.com",
"password": "xxxxxx"
}
```
잘못된 사용자 이름이나 비밀번호를 입력했을 때의 응답은 다음과 같습니다.
이제 사용자 이름과 비밀번호로 로그인할 수 있습니다.
```json5 theme={null}
{
"_csrf": "<>",
"email": "admin@overleaf.com",
"password": "xxxxxx"
}
```
잘못된 사용자 이름이나 비밀번호를 입력했을 때의 응답은 다음과 같습니다.
 This documentation is built and hosted on [Mintlify](https://mintlify.com), a developer documentation platform.