> ## Documentation Index
> Fetch the complete documentation index at: https://ayakaleaf-pro.mintlify.site/llms.txt
> Use this file to discover all available pages before exploring further.
# R コード(knitr)
Overleaf は **knitr** との統合を提供しており、LaTeX ドキュメントに R コードを追加して動的な出力を生成できます。
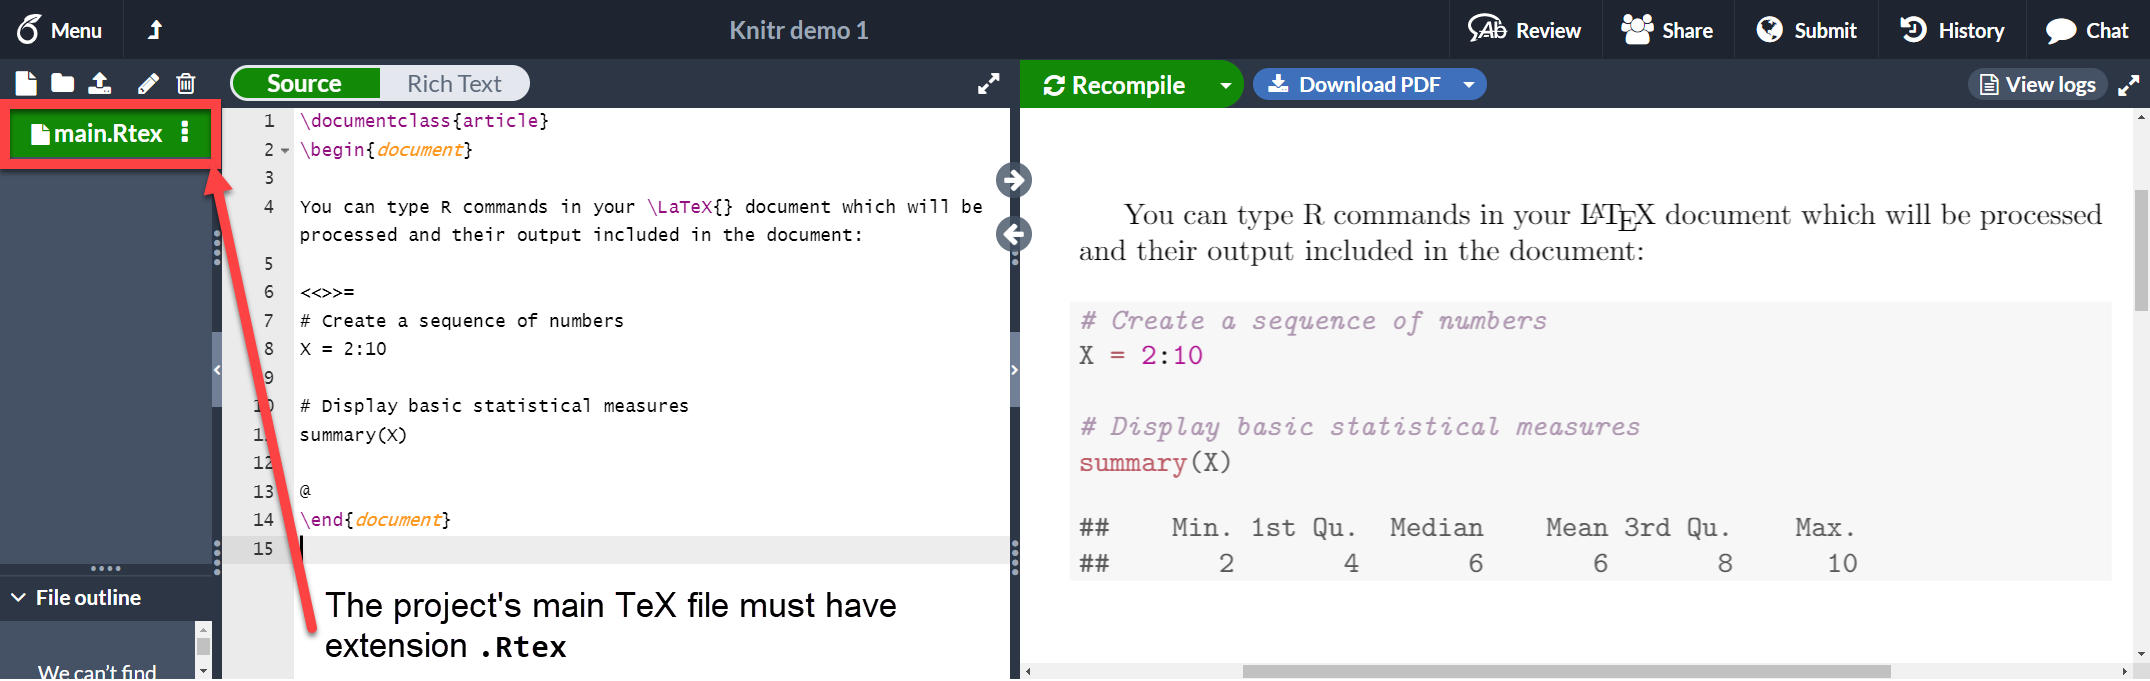
R コードを含むドキュメントは、拡張子 `.Rtex` または `.Rnw` で保存する必要があります。そうしないとコードは動作しません。例を見てみましょう。
```latex wrap theme={null}
\documentclass{article}
\begin{document}
You can type R commands in your \LaTeX{} document which will be processed and their output included in the document:
<<>>=
# Create a sequence of numbers
X = 2:10
# Display basic statistical measures
summary(X)
@
\end{document}
```
 [この `knitr` の例を Overleaf で開く](https://www.overleaf.com/project/new/template/20421?id=69881107\&templateName=Knitr+demo+1\&latexEngine=pdflatex\&texImage=texlive-full%3A2020.1\&mainFile=)
ご覧のとおり、`<<>>=` と `@` の間のテキストが R コードです。このコードとその出力は、リスティングのような形式で出力されます。次のセクションで説明するように、このコードの塊には動的な出力をカスタマイズするための追加パラメーターを指定できます。
### コードチャンク
前のセクションで示したようなコードブロックは、通常 *チャンク* と呼ばれます。knitr のチャンクにはいくつかの追加オプションを設定できます。以下の例を見てください。
```latex wrap theme={null}
\documentclass{article}
\begin{document}
You can type R commands in your \LaTeX{} document which will be processed and their output included in the document:
<>=
# Create a sequence of numbers
X = 2:10
# Display basic statistical measures
summary(X)
@
\end{document}
```
[この `knitr` の例を Overleaf で開く](https://www.overleaf.com/project/new/template/20421?id=69881107\&templateName=Knitr+demo+1\&latexEngine=pdflatex\&texImage=texlive-full%3A2020.1\&mainFile=)
ご覧のとおり、`<<>>=` と `@` の間のテキストが R コードです。このコードとその出力は、リスティングのような形式で出力されます。次のセクションで説明するように、このコードの塊には動的な出力をカスタマイズするための追加パラメーターを指定できます。
### コードチャンク
前のセクションで示したようなコードブロックは、通常 *チャンク* と呼ばれます。knitr のチャンクにはいくつかの追加オプションを設定できます。以下の例を見てください。
```latex wrap theme={null}
\documentclass{article}
\begin{document}
You can type R commands in your \LaTeX{} document which will be processed and their output included in the document:
<>=
# Create a sequence of numbers
X = 2:10
# Display basic statistical measures
summary(X)
@
\end{document}
```
 [この `knitr` の例を Overleaf で開く](https://www.overleaf.com/project/new/template/20423?id=69885763\&templateName=Knitr+demo+2\&latexEngine=pdflatex\&texImage=texlive-full%3A2020.1\&mainFile=)
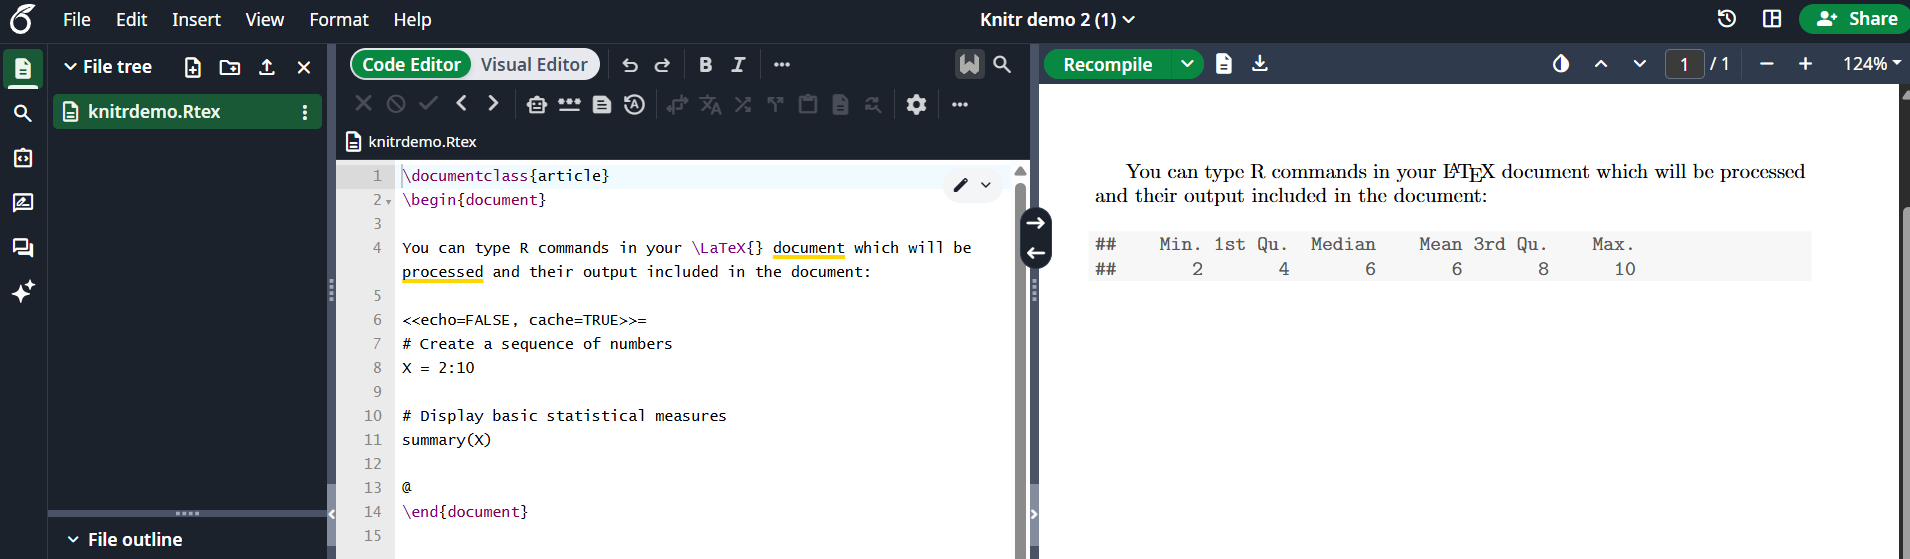
`<<` と `>>` の内側に 2 つの追加オプションが渡されています。
* `echo=FALSE` コードを非表示にし、R によって生成された出力のみを表示します。
* `cache=TRUE` cache を true に設定すると、チャンクは実行されず、そのチャンクで生成されたオブジェクトのみが使用されます。チャンク内のデータが変更されていない場合、時間を節約できます。
cache=TRUE オプションは現在 Overleaf ではサポートされていませんが、ローカルでは動作するはずです。
その他のオプションについては、[リファレンスガイド](https://learn.overleaf.com/learn/Knitr#Reference_guide)を参照してください。
### インラインコマンド
チャンクで生成されたオブジェクトにアクセスし、インラインで出力することができます。
```latex wrap theme={null}
\documentclass{article}
\begin{document}
You can type R commands in your \LaTeX{} document which will be processed and their output included in the document:
<>=
# Create a sequence of numbers
X = 2:10
# Display basic statistical measures
summary(X)
@
So, the mean of the data is $\Sexpr{mean(X)}$
\end{document}
```
[この `knitr` の例を Overleaf で開く](https://www.overleaf.com/project/new/template/20423?id=69885763\&templateName=Knitr+demo+2\&latexEngine=pdflatex\&texImage=texlive-full%3A2020.1\&mainFile=)
`<<` と `>>` の内側に 2 つの追加オプションが渡されています。
* `echo=FALSE` コードを非表示にし、R によって生成された出力のみを表示します。
* `cache=TRUE` cache を true に設定すると、チャンクは実行されず、そのチャンクで生成されたオブジェクトのみが使用されます。チャンク内のデータが変更されていない場合、時間を節約できます。
cache=TRUE オプションは現在 Overleaf ではサポートされていませんが、ローカルでは動作するはずです。
その他のオプションについては、[リファレンスガイド](https://learn.overleaf.com/learn/Knitr#Reference_guide)を参照してください。
### インラインコマンド
チャンクで生成されたオブジェクトにアクセスし、インラインで出力することができます。
```latex wrap theme={null}
\documentclass{article}
\begin{document}
You can type R commands in your \LaTeX{} document which will be processed and their output included in the document:
<>=
# Create a sequence of numbers
X = 2:10
# Display basic statistical measures
summary(X)
@
So, the mean of the data is $\Sexpr{mean(X)}$
\end{document}
```
 [この `knitr` の例を Overleaf で開く](https://www.overleaf.com/project/new/template/20425?id=69886866\&templateName=Knitr+demo+3\&latexEngine=pdflatex\&texImage=texlive-full%3A2020.1\&mainFile=)
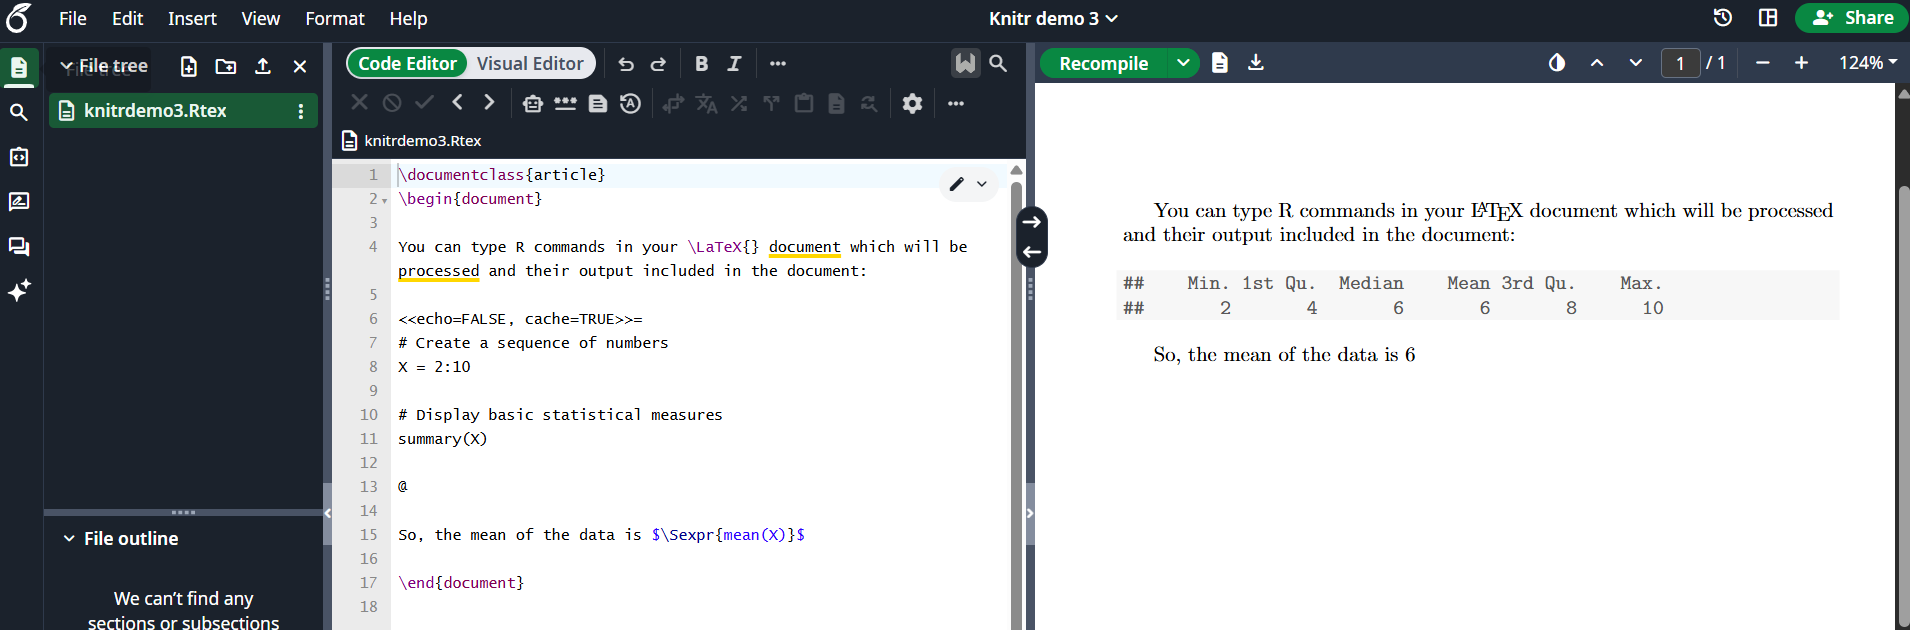
コマンド `\Sexpr{mean(X)}` は、R コード `mean(X)` が返す出力を表示します。波括弧の中には任意の R コマンドを渡すことができます。
### プロット
次の例のように、knitr ドキュメントにプロットを追加することもできます。
```latex wrap theme={null}
\documentclass{article}
\begin{document}
<>=
xdata = read.csv(file="data.txt", head=TRUE,sep=" ")
hist(xdata$data, main="Overleaf histogram", xlab="Data")
@
The figure \ref{fig:plot1} is simple histogram.
\end{document}
```
[この `knitr` の例を Overleaf で開く](https://www.overleaf.com/project/new/template/20425?id=69886866\&templateName=Knitr+demo+3\&latexEngine=pdflatex\&texImage=texlive-full%3A2020.1\&mainFile=)
コマンド `\Sexpr{mean(X)}` は、R コード `mean(X)` が返す出力を表示します。波括弧の中には任意の R コマンドを渡すことができます。
### プロット
次の例のように、knitr ドキュメントにプロットを追加することもできます。
```latex wrap theme={null}
\documentclass{article}
\begin{document}
<>=
xdata = read.csv(file="data.txt", head=TRUE,sep=" ")
hist(xdata$data, main="Overleaf histogram", xlab="Data")
@
The figure \ref{fig:plot1} is simple histogram.
\end{document}
```
 [この `knitr` の例を Overleaf で開く](https://www.overleaf.com/project/new/template/20427?id=69890965\&templateName=Knitr+demo+3\&latexEngine=pdflatex\&texImage=texlive-full%3A2020.1\&mainFile=)
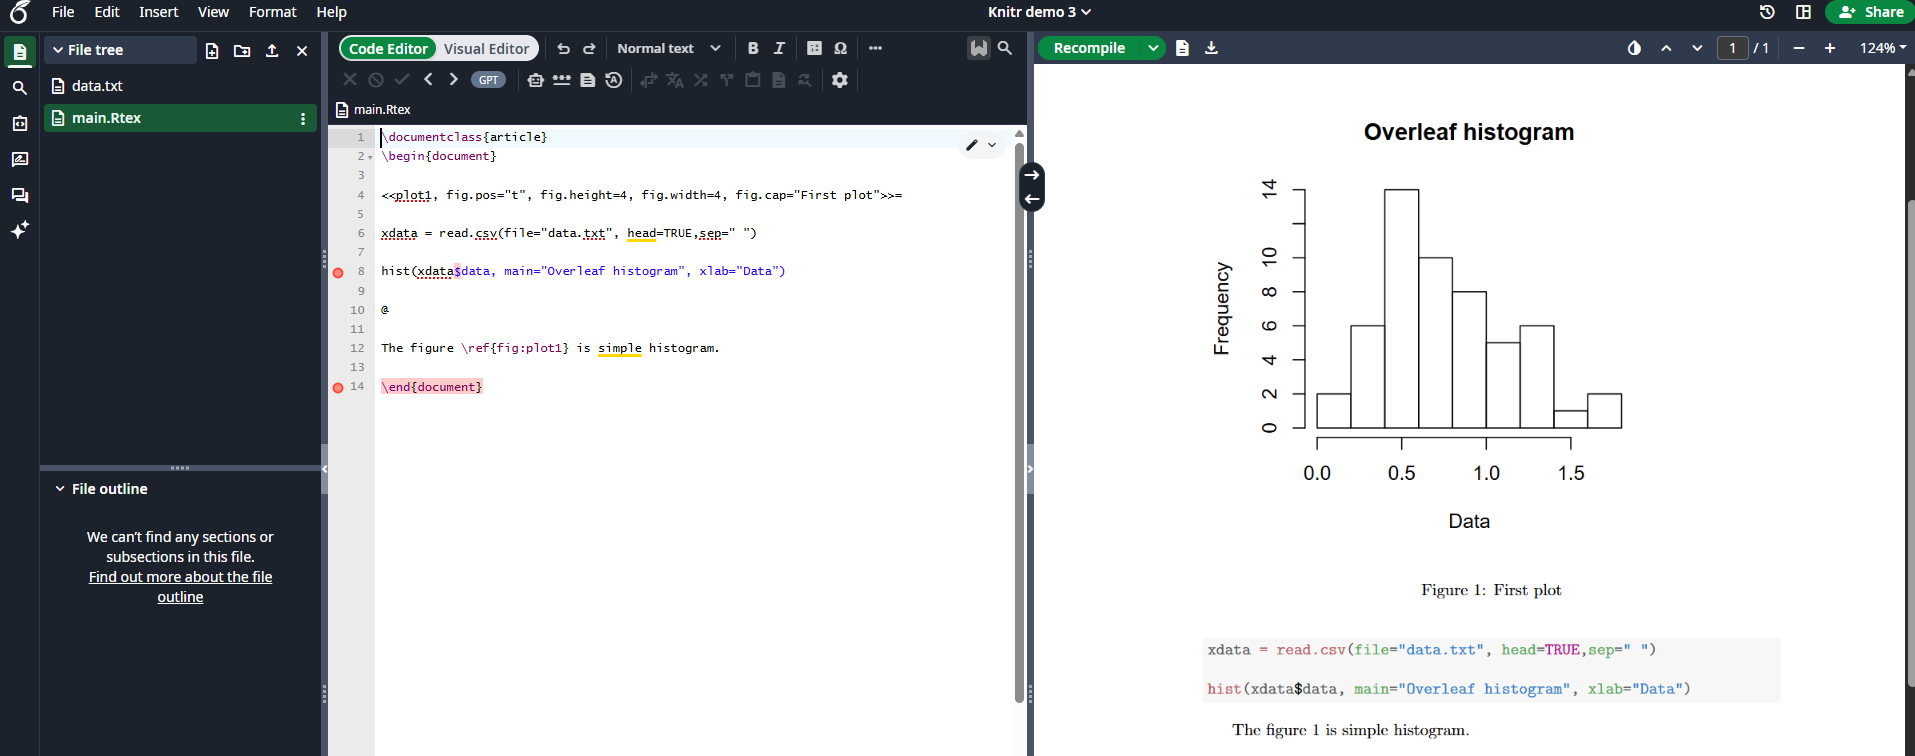
このヒストグラムは、現在の作業ディレクトリに保存された "data.txt" のデータを使用しています。チャンクには図に関連するいくつかのオプションが渡されています。
`plot1` プロットを参照するために使用されるラベルです。接頭辞 "fig:" は必須です。例では、図が `\ref{fig:plot1}` で参照されていることがわかります。`fig.pos="t"` 配置パラメーターです。これは [figure 環境](https://learn.overleaf.com/learn/Positioning_images_and_tables#The_figure_environment)で使用されるものと同じです。`fig.height=4, fig.width=4` 図の幅と高さです。`fig.cap="First plot"` 図のキャプションです。
### 外部 R スクリプト
外部の R スクリプトの一部を knitr ドキュメントにインポートできます。ドキュメントに含める前に外部プログラムでスクリプトを作成・デバッグすることはよくあるため、これは非常に便利です。
LaTeX ドキュメントに取り込む次の R コードが、`mycode.R` というファイルにあるとします。
```r theme={null}
## ---- myrcode1
# Create a sequence of numbers
X = 2:10
## ---- myrcode2
# Display basic statistical measures
summary(X)
```
次の行に注目してください。
```r theme={null}
## ---- myrcode1
```
および
```r theme={null}
## ---- myrcode2
```
これらはコードチャンクの開始を示すもので、次のコード断片に示すように、このスクリプトをドキュメントで使用する場合は必須です。
```r theme={null}
The chunk below will not be printed
<>=
read_chunk("mycode.R")
@
The code must show up here
<>=
@
```
[この `knitr` の例を Overleaf で開く](https://www.overleaf.com/project/new/template/20427?id=69890965\&templateName=Knitr+demo+3\&latexEngine=pdflatex\&texImage=texlive-full%3A2020.1\&mainFile=)
このヒストグラムは、現在の作業ディレクトリに保存された "data.txt" のデータを使用しています。チャンクには図に関連するいくつかのオプションが渡されています。
`plot1` プロットを参照するために使用されるラベルです。接頭辞 "fig:" は必須です。例では、図が `\ref{fig:plot1}` で参照されていることがわかります。`fig.pos="t"` 配置パラメーターです。これは [figure 環境](https://learn.overleaf.com/learn/Positioning_images_and_tables#The_figure_environment)で使用されるものと同じです。`fig.height=4, fig.width=4` 図の幅と高さです。`fig.cap="First plot"` 図のキャプションです。
### 外部 R スクリプト
外部の R スクリプトの一部を knitr ドキュメントにインポートできます。ドキュメントに含める前に外部プログラムでスクリプトを作成・デバッグすることはよくあるため、これは非常に便利です。
LaTeX ドキュメントに取り込む次の R コードが、`mycode.R` というファイルにあるとします。
```r theme={null}
## ---- myrcode1
# Create a sequence of numbers
X = 2:10
## ---- myrcode2
# Display basic statistical measures
summary(X)
```
次の行に注目してください。
```r theme={null}
## ---- myrcode1
```
および
```r theme={null}
## ---- myrcode2
```
これらはコードチャンクの開始を示すもので、次のコード断片に示すように、このスクリプトをドキュメントで使用する場合は必須です。
```r theme={null}
The chunk below will not be printed
<>=
read_chunk("mycode.R")
@
The code must show up here
<>=
@
```
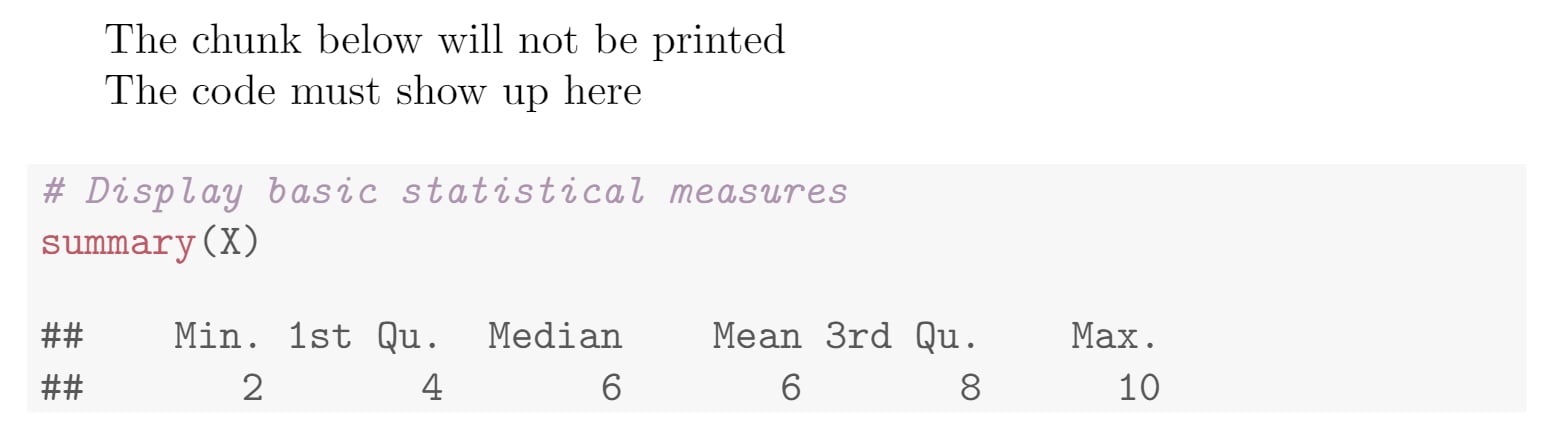 最初のチャンクは出力されず、コマンド `read_chunk("mycode.R")` でスクリプトをインポートするためだけに使用されます。そのため `echo=FALSE` オプションが設定されています。また、スクリプトはキャッシュしてはいけません。スクリプトをインポートしたら、`## ----` の後に設定したラベルを使ってチャンクを出力できます。この例では `myrcode2` です。
この記事のすべてのコード断片をまとめたプロジェクトを用意しており、[Overleaf で開く](https://www.overleaf.com/project/new/template/20429?id=69894649\&templateName=Knitr+full+demo\&latexEngine=pdflatex\&texImage=texlive-full%3A2020.1\&mainFile=)ことができます。
### リファレンスガイド
主なチャンクオプション:
* `results`。R コードによって生成される結果の動作を変更します。指定可能な値:
* `markup` LaTeX を使用して出力を整形します。
* `asis` R の生の結果をそのまま出力します。
* `hold` 出力結果を保持し、チャンクの末尾にまとめて出力します。
* `hide` 結果を非表示にします。
* `echo`。R のソースコードを含めるかどうか。その他の指定方法:
* `echo=2:3` は 2 行目と 3 行目のみを出力します。
* `echo=-2:-3` は 2 行目と 3 行目のみを除外します。
* `cache`。コードチャンクをキャッシュするかどうか。指定可能な値: `TRUE` と `FALSE`
* `highlight`。ソースコードをハイライトするかどうか。指定可能な値: `TRUE` と `FALSE`
* `background`。チャンクの背景色。rgb 形式と HTML 形式を使用できます。デフォルト値は *"#F7F7F7"* です。
This documentation is built and hosted on [Mintlify](https://mintlify.com), a developer documentation platform.
最初のチャンクは出力されず、コマンド `read_chunk("mycode.R")` でスクリプトをインポートするためだけに使用されます。そのため `echo=FALSE` オプションが設定されています。また、スクリプトはキャッシュしてはいけません。スクリプトをインポートしたら、`## ----` の後に設定したラベルを使ってチャンクを出力できます。この例では `myrcode2` です。
この記事のすべてのコード断片をまとめたプロジェクトを用意しており、[Overleaf で開く](https://www.overleaf.com/project/new/template/20429?id=69894649\&templateName=Knitr+full+demo\&latexEngine=pdflatex\&texImage=texlive-full%3A2020.1\&mainFile=)ことができます。
### リファレンスガイド
主なチャンクオプション:
* `results`。R コードによって生成される結果の動作を変更します。指定可能な値:
* `markup` LaTeX を使用して出力を整形します。
* `asis` R の生の結果をそのまま出力します。
* `hold` 出力結果を保持し、チャンクの末尾にまとめて出力します。
* `hide` 結果を非表示にします。
* `echo`。R のソースコードを含めるかどうか。その他の指定方法:
* `echo=2:3` は 2 行目と 3 行目のみを出力します。
* `echo=-2:-3` は 2 行目と 3 行目のみを除外します。
* `cache`。コードチャンクをキャッシュするかどうか。指定可能な値: `TRUE` と `FALSE`
* `highlight`。ソースコードをハイライトするかどうか。指定可能な値: `TRUE` と `FALSE`
* `background`。チャンクの背景色。rgb 形式と HTML 形式を使用できます。デフォルト値は *"#F7F7F7"* です。
This documentation is built and hosted on [Mintlify](https://mintlify.com), a developer documentation platform.