> ## Documentation Index
> Fetch the complete documentation index at: https://ayakaleaf-pro.mintlify.site/llms.txt
> Use this file to discover all available pages before exploring further.
# 30 分で学ぶ LaTeX
> NEW: 新しい [Overleaf Learning Center](https://learn.overleaf.com/) では、無料のオンラインコースやライブウェビナーを提供しています。LaTeX をマスターし、Overleaf を最大限に活用するために必要なものがすべて揃っています。
この入門チュートリアルでは、LaTeX の経験を前提としていません。チュートリアルを終える頃には、最初の LaTeX ドキュメントを書き上げているだけでなく、LaTeX に習熟するための次のステップに進むのに十分な知識と自信を身に付けていることでしょう。
## LaTeX とは?
LaTeX(「*レイ*テック」または「*ラー*テック」と発音します)は、プロフェッショナルな見た目のドキュメントを組版するためのツールです。ただし、LaTeX の動作方法は、Microsoft Word や LibreOffice Writer など、これまでに使ったことがあるかもしれない多くのドキュメント作成アプリケーションとはかなり異なります。それらの「[WYSIWYG](https://en.wikipedia.org/wiki/WYSIWYG)」ツールでは、ユーザーはインタラクティブなページ上でテキストを入力・編集し、さまざまなスタイルを適用します。LaTeX の仕組みはまったく違います。ドキュメントはプレーンテキストファイルであり、そこに目的の(組版された)結果を表現するための LaTeX の*コマンド*が散りばめられています。目に見える組版済みのドキュメントを作成するには、LaTeX ファイルを *TeX エンジン*と呼ばれるソフトウェアで処理します。TeX エンジンはテキストファイルに埋め込まれたコマンドを使って組版処理を導き制御し、LaTeX コマンドとドキュメントのテキストをプロフェッショナルに組版された PDF ファイルに変換します。つまり、あなたはドキュメントの*内容*だけに集中すればよく、*見た目*(書式設定)は LaTeX コマンドと TeX エンジンを通じてコンピューターが処理してくれるのです。
## なぜ LaTeX を学ぶのか?
他のドキュメント作成アプリケーションの代わりに LaTeX の使い方を学ぶことについては、賛否さまざまな意見があります。しかし最終的には、好みや相性、ドキュメントの要件に基づく個人の選択です。
LaTeX を支持する理由には次のようなものがあります。
* 非常に複雑な数式、表、自然科学向けの技術的な内容の組版をサポートしていること
* 脚注、相互参照、参考文献の管理のための機能
* 索引、用語集、目次、図の一覧など、複雑または面倒なドキュメント要素を簡単に作成できること
* 本質的なプログラム可能性と、数千もの[無料のアドオンパッケージ](https://www.ctan.org/pkg)による拡張性により、オーダーメイドのドキュメント作成向けに高度にカスタマイズできること
全体として、LaTeX はユーザーにドキュメント作成に対する大きなコントロールを与え、極めて高い水準で組版されたドキュメントを生み出します。もちろん、雑誌のような出版物によく見られる「自由形式」のページデザインなど、LaTeX が得意としないドキュメントや出版物の種類もあります。
LaTeX の重要な利点の 1 つは、ドキュメントの内容とスタイルの分離です。ドキュメントの内容を書き終えた後でも、その見た目を簡単に変更できます。同様に、特定の種類のドキュメントのレイアウトやスタイルを定義する LaTeX ファイルを作成し、そのファイルを*テンプレート*として使えば、同じ種類の他のドキュメントの執筆・作成を標準化できます。たとえば、科学系の出版社は LaTeX で論文テンプレートを作成し、著者はそれを使って学術誌に投稿する論文を書きます。Overleaf には、科学論文、レポート、書籍から履歴書やプレゼンテーションまで、非常に幅広い種類のドキュメントを網羅する[数千ものテンプレートを集めたギャラリー](https://www.overleaf.com/gallery)があります。これらのテンプレートがドキュメントのレイアウトとスタイルを定義しているため、著者は Overleaf でテンプレートを開いて新しいプロジェクトを作成し、内容を書き始めるだけで済みます。
## 最初の LaTeX を書いてみる
最初のステップは、新しい LaTeX プロジェクトを作成することです。自分のコンピューター上で新しい `.tex` ファイルを作成してもよいですし、Overleaf で新しいプロジェクトを開始することもできます。
Overleaf で直接開ける、最もシンプルな動作例から始めましょう。
```latex theme={null}
\documentclass{article}
\begin{document}
First document. This is a simple example, with no
extra parameters or packages included.
\end{document}
```
[この例を Overleaf で開く。](https://www.overleaf.com/docs?engine=pdflatex\&snip%5Fname=Simplest+working+example+LaTeX+document\&snip=%5Cdocumentclass%7Barticle%7D%0A%5Cbegin%7Bdocument%7D%0AFirst+document.+This+is+a+simple+example%2C+with+no+%0Aextra+parameters+or+packages+included.%0A%5Cend%7Bdocument%7D)
この例の出力は次のとおりです。

LaTeX が段落の最初の行を自動的に字下げし、書式設定を代わりに処理してくれていることがわかります。コードの各部分が何をしているのか、詳しく見てみましょう。
コードの最初の行 `\documentclass{article}` は、*クラス*と呼ばれるドキュメントの種類を宣言します。クラスはドキュメント全体の見た目を制御します。ドキュメントの種類によって必要なクラスは異なります。たとえば、履歴書には、標準の LaTeX `article` クラスを使うような科学論文とは別のクラスが必要です。作業するドキュメントの種類によっては、`book` や `report` などの別のクラスが必要になることもあります。利用可能な多くの LaTeX クラスの種類を知るには、[CTAN(Comprehensive TeX Archive Network)の関連ページ](https://www.ctan.org/topic/class)を参照してください。
ドキュメントクラスを設定したら、ドキュメントの*本文*と呼ばれる内容を `\begin{document}` タグと `\end{document}` タグの間に記述します。上の例を開いた後、テキストを変更し、終わったら*ドキュメントを再コンパイル*することで、組版された PDF の結果を確認できます。Overleaf でこれを行うには、次の短い動画クリップのように **Recompile** をクリックするだけです。
どの Overleaf プロジェクトも、編集するたびに自動的に再コンパイルするように設定できます。次のスクリーンショットのように、**Recompile** ボタンの横にある小さな矢印をクリックし、**Auto Compile** を **On** に設定します。
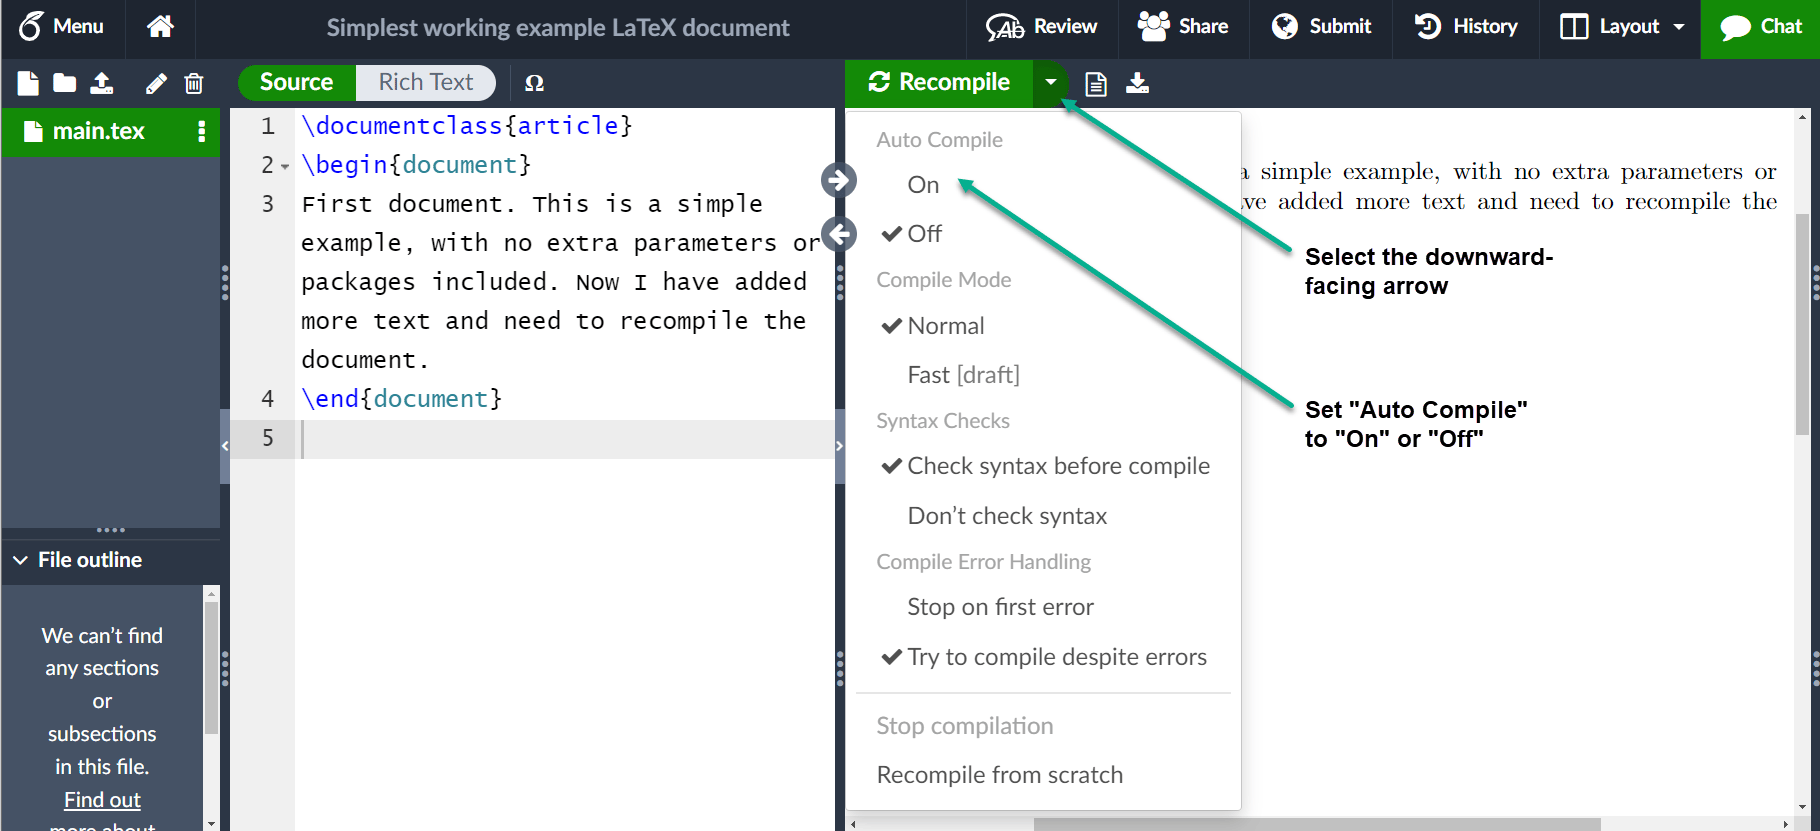 ドキュメントに内容を追加する方法がわかったので、次はタイトルを付けてみましょう。そのためには、**プリアンブル**について簡単に説明する必要があります。
## ドキュメントのプリアンブル
上のスクリーンショットでは、Overleaf が LaTeX ドキュメントを `main.tex` というファイルとして保存しています。慣例として、ドキュメントの LaTeX コードを含むファイルには `.tex` という拡張子が使われます。
前の例では、ドキュメントの内容を `\begin{document}` コマンドの後に入力する方法を示しました。一方、`.tex` ファイル内でそれより*前*に現れるものはすべて*プリアンブル*と呼ばれ、ドキュメントの「セットアップ」セクションとして機能します。プリアンブルでは、ドキュメントのクラス(種類)とともに、ドキュメントを書く際に使用する言語などの詳細を定義します。また、使用したい*パッケージ*を読み込み(詳しくは[後述](/ja/texlive/latex-basics/learn-latex-in-30-minutes#Finding%5Fand%5Fusing%5FLaTeX%5Fpackages))、その他の各種設定を行う場所でもあります。
最小限のドキュメントのプリアンブルは次のようになります。
```latex theme={null}
\documentclass[12pt, letterpaper]{article}
\usepackage{graphicx}
```
ここで、`\documentclass[12pt, letterpaper]{article}` はドキュメント全体のクラス(種類)を定義します。カンマで区切る必要がある追加のパラメーターは角括弧(`[...]`)内に記述し、この article クラスのインスタンスを設定するために使用します。つまり、この `article` クラスベースのドキュメントで使いたい設定です。
この例では、2 つのパラメーターは次のことを行います。
* `12pt` はフォントサイズを設定します
* `letterpaper` は用紙サイズを設定します
もちろん、`9pt`、`11pt`、`12pt` など他のフォントサイズも使用できますが、何も指定しない場合のデフォルトのサイズは `10pt` です。用紙サイズについては、他に `a4paper` や `legalpaper` を指定できます。詳しくはページサイズと余白に関する記事を参照してください。
プリアンブルの次の行は
```latex theme={null}
\usepackage{graphicx}
```
外部パッケージ(ここでは [graphicx](https://ctan.org/pkg/graphicx?lang=en))を読み込んで LaTeX の機能を拡張し、外部のグラフィックファイルをインポートできるようにする例です。LaTeX パッケージについては、[LaTeX パッケージの検索と使用](/ja/texlive/latex-basics/learn-latex-in-30-minutes#Finding%5Fand%5Fusing%5FLaTeX%5Fpackages)のセクションで説明します。
## タイトル、著者、日付の情報を含める
ドキュメントにタイトル、著者、日付を追加するには、*プリアンブル*(ドキュメントの本文*ではありません*)にさらに 3 行が必要です。それらの行は次のとおりです。
* `\title{My first LaTeX document}`:ドキュメントのタイトル
* `\author{Hubert Farnsworth}`:ここには著者名を記述し、必要に応じて波括弧内に `\thanks` コマンドを記述します。
* `\thanks{Funded by the Overleaf team.}`:`author` コマンドの波括弧内で、著者名の後に追加できます。上付き文字と、波括弧内のテキストを含む脚注が追加されます。論文の中で機関に謝辞を述べる必要がある場合に便利です。
* `\date{August 2022}`:日付は手動で入力することも、`\today` コマンドを使ってドキュメントをコンパイルするたびに現在の日付を組版することもできます
これらの行を追加すると、プリアンブルは次のようになります。
```latex theme={null}
\documentclass[12pt, letterpaper]{article}
\title{My first LaTeX document}
\author{Hubert Farnsworth\thanks{Funded by the Overleaf team.}}
\date{August 2022}
```
タイトル、著者、日付を組版するには、ドキュメントの*本文*で `\maketitle` コマンドを使用します。
```latex theme={null}
\begin{document}
\maketitle
We have now added a title, author and date to our first \LaTeX{} document!
\end{document}
```
これでプリアンブルと本文を組み合わせて、Overleaf で開ける完全なドキュメントを作成できます。
```latex theme={null}
\documentclass[12pt, letterpaper]{article}
\title{My first LaTeX document}
\author{Hubert Farnsworth\thanks{Funded by the Overleaf team.}}
\date{August 2022}
\begin{document}
\maketitle
We have now added a title, author and date to our first \LaTeX{} document!
\end{document}
```
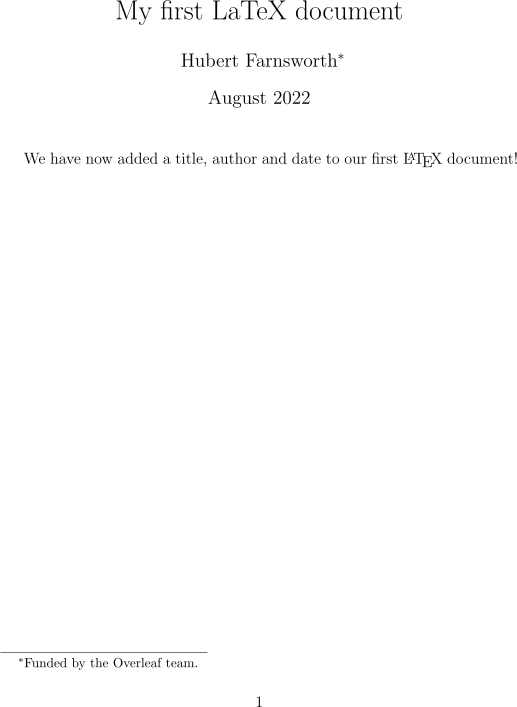
[この例を Overleaf で開く。](https://www.overleaf.com/docs?engine=pdflatex\&snip%5Fname=My+first+LaTeX+document\&snip=%5Cdocumentclass%5B12pt%2C+letterpaper%5D%7Barticle%7D%0A%5Ctitle%7BMy+first+LaTeX+document%7D%0A%5Cauthor%7BHubert+Farnsworth%5Cthanks%7BFunded+by+the+Overleaf+team.%7D%7D%0A%5Cdate%7BAugust+2022%7D%0A%5Cbegin%7Bdocument%7D%0A%5Cmaketitle%0AWe+have+now+added+a+title%2C+author+and+date+to+our+first+%5CLaTeX%7B%7D+document%21%0A%5Cend%7Bdocument%7D)
この例の出力は次のとおりです。
## コメントを追加する
LaTeX は一種の「プログラムコード」ですが、ドキュメントの組版に特化したものです。そのため、他のプログラミング言語で書かれたコードと同様に、ドキュメント内にコメントを含めると非常に便利です。LaTeX のコメントとは、組版されることもドキュメントに影響を与えることもないテキスト部分のことです。「やること」メモを追加したり、説明のメモを含めたり、複雑なマクロのインライン説明を記述したり、デバッグ時に LaTeX コードの行やセクションをコメントアウトしたりするのによく使われます。
LaTeX でコメントを書くには、次のコード(上の例を使用)のように、行の先頭に `%` 記号を書くだけです。
```latex theme={null}
\documentclass[12pt, letterpaper]{article}
\title{My first LaTeX document}
\author{Hubert Farnsworth\thanks{Funded by the Overleaf team.}}
\date{August 2022}
\begin{document}
\maketitle
We have now added a title, author and date to our first \LaTeX{} document!
% This line here is a comment. It will not be typeset in the document.
\end{document}
```
[この例を Overleaf で開く。](https://www.overleaf.com/docs?engine=pdflatex\&snip%5Fname=My+first+LaTeX+document+with+a+comment\&snip=%5Cdocumentclass%5B12pt%2C+letterpaper%5D%7Barticle%7D%0A%5Ctitle%7BMy+first+LaTeX+document%7D%0A%5Cauthor%7BHubert+Farnsworth%5Cthanks%7BFunded+by+the+Overleaf+team.%7D%7D%0A%5Cdate%7BAugust+2022%7D%0A%5Cbegin%7Bdocument%7D%0A%5Cmaketitle%0AWe+have+now+added+a+title%2C+author+and+date+to+our+first+%5CLaTeX%7B%7D+document%21%0A%0A%25+This+line+here+is+a+comment.+It+will+not+be+typeset+in+the+document.%0A%5Cend%7Bdocument%7D)
この例の出力は、コメントを含まない前の LaTeX コードの出力と同じです。
## 太字、斜体、下線
次に、テキストの書式設定コマンドをいくつか見てみましょう。
* **太字**:LaTeX で太字のテキストは `\textbf{...}` コマンドで組版します。
* *斜体*:斜体のテキストは `\textit{...}` コマンドで作成します。
* 下線:テキストに下線を引くには `\underline{...}` コマンドを使用します。
次の例でこれらのコマンドを示します。
```latex theme={null}
Some of the \textbf{greatest}
discoveries in \underline{science}
were made by \textbf{\textit{accident}}.
```
[この例を Overleaf で開く。](https://www.overleaf.com/docs?engine=pdflatex\&snip%5Fname=First+example+with+formatted+text\&snip=%5Cdocumentclass%5B12pt%2C+letterpaper%5D%7Barticle%7D%0A%5Ctitle%7BMy+first+LaTeX+document%7D%0A%5Cauthor%7BHubert+Farnsworth%5Cthanks%7BFunded+by+the+Overleaf+team.%7D%7D%0A%5Cdate%7BAugust+2022%7D%0A%5Cbegin%7Bdocument%7D%0A%5Cmaketitle%0ASome+of+the+%5Ctextbf%7Bgreatest%7D%0Adiscoveries+in+%5Cunderline%7Bscience%7D+%0Awere+made+by+%5Ctextbf%7B%5Ctextit%7Baccident%7D%7D.%0A%5Cend%7Bdocument%7D)
この例の出力は次のとおりです。

もう 1 つの非常に便利なコマンドが `\emph{_argument_}` で、その `_argument_` への効果は文脈によって異なります。通常のテキスト内では強調されたテキストは斜体になりますが、斜体のテキスト内で使用すると、この動作は逆になります。次の例を見てください。
```latex theme={null}
Some of the greatest \emph{discoveries} in science
were made by accident.
\textit{Some of the greatest \emph{discoveries}
in science were made by accident.}
\textbf{Some of the greatest \emph{discoveries}
in science were made by accident.}
```
[この \emph の例を Overleaf で開く。](https://www.overleaf.com/docs?engine=pdflatex\&snip%5Fname=Using+the+emph+command\&snip=%5Cdocumentclass%5B12pt%2C+letterpaper%5D%7Barticle%7D%0A%5Ctitle%7BMy+first+LaTeX+document%7D%0A%5Cauthor%7BHubert+Farnsworth%5Cthanks%7BFunded+by+the+Overleaf+team.%7D%7D%0A%5Cdate%7BAugust+2022%7D%0A%5Cbegin%7Bdocument%7D%0A%5Cparindent0pt%25+To+remove+the+paragraph+indentation%0A%5Cmaketitle%0ASome+of+the+greatest+%5Cemph%7Bdiscoveries%7D+in+science+%0Awere+made+by+accident.%0A%0A%5Ctextit%7BSome+of+the+greatest+%5Cemph%7Bdiscoveries%7D+%0Ain+science+were+made+by+accident.%7D%0A%0A%5Ctextbf%7BSome+of+the+greatest+%5Cemph%7Bdiscoveries%7D+%0Ain+science+were+made+by+accident.%7D%0A%5Cend%7Bdocument%7D)
この例の出力は次のとおりです。

* 注意: Beamer などの一部のパッケージは、`\emph` コマンドの動作を変更します。
## 画像を追加する
このセクションでは、LaTeX ドキュメントに画像を追加する方法を見ていきます。Overleaf では、画像を挿入する方法が 3 つあります。
1. エディターのツールバーにある [**Insert Figure** ボタン](https://learn.overleaf.com/learn/Kb/How_to_insert_figures_in_Overleaf#Using%5FInsert%5FFigure%5Fto%5Fadd%5Fa%5Ffigure%5Fto%5Fyour%5Fproject)()を使って、**Visual Editor** または **Code Editor** に画像を挿入する。
2. 画像をコピーして **Visual Editor** または **Code Editor** に貼り付ける。
3. **Code Editor** を使って、グラフィックを挿入する LaTeX コードを書く。
方法 1 と 2 では画像の挿入に必要な LaTeX コードが自動的に生成されますが、ここでは方法 3 を紹介します。なお、それらの画像を Overleaf プロジェクトに[アップロード](https://docs.overleaf.com/writing-and-editing/inserting-images)しておく必要があります。次の例は、画像を含める方法を示しています。
```latex theme={null}
\documentclass{article}
\usepackage{graphicx} %LaTeX package to import graphics
\graphicspath{{images/}} %configuring the graphicx package
\begin{document}
The universe is immense and it seems to be homogeneous,
on a large scale, everywhere we look.
% The \includegraphics command is
% provided (implemented) by the
% graphicx package
\includegraphics{universe}
There's a picture of a galaxy above.
\end{document}
```
[この画像の例を Overleaf で開く。](https://www.overleaf.com/project/new/template/25686?id=107971142\&templateName=Example+using+images+in+LaTeX\&latexEngine=pdflatex\&texImage=texlive-full%3A2022.1\&mainFile=)
この例の出力は次のとおりです。
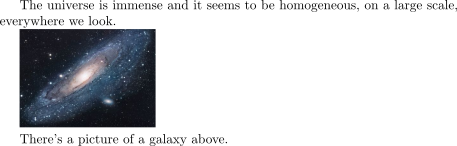
LaTeX ドキュメントにグラフィックを取り込むには、外部のグラフィックファイルを含めるのに必要なコマンドと機能を提供する[アドオン*パッケージ*](/ja/texlive/latex-basics/learn-latex-in-30-minutes#Finding%5Fand%5Fusing%5FLaTeX%5Fpackages)が必要です。上の例では [graphicx パッケージ](https://ctan.org/pkg/graphicx?lang=en)を読み込んでいます。このパッケージは多くのコマンドを提供しており、その中にはグラフィックをインポートする `\includegraphics{...}` や、グラフィックの場所を LaTeX に知らせる `\graphicspath{...}` があります。
`graphicx` パッケージを使用するには、Overleaf ドキュメントのプリアンブルに次の行を含めます。
```latex theme={null}
\usepackage{graphicx}
```
この例では、コマンド `\graphicspath{{images/}}` が、画像が現在のディレクトリ内の `images` という名前のフォルダーに保存されていることを LaTeX に伝えます。

`\includegraphics{universe}` コマンドが、実際にドキュメントに画像を挿入する処理を行います。ここで、`universe` は拡張子を除いた画像ファイルの名前です。
**注意**:
* `\includegraphics` コマンドでは拡張子を含む完全なファイル名も指定できますが、拡張子を省略するのがベストプラクティスとされています。そうすることで、LaTeX がサポートされているすべての形式を検索するようになるためです。
* 一般に、グラフィックのファイル名には空白や複数のドットを含めるべきではありません。また、Overleaf に画像ファイルをアップロードする際は、ファイル拡張子に小文字を使うことをおすすめします。
LaTeX パッケージについての詳しい情報は、このチュートリアルの最後にある [LaTeX パッケージの検索と使用](/ja/texlive/latex-basics/learn-latex-in-30-minutes#Finding%5Fand%5Fusing%5FLaTeX%5Fpackages)のセクションにあります。
## キャプション、ラベル、参照
以下に示すように、`figure` 環境を使うと、画像にキャプションやラベルを付けたり、画像を参照したりできます。
```latex theme={null}
\documentclass{article}
\usepackage{graphicx}
\graphicspath{{images/}}
\begin{document}
\begin{figure}[h]
\centering
\includegraphics[width=0.75\textwidth]{mesh}
\caption{A nice plot.}
\label{fig:mesh1}
\end{figure}
As you can see in figure \ref{fig:mesh1}, the function grows near the origin. This example is on page \pageref{fig:mesh1}.
\end{document}
```
[この画像の例を Overleaf で開く。](https://www.overleaf.com/project/new/template/25519?id=107980830\&templateName=Example+using+image+captions+in+LaTeX\&latexEngine=pdflatex\&texImage=texlive-full%3A2022.1\&mainFile=)
この例の出力は次のとおりです。
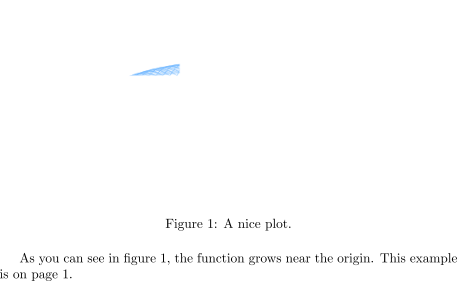
この例には注目すべきコマンドがいくつかあります。
* **`\includegraphics[width=0.75\textwidth]{mesh}`**:この形式の `\includegraphics` は、図の幅をテキスト幅の 75% に設定するよう LaTeX に指示します。テキスト幅の値は `\textwidth` コマンドに格納されています。
* **`\caption{A nice plot.}`**:その名のとおり、このコマンドは図のキャプションを設定します。キャプションは図の上または下に配置できます。図の一覧を作成する場合、このキャプションがその一覧で使用されます。
* **`\label{fig:mesh1}`**:ドキュメント内でこの画像を参照するには、`\label` コマンドを使ってラベルを付けます。ラベルは画像の番号を生成するために使われ、次のコマンドと組み合わせることで画像を参照できるようになります。
* **`\ref{fig:mesh1}`**:このコードは、参照された図に対応する番号に置き換えられます。
LaTeX ドキュメントに組み込む画像は、`figure` 環境またはそれに類する環境の中に配置して、LaTeX がドキュメント内の適切な位置に画像を自動的に配置できるようにすべきです。
詳しいガイダンスは、次の Overleaf ヘルプ記事にあります。
* 図の配置
* [画像の挿入](https://docs.overleaf.com/writing-and-editing/inserting-images)
## LaTeX でリストを作成する
*環境*を使うと、さまざまな種類のリストを作成できます。環境は、特定の組版機能を実装するために必要な LaTeX コードをカプセル化するために使われます。環境は `\begin{_environment-name_}` で始まり `\end{_environment-name_}` で終わります。ここで `_environment-name_` は `figure`、`tabular`、またはリストの種類(順序なしリストの場合は `itemize`、順序付きリストの場合は `enumerate`)などです。
### 順序なしリスト
順序なしリストは `itemize` 環境で作成します。以下に示すように、リストの各項目の前には `\item` コマンドを置く必要があります。
```latex theme={null}
\documentclass{article}
\begin{document}
\begin{itemize}
\item The individual entries are indicated with a black dot, a so-called bullet.
\item The text in the entries may be of any length.
\end{itemize}
\end{document}
```
[この例を Overleaf で開く。](https://www.overleaf.com/docs?engine=pdflatex\&snip%5Fname=Example+of+a+LaTeX+unordered+list\&snip=%5Cdocumentclass%7Barticle%7D%0A%5Cbegin%7Bdocument%7D%0A%5Cbegin%7Bitemize%7D%0A++%5Citem+The+individual+entries+are+indicated+with+a+black+dot%2C+a+so-called+bullet.%0A++%5Citem+The+text+in+the+entries+may+be+of+any+length.%0A%5Cend%7Bitemize%7D%0A%5Cend%7Bdocument%7D)
この例の出力は次のとおりです。

さまざまな種類の LaTeX リストを紹介している、こちらの[より大きな Overleaf プロジェクト](https://www.overleaf.com/project/new/template/25521?id=107987258\&templateName=Demonstrating+various+types+of+LaTeX+list\&latexEngine=pdflatex\&texImage=texlive-full%3A2022.1\&mainFile=)を開くこともできます。
### 順序付きリスト
順序付きリストは順序なしリストと同じ構文を使いますが、`enumerate` 環境で作成します。
```latex theme={null}
\documentclass{article}
\begin{document}
\begin{enumerate}
\item This is the first entry in our list.
\item The list numbers increase with each entry we add.
\end{enumerate}
\end{document}
```
[この例を Overleaf で開く。](https://www.overleaf.com/docs?engine=pdflatex\&snip%5Fname=Example+of+the+enumerate+environment\&snip=%5Cdocumentclass%7Barticle%7D%0A%5Cbegin%7Bdocument%7D%0A%5Cbegin%7Benumerate%7D%0A++%5Citem+This+is+the+first+entry+in+our+list.%0A++%5Citem+The+list+numbers+increase+with+each+entry+we+add.%0A%5Cend%7Benumerate%7D%0A%5Cend%7Bdocument%7D)
この例の出力は次のとおりです。

`unordered` リストと同様に、各項目の前には `\item` コマンドを置く必要があります。ここでは、このコマンドが 1 から始まる数字の順序付きリストのラベル値を自動的に生成します。
詳しくは、さまざまな種類の LaTeX リストを紹介しているこちらの[より大きな Overleaf プロジェクト](https://www.overleaf.com/project/new/template/25521?id=107987258\&templateName=Demonstrating+various+types+of+LaTeX+list\&latexEngine=pdflatex\&texImage=texlive-full%3A2022.1\&mainFile=)を開くか、さらに多くの例を掲載し、カスタマイズしたリストの作成方法を紹介している LaTeX リストに関する専用のヘルプ記事を参照してください。
## LaTeX に数式を追加する
LaTeX の主な利点の 1 つは、数式を簡単に書けることです。LaTeX には、数式を組版するための 2 つの記述モードがあります。
* *インライン*数式モード:段落の一部となる数式を書くために使用します
* *ディスプレイ*数式モード:テキストや段落の一部ではなく、独立した行に組版される数式を書くために使用します
### インライン数式モード
インライン数式モードの例を見てみましょう。
```latex theme={null}
\documentclass[12pt, letterpaper]{article}
\begin{document}
In physics, the mass-energy equivalence is stated
by the equation $E=mc^2$, discovered in 1905 by Albert Einstein.
\end{document}
```
[この例を Overleaf で開く。](https://www.overleaf.com/docs?engine=pdflatex\&snip%5Fname=Inline+LaTeX+maths+example\&snip=%5Cdocumentclass%5B12pt%2C+letterpaper%5D%7Barticle%7D%0A%5Cbegin%7Bdocument%7D%0AIn+physics%2C+the+mass-energy+equivalence+is+stated+%0Aby+the+equation+%24E%3Dmc%5E2%24%2C+discovered+in+1905+by+Albert+Einstein.%0A%5Cend%7Bdocument%7D)
この例の出力は次のとおりです。

インラインモードの数式を組版するには、次の例のように、`\( ... \)`、`$ ... $`、`\begin{math} ... \end{math}` のいずれかの区切り文字のペアを使用します。
```latex theme={null}
\documentclass[12pt, letterpaper]{article}
\begin{document}
\begin{math}
E=mc^2
\end{math} is typeset in a paragraph using inline math mode---as is $E=mc^2$, and so too is \(E=mc^2\).
\end{document}
```
[この例を Overleaf で開く。](https://www.overleaf.com/docs?engine=pdflatex\&snip%5Fname=Demonstrating+inline+math+mode\&snip=%5Cdocumentclass%5B12pt%2C+letterpaper%5D%7Barticle%7D%0A%5Cbegin%7Bdocument%7D%0A%5Cbegin%7Bmath%7D%0AE%3Dmc%5E2%0A%5Cend%7Bmath%7D+is+typeset+in+a+paragraph+using+inline+math+mode---as+is+%24E%3Dmc%5E2%24%2C+and+so+too+is+%5C%28E%3Dmc%5E2%5C%29.%0A%5Cend%7Bdocument%7D)
この例の出力は次のとおりです。

### ディスプレイ数式モード
次の例のように、ディスプレイモードで組版された数式には番号を付けることも、付けないこともできます。
```latex theme={null}
\documentclass[12pt, letterpaper]{article}
\begin{document}
The mass-energy equivalence is described by the famous equation
\[ E=mc^2 \] discovered in 1905 by Albert Einstein.
In natural units ($c = 1$), the formula expresses the identity
\begin{equation}
E=m
\end{equation}
\end{document}
```
[この例を Overleaf で開く。](https://www.overleaf.com/docs?engine=pdflatex\&snip%5Fname=Display+math+mode+example\&snip=%5Cdocumentclass%5B12pt%2C+letterpaper%5D%7Barticle%7D%0A%5Cbegin%7Bdocument%7D%0AThe+mass-energy+equivalence+is+described+by+the+famous+equation%0A%5C%5B+E%3Dmc%5E2+%5C%5D+discovered+in+1905+by+Albert+Einstein.+%0A%0AIn+natural+units+%28%24c+%3D+1%24%29%2C+the+formula+expresses+the+identity%0A%5Cbegin%7Bequation%7D%0AE%3Dm%0A%5Cend%7Bequation%7D%0A%5Cend%7Bdocument%7D)
この例の出力は次のとおりです。
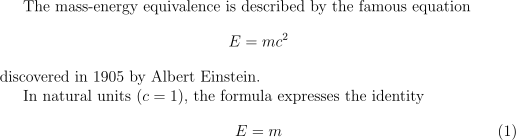
ディスプレイモードの数式を組版するには、`\[ ... \]`、`\begin{displaymath} ... \end{displaymath}`、`\begin{equation} ... \end{equation}` のいずれかの区切り文字のペアを使用します。歴史的には、ディスプレイモードの数式の組版には `$$ _... display math here ..._$$` のように `$$` 文字を区切りとして使う必要がありましたが、この方法は[現在は推奨されていません](https://texfaq.org/FAQ-dolldoll)。代わりに LaTeX の区切り文字 `\[ ... \]` を使用してください。
### より完全な例
次の例は、LaTeX で組版したさまざまな数学的内容を示しています。
```latex theme={null}
\documentclass{article}
\begin{document}
Subscripts in math mode are written as $a_b$ and superscripts are written as $a^b$. These can be combined and nested to write expressions such as
\[ T^{i_1 i_2 \dots i_p}_{j_1 j_2 \dots j_q} = T(x^{i_1},\dots,x^{i_p},e_{j_1},\dots,e_{j_q}) \]
We write integrals using $\int$ and fractions using $\frac{a}{b}$. Limits are placed on integrals using superscripts and subscripts:
\[ \int_0^1 \frac{dx}{e^x} = \frac{e-1}{e} \]
Lower case Greek letters are written as $\omega$ $\delta$ etc. while upper case Greek letters are written as $\Omega$ $\Delta$.
Mathematical operators are prefixed with a backslash as $\sin(\beta)$, $\cos(\alpha)$, $\log(x)$ etc.
\end{document}
```
[この例を Overleaf で開く。](https://www.overleaf.com/docs?engine=pdflatex\&snip%5Fname=More+advanced+LaTeX+math+example\&snip=%5Cdocumentclass%7Barticle%7D%0A%5Cbegin%7Bdocument%7D%0ASubscripts+in+math+mode+are+written+as+%24a%5Fb%24+and+superscripts+are+written+as+%24a%5Eb%24.+These+can+be+combined+and+nested+to+write+expressions+such+as%0A%0A%5C%5B+T%5E%7Bi%5F1+i%5F2+%5Cdots+i%5Fp%7D%5F%7Bj%5F1+j%5F2+%5Cdots+j%5Fq%7D+%3D+T%28x%5E%7Bi%5F1%7D%2C%5Cdots%2Cx%5E%7Bi%5Fp%7D%2Ce%5F%7Bj%5F1%7D%2C%5Cdots%2Ce%5F%7Bj%5Fq%7D%29+%5C%5D%0A+%0AWe+write+integrals+using+%24%5Cint%24+and+fractions+using+%24%5Cfrac%7Ba%7D%7Bb%7D%24.+Limits+are+placed+on+integrals+using+superscripts+and+subscripts%3A%0A%0A%5C%5B+%5Cint%5F0%5E1+%5Cfrac%7Bdx%7D%7Be%5Ex%7D+%3D++%5Cfrac%7Be-1%7D%7Be%7D+%5C%5D%0A%0ALower+case+Greek+letters+are+written+as+%24%5Comega%24+%24%5Cdelta%24+etc.+while+upper+case+Greek+letters+are+written+as+%24%5COmega%24+%24%5CDelta%24.%0A%0AMathematical+operators+are+prefixed+with+a+backslash+as+%24%5Csin%28%5Cbeta%29%24%2C+%24%5Ccos%28%5Calpha%29%24%2C+%24%5Clog%28x%29%24+etc.%0A%5Cend%7Bdocument%7D)
この例の出力は次のとおりです。
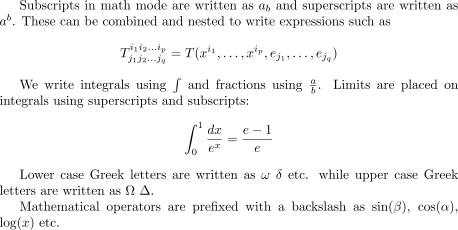
次の例では `amsmath` パッケージが提供する `equation*` 環境を使用するため、ドキュメントのプリアンブルに次の行を追加する必要があります。
```latex theme={null}
\usepackage{amsmath}% For the equation* environment
```
`amsmath` の使い方について詳しくは、ヘルプ記事を参照してください。
```latex theme={null}
\documentclass{article}
\usepackage{amsmath}% For the equation* environment
\begin{document}
\section{First example}
The well-known Pythagorean theorem \(x^2 + y^2 = z^2\) was proved to be invalid for other exponents, meaning the next equation has no integer solutions for \(n>2\):
\[ x^n + y^n = z^n \]
\section{Second example}
This is a simple math expression \(\sqrt{x^2+1}\) inside text.
And this is also the same:
\begin{math}
\sqrt{x^2+1}
\end{math}
but by using another command.
This is a simple math expression without numbering
\[\sqrt{x^2+1}\]
separated from text.
This is also the same:
\begin{displaymath}
\sqrt{x^2+1}
\end{displaymath}
\ldots and this:
\begin{equation*}
\sqrt{x^2+1}
\end{equation*}
\end{document}
```
[この例を Overleaf で開く。](https://www.overleaf.com/docs?engine=pdflatex\&snip%5Fname=More+math+content+typeset+in+LaTeX\&snip=%5Cdocumentclass%7Barticle%7D%0A%5Cusepackage%7Bamsmath%7D%25+For+the+equation%2A+environment%0A%5Cbegin%7Bdocument%7D%0A%5Csection%7BFirst+example%7D%0A%0AThe+well-known+Pythagorean+theorem+%5C%28x%5E2+%2B+y%5E2+%3D+z%5E2%5C%29+was+proved+to+be+invalid+for+other+exponents%2C+meaning+the+next+equation+has+no+integer+solutions+for+%5C%28n%3E2%5C%29%3A%0A%0A%5C%5B+x%5En+%2B+y%5En+%3D+z%5En+%5C%5D%0A%0A%5Csection%7BSecond+example%7D%0A%0AThis+is+a+simple+math+expression+%5C%28%5Csqrt%7Bx%5E2%2B1%7D%5C%29+inside+text.+%0AAnd+this+is+also+the+same%3A+%0A%5Cbegin%7Bmath%7D%0A%5Csqrt%7Bx%5E2%2B1%7D%0A%5Cend%7Bmath%7D%0Abut+by+using+another+command.%0A%0AThis+is+a+simple+math+expression+without+numbering%0A%5C%5B%5Csqrt%7Bx%5E2%2B1%7D%5C%5D+%0Aseparated+from+text.%0A%0AThis+is+also+the+same%3A%0A%5Cbegin%7Bdisplaymath%7D%0A%5Csqrt%7Bx%5E2%2B1%7D%0A%5Cend%7Bdisplaymath%7D%0A%0A%5Cldots+and+this%3A%0A%5Cbegin%7Bequation%2A%7D%0A%5Csqrt%7Bx%5E2%2B1%7D%0A%5Cend%7Bequation%2A%7D%0A%5Cend%7Bdocument%7D)
この例の出力は次のとおりです。
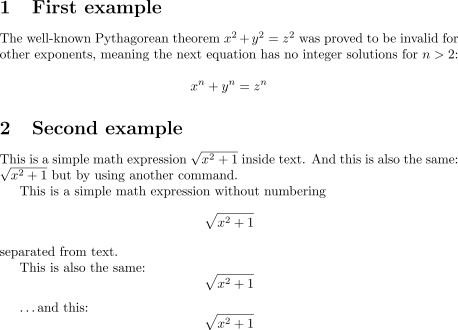
LaTeX での数式の可能性は無限大です。特定のトピックに関するアドバイスや例については、ぜひヘルプページを参照してください。
* 数式
* 下付き文字と上付き文字
* 括弧
* 分数と二項係数
* 数式の整列
* 演算子
* 数式モードでのスペース
* 積分、総和、極限
* 数式モードでのディスプレイスタイル
* ギリシャ文字と数学記号の一覧
* 数式用フォント
## 基本的なドキュメント構造
次に、概要(アブストラクト)と、LaTeX ドキュメントをさまざまな章、節、段落に分割する方法を見ていきます。
### 概要(アブストラクト)
科学論文には通常、主要なトピックや論点の簡潔な概要・要約である*アブストラクト*が付いています。次の例は、LaTeX の `abstract` 環境を使ってアブストラクトを組版する方法を示しています。
```latex theme={null}
\documentclass{article}
\begin{document}
\begin{abstract}
This is a simple paragraph at the beginning of the
document. A brief introduction about the main subject.
\end{abstract}
\end{document}
```
[この例を Overleaf で開く。](https://www.overleaf.com/docs?engine=pdflatex\&snip%5Fname=How+to+create+a+document+abstract\&snip=%5Cdocumentclass%7Barticle%7D%0A%5Cbegin%7Bdocument%7D%0A%5Cbegin%7Babstract%7D%0AThis+is+a+simple+paragraph+at+the+beginning+of+the+%0Adocument.+A+brief+introduction+about+the+main+subject.%0A%5Cend%7Babstract%7D%0A%5Cend%7Bdocument%7D)
この例の出力は次のとおりです。

### 段落と改行
アブストラクトができたら、最初の段落を書き始められます。次の例では、以下のことを示します。
* 「Enter」キーを 2 回押して現在の行を終え、続けて空行を挿入することで、新しい段落が作成されること
* 段落を変えずに新しい行を始めるには、二重のバックスラッシュである `\\` コマンドを使って手動で改行を挿入すること。代わりに `\newline` コマンドを使うこともできます。
この例の 3 番目の段落では、`\\` コマンドと `\newline` コマンドの使い方を示しています。
```latex theme={null}
\documentclass{article}
\begin{document}
\begin{abstract}
This is a simple paragraph at the beginning of the
document. A brief introduction about the main subject.
\end{abstract}
After our abstract we can begin the first paragraph, then press ``enter'' twice to start the second one.
This line will start a second paragraph.
I will start the third paragraph and then add \\ a manual line break which causes this text to start on a new line but remains part of the same paragraph. Alternatively, I can use the \verb|\newline|\newline command to start a new line, which is also part of the same paragraph.
\end{document}
```
[この例を Overleaf で開く。](https://www.overleaf.com/docs?engine=pdflatex\&snip%5Fname=Example+to+create+a+new+paragraph\&snip=%5Cdocumentclass%7Barticle%7D%0A%5Cbegin%7Bdocument%7D%0A%0A%5Cbegin%7Babstract%7D%0AThis+is+a+simple+paragraph+at+the+beginning+of+the+%0Adocument.+A+brief+introduction+about+the+main+subject.%0A%5Cend%7Babstract%7D%0A%0AAfter+our+abstract+we+can+begin+the+first+paragraph%2C+then+press+%60%60enter%27%27+twice+to+start+the+second+one.%0A%0AThis+line+will+start+a+second+paragraph.%0A%0AI+will+start+the+third+paragraph+and+then+add+%5C%5C+a+manual+line+break+which+causes+this+text+to+start+on+a+new+line+but+remains+part+of+the+same+paragraph.+Alternatively%2C+I+can+use+the+%5Cverb%7C%5Cnewline%7C%5Cnewline+command+to+start+a+new+line%2C+which+is+also+part+of+the+same+paragraph.%0A%5Cend%7Bdocument%7D)
この例の出力は次のとおりです。
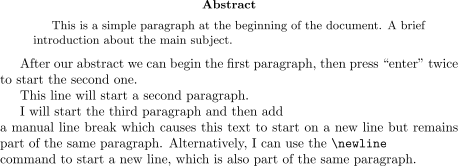
[後で見るように](/ja/texlive/latex-basics/learn-latex-in-30-minutes#Chapters%5Fand%5Fsections)、LaTeX は段落を自動的に字下げします。ただし、節や小節などのドキュメントの見出しの直後は例外です。
初めて使う方への注意として、段落間の間隔を広げた段落を「再現」するために、`\\` や `\newline` を複数使うべきではありません。LaTeX の組版アルゴリズムに干渉する可能性があるためです。推奨される方法は、`\\` を使わずに引き続き空行で新しい段落を作成し、プリアンブルに `\usepackage{parskip}` を追加して [parskip パッケージ](https://ctan.org/pkg/parskip?lang=en)を読み込むことです。
段落についての詳しい情報は、次の記事にあります。
* 段落と改行
* LaTeX で段落の間隔を変更する方法
* LaTeX Error: There's no line here to end では、`\\` の使い方に関する追加のアドバイスとガイダンスを提供しています。
### 章と節
長いドキュメントは、作成ソフトウェアに関係なく、通常は部、章、節、小節などに分割されます。LaTeX もドキュメントを構造化するコマンドを提供していますが、利用できるコマンドとその実装(何をするか)は、使用するドキュメントクラスによって異なる場合があります。たとえば、`book` クラスで作成したドキュメントは部、章、節、小節などに分割できますが、`letter` クラスにはそのためのコマンドが用意されて(サポートされて)いません。
次の例は、`book` クラスに基づくドキュメントを構造化するためのコマンドを示しています。
```latex theme={null}
\documentclass{book}
\begin{document}
\chapter{First Chapter}
\section{Introduction}
This is the first section.
Lorem ipsum dolor sit amet, consectetuer adipiscing
elit. Etiam lobortisfacilisis sem. Nullam nec mi et
neque pharetra sollicitudin. Praesent imperdietmi nec ante.
Donec ullamcorper, felis non sodales...
\section{Second Section}
Lorem ipsum dolor sit amet, consectetuer adipiscing elit.
Etiam lobortis facilisissem. Nullam nec mi et neque pharetra
sollicitudin. Praesent imperdiet mi necante...
\subsection{First Subsection}
Praesent imperdietmi nec ante. Donec ullamcorper, felis non sodales...
\section*{Unnumbered Section}
Lorem ipsum dolor sit amet, consectetuer adipiscing elit.
Etiam lobortis facilisissem...
\end{document}
```
[この例を Overleaf で開く。](https://www.overleaf.com/docs?engine=pdflatex\&snip%5Fname=Book+class+example+document\&snip=%5Cdocumentclass%7Bbook%7D%0A%5Cbegin%7Bdocument%7D%0A%0A%5Cchapter%7BFirst+Chapter%7D%0A%0A%5Csection%7BIntroduction%7D%0A%0AThis+is+the+first+section.%0A%0ALorem++ipsum++dolor++sit++amet%2C++consectetuer++adipiscing++%0Aelit.+Etiam++lobortisfacilisis+sem.++Nullam+nec+mi+et+%0Aneque+pharetra+sollicitudin.++Praesent+imperdietmi+nec+ante.+%0ADonec+ullamcorper%2C+felis+non+sodales...%0A%0A%5Csection%7BSecond+Section%7D%0A%0ALorem+ipsum+dolor+sit+amet%2C+consectetuer+adipiscing+elit.++%0AEtiam+lobortis+facilisissem.++Nullam+nec+mi+et+neque+pharetra+%0Asollicitudin.++Praesent+imperdiet+mi+necante...%0A%0A%5Csubsection%7BFirst+Subsection%7D%0APraesent+imperdietmi+nec+ante.+Donec+ullamcorper%2C+felis+non+sodales...%0A%0A%5Csection%2A%7BUnnumbered+Section%7D%0ALorem+ipsum+dolor+sit+amet%2C+consectetuer+adipiscing+elit.++%0AEtiam+lobortis+facilisissem...%0A%5Cend%7Bdocument%7D)
この例の出力は次のとおりです。
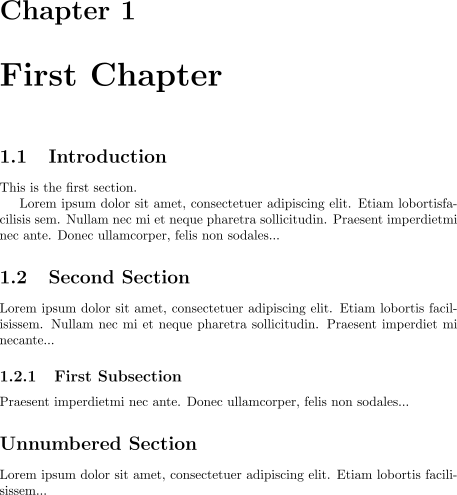
セクション分けのコマンドの名前は、ほとんど見たとおりの意味です。たとえば、`\chapter{First Chapter}` は `First Chapter` というタイトルの新しい章を作成し、`\section{Introduction}` は `Introduction` というタイトルの節を作成します。節はさらに `\subsection{...}` や、さらには `\subsubsection{...}` に分割できます。節や小節などの番号付けは自動的に行われますが、`\section*{...}` や `\subsection*{...}` のように末尾にアスタリスク(\*)を付けた、いわゆる*スター付きバージョン*のコマンドを使うと無効にできます。
LaTeX のドキュメントクラスは*全体として*、次のセクション分けコマンドを提供しており、個々のクラスはそれぞれ関連するサブセットをサポートしています。
* `\part{part}`
* `\chapter{chapter}`
* `\section{section}`
* `\subsection{subsection}`
* `\subsubsection{subsubsection}`
* `\paragraph{paragraph}`
* `\subparagraph{subparagraph}`
特に、`\part` コマンドと `\chapter` コマンドは、`report` と `book` のドキュメントクラスでのみ利用できます。
ドキュメント構造のコマンドについて詳しくは、節と章に関する Overleaf の記事を参照してください。
## 表を作成する
Overleaf では、表を作成する方法が 3 つあります。
1. **Visual Editor**(または **Code Editor**)のツールバーにある [**Insert Table** ボタン](https://www.overleaf.com/learn/how-to/How_to_insert_tables_in_Overleaf%23inserttable#Using%5FInsert%5FTable%5Fto%5Fcreate%5Fa%5Ftable%5Fin%5Fyour%5Fproject)を使用する。
2. **Visual Editor** の使用中に、別のドキュメントから[表をコピーして貼り付ける](https://www.overleaf.com/learn/how-to/How_to_paste_formatted_content_into_Overleaf%23pastingtables)。
3. Code Editor で表の LaTeX コードを書く。
LaTeX を初めて使う場合は、**Visual Editor** のツールバー(方法 1)を使うのが手始めとして最適です。**Visual Editor** と **Code Editor** を切り替えて、表の背後にあるコードを確認できます。
ここでは、表を作成する最も柔軟な方法である方法 3 に焦点を当て、罫線(ルール)やキャプションの追加を含め、LaTeX で表を作成する方法を示す例を紹介します。慣れてきたら、[LaTeX を使った表の作成方法](https://www.overleaf.com/learn/latex/Tables)に関する詳細なガイダンスもご覧ください。
### LaTeX で基本的な表を作成する
まずは、基本的な表を組版する方法を示す例から始めます。
```latex theme={null}
\begin{center}
\begin{tabular}{c c c}
cell1 & cell2 & cell3 \\
cell4 & cell5 & cell6 \\
cell7 & cell8 & cell9
\end{tabular}
\end{center}
```
[この例を Overleaf で開く。](https://www.overleaf.com/docs?engine=pdflatex\&snip%5Fname=An+example+of+a+basic+table\&snip=%5Cdocumentclass%7Barticle%7D%0A%5Cbegin%7Bdocument%7D%0A%5Cbegin%7Bcenter%7D%0A%5Cbegin%7Btabular%7D%7Bc+c+c%7D%0A+cell1+%26+cell2+%26+cell3+%5C%5C+%0A+cell4+%26+cell5+%26+cell6+%5C%5C++%0A+cell7+%26+cell8+%26+cell9++++%0A%5Cend%7Btabular%7D%0A%5Cend%7Bcenter%7D%0A%5Cend%7Bdocument%7D%0A%3C%2Fsource%3E)
この例の出力は次のとおりです。
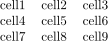
`tabular` 環境は、LaTeX で表を作成するデフォルトの方法です。この環境にはパラメーターを指定する必要があります。この場合は `{c c c}` で、列が 3 つあり、それぞれの列内のテキストを中央揃えにすることを LaTeX に伝えています。テキストを右揃えにするには `r`、左揃えにするには `l` を使うこともできます。揃え記号 `&` は、表の行内で個々のセルを区切るために使用します。表の行を終えるには、*改行*コマンド `\\` を使用します。この表は、ページのテキスト幅の中で中央に配置されるように `center` 環境内に置かれています。
### 罫線を追加する
`tabular` 環境では、表の一部として横線と縦線(罫線)を使用できます。
* 行の上下に横罫線を追加するには、`\hline` コマンドを使用します
* 列の間に縦罫線を追加するには、縦線パラメーター `|` を使用します
この例では、引数は `{|c|c|c|}` で、それぞれ縦線(罫線)で区切られた 3 つの(中央揃えの)列を宣言しています。さらに、`\hline` を使って最初の行の上と最後の行の下に横罫線を配置しています。
```latex theme={null}
\begin{center}
\begin{tabular}{|c|c|c|}
\hline
cell1 & cell2 & cell3 \\
cell4 & cell5 & cell6 \\
cell7 & cell8 & cell9 \\
\hline
\end{tabular}
\end{center}
```
[この例を Overleaf で開く。](https://www.overleaf.com/docs?engine=pdflatex\&snip%5Fname=Table+example+with+rules\&snip=%5Cdocumentclass%7Barticle%7D%0A%5Cbegin%7Bdocument%7D%0A%5Cbegin%7Bcenter%7D%0A%5Cbegin%7Btabular%7D%7B%7Cc%7Cc%7Cc%7C%7D+%0A+%5Chline%0A+cell1+%26+cell2+%26+cell3+%5C%5C+%0A+cell4+%26+cell5+%26+cell6+%5C%5C+%0A+cell7+%26+cell8+%26+cell9+%5C%5C+%0A+%5Chline%0A%5Cend%7Btabular%7D%0A%5Cend%7Bcenter%7D%0A%5Cend%7Bdocument%7D)
この例の出力は次のとおりです。
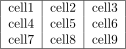
もう 1 つの例を示します。
```latex theme={null}
\begin{center}
\begin{tabular}{||c c c c||}
\hline
Col1 & Col2 & Col2 & Col3 \\ [0.5ex]
\hline\hline
1 & 6 & 87837 & 787 \\
\hline
2 & 7 & 78 & 5415 \\
\hline
3 & 545 & 778 & 7507 \\
\hline
4 & 545 & 18744 & 7560 \\
\hline
5 & 88 & 788 & 6344 \\ [1ex]
\hline
\end{tabular}
\end{center}
```
[この例を Overleaf で開く。](https://www.overleaf.com/docs?engine=pdflatex\&snip%5Fname=Another+table+example+containing+rules\&snip=%5Cdocumentclass%7Barticle%7D%0A%5Cbegin%7Bdocument%7D%0A%5Cbegin%7Bcenter%7D%0A+%5Cbegin%7Btabular%7D%7B%7C%7Cc+c+c+c%7C%7C%7D+%0A+%5Chline%0A+Col1+%26+Col2+%26+Col2+%26+Col3+%5C%5C+%5B0.5ex%5D+%0A+%5Chline%5Chline%0A+1+%26+6+%26+87837+%26+787+%5C%5C+%0A+%5Chline%0A+2+%26+7+%26+78+%26+5415+%5C%5C%0A+%5Chline%0A+3+%26+545+%26+778+%26+7507+%5C%5C%0A+%5Chline%0A+4+%26+545+%26+18744+%26+7560+%5C%5C%0A+%5Chline%0A+5+%26+88+%26+788+%26+6344+%5C%5C+%5B1ex%5D+%0A+%5Chline%0A%5Cend%7Btabular%7D%0A%5Cend%7Bcenter%7D%0A%5Cend%7Bdocument%7D)
この例の出力は次のとおりです。
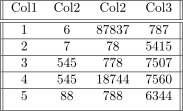
### キャプション、ラベル、参照
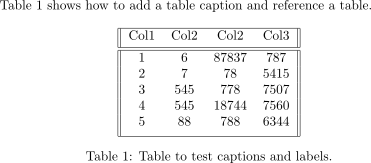
表にも、画像とほぼ同じ方法でキャプションを付けたり参照したりできます。唯一の違いは、**`figure`** 環境の代わりに **`table`** 環境を使うことです。
表 \ref\{table:data} は、表にキャプションを追加し、表を参照する方法を示しています。
```latex theme={null}
\begin{table}[h!]
\centering
\begin{tabular}{||c c c c||}
\hline
Col1 & Col2 & Col2 & Col3 \\ [0.5ex]
\hline\hline
1 & 6 & 87837 & 787 \\
2 & 7 & 78 & 5415 \\
3 & 545 & 778 & 7507 \\
4 & 545 & 18744 & 7560 \\
5 & 88 & 788 & 6344 \\ [1ex]
\hline
\end{tabular}
\caption{Table to test captions and labels.}
\label{table:data}
\end{table}
```
[この例を Overleaf で開く。](https://www.overleaf.com/docs?engine=pdflatex\&snip%5Fname=Table+captions+and+references\&snip=%5Cdocumentclass%7Barticle%7D%0A%5Cbegin%7Bdocument%7D%0ATable+%5Cref%7Btable%3Adata%7D+shows+how+to+add+a+table+caption+and+reference+a+table.%0A%5Cbegin%7Btable%7D%5Bh%21%5D%0A%5Ccentering%0A%5Cbegin%7Btabular%7D%7B%7C%7Cc+c+c+c%7C%7C%7D+%0A+%5Chline%0A+Col1+%26+Col2+%26+Col2+%26+Col3+%5C%5C+%5B0.5ex%5D+%0A+%5Chline%5Chline%0A+1+%26+6+%26+87837+%26+787+%5C%5C+%0A+2+%26+7+%26+78+%26+5415+%5C%5C%0A+3+%26+545+%26+778+%26+7507+%5C%5C%0A+4+%26+545+%26+18744+%26+7560+%5C%5C%0A+5+%26+88+%26+788+%26+6344+%5C%5C+%5B1ex%5D+%0A+%5Chline%0A%5Cend%7Btabular%7D%0A%5Ccaption%7BTable+to+test+captions+and+labels.%7D%0A%5Clabel%7Btable%3Adata%7D%0A%5Cend%7Btable%7D%0A%5Cend%7Bdocument%7D)
この例の出力は次のとおりです。
## 目次を追加する
目次の作成は簡単です。`\tableofcontents` コマンドがほとんどすべての作業を行ってくれるからです。
```latex theme={null}
\documentclass{article}
\title{Sections and Chapters}
\author{Gubert Farnsworth}
\date{August 2022}
\begin{document}
\maketitle
\tableofcontents
\section{Introduction}
This is the first section.
Lorem ipsum dolor sit amet, consectetuer adipiscing
elit. Etiam lobortisfacilisis sem. Nullam nec mi et
neque pharetra sollicitudin. Praesent imperdietmi nec ante.
Donec ullamcorper, felis non sodales...
\section*{Unnumbered Section}
\addcontentsline{toc}{section}{Unnumbered Section}
Lorem ipsum dolor sit amet, consectetuer adipiscing elit.
Etiam lobortis facilisissem. Nullam nec mi et neque pharetra
sollicitudin. Praesent imperdiet mi necante...
\section{Second Section}
Lorem ipsum dolor sit amet, consectetuer adipiscing elit.
Etiam lobortis facilisissem. Nullam nec mi et neque pharetra
sollicitudin. Praesent imperdiet mi necante...
\end{document}
```
[この例を Overleaf で開く。](https://www.overleaf.com/docs?engine=pdflatex\&snip%5Fname=Generating+a+table+of+contents\&snip=%5Cdocumentclass%7Barticle%7D%0A%5Ctitle%7BSections+and+Chapters%7D%0A%5Cauthor%7BGubert+Farnsworth%7D%0A%5Cdate%7BAugust+2022%7D%0A%5Cbegin%7Bdocument%7D%0A++%0A%5Cmaketitle%0A++%0A%5Ctableofcontents%0A%0A%5Csection%7BIntroduction%7D%0A+++%0AThis+is+the+first+section.%0A++++++%0ALorem++ipsum++dolor++sit++amet%2C++consectetuer++adipiscing++%0Aelit.+++Etiam++lobortisfacilisis+sem.++Nullam+nec+mi+et+%0Aneque+pharetra+sollicitudin.++Praesent+imperdietmi+nec+ante.+%0ADonec+ullamcorper%2C+felis+non+sodales...%0A+++++++%0A%5Csection%2A%7BUnnumbered+Section%7D%0A%5Caddcontentsline%7Btoc%7D%7Bsection%7D%7BUnnumbered+Section%7D%0A%0ALorem+ipsum+dolor+sit+amet%2C+consectetuer+adipiscing+elit.++%0AEtiam+lobortis+facilisissem.++Nullam+nec+mi+et+neque+pharetra+%0Asollicitudin.++Praesent+imperdiet+mi+necante...%0A%0A%5Csection%7BSecond+Section%7D%0A+++++++%0ALorem+ipsum+dolor+sit+amet%2C+consectetuer+adipiscing+elit.++%0AEtiam+lobortis+facilisissem.++Nullam+nec+mi+et+neque+pharetra+%0Asollicitudin.++Praesent+imperdiet+mi+necante...%0A%5Cend%7Bdocument%7D)
この例の出力は次のとおりです。
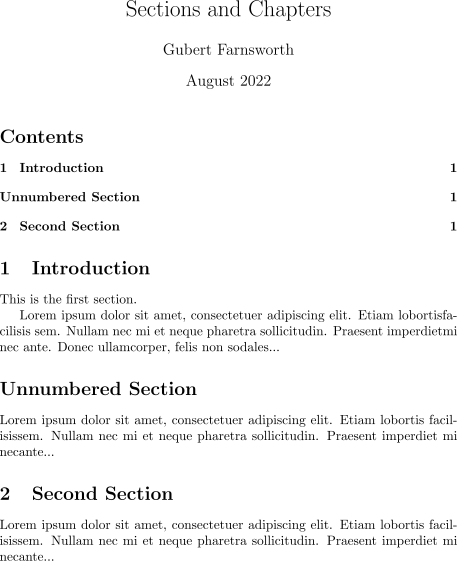
節、小節、章は自動的に目次に含まれます。番号なしの節などの項目を手動で追加するには、例のように `\addcontentsline` コマンドを使用します。
## 完成したドキュメントをダウンロードする
次の短い動画クリップでは、プロジェクトのソースコードや組版された PDF ファイルをダウンロードする方法を紹介しています。
詳しい情報は、Overleaf のヘルプ記事 [Overleaf から作業内容をエクスポートする](https://docs.overleaf.com/managing-projects-and-files/downloading-a-project)にあります。
## LaTeX パッケージの検索と使用
LaTeX は優れた組版機能を提供するだけでなく、アドオンの*パッケージ*を使った*拡張のためのフレームワーク*も提供しています。LaTeX は「すべてをこなそうとする」コマンドや機能を提供しようとするのではなく、*拡張可能*であるように設計されています。ユーザーは外部のコード群(パッケージ)を読み込むことで、より専門的な組版機能を利用したり、表の組版など LaTeX の組み込み機能を拡張したりできます。[画像を追加する](/ja/texlive/latex-basics/learn-latex-in-30-minutes#Adding%5Fimages)のセクションで見たように、`graphicx` パッケージはグラフィックファイルをインポートするコマンドを提供して LaTeX を拡張するもので、(プリアンブルで)次のように記述して読み込みました。
```latex theme={null}
\usepackage{graphicx}
```
### パッケージの読み込み
前述のとおり、パッケージはドキュメントのプリアンブルで `\usepackage` コマンドを使って読み込みます。ただし、(多くの)LaTeX パッケージは動作を設定するための一連の*オプション*を提供しているため、`\usepackage` コマンドは次のような形になることがよくあります。
```latex theme={null}
\usepackage[options]{somepackage}
```
角括弧「`[...]`」は、`somepackage` を読み込む際にどのオプションのセットを適用するかを LaTeX に伝えます。ユーザーが指定するオプションのセットでは、個々のオプションや設定は通常カンマで区切ります。たとえば、[geometry パッケージ](https://ctan.org/pkg/geometry)は LaTeX でページレイアウトを設定するための多くのオプションを提供しているので、`geometry` の典型的な使い方は次のようになります。
```latex theme={null}
\usepackage[total={6.5in,8.75in},
top=1.2in, left=0.9in, includefoot]{geometry}
```
`geometry` パッケージは、世界中の LaTeX コミュニティのメンバーによって作成・提供され、使いたい人なら誰でも無料で利用できるパッケージの一例です。
LaTeX パッケージがオプションを提供していない場合や、ユーザーがパッケージのオプションのデフォルト値を使いたい場合は、次のように読み込みます。
```latex theme={null}
\usepackage{somepackage}
```
`\usepackage[...]{somepackage}` と記述すると、LaTeX は対応する `_somepackage_.sty` というファイルを探し、それを読み込んで処理します。これにより、パッケージのコマンドが利用可能になり、そのパッケージが提供するその他のコードが実行されます。LaTeX が `_somepackage_.sty` を見つけられない場合は、次の Overleaf の例のように、エラーで終了します。
```latex theme={null}
\documentclass[12pt, letterpaper]{article}
\usepackage{somepackage}% a NON-EXISTENT package
\begin{document}
This will fail!
\end{document}
```
[この***エラーを発生させる例***を Overleaf で開く](https://www.overleaf.com/docs?engine=pdflatex\&snip%5Fname=Error+due+to+missing+package\&snip=%5Cdocumentclass%5B12pt%2C+letterpaper%5D%7Barticle%7D%0A%5Cusepackage%7Bsomepackage%7D%25+a+NON-EXISTENT+package%0A%5Cbegin%7Bdocument%7D%0AThis+will+fail%21%0A%5Cend%7Bdocument%7D)
この例の出力は次のとおりです。

### パッケージに関する情報を探す:CTAN
パッケージは [Comprehensive TeX Archive Network](https://www.ctan.org/)(通常 CTAN と呼ばれます)を通じて配布されています。執筆時点で、CTAN は 2881 人の貢献者による 6287 個のパッケージをホストしています。CTAN は[自らを](https://www.ctan.org/ctan)次のように説明しています。
> ... a set of Internet sites around the world that offer TEX-related material for download.
>
> (TEX 関連の資料をダウンロード提供している、世界中のインターネットサイトの集まり)
CTAN を閲覧して、役に立つパッケージを探すことができます。たとえば次のような方法があります。
* [トピック別](https://www.ctan.org/topics/cloud)
* [アルファベット順](https://www.ctan.org/pkg)(パッケージ名がわかっている場合に便利)
(ページ上部にある)[検索機能](https://www.ctan.org/pkg)を使うこともできます。
### Overleaf で利用できるパッケージ:TeX Live の紹介
年に一度、CTAN でホストされているパッケージの(大規模な)*サブセット*と、LaTeX 関連のフォントやその他のソフトウェアがまとめられ、[TeX Live](https://tug.org/texlive/) と呼ばれるシステムとして配布されます。これを使って、自分の(ローカルの)LaTeX 環境をインストールできます。実は、[Overleaf のサーバーも TeX Live を使用しており](https://www.overleaf.com/learn/latex/Overleaf_and_TeX_Live)、TeX Live の新しいバージョンがリリースされると更新されます。Overleaf の TeX Live の更新はリリース直後ではなく、リリースから数か月後に行われます。これは、新しい TeX Live バージョンと[ギャラリーにある数千ものテンプレート](https://www.overleaf.com/gallery)との互換性テストを行う時間を確保するためです。たとえば、こちらが [TeX Live 2025 へのアップグレードのお知らせ](https://www.overleaf.com/blog/tex-live-2025-is-now-available)です。
TeX Live には CTAN パッケージの(大規模な)*サブセット*が含まれていますが、[囲碁の棋譜を組版するための igo](https://ctan.org/pkg/igo?lang=en) のように、CTAN でホストされているものの TeX Live には含まれておらず(TeX Live で配布されておらず)、そのため Overleaf では利用できない興味深いパッケージが見つかることもあります。CTAN でホストされている一部のパッケージは、さまざまな理由で TeX Live に含まれていません。たとえば、パッケージが古くなっている、ライセンスに問題がある、非常に新しい(最近アップロードされた)、または Windows では動作するが Linux では動作しないといったプラットフォーム依存性がある、などの理由です。
新しいパッケージや既存パッケージの更新は一年中 CTAN にアップロードされていますが、TeX Live の更新は年に一度配布されます。そのため、現行バージョンの TeX Live に含まれるパッケージは、CTAN でホストされているものほど最新ではありません。Overleaf のサーバーは TeX Live を使用しているため、私たちのサーバーにインストールされているパッケージ、つまりユーザーが利用できるパッケージは、CTAN で入手できる最新バージョンではない可能性があります。ただし、一般的にはそれが問題になることはほとんどありません。
This documentation is built and hosted on [Mintlify](https://mintlify.com), a developer documentation platform.
ドキュメントに内容を追加する方法がわかったので、次はタイトルを付けてみましょう。そのためには、**プリアンブル**について簡単に説明する必要があります。
## ドキュメントのプリアンブル
上のスクリーンショットでは、Overleaf が LaTeX ドキュメントを `main.tex` というファイルとして保存しています。慣例として、ドキュメントの LaTeX コードを含むファイルには `.tex` という拡張子が使われます。
前の例では、ドキュメントの内容を `\begin{document}` コマンドの後に入力する方法を示しました。一方、`.tex` ファイル内でそれより*前*に現れるものはすべて*プリアンブル*と呼ばれ、ドキュメントの「セットアップ」セクションとして機能します。プリアンブルでは、ドキュメントのクラス(種類)とともに、ドキュメントを書く際に使用する言語などの詳細を定義します。また、使用したい*パッケージ*を読み込み(詳しくは[後述](/ja/texlive/latex-basics/learn-latex-in-30-minutes#Finding%5Fand%5Fusing%5FLaTeX%5Fpackages))、その他の各種設定を行う場所でもあります。
最小限のドキュメントのプリアンブルは次のようになります。
```latex theme={null}
\documentclass[12pt, letterpaper]{article}
\usepackage{graphicx}
```
ここで、`\documentclass[12pt, letterpaper]{article}` はドキュメント全体のクラス(種類)を定義します。カンマで区切る必要がある追加のパラメーターは角括弧(`[...]`)内に記述し、この article クラスのインスタンスを設定するために使用します。つまり、この `article` クラスベースのドキュメントで使いたい設定です。
この例では、2 つのパラメーターは次のことを行います。
* `12pt` はフォントサイズを設定します
* `letterpaper` は用紙サイズを設定します
もちろん、`9pt`、`11pt`、`12pt` など他のフォントサイズも使用できますが、何も指定しない場合のデフォルトのサイズは `10pt` です。用紙サイズについては、他に `a4paper` や `legalpaper` を指定できます。詳しくはページサイズと余白に関する記事を参照してください。
プリアンブルの次の行は
```latex theme={null}
\usepackage{graphicx}
```
外部パッケージ(ここでは [graphicx](https://ctan.org/pkg/graphicx?lang=en))を読み込んで LaTeX の機能を拡張し、外部のグラフィックファイルをインポートできるようにする例です。LaTeX パッケージについては、[LaTeX パッケージの検索と使用](/ja/texlive/latex-basics/learn-latex-in-30-minutes#Finding%5Fand%5Fusing%5FLaTeX%5Fpackages)のセクションで説明します。
## タイトル、著者、日付の情報を含める
ドキュメントにタイトル、著者、日付を追加するには、*プリアンブル*(ドキュメントの本文*ではありません*)にさらに 3 行が必要です。それらの行は次のとおりです。
* `\title{My first LaTeX document}`:ドキュメントのタイトル
* `\author{Hubert Farnsworth}`:ここには著者名を記述し、必要に応じて波括弧内に `\thanks` コマンドを記述します。
* `\thanks{Funded by the Overleaf team.}`:`author` コマンドの波括弧内で、著者名の後に追加できます。上付き文字と、波括弧内のテキストを含む脚注が追加されます。論文の中で機関に謝辞を述べる必要がある場合に便利です。
* `\date{August 2022}`:日付は手動で入力することも、`\today` コマンドを使ってドキュメントをコンパイルするたびに現在の日付を組版することもできます
これらの行を追加すると、プリアンブルは次のようになります。
```latex theme={null}
\documentclass[12pt, letterpaper]{article}
\title{My first LaTeX document}
\author{Hubert Farnsworth\thanks{Funded by the Overleaf team.}}
\date{August 2022}
```
タイトル、著者、日付を組版するには、ドキュメントの*本文*で `\maketitle` コマンドを使用します。
```latex theme={null}
\begin{document}
\maketitle
We have now added a title, author and date to our first \LaTeX{} document!
\end{document}
```
これでプリアンブルと本文を組み合わせて、Overleaf で開ける完全なドキュメントを作成できます。
```latex theme={null}
\documentclass[12pt, letterpaper]{article}
\title{My first LaTeX document}
\author{Hubert Farnsworth\thanks{Funded by the Overleaf team.}}
\date{August 2022}
\begin{document}
\maketitle
We have now added a title, author and date to our first \LaTeX{} document!
\end{document}
```
[この例を Overleaf で開く。](https://www.overleaf.com/docs?engine=pdflatex\&snip%5Fname=My+first+LaTeX+document\&snip=%5Cdocumentclass%5B12pt%2C+letterpaper%5D%7Barticle%7D%0A%5Ctitle%7BMy+first+LaTeX+document%7D%0A%5Cauthor%7BHubert+Farnsworth%5Cthanks%7BFunded+by+the+Overleaf+team.%7D%7D%0A%5Cdate%7BAugust+2022%7D%0A%5Cbegin%7Bdocument%7D%0A%5Cmaketitle%0AWe+have+now+added+a+title%2C+author+and+date+to+our+first+%5CLaTeX%7B%7D+document%21%0A%5Cend%7Bdocument%7D)
この例の出力は次のとおりです。

## コメントを追加する
LaTeX は一種の「プログラムコード」ですが、ドキュメントの組版に特化したものです。そのため、他のプログラミング言語で書かれたコードと同様に、ドキュメント内にコメントを含めると非常に便利です。LaTeX のコメントとは、組版されることもドキュメントに影響を与えることもないテキスト部分のことです。「やること」メモを追加したり、説明のメモを含めたり、複雑なマクロのインライン説明を記述したり、デバッグ時に LaTeX コードの行やセクションをコメントアウトしたりするのによく使われます。
LaTeX でコメントを書くには、次のコード(上の例を使用)のように、行の先頭に `%` 記号を書くだけです。
```latex theme={null}
\documentclass[12pt, letterpaper]{article}
\title{My first LaTeX document}
\author{Hubert Farnsworth\thanks{Funded by the Overleaf team.}}
\date{August 2022}
\begin{document}
\maketitle
We have now added a title, author and date to our first \LaTeX{} document!
% This line here is a comment. It will not be typeset in the document.
\end{document}
```
[この例を Overleaf で開く。](https://www.overleaf.com/docs?engine=pdflatex\&snip%5Fname=My+first+LaTeX+document+with+a+comment\&snip=%5Cdocumentclass%5B12pt%2C+letterpaper%5D%7Barticle%7D%0A%5Ctitle%7BMy+first+LaTeX+document%7D%0A%5Cauthor%7BHubert+Farnsworth%5Cthanks%7BFunded+by+the+Overleaf+team.%7D%7D%0A%5Cdate%7BAugust+2022%7D%0A%5Cbegin%7Bdocument%7D%0A%5Cmaketitle%0AWe+have+now+added+a+title%2C+author+and+date+to+our+first+%5CLaTeX%7B%7D+document%21%0A%0A%25+This+line+here+is+a+comment.+It+will+not+be+typeset+in+the+document.%0A%5Cend%7Bdocument%7D)
この例の出力は、コメントを含まない前の LaTeX コードの出力と同じです。
## 太字、斜体、下線
次に、テキストの書式設定コマンドをいくつか見てみましょう。
* **太字**:LaTeX で太字のテキストは `\textbf{...}` コマンドで組版します。
* *斜体*:斜体のテキストは `\textit{...}` コマンドで作成します。
* 下線:テキストに下線を引くには `\underline{...}` コマンドを使用します。
次の例でこれらのコマンドを示します。
```latex theme={null}
Some of the \textbf{greatest}
discoveries in \underline{science}
were made by \textbf{\textit{accident}}.
```
[この例を Overleaf で開く。](https://www.overleaf.com/docs?engine=pdflatex\&snip%5Fname=First+example+with+formatted+text\&snip=%5Cdocumentclass%5B12pt%2C+letterpaper%5D%7Barticle%7D%0A%5Ctitle%7BMy+first+LaTeX+document%7D%0A%5Cauthor%7BHubert+Farnsworth%5Cthanks%7BFunded+by+the+Overleaf+team.%7D%7D%0A%5Cdate%7BAugust+2022%7D%0A%5Cbegin%7Bdocument%7D%0A%5Cmaketitle%0ASome+of+the+%5Ctextbf%7Bgreatest%7D%0Adiscoveries+in+%5Cunderline%7Bscience%7D+%0Awere+made+by+%5Ctextbf%7B%5Ctextit%7Baccident%7D%7D.%0A%5Cend%7Bdocument%7D)
この例の出力は次のとおりです。

もう 1 つの非常に便利なコマンドが `\emph{_argument_}` で、その `_argument_` への効果は文脈によって異なります。通常のテキスト内では強調されたテキストは斜体になりますが、斜体のテキスト内で使用すると、この動作は逆になります。次の例を見てください。
```latex theme={null}
Some of the greatest \emph{discoveries} in science
were made by accident.
\textit{Some of the greatest \emph{discoveries}
in science were made by accident.}
\textbf{Some of the greatest \emph{discoveries}
in science were made by accident.}
```
[この \emph の例を Overleaf で開く。](https://www.overleaf.com/docs?engine=pdflatex\&snip%5Fname=Using+the+emph+command\&snip=%5Cdocumentclass%5B12pt%2C+letterpaper%5D%7Barticle%7D%0A%5Ctitle%7BMy+first+LaTeX+document%7D%0A%5Cauthor%7BHubert+Farnsworth%5Cthanks%7BFunded+by+the+Overleaf+team.%7D%7D%0A%5Cdate%7BAugust+2022%7D%0A%5Cbegin%7Bdocument%7D%0A%5Cparindent0pt%25+To+remove+the+paragraph+indentation%0A%5Cmaketitle%0ASome+of+the+greatest+%5Cemph%7Bdiscoveries%7D+in+science+%0Awere+made+by+accident.%0A%0A%5Ctextit%7BSome+of+the+greatest+%5Cemph%7Bdiscoveries%7D+%0Ain+science+were+made+by+accident.%7D%0A%0A%5Ctextbf%7BSome+of+the+greatest+%5Cemph%7Bdiscoveries%7D+%0Ain+science+were+made+by+accident.%7D%0A%5Cend%7Bdocument%7D)
この例の出力は次のとおりです。

* 注意: Beamer などの一部のパッケージは、`\emph` コマンドの動作を変更します。
## 画像を追加する
このセクションでは、LaTeX ドキュメントに画像を追加する方法を見ていきます。Overleaf では、画像を挿入する方法が 3 つあります。
1. エディターのツールバーにある [**Insert Figure** ボタン](https://learn.overleaf.com/learn/Kb/How_to_insert_figures_in_Overleaf#Using%5FInsert%5FFigure%5Fto%5Fadd%5Fa%5Ffigure%5Fto%5Fyour%5Fproject)()を使って、**Visual Editor** または **Code Editor** に画像を挿入する。
2. 画像をコピーして **Visual Editor** または **Code Editor** に貼り付ける。
3. **Code Editor** を使って、グラフィックを挿入する LaTeX コードを書く。
方法 1 と 2 では画像の挿入に必要な LaTeX コードが自動的に生成されますが、ここでは方法 3 を紹介します。なお、それらの画像を Overleaf プロジェクトに[アップロード](https://docs.overleaf.com/writing-and-editing/inserting-images)しておく必要があります。次の例は、画像を含める方法を示しています。
```latex theme={null}
\documentclass{article}
\usepackage{graphicx} %LaTeX package to import graphics
\graphicspath{{images/}} %configuring the graphicx package
\begin{document}
The universe is immense and it seems to be homogeneous,
on a large scale, everywhere we look.
% The \includegraphics command is
% provided (implemented) by the
% graphicx package
\includegraphics{universe}
There's a picture of a galaxy above.
\end{document}
```
[この画像の例を Overleaf で開く。](https://www.overleaf.com/project/new/template/25686?id=107971142\&templateName=Example+using+images+in+LaTeX\&latexEngine=pdflatex\&texImage=texlive-full%3A2022.1\&mainFile=)
この例の出力は次のとおりです。

LaTeX ドキュメントにグラフィックを取り込むには、外部のグラフィックファイルを含めるのに必要なコマンドと機能を提供する[アドオン*パッケージ*](/ja/texlive/latex-basics/learn-latex-in-30-minutes#Finding%5Fand%5Fusing%5FLaTeX%5Fpackages)が必要です。上の例では [graphicx パッケージ](https://ctan.org/pkg/graphicx?lang=en)を読み込んでいます。このパッケージは多くのコマンドを提供しており、その中にはグラフィックをインポートする `\includegraphics{...}` や、グラフィックの場所を LaTeX に知らせる `\graphicspath{...}` があります。
`graphicx` パッケージを使用するには、Overleaf ドキュメントのプリアンブルに次の行を含めます。
```latex theme={null}
\usepackage{graphicx}
```
この例では、コマンド `\graphicspath{{images/}}` が、画像が現在のディレクトリ内の `images` という名前のフォルダーに保存されていることを LaTeX に伝えます。

`\includegraphics{universe}` コマンドが、実際にドキュメントに画像を挿入する処理を行います。ここで、`universe` は拡張子を除いた画像ファイルの名前です。
**注意**:
* `\includegraphics` コマンドでは拡張子を含む完全なファイル名も指定できますが、拡張子を省略するのがベストプラクティスとされています。そうすることで、LaTeX がサポートされているすべての形式を検索するようになるためです。
* 一般に、グラフィックのファイル名には空白や複数のドットを含めるべきではありません。また、Overleaf に画像ファイルをアップロードする際は、ファイル拡張子に小文字を使うことをおすすめします。
LaTeX パッケージについての詳しい情報は、このチュートリアルの最後にある [LaTeX パッケージの検索と使用](/ja/texlive/latex-basics/learn-latex-in-30-minutes#Finding%5Fand%5Fusing%5FLaTeX%5Fpackages)のセクションにあります。
## キャプション、ラベル、参照
以下に示すように、`figure` 環境を使うと、画像にキャプションやラベルを付けたり、画像を参照したりできます。
```latex theme={null}
\documentclass{article}
\usepackage{graphicx}
\graphicspath{{images/}}
\begin{document}
\begin{figure}[h]
\centering
\includegraphics[width=0.75\textwidth]{mesh}
\caption{A nice plot.}
\label{fig:mesh1}
\end{figure}
As you can see in figure \ref{fig:mesh1}, the function grows near the origin. This example is on page \pageref{fig:mesh1}.
\end{document}
```
[この画像の例を Overleaf で開く。](https://www.overleaf.com/project/new/template/25519?id=107980830\&templateName=Example+using+image+captions+in+LaTeX\&latexEngine=pdflatex\&texImage=texlive-full%3A2022.1\&mainFile=)
この例の出力は次のとおりです。

この例には注目すべきコマンドがいくつかあります。
* **`\includegraphics[width=0.75\textwidth]{mesh}`**:この形式の `\includegraphics` は、図の幅をテキスト幅の 75% に設定するよう LaTeX に指示します。テキスト幅の値は `\textwidth` コマンドに格納されています。
* **`\caption{A nice plot.}`**:その名のとおり、このコマンドは図のキャプションを設定します。キャプションは図の上または下に配置できます。図の一覧を作成する場合、このキャプションがその一覧で使用されます。
* **`\label{fig:mesh1}`**:ドキュメント内でこの画像を参照するには、`\label` コマンドを使ってラベルを付けます。ラベルは画像の番号を生成するために使われ、次のコマンドと組み合わせることで画像を参照できるようになります。
* **`\ref{fig:mesh1}`**:このコードは、参照された図に対応する番号に置き換えられます。
LaTeX ドキュメントに組み込む画像は、`figure` 環境またはそれに類する環境の中に配置して、LaTeX がドキュメント内の適切な位置に画像を自動的に配置できるようにすべきです。
詳しいガイダンスは、次の Overleaf ヘルプ記事にあります。
* 図の配置
* [画像の挿入](https://docs.overleaf.com/writing-and-editing/inserting-images)
## LaTeX でリストを作成する
*環境*を使うと、さまざまな種類のリストを作成できます。環境は、特定の組版機能を実装するために必要な LaTeX コードをカプセル化するために使われます。環境は `\begin{_environment-name_}` で始まり `\end{_environment-name_}` で終わります。ここで `_environment-name_` は `figure`、`tabular`、またはリストの種類(順序なしリストの場合は `itemize`、順序付きリストの場合は `enumerate`)などです。
### 順序なしリスト
順序なしリストは `itemize` 環境で作成します。以下に示すように、リストの各項目の前には `\item` コマンドを置く必要があります。
```latex theme={null}
\documentclass{article}
\begin{document}
\begin{itemize}
\item The individual entries are indicated with a black dot, a so-called bullet.
\item The text in the entries may be of any length.
\end{itemize}
\end{document}
```
[この例を Overleaf で開く。](https://www.overleaf.com/docs?engine=pdflatex\&snip%5Fname=Example+of+a+LaTeX+unordered+list\&snip=%5Cdocumentclass%7Barticle%7D%0A%5Cbegin%7Bdocument%7D%0A%5Cbegin%7Bitemize%7D%0A++%5Citem+The+individual+entries+are+indicated+with+a+black+dot%2C+a+so-called+bullet.%0A++%5Citem+The+text+in+the+entries+may+be+of+any+length.%0A%5Cend%7Bitemize%7D%0A%5Cend%7Bdocument%7D)
この例の出力は次のとおりです。

さまざまな種類の LaTeX リストを紹介している、こちらの[より大きな Overleaf プロジェクト](https://www.overleaf.com/project/new/template/25521?id=107987258\&templateName=Demonstrating+various+types+of+LaTeX+list\&latexEngine=pdflatex\&texImage=texlive-full%3A2022.1\&mainFile=)を開くこともできます。
### 順序付きリスト
順序付きリストは順序なしリストと同じ構文を使いますが、`enumerate` 環境で作成します。
```latex theme={null}
\documentclass{article}
\begin{document}
\begin{enumerate}
\item This is the first entry in our list.
\item The list numbers increase with each entry we add.
\end{enumerate}
\end{document}
```
[この例を Overleaf で開く。](https://www.overleaf.com/docs?engine=pdflatex\&snip%5Fname=Example+of+the+enumerate+environment\&snip=%5Cdocumentclass%7Barticle%7D%0A%5Cbegin%7Bdocument%7D%0A%5Cbegin%7Benumerate%7D%0A++%5Citem+This+is+the+first+entry+in+our+list.%0A++%5Citem+The+list+numbers+increase+with+each+entry+we+add.%0A%5Cend%7Benumerate%7D%0A%5Cend%7Bdocument%7D)
この例の出力は次のとおりです。

`unordered` リストと同様に、各項目の前には `\item` コマンドを置く必要があります。ここでは、このコマンドが 1 から始まる数字の順序付きリストのラベル値を自動的に生成します。
詳しくは、さまざまな種類の LaTeX リストを紹介しているこちらの[より大きな Overleaf プロジェクト](https://www.overleaf.com/project/new/template/25521?id=107987258\&templateName=Demonstrating+various+types+of+LaTeX+list\&latexEngine=pdflatex\&texImage=texlive-full%3A2022.1\&mainFile=)を開くか、さらに多くの例を掲載し、カスタマイズしたリストの作成方法を紹介している LaTeX リストに関する専用のヘルプ記事を参照してください。
## LaTeX に数式を追加する
LaTeX の主な利点の 1 つは、数式を簡単に書けることです。LaTeX には、数式を組版するための 2 つの記述モードがあります。
* *インライン*数式モード:段落の一部となる数式を書くために使用します
* *ディスプレイ*数式モード:テキストや段落の一部ではなく、独立した行に組版される数式を書くために使用します
### インライン数式モード
インライン数式モードの例を見てみましょう。
```latex theme={null}
\documentclass[12pt, letterpaper]{article}
\begin{document}
In physics, the mass-energy equivalence is stated
by the equation $E=mc^2$, discovered in 1905 by Albert Einstein.
\end{document}
```
[この例を Overleaf で開く。](https://www.overleaf.com/docs?engine=pdflatex\&snip%5Fname=Inline+LaTeX+maths+example\&snip=%5Cdocumentclass%5B12pt%2C+letterpaper%5D%7Barticle%7D%0A%5Cbegin%7Bdocument%7D%0AIn+physics%2C+the+mass-energy+equivalence+is+stated+%0Aby+the+equation+%24E%3Dmc%5E2%24%2C+discovered+in+1905+by+Albert+Einstein.%0A%5Cend%7Bdocument%7D)
この例の出力は次のとおりです。

インラインモードの数式を組版するには、次の例のように、`\( ... \)`、`$ ... $`、`\begin{math} ... \end{math}` のいずれかの区切り文字のペアを使用します。
```latex theme={null}
\documentclass[12pt, letterpaper]{article}
\begin{document}
\begin{math}
E=mc^2
\end{math} is typeset in a paragraph using inline math mode---as is $E=mc^2$, and so too is \(E=mc^2\).
\end{document}
```
[この例を Overleaf で開く。](https://www.overleaf.com/docs?engine=pdflatex\&snip%5Fname=Demonstrating+inline+math+mode\&snip=%5Cdocumentclass%5B12pt%2C+letterpaper%5D%7Barticle%7D%0A%5Cbegin%7Bdocument%7D%0A%5Cbegin%7Bmath%7D%0AE%3Dmc%5E2%0A%5Cend%7Bmath%7D+is+typeset+in+a+paragraph+using+inline+math+mode---as+is+%24E%3Dmc%5E2%24%2C+and+so+too+is+%5C%28E%3Dmc%5E2%5C%29.%0A%5Cend%7Bdocument%7D)
この例の出力は次のとおりです。

### ディスプレイ数式モード
次の例のように、ディスプレイモードで組版された数式には番号を付けることも、付けないこともできます。
```latex theme={null}
\documentclass[12pt, letterpaper]{article}
\begin{document}
The mass-energy equivalence is described by the famous equation
\[ E=mc^2 \] discovered in 1905 by Albert Einstein.
In natural units ($c = 1$), the formula expresses the identity
\begin{equation}
E=m
\end{equation}
\end{document}
```
[この例を Overleaf で開く。](https://www.overleaf.com/docs?engine=pdflatex\&snip%5Fname=Display+math+mode+example\&snip=%5Cdocumentclass%5B12pt%2C+letterpaper%5D%7Barticle%7D%0A%5Cbegin%7Bdocument%7D%0AThe+mass-energy+equivalence+is+described+by+the+famous+equation%0A%5C%5B+E%3Dmc%5E2+%5C%5D+discovered+in+1905+by+Albert+Einstein.+%0A%0AIn+natural+units+%28%24c+%3D+1%24%29%2C+the+formula+expresses+the+identity%0A%5Cbegin%7Bequation%7D%0AE%3Dm%0A%5Cend%7Bequation%7D%0A%5Cend%7Bdocument%7D)
この例の出力は次のとおりです。

ディスプレイモードの数式を組版するには、`\[ ... \]`、`\begin{displaymath} ... \end{displaymath}`、`\begin{equation} ... \end{equation}` のいずれかの区切り文字のペアを使用します。歴史的には、ディスプレイモードの数式の組版には `$$ _... display math here ..._$$` のように `$$` 文字を区切りとして使う必要がありましたが、この方法は[現在は推奨されていません](https://texfaq.org/FAQ-dolldoll)。代わりに LaTeX の区切り文字 `\[ ... \]` を使用してください。
### より完全な例
次の例は、LaTeX で組版したさまざまな数学的内容を示しています。
```latex theme={null}
\documentclass{article}
\begin{document}
Subscripts in math mode are written as $a_b$ and superscripts are written as $a^b$. These can be combined and nested to write expressions such as
\[ T^{i_1 i_2 \dots i_p}_{j_1 j_2 \dots j_q} = T(x^{i_1},\dots,x^{i_p},e_{j_1},\dots,e_{j_q}) \]
We write integrals using $\int$ and fractions using $\frac{a}{b}$. Limits are placed on integrals using superscripts and subscripts:
\[ \int_0^1 \frac{dx}{e^x} = \frac{e-1}{e} \]
Lower case Greek letters are written as $\omega$ $\delta$ etc. while upper case Greek letters are written as $\Omega$ $\Delta$.
Mathematical operators are prefixed with a backslash as $\sin(\beta)$, $\cos(\alpha)$, $\log(x)$ etc.
\end{document}
```
[この例を Overleaf で開く。](https://www.overleaf.com/docs?engine=pdflatex\&snip%5Fname=More+advanced+LaTeX+math+example\&snip=%5Cdocumentclass%7Barticle%7D%0A%5Cbegin%7Bdocument%7D%0ASubscripts+in+math+mode+are+written+as+%24a%5Fb%24+and+superscripts+are+written+as+%24a%5Eb%24.+These+can+be+combined+and+nested+to+write+expressions+such+as%0A%0A%5C%5B+T%5E%7Bi%5F1+i%5F2+%5Cdots+i%5Fp%7D%5F%7Bj%5F1+j%5F2+%5Cdots+j%5Fq%7D+%3D+T%28x%5E%7Bi%5F1%7D%2C%5Cdots%2Cx%5E%7Bi%5Fp%7D%2Ce%5F%7Bj%5F1%7D%2C%5Cdots%2Ce%5F%7Bj%5Fq%7D%29+%5C%5D%0A+%0AWe+write+integrals+using+%24%5Cint%24+and+fractions+using+%24%5Cfrac%7Ba%7D%7Bb%7D%24.+Limits+are+placed+on+integrals+using+superscripts+and+subscripts%3A%0A%0A%5C%5B+%5Cint%5F0%5E1+%5Cfrac%7Bdx%7D%7Be%5Ex%7D+%3D++%5Cfrac%7Be-1%7D%7Be%7D+%5C%5D%0A%0ALower+case+Greek+letters+are+written+as+%24%5Comega%24+%24%5Cdelta%24+etc.+while+upper+case+Greek+letters+are+written+as+%24%5COmega%24+%24%5CDelta%24.%0A%0AMathematical+operators+are+prefixed+with+a+backslash+as+%24%5Csin%28%5Cbeta%29%24%2C+%24%5Ccos%28%5Calpha%29%24%2C+%24%5Clog%28x%29%24+etc.%0A%5Cend%7Bdocument%7D)
この例の出力は次のとおりです。

次の例では `amsmath` パッケージが提供する `equation*` 環境を使用するため、ドキュメントのプリアンブルに次の行を追加する必要があります。
```latex theme={null}
\usepackage{amsmath}% For the equation* environment
```
`amsmath` の使い方について詳しくは、ヘルプ記事を参照してください。
```latex theme={null}
\documentclass{article}
\usepackage{amsmath}% For the equation* environment
\begin{document}
\section{First example}
The well-known Pythagorean theorem \(x^2 + y^2 = z^2\) was proved to be invalid for other exponents, meaning the next equation has no integer solutions for \(n>2\):
\[ x^n + y^n = z^n \]
\section{Second example}
This is a simple math expression \(\sqrt{x^2+1}\) inside text.
And this is also the same:
\begin{math}
\sqrt{x^2+1}
\end{math}
but by using another command.
This is a simple math expression without numbering
\[\sqrt{x^2+1}\]
separated from text.
This is also the same:
\begin{displaymath}
\sqrt{x^2+1}
\end{displaymath}
\ldots and this:
\begin{equation*}
\sqrt{x^2+1}
\end{equation*}
\end{document}
```
[この例を Overleaf で開く。](https://www.overleaf.com/docs?engine=pdflatex\&snip%5Fname=More+math+content+typeset+in+LaTeX\&snip=%5Cdocumentclass%7Barticle%7D%0A%5Cusepackage%7Bamsmath%7D%25+For+the+equation%2A+environment%0A%5Cbegin%7Bdocument%7D%0A%5Csection%7BFirst+example%7D%0A%0AThe+well-known+Pythagorean+theorem+%5C%28x%5E2+%2B+y%5E2+%3D+z%5E2%5C%29+was+proved+to+be+invalid+for+other+exponents%2C+meaning+the+next+equation+has+no+integer+solutions+for+%5C%28n%3E2%5C%29%3A%0A%0A%5C%5B+x%5En+%2B+y%5En+%3D+z%5En+%5C%5D%0A%0A%5Csection%7BSecond+example%7D%0A%0AThis+is+a+simple+math+expression+%5C%28%5Csqrt%7Bx%5E2%2B1%7D%5C%29+inside+text.+%0AAnd+this+is+also+the+same%3A+%0A%5Cbegin%7Bmath%7D%0A%5Csqrt%7Bx%5E2%2B1%7D%0A%5Cend%7Bmath%7D%0Abut+by+using+another+command.%0A%0AThis+is+a+simple+math+expression+without+numbering%0A%5C%5B%5Csqrt%7Bx%5E2%2B1%7D%5C%5D+%0Aseparated+from+text.%0A%0AThis+is+also+the+same%3A%0A%5Cbegin%7Bdisplaymath%7D%0A%5Csqrt%7Bx%5E2%2B1%7D%0A%5Cend%7Bdisplaymath%7D%0A%0A%5Cldots+and+this%3A%0A%5Cbegin%7Bequation%2A%7D%0A%5Csqrt%7Bx%5E2%2B1%7D%0A%5Cend%7Bequation%2A%7D%0A%5Cend%7Bdocument%7D)
この例の出力は次のとおりです。

LaTeX での数式の可能性は無限大です。特定のトピックに関するアドバイスや例については、ぜひヘルプページを参照してください。
* 数式
* 下付き文字と上付き文字
* 括弧
* 分数と二項係数
* 数式の整列
* 演算子
* 数式モードでのスペース
* 積分、総和、極限
* 数式モードでのディスプレイスタイル
* ギリシャ文字と数学記号の一覧
* 数式用フォント
## 基本的なドキュメント構造
次に、概要(アブストラクト)と、LaTeX ドキュメントをさまざまな章、節、段落に分割する方法を見ていきます。
### 概要(アブストラクト)
科学論文には通常、主要なトピックや論点の簡潔な概要・要約である*アブストラクト*が付いています。次の例は、LaTeX の `abstract` 環境を使ってアブストラクトを組版する方法を示しています。
```latex theme={null}
\documentclass{article}
\begin{document}
\begin{abstract}
This is a simple paragraph at the beginning of the
document. A brief introduction about the main subject.
\end{abstract}
\end{document}
```
[この例を Overleaf で開く。](https://www.overleaf.com/docs?engine=pdflatex\&snip%5Fname=How+to+create+a+document+abstract\&snip=%5Cdocumentclass%7Barticle%7D%0A%5Cbegin%7Bdocument%7D%0A%5Cbegin%7Babstract%7D%0AThis+is+a+simple+paragraph+at+the+beginning+of+the+%0Adocument.+A+brief+introduction+about+the+main+subject.%0A%5Cend%7Babstract%7D%0A%5Cend%7Bdocument%7D)
この例の出力は次のとおりです。

### 段落と改行
アブストラクトができたら、最初の段落を書き始められます。次の例では、以下のことを示します。
* 「Enter」キーを 2 回押して現在の行を終え、続けて空行を挿入することで、新しい段落が作成されること
* 段落を変えずに新しい行を始めるには、二重のバックスラッシュである `\\` コマンドを使って手動で改行を挿入すること。代わりに `\newline` コマンドを使うこともできます。
この例の 3 番目の段落では、`\\` コマンドと `\newline` コマンドの使い方を示しています。
```latex theme={null}
\documentclass{article}
\begin{document}
\begin{abstract}
This is a simple paragraph at the beginning of the
document. A brief introduction about the main subject.
\end{abstract}
After our abstract we can begin the first paragraph, then press ``enter'' twice to start the second one.
This line will start a second paragraph.
I will start the third paragraph and then add \\ a manual line break which causes this text to start on a new line but remains part of the same paragraph. Alternatively, I can use the \verb|\newline|\newline command to start a new line, which is also part of the same paragraph.
\end{document}
```
[この例を Overleaf で開く。](https://www.overleaf.com/docs?engine=pdflatex\&snip%5Fname=Example+to+create+a+new+paragraph\&snip=%5Cdocumentclass%7Barticle%7D%0A%5Cbegin%7Bdocument%7D%0A%0A%5Cbegin%7Babstract%7D%0AThis+is+a+simple+paragraph+at+the+beginning+of+the+%0Adocument.+A+brief+introduction+about+the+main+subject.%0A%5Cend%7Babstract%7D%0A%0AAfter+our+abstract+we+can+begin+the+first+paragraph%2C+then+press+%60%60enter%27%27+twice+to+start+the+second+one.%0A%0AThis+line+will+start+a+second+paragraph.%0A%0AI+will+start+the+third+paragraph+and+then+add+%5C%5C+a+manual+line+break+which+causes+this+text+to+start+on+a+new+line+but+remains+part+of+the+same+paragraph.+Alternatively%2C+I+can+use+the+%5Cverb%7C%5Cnewline%7C%5Cnewline+command+to+start+a+new+line%2C+which+is+also+part+of+the+same+paragraph.%0A%5Cend%7Bdocument%7D)
この例の出力は次のとおりです。

[後で見るように](/ja/texlive/latex-basics/learn-latex-in-30-minutes#Chapters%5Fand%5Fsections)、LaTeX は段落を自動的に字下げします。ただし、節や小節などのドキュメントの見出しの直後は例外です。
初めて使う方への注意として、段落間の間隔を広げた段落を「再現」するために、`\\` や `\newline` を複数使うべきではありません。LaTeX の組版アルゴリズムに干渉する可能性があるためです。推奨される方法は、`\\` を使わずに引き続き空行で新しい段落を作成し、プリアンブルに `\usepackage{parskip}` を追加して [parskip パッケージ](https://ctan.org/pkg/parskip?lang=en)を読み込むことです。
段落についての詳しい情報は、次の記事にあります。
* 段落と改行
* LaTeX で段落の間隔を変更する方法
* LaTeX Error: There's no line here to end では、`\\` の使い方に関する追加のアドバイスとガイダンスを提供しています。
### 章と節
長いドキュメントは、作成ソフトウェアに関係なく、通常は部、章、節、小節などに分割されます。LaTeX もドキュメントを構造化するコマンドを提供していますが、利用できるコマンドとその実装(何をするか)は、使用するドキュメントクラスによって異なる場合があります。たとえば、`book` クラスで作成したドキュメントは部、章、節、小節などに分割できますが、`letter` クラスにはそのためのコマンドが用意されて(サポートされて)いません。
次の例は、`book` クラスに基づくドキュメントを構造化するためのコマンドを示しています。
```latex theme={null}
\documentclass{book}
\begin{document}
\chapter{First Chapter}
\section{Introduction}
This is the first section.
Lorem ipsum dolor sit amet, consectetuer adipiscing
elit. Etiam lobortisfacilisis sem. Nullam nec mi et
neque pharetra sollicitudin. Praesent imperdietmi nec ante.
Donec ullamcorper, felis non sodales...
\section{Second Section}
Lorem ipsum dolor sit amet, consectetuer adipiscing elit.
Etiam lobortis facilisissem. Nullam nec mi et neque pharetra
sollicitudin. Praesent imperdiet mi necante...
\subsection{First Subsection}
Praesent imperdietmi nec ante. Donec ullamcorper, felis non sodales...
\section*{Unnumbered Section}
Lorem ipsum dolor sit amet, consectetuer adipiscing elit.
Etiam lobortis facilisissem...
\end{document}
```
[この例を Overleaf で開く。](https://www.overleaf.com/docs?engine=pdflatex\&snip%5Fname=Book+class+example+document\&snip=%5Cdocumentclass%7Bbook%7D%0A%5Cbegin%7Bdocument%7D%0A%0A%5Cchapter%7BFirst+Chapter%7D%0A%0A%5Csection%7BIntroduction%7D%0A%0AThis+is+the+first+section.%0A%0ALorem++ipsum++dolor++sit++amet%2C++consectetuer++adipiscing++%0Aelit.+Etiam++lobortisfacilisis+sem.++Nullam+nec+mi+et+%0Aneque+pharetra+sollicitudin.++Praesent+imperdietmi+nec+ante.+%0ADonec+ullamcorper%2C+felis+non+sodales...%0A%0A%5Csection%7BSecond+Section%7D%0A%0ALorem+ipsum+dolor+sit+amet%2C+consectetuer+adipiscing+elit.++%0AEtiam+lobortis+facilisissem.++Nullam+nec+mi+et+neque+pharetra+%0Asollicitudin.++Praesent+imperdiet+mi+necante...%0A%0A%5Csubsection%7BFirst+Subsection%7D%0APraesent+imperdietmi+nec+ante.+Donec+ullamcorper%2C+felis+non+sodales...%0A%0A%5Csection%2A%7BUnnumbered+Section%7D%0ALorem+ipsum+dolor+sit+amet%2C+consectetuer+adipiscing+elit.++%0AEtiam+lobortis+facilisissem...%0A%5Cend%7Bdocument%7D)
この例の出力は次のとおりです。

セクション分けのコマンドの名前は、ほとんど見たとおりの意味です。たとえば、`\chapter{First Chapter}` は `First Chapter` というタイトルの新しい章を作成し、`\section{Introduction}` は `Introduction` というタイトルの節を作成します。節はさらに `\subsection{...}` や、さらには `\subsubsection{...}` に分割できます。節や小節などの番号付けは自動的に行われますが、`\section*{...}` や `\subsection*{...}` のように末尾にアスタリスク(\*)を付けた、いわゆる*スター付きバージョン*のコマンドを使うと無効にできます。
LaTeX のドキュメントクラスは*全体として*、次のセクション分けコマンドを提供しており、個々のクラスはそれぞれ関連するサブセットをサポートしています。
* `\part{part}`
* `\chapter{chapter}`
* `\section{section}`
* `\subsection{subsection}`
* `\subsubsection{subsubsection}`
* `\paragraph{paragraph}`
* `\subparagraph{subparagraph}`
特に、`\part` コマンドと `\chapter` コマンドは、`report` と `book` のドキュメントクラスでのみ利用できます。
ドキュメント構造のコマンドについて詳しくは、節と章に関する Overleaf の記事を参照してください。
## 表を作成する
Overleaf では、表を作成する方法が 3 つあります。
1. **Visual Editor**(または **Code Editor**)のツールバーにある [**Insert Table** ボタン](https://www.overleaf.com/learn/how-to/How_to_insert_tables_in_Overleaf%23inserttable#Using%5FInsert%5FTable%5Fto%5Fcreate%5Fa%5Ftable%5Fin%5Fyour%5Fproject)を使用する。
2. **Visual Editor** の使用中に、別のドキュメントから[表をコピーして貼り付ける](https://www.overleaf.com/learn/how-to/How_to_paste_formatted_content_into_Overleaf%23pastingtables)。
3. Code Editor で表の LaTeX コードを書く。
LaTeX を初めて使う場合は、**Visual Editor** のツールバー(方法 1)を使うのが手始めとして最適です。**Visual Editor** と **Code Editor** を切り替えて、表の背後にあるコードを確認できます。
ここでは、表を作成する最も柔軟な方法である方法 3 に焦点を当て、罫線(ルール)やキャプションの追加を含め、LaTeX で表を作成する方法を示す例を紹介します。慣れてきたら、[LaTeX を使った表の作成方法](https://www.overleaf.com/learn/latex/Tables)に関する詳細なガイダンスもご覧ください。
### LaTeX で基本的な表を作成する
まずは、基本的な表を組版する方法を示す例から始めます。
```latex theme={null}
\begin{center}
\begin{tabular}{c c c}
cell1 & cell2 & cell3 \\
cell4 & cell5 & cell6 \\
cell7 & cell8 & cell9
\end{tabular}
\end{center}
```
[この例を Overleaf で開く。](https://www.overleaf.com/docs?engine=pdflatex\&snip%5Fname=An+example+of+a+basic+table\&snip=%5Cdocumentclass%7Barticle%7D%0A%5Cbegin%7Bdocument%7D%0A%5Cbegin%7Bcenter%7D%0A%5Cbegin%7Btabular%7D%7Bc+c+c%7D%0A+cell1+%26+cell2+%26+cell3+%5C%5C+%0A+cell4+%26+cell5+%26+cell6+%5C%5C++%0A+cell7+%26+cell8+%26+cell9++++%0A%5Cend%7Btabular%7D%0A%5Cend%7Bcenter%7D%0A%5Cend%7Bdocument%7D%0A%3C%2Fsource%3E)
この例の出力は次のとおりです。

`tabular` 環境は、LaTeX で表を作成するデフォルトの方法です。この環境にはパラメーターを指定する必要があります。この場合は `{c c c}` で、列が 3 つあり、それぞれの列内のテキストを中央揃えにすることを LaTeX に伝えています。テキストを右揃えにするには `r`、左揃えにするには `l` を使うこともできます。揃え記号 `&` は、表の行内で個々のセルを区切るために使用します。表の行を終えるには、*改行*コマンド `\\` を使用します。この表は、ページのテキスト幅の中で中央に配置されるように `center` 環境内に置かれています。
### 罫線を追加する
`tabular` 環境では、表の一部として横線と縦線(罫線)を使用できます。
* 行の上下に横罫線を追加するには、`\hline` コマンドを使用します
* 列の間に縦罫線を追加するには、縦線パラメーター `|` を使用します
この例では、引数は `{|c|c|c|}` で、それぞれ縦線(罫線)で区切られた 3 つの(中央揃えの)列を宣言しています。さらに、`\hline` を使って最初の行の上と最後の行の下に横罫線を配置しています。
```latex theme={null}
\begin{center}
\begin{tabular}{|c|c|c|}
\hline
cell1 & cell2 & cell3 \\
cell4 & cell5 & cell6 \\
cell7 & cell8 & cell9 \\
\hline
\end{tabular}
\end{center}
```
[この例を Overleaf で開く。](https://www.overleaf.com/docs?engine=pdflatex\&snip%5Fname=Table+example+with+rules\&snip=%5Cdocumentclass%7Barticle%7D%0A%5Cbegin%7Bdocument%7D%0A%5Cbegin%7Bcenter%7D%0A%5Cbegin%7Btabular%7D%7B%7Cc%7Cc%7Cc%7C%7D+%0A+%5Chline%0A+cell1+%26+cell2+%26+cell3+%5C%5C+%0A+cell4+%26+cell5+%26+cell6+%5C%5C+%0A+cell7+%26+cell8+%26+cell9+%5C%5C+%0A+%5Chline%0A%5Cend%7Btabular%7D%0A%5Cend%7Bcenter%7D%0A%5Cend%7Bdocument%7D)
この例の出力は次のとおりです。

もう 1 つの例を示します。
```latex theme={null}
\begin{center}
\begin{tabular}{||c c c c||}
\hline
Col1 & Col2 & Col2 & Col3 \\ [0.5ex]
\hline\hline
1 & 6 & 87837 & 787 \\
\hline
2 & 7 & 78 & 5415 \\
\hline
3 & 545 & 778 & 7507 \\
\hline
4 & 545 & 18744 & 7560 \\
\hline
5 & 88 & 788 & 6344 \\ [1ex]
\hline
\end{tabular}
\end{center}
```
[この例を Overleaf で開く。](https://www.overleaf.com/docs?engine=pdflatex\&snip%5Fname=Another+table+example+containing+rules\&snip=%5Cdocumentclass%7Barticle%7D%0A%5Cbegin%7Bdocument%7D%0A%5Cbegin%7Bcenter%7D%0A+%5Cbegin%7Btabular%7D%7B%7C%7Cc+c+c+c%7C%7C%7D+%0A+%5Chline%0A+Col1+%26+Col2+%26+Col2+%26+Col3+%5C%5C+%5B0.5ex%5D+%0A+%5Chline%5Chline%0A+1+%26+6+%26+87837+%26+787+%5C%5C+%0A+%5Chline%0A+2+%26+7+%26+78+%26+5415+%5C%5C%0A+%5Chline%0A+3+%26+545+%26+778+%26+7507+%5C%5C%0A+%5Chline%0A+4+%26+545+%26+18744+%26+7560+%5C%5C%0A+%5Chline%0A+5+%26+88+%26+788+%26+6344+%5C%5C+%5B1ex%5D+%0A+%5Chline%0A%5Cend%7Btabular%7D%0A%5Cend%7Bcenter%7D%0A%5Cend%7Bdocument%7D)
この例の出力は次のとおりです。

### キャプション、ラベル、参照
表にも、画像とほぼ同じ方法でキャプションを付けたり参照したりできます。唯一の違いは、**`figure`** 環境の代わりに **`table`** 環境を使うことです。
表 \ref\{table:data} は、表にキャプションを追加し、表を参照する方法を示しています。
```latex theme={null}
\begin{table}[h!]
\centering
\begin{tabular}{||c c c c||}
\hline
Col1 & Col2 & Col2 & Col3 \\ [0.5ex]
\hline\hline
1 & 6 & 87837 & 787 \\
2 & 7 & 78 & 5415 \\
3 & 545 & 778 & 7507 \\
4 & 545 & 18744 & 7560 \\
5 & 88 & 788 & 6344 \\ [1ex]
\hline
\end{tabular}
\caption{Table to test captions and labels.}
\label{table:data}
\end{table}
```
[この例を Overleaf で開く。](https://www.overleaf.com/docs?engine=pdflatex\&snip%5Fname=Table+captions+and+references\&snip=%5Cdocumentclass%7Barticle%7D%0A%5Cbegin%7Bdocument%7D%0ATable+%5Cref%7Btable%3Adata%7D+shows+how+to+add+a+table+caption+and+reference+a+table.%0A%5Cbegin%7Btable%7D%5Bh%21%5D%0A%5Ccentering%0A%5Cbegin%7Btabular%7D%7B%7C%7Cc+c+c+c%7C%7C%7D+%0A+%5Chline%0A+Col1+%26+Col2+%26+Col2+%26+Col3+%5C%5C+%5B0.5ex%5D+%0A+%5Chline%5Chline%0A+1+%26+6+%26+87837+%26+787+%5C%5C+%0A+2+%26+7+%26+78+%26+5415+%5C%5C%0A+3+%26+545+%26+778+%26+7507+%5C%5C%0A+4+%26+545+%26+18744+%26+7560+%5C%5C%0A+5+%26+88+%26+788+%26+6344+%5C%5C+%5B1ex%5D+%0A+%5Chline%0A%5Cend%7Btabular%7D%0A%5Ccaption%7BTable+to+test+captions+and+labels.%7D%0A%5Clabel%7Btable%3Adata%7D%0A%5Cend%7Btable%7D%0A%5Cend%7Bdocument%7D)
この例の出力は次のとおりです。

## 目次を追加する
目次の作成は簡単です。`\tableofcontents` コマンドがほとんどすべての作業を行ってくれるからです。
```latex theme={null}
\documentclass{article}
\title{Sections and Chapters}
\author{Gubert Farnsworth}
\date{August 2022}
\begin{document}
\maketitle
\tableofcontents
\section{Introduction}
This is the first section.
Lorem ipsum dolor sit amet, consectetuer adipiscing
elit. Etiam lobortisfacilisis sem. Nullam nec mi et
neque pharetra sollicitudin. Praesent imperdietmi nec ante.
Donec ullamcorper, felis non sodales...
\section*{Unnumbered Section}
\addcontentsline{toc}{section}{Unnumbered Section}
Lorem ipsum dolor sit amet, consectetuer adipiscing elit.
Etiam lobortis facilisissem. Nullam nec mi et neque pharetra
sollicitudin. Praesent imperdiet mi necante...
\section{Second Section}
Lorem ipsum dolor sit amet, consectetuer adipiscing elit.
Etiam lobortis facilisissem. Nullam nec mi et neque pharetra
sollicitudin. Praesent imperdiet mi necante...
\end{document}
```
[この例を Overleaf で開く。](https://www.overleaf.com/docs?engine=pdflatex\&snip%5Fname=Generating+a+table+of+contents\&snip=%5Cdocumentclass%7Barticle%7D%0A%5Ctitle%7BSections+and+Chapters%7D%0A%5Cauthor%7BGubert+Farnsworth%7D%0A%5Cdate%7BAugust+2022%7D%0A%5Cbegin%7Bdocument%7D%0A++%0A%5Cmaketitle%0A++%0A%5Ctableofcontents%0A%0A%5Csection%7BIntroduction%7D%0A+++%0AThis+is+the+first+section.%0A++++++%0ALorem++ipsum++dolor++sit++amet%2C++consectetuer++adipiscing++%0Aelit.+++Etiam++lobortisfacilisis+sem.++Nullam+nec+mi+et+%0Aneque+pharetra+sollicitudin.++Praesent+imperdietmi+nec+ante.+%0ADonec+ullamcorper%2C+felis+non+sodales...%0A+++++++%0A%5Csection%2A%7BUnnumbered+Section%7D%0A%5Caddcontentsline%7Btoc%7D%7Bsection%7D%7BUnnumbered+Section%7D%0A%0ALorem+ipsum+dolor+sit+amet%2C+consectetuer+adipiscing+elit.++%0AEtiam+lobortis+facilisissem.++Nullam+nec+mi+et+neque+pharetra+%0Asollicitudin.++Praesent+imperdiet+mi+necante...%0A%0A%5Csection%7BSecond+Section%7D%0A+++++++%0ALorem+ipsum+dolor+sit+amet%2C+consectetuer+adipiscing+elit.++%0AEtiam+lobortis+facilisissem.++Nullam+nec+mi+et+neque+pharetra+%0Asollicitudin.++Praesent+imperdiet+mi+necante...%0A%5Cend%7Bdocument%7D)
この例の出力は次のとおりです。

節、小節、章は自動的に目次に含まれます。番号なしの節などの項目を手動で追加するには、例のように `\addcontentsline` コマンドを使用します。
## 完成したドキュメントをダウンロードする
次の短い動画クリップでは、プロジェクトのソースコードや組版された PDF ファイルをダウンロードする方法を紹介しています。
詳しい情報は、Overleaf のヘルプ記事 [Overleaf から作業内容をエクスポートする](https://docs.overleaf.com/managing-projects-and-files/downloading-a-project)にあります。
## LaTeX パッケージの検索と使用
LaTeX は優れた組版機能を提供するだけでなく、アドオンの*パッケージ*を使った*拡張のためのフレームワーク*も提供しています。LaTeX は「すべてをこなそうとする」コマンドや機能を提供しようとするのではなく、*拡張可能*であるように設計されています。ユーザーは外部のコード群(パッケージ)を読み込むことで、より専門的な組版機能を利用したり、表の組版など LaTeX の組み込み機能を拡張したりできます。[画像を追加する](/ja/texlive/latex-basics/learn-latex-in-30-minutes#Adding%5Fimages)のセクションで見たように、`graphicx` パッケージはグラフィックファイルをインポートするコマンドを提供して LaTeX を拡張するもので、(プリアンブルで)次のように記述して読み込みました。
```latex theme={null}
\usepackage{graphicx}
```
### パッケージの読み込み
前述のとおり、パッケージはドキュメントのプリアンブルで `\usepackage` コマンドを使って読み込みます。ただし、(多くの)LaTeX パッケージは動作を設定するための一連の*オプション*を提供しているため、`\usepackage` コマンドは次のような形になることがよくあります。
```latex theme={null}
\usepackage[options]{somepackage}
```
角括弧「`[...]`」は、`somepackage` を読み込む際にどのオプションのセットを適用するかを LaTeX に伝えます。ユーザーが指定するオプションのセットでは、個々のオプションや設定は通常カンマで区切ります。たとえば、[geometry パッケージ](https://ctan.org/pkg/geometry)は LaTeX でページレイアウトを設定するための多くのオプションを提供しているので、`geometry` の典型的な使い方は次のようになります。
```latex theme={null}
\usepackage[total={6.5in,8.75in},
top=1.2in, left=0.9in, includefoot]{geometry}
```
`geometry` パッケージは、世界中の LaTeX コミュニティのメンバーによって作成・提供され、使いたい人なら誰でも無料で利用できるパッケージの一例です。
LaTeX パッケージがオプションを提供していない場合や、ユーザーがパッケージのオプションのデフォルト値を使いたい場合は、次のように読み込みます。
```latex theme={null}
\usepackage{somepackage}
```
`\usepackage[...]{somepackage}` と記述すると、LaTeX は対応する `_somepackage_.sty` というファイルを探し、それを読み込んで処理します。これにより、パッケージのコマンドが利用可能になり、そのパッケージが提供するその他のコードが実行されます。LaTeX が `_somepackage_.sty` を見つけられない場合は、次の Overleaf の例のように、エラーで終了します。
```latex theme={null}
\documentclass[12pt, letterpaper]{article}
\usepackage{somepackage}% a NON-EXISTENT package
\begin{document}
This will fail!
\end{document}
```
[この***エラーを発生させる例***を Overleaf で開く](https://www.overleaf.com/docs?engine=pdflatex\&snip%5Fname=Error+due+to+missing+package\&snip=%5Cdocumentclass%5B12pt%2C+letterpaper%5D%7Barticle%7D%0A%5Cusepackage%7Bsomepackage%7D%25+a+NON-EXISTENT+package%0A%5Cbegin%7Bdocument%7D%0AThis+will+fail%21%0A%5Cend%7Bdocument%7D)
この例の出力は次のとおりです。

### パッケージに関する情報を探す:CTAN
パッケージは [Comprehensive TeX Archive Network](https://www.ctan.org/)(通常 CTAN と呼ばれます)を通じて配布されています。執筆時点で、CTAN は 2881 人の貢献者による 6287 個のパッケージをホストしています。CTAN は[自らを](https://www.ctan.org/ctan)次のように説明しています。
> ... a set of Internet sites around the world that offer TEX-related material for download.
>
> (TEX 関連の資料をダウンロード提供している、世界中のインターネットサイトの集まり)
CTAN を閲覧して、役に立つパッケージを探すことができます。たとえば次のような方法があります。
* [トピック別](https://www.ctan.org/topics/cloud)
* [アルファベット順](https://www.ctan.org/pkg)(パッケージ名がわかっている場合に便利)
(ページ上部にある)[検索機能](https://www.ctan.org/pkg)を使うこともできます。
### Overleaf で利用できるパッケージ:TeX Live の紹介
年に一度、CTAN でホストされているパッケージの(大規模な)*サブセット*と、LaTeX 関連のフォントやその他のソフトウェアがまとめられ、[TeX Live](https://tug.org/texlive/) と呼ばれるシステムとして配布されます。これを使って、自分の(ローカルの)LaTeX 環境をインストールできます。実は、[Overleaf のサーバーも TeX Live を使用しており](https://www.overleaf.com/learn/latex/Overleaf_and_TeX_Live)、TeX Live の新しいバージョンがリリースされると更新されます。Overleaf の TeX Live の更新はリリース直後ではなく、リリースから数か月後に行われます。これは、新しい TeX Live バージョンと[ギャラリーにある数千ものテンプレート](https://www.overleaf.com/gallery)との互換性テストを行う時間を確保するためです。たとえば、こちらが [TeX Live 2025 へのアップグレードのお知らせ](https://www.overleaf.com/blog/tex-live-2025-is-now-available)です。
TeX Live には CTAN パッケージの(大規模な)*サブセット*が含まれていますが、[囲碁の棋譜を組版するための igo](https://ctan.org/pkg/igo?lang=en) のように、CTAN でホストされているものの TeX Live には含まれておらず(TeX Live で配布されておらず)、そのため Overleaf では利用できない興味深いパッケージが見つかることもあります。CTAN でホストされている一部のパッケージは、さまざまな理由で TeX Live に含まれていません。たとえば、パッケージが古くなっている、ライセンスに問題がある、非常に新しい(最近アップロードされた)、または Windows では動作するが Linux では動作しないといったプラットフォーム依存性がある、などの理由です。
新しいパッケージや既存パッケージの更新は一年中 CTAN にアップロードされていますが、TeX Live の更新は年に一度配布されます。そのため、現行バージョンの TeX Live に含まれるパッケージは、CTAN でホストされているものほど最新ではありません。Overleaf のサーバーは TeX Live を使用しているため、私たちのサーバーにインストールされているパッケージ、つまりユーザーが利用できるパッケージは、CTAN で入手できる最新バージョンではない可能性があります。ただし、一般的にはそれが問題になることはほとんどありません。
This documentation is built and hosted on [Mintlify](https://mintlify.com), a developer documentation platform.